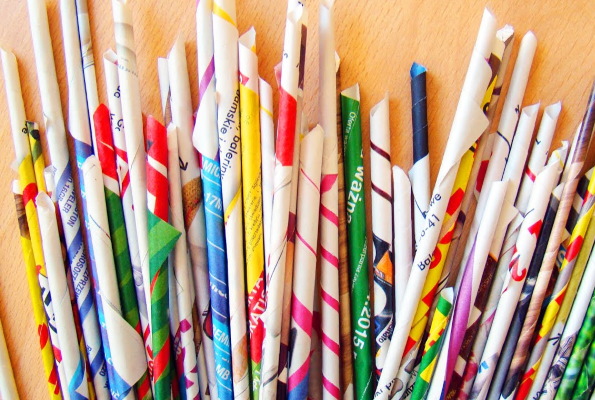
Weaving and creating various crafts with it is an activity known since ancient times. However, using paper tubes for this purpose has recently gained popularity. Old newspapers, magazines and books can serve as materials for creating products.
Weaving techniques
Baskets, fence parts and decorative items are usually woven using vines and straw. All of this can also be made from paper tubes. With the addition of high-quality and original decorations, such crafts will become an excellent gift or souvenir.
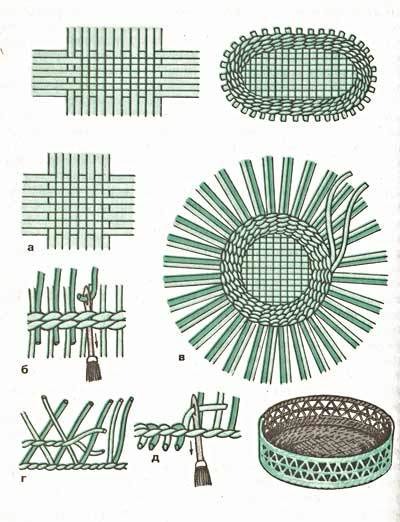
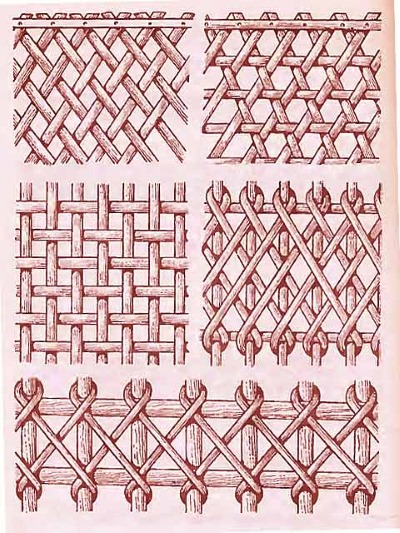
There are 6 basic techniques of weaving from paper blanks, which are used in various variations and methods of execution.
| Technique | The basic principle of execution | What products is it used for? |
| Braiding | The technique has two varieties – edge weaving and overlay weaving. In the first case, the process is carried out counterclockwise with the working tubes alternately located behind the posts and in front of them. The second method involves the simultaneous use of several twists with the formation of the edge. | For making medium and large baskets that look like those made from willow twigs. |
| Rope | The simplest method of weaving consists of layer-by-layer interweaving of working tubes with posts. | For creating simple baskets, storage boxes, bread bins and decorative containers in square or round shapes. |
| Layered ("cotton" or "chintz") | The technique consists of the simultaneous use of 2-3 working tubes, intertwined not only with the posts, but also with each other. In this case, the blanks for the posts must be significantly stronger than the working ones. | For making baskets of any size and shape, as well as a decorative element for other products. |
| Spiral weaving | The method is similar to rope weaving, but is not done in straight lines, but at an angle to the base. | For making small interior items – vases, figurines, jugs, etc. |
| Spiral twisting | The technique involves layer-by-layer circular interlacing of working tubes around the posts. In fact, each new part is twisted with the previous one. | For creating large and tall decorative elements – floor vases, voluminous baskets and complex figures. |
| Openwork weaving | This is a combination of several techniques, which results in a patterned surface with holes, reminiscent of fabric lace. | Decorative baskets and vases with or without lids, gift boxes. |
How to weave a round basket
Crafts made from paper tubes are most often baskets. This is explained by the simplicity of their creation and the many available product options (in shape and size). Such baskets can become an excellent decorative element in the room or an interesting gift.
To weave a classic round basket, you will need:
- a large sheet of cardboard or thick paper;
- newspapers or other similar paper;
- knitting needle No. 4 (15 cm long);
- stationery knife;
- white glue (PVA);
- scissors;
- two clothespins;
- flat brush;
- water;
- white water based paint;
- red and blue gouache (or water-based paint);
- clear acrylic varnish;
- decorative acrylic pearlescent paint.
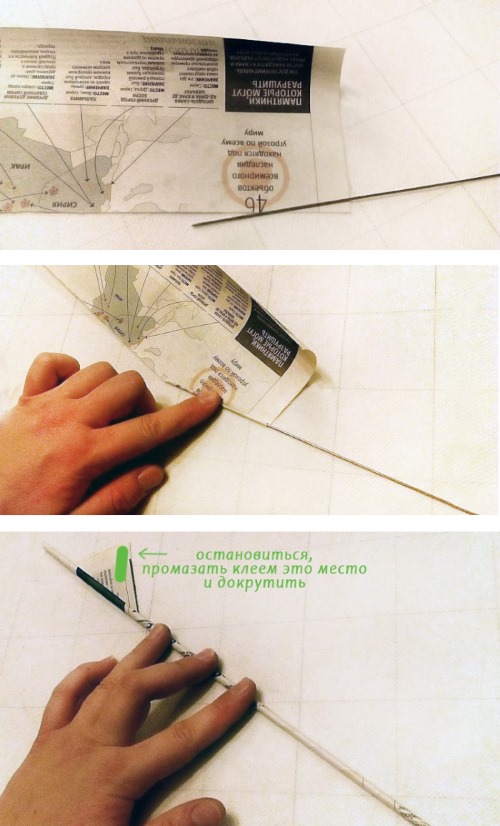
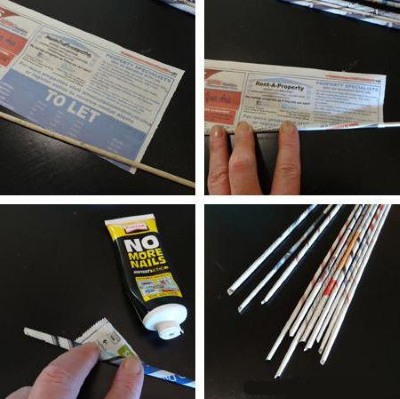
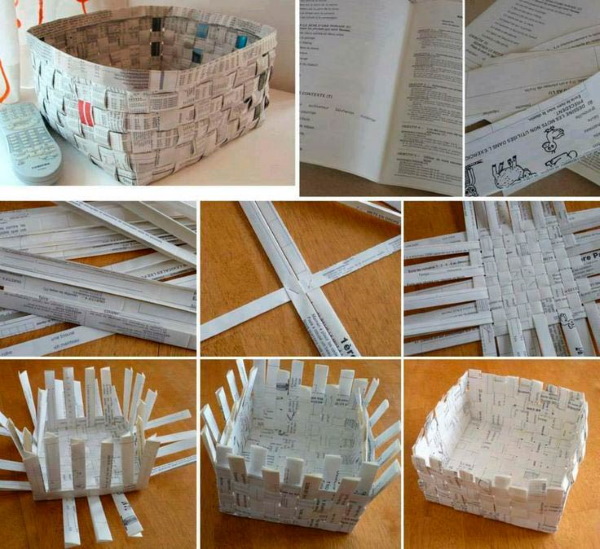
First, you need to prepare paper tubes:
- Cut the folded paper spread into 8 pieces.
- Apply a thin layer of white glue around the edge of each.
- Roll the blanks into tubes, starting from the corner, using a knitting needle.
In total, you will need several dozen tubes.
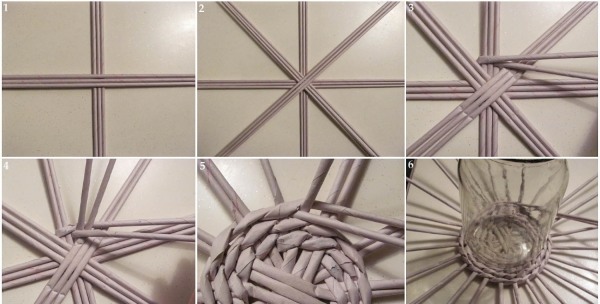
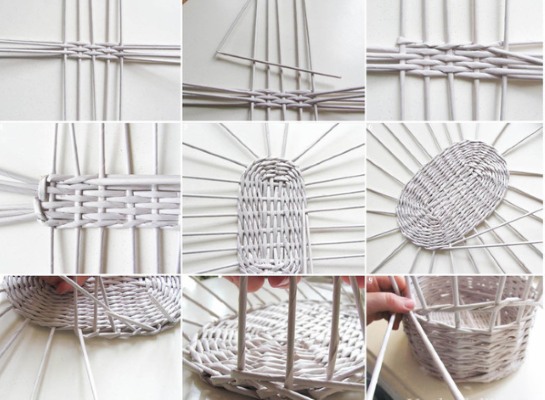
How to weave the bottom:
- Place 3 tubes horizontally next to each other on the work surface and place 3 of the same blanks on top perpendicularly (in the middle), forming a cross.
- Glue 2 tubes together lengthwise, inserting part of the tip of one into the other.
- Wrap the resulting long piece around the vertical part of the cross, then intertwine its ends.
- Next, braid the horizontal “rays” in the same way and cross the ends again.
- Repeat the 2 previous steps, moving clockwise and tightly laying the parts until 2 solid layers are formed. As soon as the length of the working tube begins to end, it should be “built up” (inserted and glued another workpiece).
- Then continue to weave the bottom of the basket using the same technique, but braiding 1 tube of “rays” and crossing the ends (the remaining number of layers, until you get a round base of the desired diameter).
- Secure the weaving by gluing the outer layer of the workpiece to the “rays”, tuck the edges of the working tube inside, glue and cut off the excess.

Transition from the bottom to the walls:
- To move to the walls, extend all 12 “rays” using other blanks and glue and cross them one by one (clockwise).
- Take a new long tube, wrap it around the outer layer, lift the ends vertically and continue weaving in the same direction, forming a layer along the edge, above the previous ones.
- Secure the edges of the workpiece tightly and raise all the “rays” to a vertical position.
How to weave walls:
- To form the walls, you need to continue weaving the product clockwise, similar to the previous step. In total, you need to create 10 layers, holding the "rays" in a vertical position, and glue the remaining ends of the working tube.
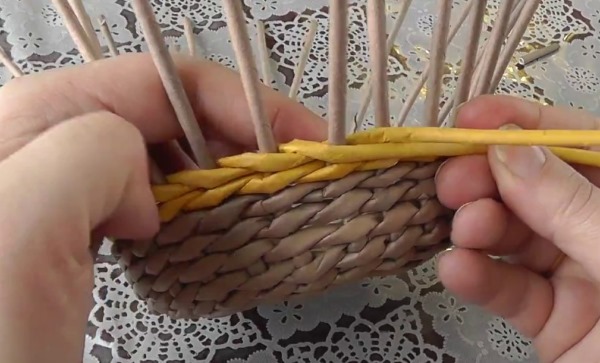
- To decorate the top of the basket, glue an additional tube next to each “ray” (tuck them in not too deep and not allowing them to stick out onto the front side).
- Next, take one of the resulting pair of tubes and bend it to the right, then repeat the same with the rest (all ends should be directed outward).
- When the circle is complete, the ends of each pair of blanks must be folded under the adjacent tubes, the last pair must be wound under the first, finishing the layer.
- Cut off the excess ends not too short, form a basket and secure with glue.
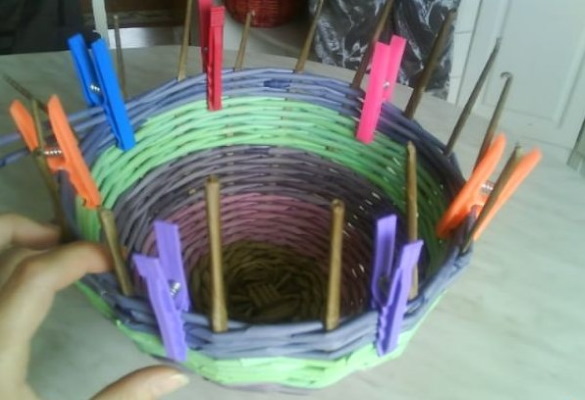
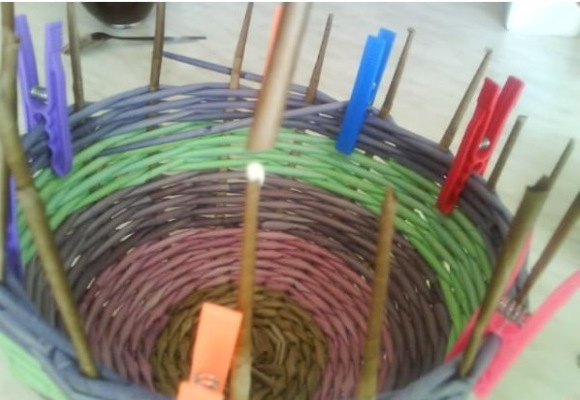
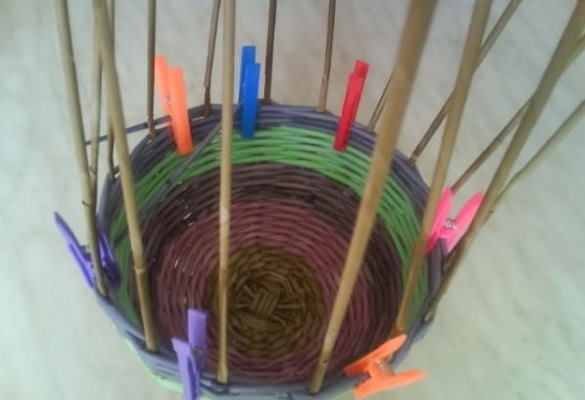
How to finish weaving:
- Insert 2 tubes vertically into 2 loops formed on the surface, located next to each other, and glue well.
- Repeat the entire previous step on the opposite side of the product.
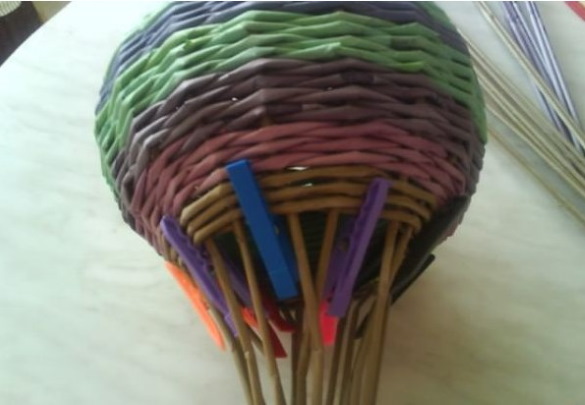
- Bend the added blanks towards the center of the basket (towards each other) to form an “arch” and secure with clothespins.
- Make a long tube (from several) and wrap it tightly around the “arch” from the middle to the edge, forming a handle, cut the ends and glue.
- Wrap the places where the pairs of blanks are attached to the base with separate tubes and glue the ends.
- Repeat the same to weave the second half of the basket handle.
How to paint a product
Crafts made from paper tubes are most often painted to give them a brighter and more attractive appearance.
To do this you will need:
- Mix equal parts white glue, white and colored water-based paint and water.
- Cover the basket with the resulting mixture using a hard bristle brush in an even layer.
- When the mixture of glue and paint has dried, apply 2 layers of acrylic varnish to the entire surface of the product.
- After it has completely dried, cover the protruding parts of the craft with pearlescent paint, lightly touching them with a greased brush and leave to dry.
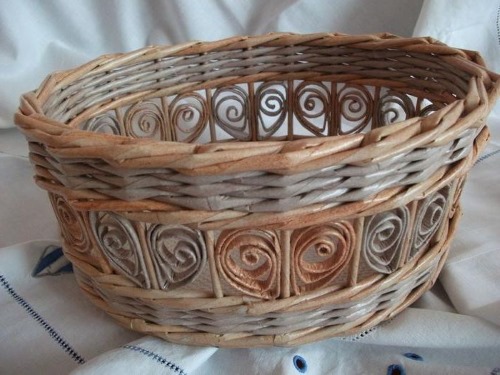
The festive basket made of paper tubes is ready. It can become a beautiful gift or decorate the interior.
How to weave an oval basket
Crafts made from paper tubes are surprisingly durable, and at the same time they are quite easy to assemble, having basic skills. Oval baskets are considered to be one of the easiest items to make. At the same time, their size, color and decorative design can be different.
To create such a craft you will need:
- paper or newspaper;
- tape or glue;
- scissors;
- a sheet of cardboard for the base;
- a narrow wooden stick.
How to prepare the tubes:
- Cut the newspaper into 4 parts vertically - they do not have to be identical.
- Then place a wooden stick in the corner of each sheet of paper and roll it tightly at a slight angle so that the resulting tube is longer than the sheet itself.
- Apply a drop of glue to the extreme corner to secure the shape of the blank, and remove the skewer after it has completely dried.
To create a basket you will need a lot of paper tubes, so you should make a significant supply of them in advance. Instead of a wooden skewer, you can use a thin knitting needle, an awl with a diameter of 3 mm or another similar object.
How to form the base:
- Cut an oval shape out of a sheet of cardboard to form the base. It can be any size.
- Then glue the paper tubes to the cardboard oval so that they radiate from the center. It is necessary to use an odd number of blanks for this. The closer the "rays" are to each other, the denser the weaving will be.
- Cut a second piece of cardboard the same size to complete the base and glue it to the first so that the paper tubes are sandwiched tightly between the two sheets.
- Place a heavy object on the formed base as a press and wait until the glue dries completely.
How to weave a basket:
- Raise the "beams" up and set them vertically.
- Place a new paper tube on the bottom of one of the "rays" and glue its tip to it with glue.
- Then tightly weave the blank around all the "rays" in a circle, forming the walls of the basket. As soon as the entire length of the tube is woven in, it is necessary to lengthen it by inserting the tip inside the next tube. In fact, this will be one long tube, from which the entire basket is made. As you weave, the fixed blanks will flatten. This will make the basket stronger.
- Continue weaving until the desired height of the product is reached or until the entire length of the "rays" is used. After completing this process, bend the tip of the tube used over the nearest "ray" and glue it from the inside.
- Cut off the unused part of each "ray", leaving a length of 2-3 cm from the top of the basket. The ends of the "rays" located on the outside of the product must be folded inward over the edge and glued to the inner wall.
You can use a clothespin to hold the piece in place until the glue dries completely. Bend the ends of the "rays" located inside the basket over the edge to the outside and tuck them into the second row (from above) of the basket weave, securing them well.
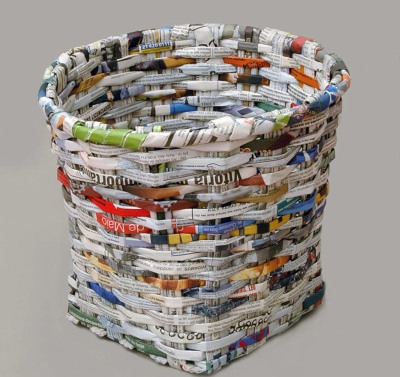
Square basket
Crafts made from paper tubes are mostly baskets of various shapes. The most common technique for making them is using a cardboard base and vinyl wallpaper.
To create a square paper basket you will need:
- a large number of paper tubes;
- corrugated cardboard sheet;
- sheet of vinyl wallpaper;
- white glue (PVA glue).
How to create a base:
- Measure the dimensions of the bottom of the planned basket and cut out the blank according to the marks made.
- Apply a thick layer of PVA to a large sheet of vinyl wallpaper and quickly wrap it around the prepared piece of cardboard on both sides, smooth it out thoroughly to prevent wrinkles and bubbles, press down with books or a container of water and leave until completely dry.
- Next, place the paper tubes on the blank at equal distances from each other, securely fixing each one with glue, and wait until it dries.
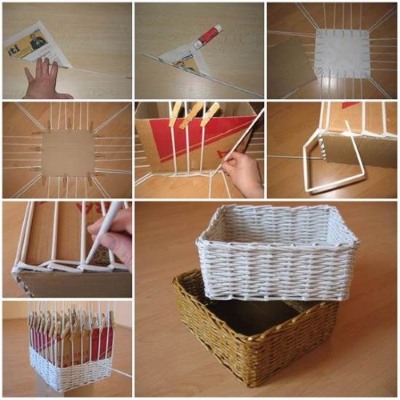
How to make walls:
- When the bottom with the glued elements is completely dry, lift the “ray” tubes up and bend them into a vertical position, and place a small cardboard box of the same size on the flat cardboard part (to ensure the correct and even shape of the craft).
- Glue 2 long tubes from several free ones, wrap one of them around any “ray” without tightening the loop, then similarly place the second piece on the other side.
- Next, weave both working tubes around all the posts, bringing their ends out in front and behind.
- Increasing the length of the blanks, weave using this technique, forming vertical layers (they will resemble cotton fabric).
- Once the craft has acquired a stable shape, take out the box and continue weaving, increasing the length of both tubes until the desired height of the walls is reached.
- Trim the edges of the work pieces, tuck them inside the woven fabric and securely fasten with glue.
How to shape the top edge:
- Lightly spray the “rays” with water to give them elasticity, place a new tube under the first one and bend both parts around the nearest post.
- Repeat the first step with the second and third "rays", using additional blanks. To weave the parts more tightly, you can use a knitting needle.
- Go around the fifth pillar of the first and fourth.
- Bend the second and fifth behind the sixth “ray”.
- Tuck the ends of the third and sixth posts alternately behind the seventh.
- Interlace the remaining “rays” in a similar manner, observing the sequence and order.
- As a result of the work, all the racks will be grouped and fastened in 3s, and 2 pieces will remain free.
- The remaining “rays” are extended using additional tubes, intertwined and drawn along the entire perimeter, tightly bending around the twisted structures in 2-3 layers, each of which must be set in the opposite direction.
- Hide the ends of the working pieces inside the volumetric edge and secure with glue.
Final finishing
Paint the basket with acrylic paint of one or several colors. To ensure increased durability of the craft, it is recommended to cover it with a layer of transparent varnish and let it dry completely.
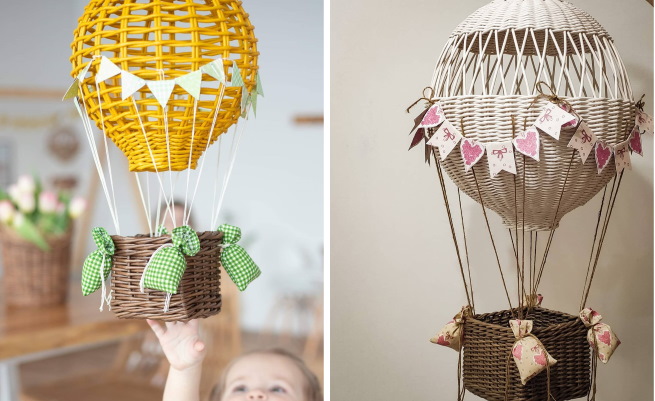
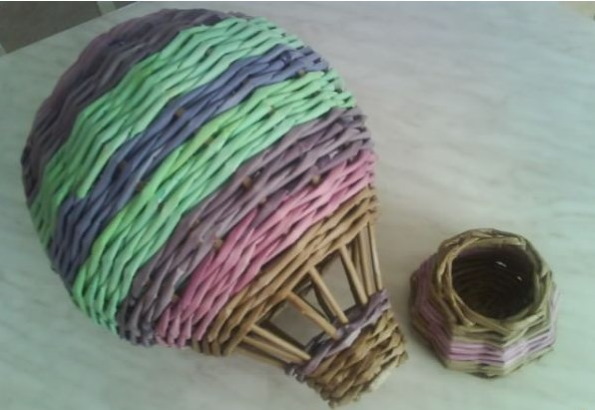
Hot air balloon made from newspaper tubes
Crafts made from paper tubes can be very original decorative items. For example, creating a balloon does not require any serious skills.
All you need to do is spend some time and prepare the following in advance:
- long tubes made of paper or newspaper, painted in any color;
- plastic deep bowls of medium and small size;
- glue;
- thick thread.
The process of creating a balloon looks like this:
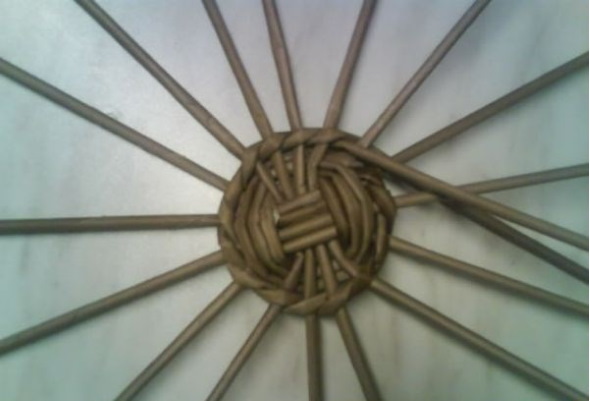
- Connect 4 tubes in the middle with glue.
- Make another similar blank, lay it out crosswise relative to the first one and tie them with a new tube, securing them in this position.
- Next, bend the ends of a single tube and wrap them around the intersection of the glued pieces in a circle.
- Separate the ends of the combined tubes into “rays” and begin to weave them in a circle with the next piece.
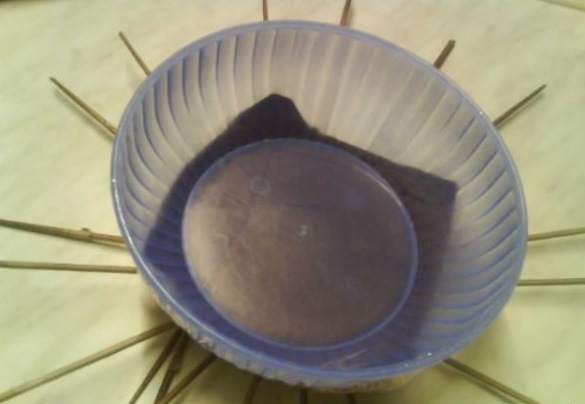
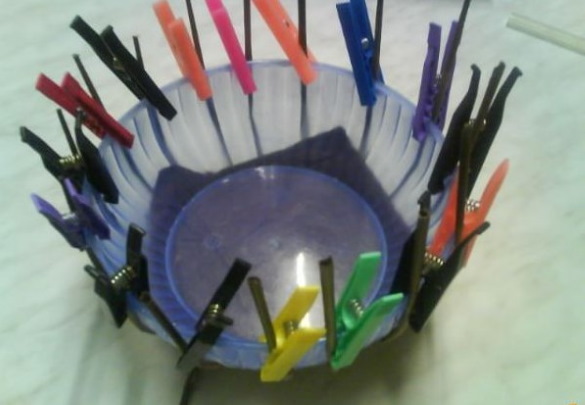
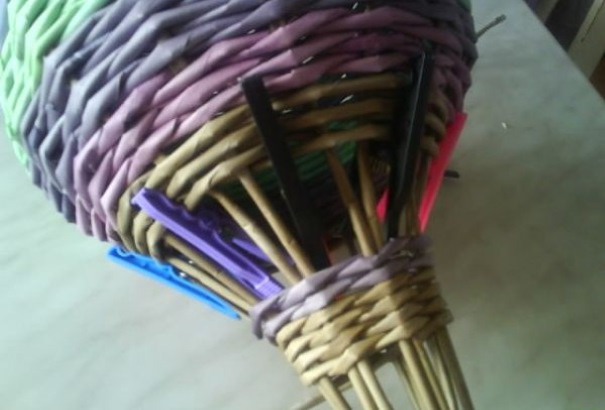
- Once the round base is formed, place it on an inverted deep bowl in the middle and arrange the “rays” along the walls of the container.
- After this, continue tightly weaving through the “rays”, repeating the shape of the bowl and lengthening the working tube as needed.
- Once a stable semi-circular shape is formed, remove the container and continue weaving until you get a balloon.
- Bend the end of the working tube inward and secure with glue.
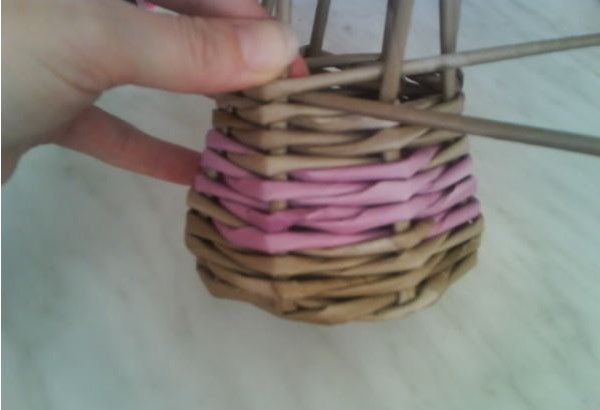
- After this, repeat the above steps using a smaller bowl to form a basket.
- The finished parts of the craft can be painted and varnished for durability and additional brightness.
- Using a thick thread, attach the basket to the balloon.
Advice from experienced craftswomen
Crafts made from paper tubes turn out to be especially attractive, durable and neat not only if the technique is fully followed, but also if certain tricks and techniques are used.
The most common advice from experienced craftswomen is the following:
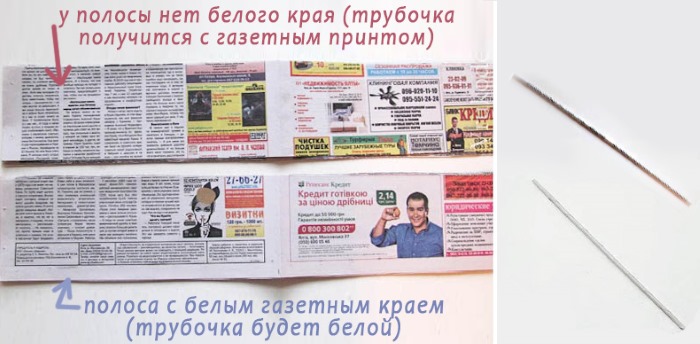
- The tubes can be made from colored craft paper, old newspapers, magazines, brochures, wall calendars, and posters. The recommended length of the blanks is 25-30 cm.
- The base or bottom of large baskets and vases is made using a sheet of cardboard or plywood, or by simple weaving on cross-shaped posts.
- The "beams" must be fixed at a distance of no more than 2 cm from each other. If the posts are placed less frequently, the finished product will be fragile and loose.
- When weaving, it is important not to bend or crush the “rays”, since their integrity and straightness determine the appearance of the craft.
- To avoid holes and pits in the woven fabric, it is necessary to maintain the posts in a level vertical position, constantly adjusting them as you work, and pressing each new row as tightly as possible to the previous one.
- It is recommended that the attachment points for the extendable working tubes be located inside the canvas, preferably behind the posts.
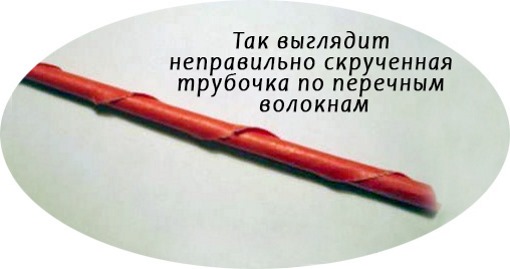
- If the tubes do not have the necessary flexibility and elasticity, you should lightly spray them with water, cover them with polyethylene film and leave for 20 minutes, and only then start creating the craft. This will allow you to weave in dense rows without creases and damage. After complete drying, the strength of the material will be restored.
- However, if the workpieces are excessively moistened, you should not continue the work process, as they will begin to "shaggy" or even collapse. It is necessary to slightly dry the "vine" until the desired characteristics are obtained.
- The ends of the twisted and secured along the edge of the racks should be cut from the inside of the craft.
- If the stumps of the “rays” are on the outside, they can be made less noticeable using the dye used for pre-coloring the paper tubes.
- To make the edges of the wicker craft look more even and neat, it is recommended to create them from new tubes (cut off the ends of the posts remaining after forming the edges and build them up with fresh moistened blanks). This will allow you to make tight bends and loops of the same size, without gaps and creases.
- When using old racks, you need to lightly spray them with water, cover them with plastic wrap and wait 15-20 minutes, and only then start bending along the edge.
- Often the place where the paper tubes are fastened is poorly painted, since the PVA layer does not allow the dye to be evenly distributed over the entire surface of the workpiece. To avoid this, it is advisable to use a glue stick and similar consumables (which do not spread).
- When using the layered or openwork method, it is recommended to create the first few layers of the product with simple rope weaving and then change the technique. This will make the craft more stable and durable and will make the work much easier.
- If the ends of the tubes remain unpainted, it is recommended to trim them before extension or fixing them into the structure.
- For preliminary painting of blanks, diluted gouache, watercolors or water-based dyes are used; for coloring of finished crafts, acrylic dyes and spray pigments are used.
- To make a paper tube basket visually indistinguishable from a willow basket, you should coat it with several layers of wood varnish, drying them thoroughly before each new application.
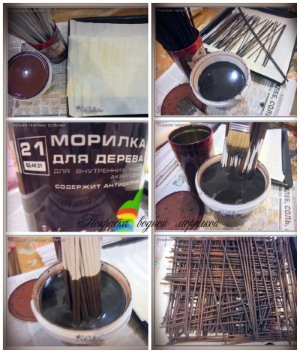
- Wood varnish not only colors the surface in the shade of natural wood rods, but also makes the craft much stronger and increases its moisture resistance. Similar properties are provided by some types of glue.
- To decorate finished products, you can use various fabric elements, decorative ribbons, buttons, artificial flowers, and so on.
When using weaving techniques from 2-3 paper tubes at the same time, you can select blanks of contrasting or transitional shades to obtain an additional decorative effect.
Video about crafts
Crafts from paper tubes: