Handmade items always look extraordinary and delight, and they are also great as gifts. To learn how to weave from newspaper tubes, a step-by-step guide with a detailed description is offered for beginners.
How to make newspaper tubes for weaving?
The size of the paper tubes depends on the size of the weaving. If the object is large, such as a basket or a vase, you need to use thick needles and wide sheets of 10 cm. For small crafts, a strip of 6 cm and a thin needle (1.5 mm) will do.
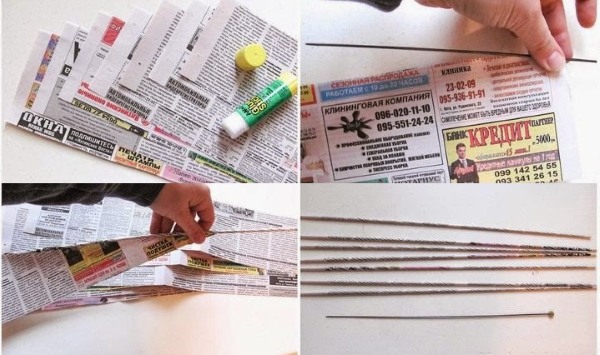
To prepare the material for weaving, you will need:
- paper (newspaper is best for this because it is the easiest to roll into tubes and can also be painted quickly);
- you need to use glue for paper, the main thing is that it glues everything securely and is not too liquid;
- scissors or a stationery knife;
- clothespins, used to secure items;
- to paint the products, you can use stain or a mixture of colorant and construction primer;
- medium sized brush;
- knitting needles of different sizes or wooden skewers are suitable for creating the shape of tubes.
It is also recommended to prepare the work surface, cover the table with oilcloth and take the necessary utensils.
The creation of tubes is carried out in several stages:
- Cut the newspaper sheet lengthwise into pieces, each piece should be about 10 cm wide.
- Place the prepared part of the sheet in front of you and place a knitting needle on its edge so that the angle is 30 degrees.
- The corner of the newspaper needs to be tightly folded and pressed with your fingers;
- You should gradually turn the knitting needle, holding the newspaper itself a little.
- Having reached almost the very end, you need to apply a small amount of glue to the corner of the paper and roll the product to the end.
- Carefully remove the knitting needle, clamp the edges with clothespins and let the glue dry.
To paint newspaper tubes, they need to be placed in a small container and filled with dye. The material should be dried on a lattice structure. It will be more difficult to paint a finished product; for such purposes, it is better to use a sprayer instead of a brush.
Methods of weaving from newspaper tubes (simple bend, voluminous, "lazy braid", "isida", double, complex, "rod bend", final)
There are many types of weaving that differ in appearance and execution technique. 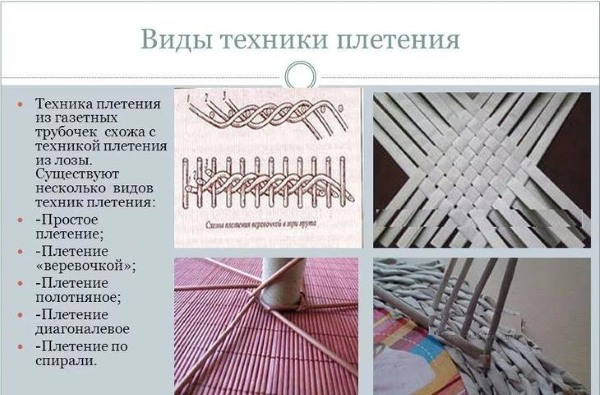 For beginners in this business, masters recommend starting with simple patterns to get the hang of it and gradually moving on to more complex options.
Simple bend
Weaving from newspaper tubes cannot be done without a simple bend. For beginners, a step-by-step instruction with basic technical principles is suitable.
Basic tubes are used for weaving, and everything is done in this way:
- Using an awl, two adjacent tubes are alternately bent at the base.
- The first tube is inserted behind the two main ones, and the same must be done with the next two.
- The first bent rod is inserted once more through two rods, then through one tube, and the edge is brought out externally. This tube will not be used any more, and at the end of the work, it should be carefully trimmed.
- Repeat the previous steps, if everything is done correctly, you will get a neat braid.
Volumetric bending
This type of bending is suitable in cases where it is necessary to design the product with a volumetric element; weaving is performed in several stages.
Stage I:
- You need to take two racks and place them behind the next two, having first moistened the inside of the elements.
- The same actions should be done with the next pair, bringing the ends to the front side. In this technique, you should weave until the end of the row. The end of the last pair of rods should be pulled through the first hole formed.
Stage II:
- To make the weaving look complete, you need to take a pair of rods, put them under the next pair and push them through the hole of the next pair of vines. The ends of the rods should be inside the product.
- Continue weaving in this manner around the entire product. The last pair of tubes should be placed under the bottom of the second pair (every other) of the outer element and brought out to the top. The remaining ends should be placed under the bottom of the third pair of vines and brought out to the wrong side.
Stage III:
- A pair of racks are inserted behind the adjacent rods and bent downwards, so you need to weave until the end. The outer rods are inserted into the compartment located next to it, and the ends are brought out to the outside.
- The ends are tucked inside the first or second pair of vines (it all depends on the length of the twigs). The remaining vines are carefully trimmed with scissors.
Lazy braid
The braid in this technique is done simply and quickly, which is why it was given the name “lazy”, although the weaving looks impressive:
- You can start from any place, the chosen twig should be slightly pressed with your fingers, put on the knitting needle and tucked under the fourth twig. Do the same with the following twigs.

- Grease the top with a thin layer of PVA and tighten the ends of the tubes and leave until completely dry. Trim the remaining tails diagonally.
"Isis"
Most craftsmen use this technique for the final stage of weaving small objects, such as a box. It is easy to perform, so it is perfect for beginners.
You need to bend the main weaving column, put it through one tube, cut off the end (if necessary), grease it with glue and put it inside the top layer of weaving. In order to make a neat connector, craftsmen recommend using an awl.
Double
Weaving from newspaper tubes looks finished with a double fold. Even for beginners, this technique will seem easy if you follow the steps step by step.
The first main rod is placed behind the next two, brought out in front of the next pair of tubes, placed behind the adjacent tube and laid out on the outer part of the product. The weaving is repeated until the end of the row, and the ends of the last pair are hidden inside.
Complex
To make a complex bend, you should weave bent vines into the base using straight and reverse braids and start weaving the pattern:
- Pass the resulting loop in front of a pair of twigs, put it behind the second pair and throw the loop over the next twigs. Repeat the same actions in a circle.
- The bottom row is woven in this way: the ends of the first pair of tubes are brought up through the next two, repeat everything with the subsequent pairs.
- The first pair brought to the top is placed on the second and brought down, and everything is repeated.
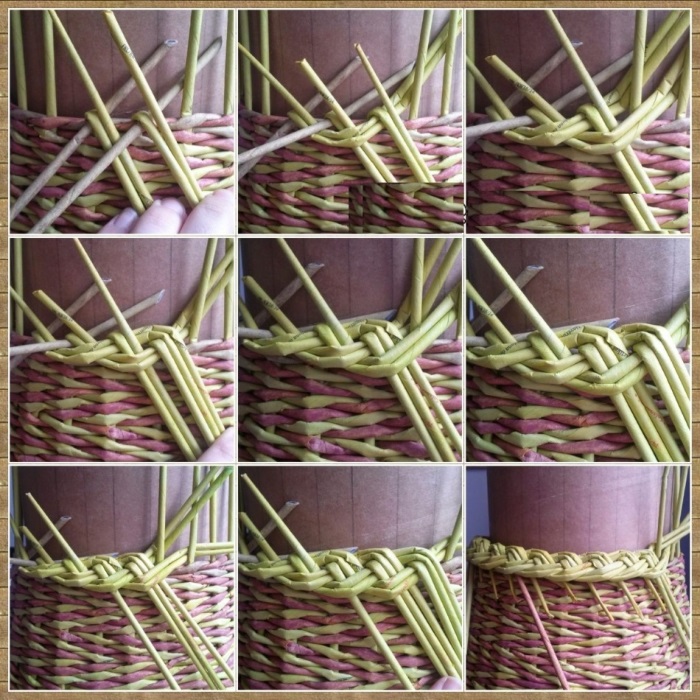
"Bending the rod"
After the product has been woven to the required height, the bending is performed:
- You need to spray the vines with water to make them more pliable.
- The first post is bent behind the next stick and brought out to the outer part, while an auxiliary rod is placed underneath. Such actions should be repeated with two adjacent posts.
- Again, take the first tube and bend it behind the fifth one, and bend the fourth twig behind the same one.
- The second tube is bent behind the sixth, and the fifth is placed behind it.
- The third and sixth tubes are placed behind column 7, resulting in 3 pairs of vines. The same actions are repeated with the remaining posts, the last lower tube is tucked in to replace the auxiliary one, then the remaining post is laid.
- The vine from the first pair is pushed into the third gap with an awl, and the same tube is pushed into the next hole. All actions are repeated until the end of the circle.
"The Final"
The final bend is done quickly and easily. The first tube is placed on the second one, so that a kind of link is obtained, an auxiliary stick of paper is placed underneath. Thus, all subsequent ones are bent, at the end the vine is pushed through instead of the auxiliary vine.
To create the second row, repeat all the same steps, but in the opposite direction. The weaving can be continued as long as the length of the paper vines allows. Then glue is applied to all the posts, after which the tails are cut off.
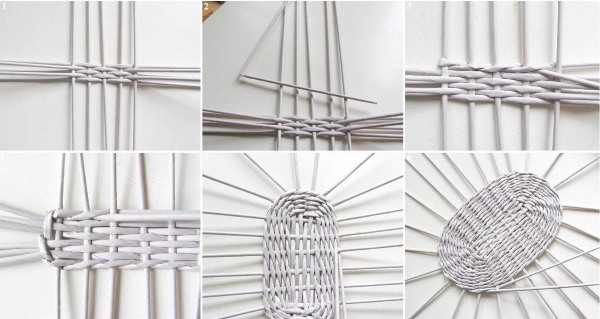
Options for weaving the bottom of a basket, box, etc. (square, oval, rectangular, round)
Weaving from newspaper tubes for beginners is described step by step from start to finish. But if you want to create something of your own, it's time to start experimenting with the shape and size of the products.
For a small square bottom you will need 7 main vines (for convenience, you can glue them to the table with masking tape, keeping the same distance.) and you can start working:
- Connect 2 working tubes, make a bend and place one half under the first main one;
- Weaving is done with a rope (the upper vine is placed under the second main one, and weaving continues until the end of the row).
In this way you can create a small square bottom; for further weaving you need to glue the main tubes on both sides.
To weave an oval bottom, you need to take the form, divide it into 4 parts and calculate the required number of vines (in this case, 7 uprights) and start weaving:
- 3 horizontal vines are woven into the vertical posts, then an additional post is taken and weaving with a rope begins in row 1;
- Then a chintz weaving pattern is applied, with one more being added between 1 and 2 or 2 and 3 side posts if the distance between them is too great, and this is how an oval is formed.
Weaving a rectangular bottom from newspaper tubes is easy. For beginners, a simplified step-by-step instruction is recommended, but to begin with you should prepare a rectangular box:
- A horizontal and vertical line is made on the box, leaving 2 cm from the edges;
- You need to make holes horizontally at the junctions of the lines and insert a pair of tubes (in this case, 9 pieces);
- The first rows are woven using a calico weave with additional extension of tubes; small ends should remain on the sides;
- The weaving is attached to a cardboard box with electrical tape, then 1 rack needs to be built up at the corners, a working tube is added and 3 rows of weaving are done with a rope and the bottom is ready.
The round bottom can be woven in this way:
- Take the required number of vines (for example, 8 pairs with 3 tubes in each) and lay them crosswise, flatten in the center and fix with glue;
- The working tube is bent in half and placed behind the bundle. The rope weaving is performed, only the working vines are placed not behind each main one, but behind the whole bundle of 4 rows;
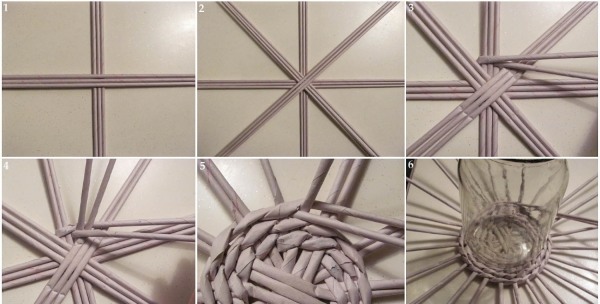
- The bundles are divided, the working tube is inserted under each main rope according to the scheme. If large gaps appear between the posts, the main vines are added and the weaving continues to the required size.
Basket weaving
First, you need to decide on the shape and choose a suitable object. Next, you need to cut out the shape, for example, a square, and then the following steps should be followed:
- Glue the twigs in pairs to the form and secure with clothespins, put exactly the same form on top, fix with glue, wait until it dries.

- The form should be installed on top of the bottom and weaving should begin, tying the vertical vines with horizontal ones. When weaving products, beginners should use patterns to avoid mistakes.
- The handle for the basket can be woven in the form of a braid.
Candy bowl made from newspaper tubes
Weaving a bowl for candies from newspaper tubes is done in several stages.
For beginners, it makes sense to use step-by-step instructions:
- You need to take 12 paper sticks and weave the bottom of a round shape.
- Make a lift and weave 10 rows using the “rope” technique, gradually widening them.
- Weave 2 circles using the “double rope” technique.
- Attach a clothespin to every three sticks to make it easier to create a wavy border and weave 2 rows using the same technique.
- Decorate the weave with a voluminous bend.
Weaving a box
For successful weaving, it is best to combine previously known techniques. To begin, weave the base of the desired size (it is convenient to take 6 pairs of vines) and try on the shape. The walls of the product are woven with straight and reverse rope, in total there should be 4 rows. To make it easier to make transitions, it is better to mark the first riser by putting on an elastic band.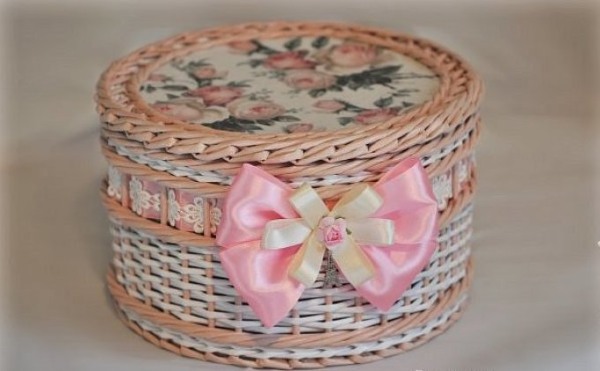
Next, a rope is woven, but this time from three vines (additional vines are pushed through the holes next to the posts and bent). For the second row, 2 more paper sticks are added in the same way and weaving continues.
The bending is done as follows: the uprights are moistened with water using a brush. The first upright is bent down behind the adjacent tube, brought out in front of two rods and bent down again. The same is repeated with all the rods.
The lid of the box is made according to the same principle as the bottom, but before moving from the base to the risers, a voluminous rope is created with the addition of 2 vines. The upper part can be left unchanged, or a small handle or flower can be made.
Master class on weaving a summer hat
To work you will need a circle of cardboard, it will serve as a guide for the diameter of the hat, and you can actually start weaving:
- Interlace 4 pairs of tubes together, attach to the center of the circle, and secure the edges with clothespins.
- Glue another one for braiding under the main twigs and flatten it a little with your fingers. Braid in a circle: 2 twigs should be on top and two on the bottom.
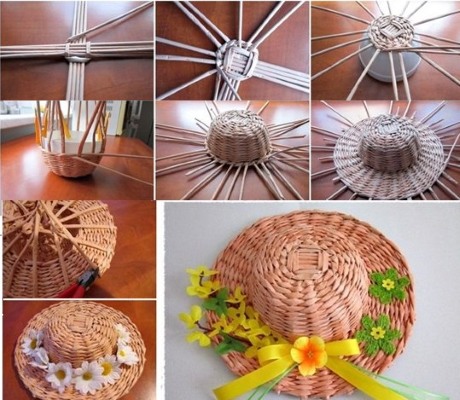
Weaving from newspaper tubes for beginners is very simple if you follow the step-by-step instructions. - Next, a bowl of the required size is placed (the circle is removed) and braided with parallel extension and addition of tubes.
- Take a cardboard circle, fix it again and weave the brims of the hat of the required size. You can finish the weaving by bending or leave neat ends.
Weaving a vase
You need to start with weaving the bottom, it is woven in the usual way, and all the ends are hidden inside. Depending on the desired diameter, several tubes are woven. To weave the walls, you need to make loops, and then increase the height. You should decorate the weaving depending on the size of the vase itself, if it is small, then the bend should be small, so the object looks neater.
Rooster made from newspaper tubes
To weave a rooster, you need to take the appropriate container to create the body. For the base, you will need 16 long tubes, they need to be laid crosswise and start weaving a regular circle. After that, put the bowl and fly around the shape of one of the above techniques. In the same way, other parts are created and attached to the base.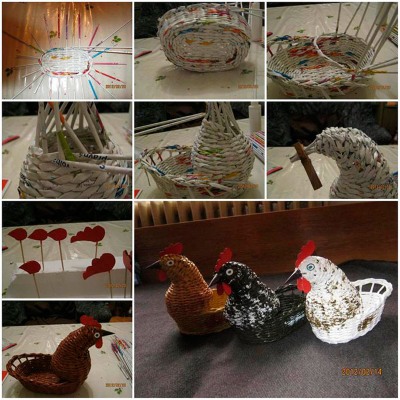
You can glue plastic eyes to the cockerel and decorate it with a bright bow, buttons or feathers.
Weaving flowers from newspaper tubes
To make a flower you need:
- Take a paper tube, insert a thin wire into it and form a petal.
- Take 1 tube and fix it at the very top (in the center) with hot glue.
- Using an additional vine, weaving is carried out along the entire length of the petal. Four more elements are woven in the same way.
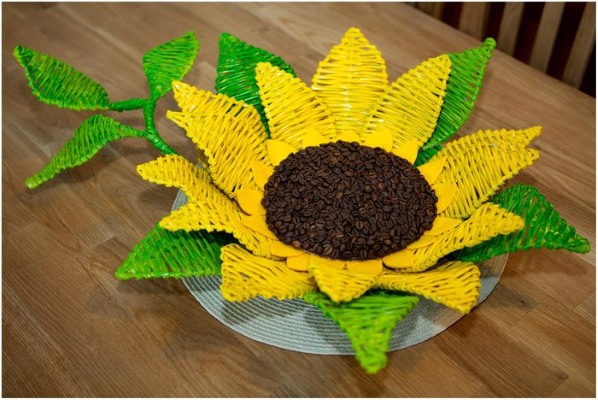
- The parts are covered with acrylic paints and connected. The middle is made of paper or you can experiment with other materials, such as beads.
Works of masters (Zakirova, Tanya Pavlovna, Nagornaya)
The works of Nagornaya, Tanya Pavlovna and Zakirov are known in many countries thanks to the improvement of old techniques and the development of new weaving patterns.
To repeat the weaving from newspaper tubes, professionals recommend watching more master classes for beginners with a step-by-step description of all actions. Famous masters offer many interesting ideas that anyone can implement.
Video: Weaving from newspaper tubes for beginners
How to make tubes from newspaper for weaving, learn in the video:
https://www.youtube.com/watch?v=PHSXc7kn2PI
How to weave a basket from newspaper tubes, watch the video:
I want to make a box in the shape of a pear. Also from tubes. Don't know how to make such a craft?
Thank you for the valuable advice... For us, beginners, this is very valuable advice... Greetings from Brazil!