Retro style dresses - models, which were at the peak of fashion in the 20s-90s of the last century and tied to the style of the 20s, 50s and 60s. Such an outfit is an indispensable attribute in the wardrobe of a modern girl, perfectly suitable for a matinee or any family special event. Made of satin/organza or made in the shape of a trapeze, dresses are complemented by an evening hairstyle and accessories that allow the child to feel like an adult beauty.
Types of Dresses
Retro style dresses for girls are models based on adult fashion of the 20-60s of the last century and copying outfits made in the Charleston, New Look or A-line styles.
"Charleston" (Chicago)
The rectangular dress was at the peak of popularity in the 1920s and featured a low waistline, a straight bodice without darts or excessive decoration, and a skirt made of several flounces. Such an outfit could be knee-length or have an asymmetrical skirt, extended from one block.
Chicago style outfits are ideal for girls aged 8-10 years, made from any easily draped fabric (organza, silk, crepe satin) and decorated with rhinestones, fringe, velvet, sequins or feathers.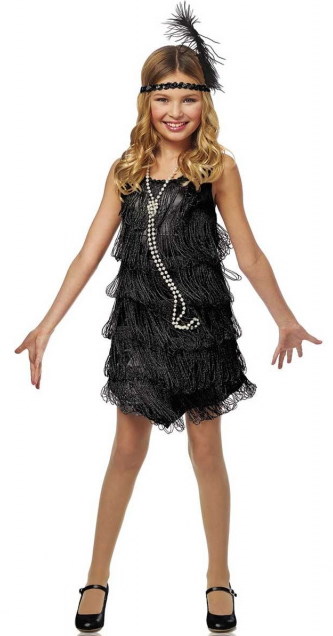
This outfit is complemented with bright accessories:
- fur cape;
- long, satin gloves;
- silk scarf;
- feather fight;
- a long string of pearls;
- pillbox hat with veil;
- artificial flowers.
The Charleston style is also used for a hairstyle that requires the girl's hair to be styled into frills.
"New Look"
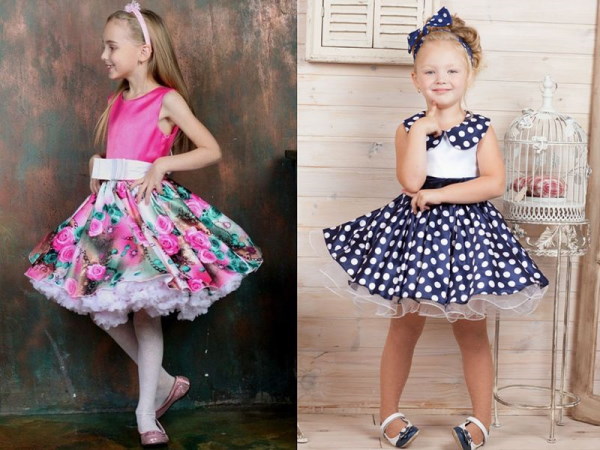
Fitted dresses with full skirts, which came into fashion thanks to the work of Christine Dior, are made from bright fabrics, complemented by a petticoat and are considered the most popular holiday clothing option for girls aged 5-12.
In the Soviet Union, and then in Russia, this outfit was called "Hipsters" and was most often made from fabric with small (or large) polka dots or material with a floral pattern.
The characteristic features of such an outfit are:
- fitted bodice;
- no sleeves (except for puff sleeves);
- sun skirt;
- a lush, multi-layered petticoat made of tulle or organza.
A wide belt decorated with an artificial flower or bow and emphasizing the girl’s waist is considered a mandatory decoration for such a dress.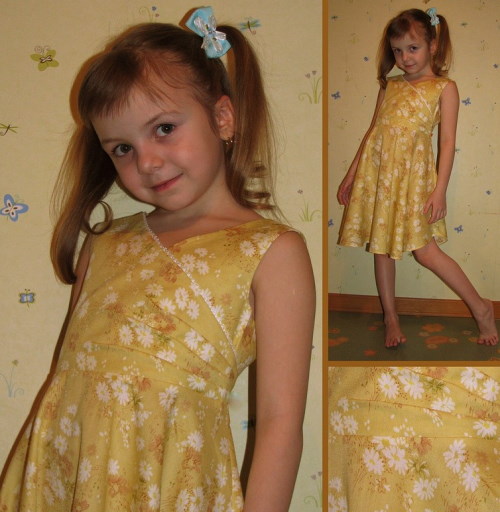
The hairstyle for such an outfit is done in the "babette" style, complemented by a ribbon with a bow or a hoop. The "New Look" dress also looks good with short, curled locks.
"Trapeze"
The "Trapeze" style dresses that appeared in the early 60s of the last century are distinguished by a free silhouette, extremely laconic cut and a length significantly above the knees. Made from velvet, jacquard or guipure, such outfits can have sleeves made in the shape of a trapeze and contrasting trim running along the hem and edge of the sleeve.
The laconic cut of the dress is combined with bright, plastic jewelry and a hairstyle with small curls.
Necessary materials
A retro-style dress for a girl, reminiscent of outfits in the Charleston, New Look or A-line style, is made of satin fabric, silk or crepe satin and is complemented by elegant accessories in the form of bows, embroidery or lace.
Materials required for sewing the product:
| What is required | How to choose and why you need it |
| Main fabric | Bright fabric with large polka dots, plain or decorated with flowers, easy to gather (satin, crepe satin, organza). To make a children's outfit, you will need about 1.5-2 m of fabric, depending on the child's height. |
| Fatin | It is required for making a petticoat and can be white, match it or have a contrasting shade. It is purchased in quantities of 2.5-3 m. |
| Trim or interlining | Used for edging the neckline, seams and bottom of the outfit. Purchased in quantities of 1.5 m. |
| Additional materials |
|
 Satin bows, guipure or fringe can be used as decoration for the dress.
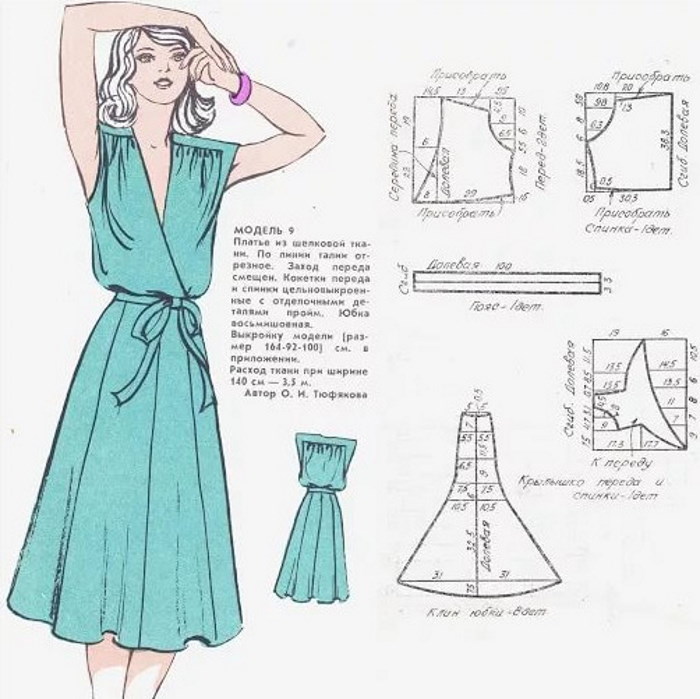
Pattern
Retro style dresses for girls are made using patterns made in strict accordance with the measurements taken from the child's body.
Depending on the measurements, the required fabric consumption is calculated.
For a girl aged 8-15 years, these values will be approximately equal to:
| Name of measure | How is it measured? | Meaning |
| Dress length (DL) | Measured from the highest point of the shoulder seam to the desired length of the garment. | from 68 to 100 cm |
| Shoulder circumference (SC) | The widest part of the hand is measured. | 19-40cm |
| Front to waist length (WL) | The line to be measured is at the base of the neck, extended to the waist area. The measurement is taken taking into account the protrusions on the chest. | from 31 to 55 cm |
| Back to Waist Length (BWL) | The distance from the shoulder seam to the waist is measured with a measuring tape | 31–50 cm |
| Neck circumference (NC) | It is required to determine the size of the neck and is equal to the circumference of the neck. | 30-45 cm |
| Chest circumference (OG) | Measured horizontally, encircling the body at the protruding points of the mammary glands | 59-70 cm |
| Chest Width (W) | Measured horizontally above the base of the mammary glands from the left to the right armpit | 24–45 cm |
| Back width (ShS) | The tape is placed horizontally on the shoulder blades, between the back corners of the armpits. | 27-47 cm |
| Waist circumference (WC) | It is carried out at the narrowest point of the natural curve of the waist. | 30-45 cm |
| Hip circumference (HC) | Measured at the most prominent part of the buttocks | 65-85 cm |
| Rear corner height (RCH) | The measuring tape should be positioned vertically, measuring the distance to the back corner of the armpit. | 17-35 cm |
| Shoulder length (SL) | Measured from the humerus to the forearm | 9-15 cm |
| Sleeve length (SL) | The line is drawn from the shoulder joint to the required sleeve length. | 15 cm |
| Belt width (W) | It is chosen depending on the girl's wishes | 4-6 cm |
Measurements are taken using a measuring tape and then transferred to graph paper.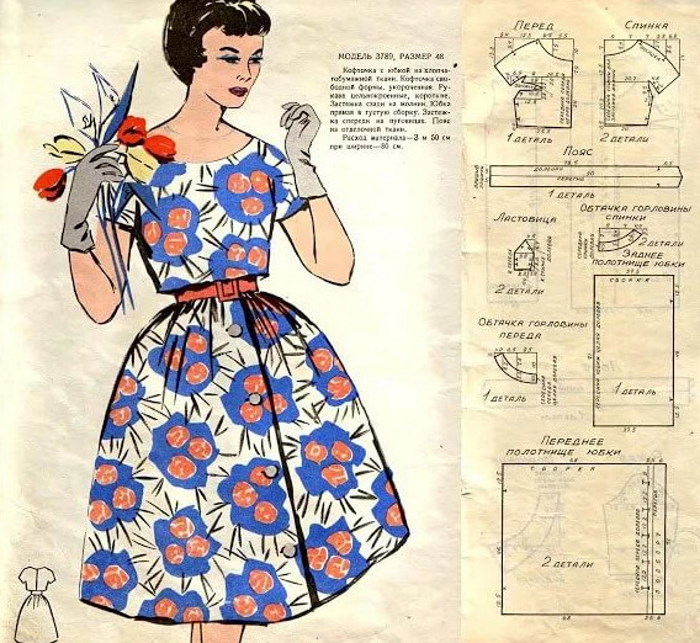
To construct the pattern:
- From point A, you need to set aside a distance equal to the chipboard (the length of the back to the waist), ending at point T.
- To the OG measurement (chest circumference) you should add the value of 4 cm / 2, which is necessary to construct a rectangle starting from point A. The finished figure should be divided in half, and then you should draw a shelf, shifting the point 1 cm to the left and fix it with the drawn line.
- The height along the back is drawn with a line stretching from point A down 2.5 cm and to the right 5 cm. The measured points need to be connected.
- From point O, you need to measure down a distance of 5.5 cm and to the left 5 cm and connect them with lines.
- The VZU mark is laid down from point A and is drawn parallel to the distance AO.
- From point B, you need to measure 1/2 of the distance SHSP to the right, and 1/2 of the SHGR value to the left, and draw 2 perpendicular lines from these two points.
- The values equal to the VPK measurement should be set aside from point T with the intersection of the shoulder line. Having measured this distance, you need to, using a pattern, draw the armhole line, remembering that on the shelf it should be a little deeper than on the back.
- To fit the outfit, you need to set aside 1.5 cm from point C on each side.
To construct a pattern for a flared sun skirt, the garment is cut out 40 cm larger than the required width. This is done to allow for a small gather on it.
Lantern sleeves are made using a classic pattern and with mandatory allowances.
Master class on making a dress "New Look" for 6-8 years old
A retro-style dress for a girl, reminiscent of the outfits of the 50s, features a tight, fitted bodice and a full skirt with frills, complemented by a tulle petticoat.
To make the dress:
- The finished pattern needs to be transferred onto the fabric using chalk and all the details need to be cut out with an additional seam allowance of 1.5-2 cm.
- The finished piece needs to be reinforced with interlining, and then, by folding the side and central parts of the front with the right sides facing each other, pin the relief seams and stitch them.
- The edges should be processed with an overlock, folded to the center of the front and ironed well.
- After stitching the central seam of the back using an overlock, you need to process the cut and iron the allowances in different directions.
- The central and side parts of the back should be placed face to face, the relief seams should be pinned and stitched. The edges of the allowances should be processed with an overlock, folded to the center and ironed well.
- The seams on the shoulders need to be stitched, the allowances need to be overcast, folded over onto the front and ironed.
- When sewing side seams on the left side of the garment, leave a small area open to accommodate the zipper, and overcast and iron the remaining seam allowances.
- The collar pieces need to be cut out according to the pattern, folded with the right sides together, pinned together and sewn. Excess allowances need to be cut off with scissors or left for triangular notches.
- The finished collar parts need to be turned inside out, ironed and stitched along the edges.
- Having attached the collar to the neck, it needs to be basted, having first connected its middle line with the central seam of the back. The collar needs to be stitched, processed with bias tape, and then, having stitched one edge, the second should be folded and sewn.
- To make puff sleeves, you need to cut out 2 sleeve and cuff pieces.
- After folding the cuffs, they need to be stitched, turned into rings, folded and stitched. The same should be done with the sleeves.
- The finished cuffs need to be sewn to the sleeves, and then the dress needs to be assembled.
- The petticoat should be 3 cm longer than the skirt, so the necessary difference should be added to the original length of the product. The yoke should be double and approximately 10 cm. It should be cut with a mandatory seam allowance of 1 cm.
The yoke is made of tulle and includes 3 tiers:
- 1st, consisting of 3 strips 150 cm wide;
- 2nd layer, including 6 stripes;
- 3rd layer with 12-15 stripes.
- To make the yoke, you need to fold it in half and stitch it, leaving 2 cm for threading the elastic.
- The resulting product needs to be folded in half, pinned and stitched to the width of the elastic.
- Having set the machine to the largest step and changed the direction of the thread, the tulle needs to be gathered with a stitch.
- Collecting strip by strip, they need to be connected together and then sewn sequentially (tier by tier) to the yoke.
- The bottom edge of the quilt is finished with a rolled seam.
Master class on making a dress for 10-15 years old
Retro-style dresses for girls aged 10-15 are made of thick satin, 2 m long. The dense and bright fabric holds its shape well, which allows you to wear a New Look model with a flared sun skirt even without adding a petticoat.
To make the dress:
- Using the standard pattern as a basis, you need to measure 5 cm down from the edge of the armhole and draw a line to the edge of the chest dart. By cutting this line and connecting the upper dart, you can get a side dart.
- To widen the neckline from its shelf to the shoulder line, you need to lay 6 cm to the left. From the found point, you need to put aside another 4 cm to the left to construct the shoulder seam.
- While moving, 9 cm are measured down from the neck, and another 8 cm are measured to the left from the found point. This is done to outline the neck of the model.
- Exactly the same actions need to be taken to draw a line on the back of the product, setting aside 6 and 4 cm to the left of the neck and 10 cm down the middle seam.
- To make a sun skirt, the satin fabric needs to be folded into 4 layers and the pattern attached to it. To create folds, the waist of the skirt needs to be increased by 20 cm.
- When cutting out the product, it is necessary to add seam allowances (1.5-2 cm).
- Darts need to be basted 4 pieces on the bodice and 2 pieces on the back of the garment, then stitched, the basting threads removed and ironed.
- The side and shoulder seams are basted and then sewn. The remaining seam allowances should be processed with an overlock. The resulting product should be well ironed along the seams.
- To create the facing, the bodice and back pieces need to be folded together to form an armhole line, and then outline it along the edge, starting from the right sleeve and measuring 4 cm from the edge. In the same way, you need to outline the line of the left sleeve, the neckline and part of the back. While drawing, you need to mark seam allowances on the fabric, exactly the same width as on the other parts of the dress.
- Following the pattern, you need to cut out 5 pieces from the interlining, not forgetting to apply the adhesive side of the lining to the back side of the facing. After ironing the front side of the interlining, you need to glue it to the pieces. The excess part of the lining can be cut off.
- The shoulder seams, the seams on the facing and the neckline itself must first be basted, then stitched, the basting removed and ironed.
- Having applied the front side of the facing to the front side of the neck, it is necessary to baste it along the edge to the neck of the front and back so that the shoulder seams on the facing coincide with the shoulder seams of the product, and then stitch and iron them
- Along the bend of the armhole, you need to make small notches, not reaching the seam by 2-3 mm, which will allow you to make a beautiful bend of the product, and then, having checked them for the same width, you can lay the edge of the facing.
- Stepping back from the seam connecting the main product with the facing by 3-5 mm, you need to lay a line from the front side so that the seam does not reach the back cut line by about 5 mm. This is done to make it convenient to sew the edge of the facing to the zipper.
- To make a skirt on a sewing machine, you need to set the maximum stitch length (with minimum thread tension) and lay the construction along the edge of the skirt (in the waist area) on the front side of the product. At the finished seam on the edge, you need to leave a long thread and gently pull it, pulling the fabric together. The edge of the skirt needs to be pulled to a length corresponding to the waist circumference.
- After returning the sewing machine to its original position, you need to connect the bodice of the dress with the skirt, carefully sweeping it, and then stitch the seams, process them with an overlock and iron them well.
- To sew on the zipper, its edge needs to be tacked to the edge of the back center seam, moving from the back neckline to the end of the zipper. Having set the stitch length on the sewing machine to 6.6-7, you need to sew in the zipper so that the seam falls exactly on the location of the blind seam.
- After closing the zipper, you need to attach the seam of the second half of the zipper so that the middle seams match, and then you should stitch it too.
- In order to sew the facing to the zipper, the interlining should be stitched along its edge, the unnecessary allowances should be cut off, the edge of the zipper should be hidden and the product should be turned inside out.
- The remaining unsewn middle seam on the skirt needs to be swept up to the zipper, stitched and immediately ironed.
- The finished dress should be put on the girl, and then measure the desired length of the skirt from the edge of the product and baste it along the entire length, aligning the edges. Putting aside 2 cm from the edge, it should be stitched, processed with an overlock and ironed well.
- The facing on the product must be hand-stitched to the main fabric using a thin needle.
- The finished dress needs to be ironed well.
- To make the belt, you need to cut out 2 strips 4 cm wide (with a seam allowance of 0.5 cm). The length of the strips should be equal to the waist circumference plus 2-3 cm. Additionally, cut out 2 more strips 20 cm long and 4 cm wide. The prepared strips need to be finished with interlining on the back side and sewn along the side seam, having basted it beforehand.
- Using a pin, turn the belt right side out and iron it well.
- You need to make a bow from a short belt by folding it in several layers and stitching it in the middle, then attach it to the central part of the belt.
- Having folded the edge of the belt inward, you need to sew a circular seam, and on its left end mark a place for the loop so that the selected button fits freely into it.
- You need to baste the loop on the machine and then cut it in the middle.
- A button needs to be sewn on the other end of the belt.
- The finished belt needs to be ironed and attached to the dress.
Master class on making a trapeze dress
A retro-style dress for a girl that replicates outfits from the 60s is made in the shape of a trapezoid, and to sew it, you can copy the pattern from a girl's ready-made clothing, paying special attention to the armhole line, neckline and position of the shoulder seam.
The position of the lower armhole is checked using the following calculation:
- 1⁄4 of the child's chest circumference + 3 cm (horizontally);
- 1/8 chest circumference + 7 cm (vertical).
To make the outfit, you can use crepe satin or satin, taken in the amount of 2-3 m.
The armhole and neckline line should be copied onto the drawing with the back of the garment, and then the length of the dress should be set aside from its highest point. To create an extension along the side cuts, an extension is made and a round bottom line is drawn. The width of the dress directly depends on the roundness of the bottom.
To make a children's dress:
- The product is cut with a mandatory seam allowance of 1.5-2 cm.
- All pattern pieces should be basted, then stitched along the shoulder and side seams, overlocked and ironed well.
- The neckline and armholes should be edged with piping (interlining).
- The bottom of the dress needs to be edged with piping, folded over by 3 cm and stitched with a blind stitch.
- You can do embroidery or applique on the front of the dress.
- The product can be decorated with a bow made from the main fabric of the model.
Master class on making the "Chicago" dress
A retro-style dress for a girl, reminiscent of outfits from the 20s of the last century and made in the Chicago style, should have a semi-fitted silhouette, slightly flared towards the bottom or finished with beautiful flounces. To sew the outfit, you need to take silk or satin 2-3 m long, and use fringe, guipure or sequins as decoration, sewn along the entire length of the product.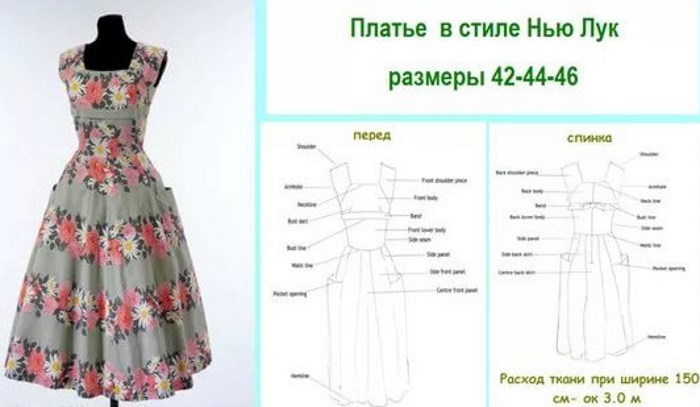
To make the dress:
- All parts of the pattern must be placed on the fabric from the wrong side, traced along the contour and cut out, adding a mandatory seam allowance of 1.5-2 cm.
- The top and bottom of the dress should be joined along the side and shoulder seams, first basting and then stitching on the machine. The finished seams should be processed with an overlock and ironed.
- You need to sew interlining to the neckline, the bottom of the outfit and along the zipper seam, attaching it first with an iron and then stitching it on the machine.
- The bottom of the dress needs to be folded up by 2-3 cm and stitched, having first selected the length desired for the child.
- The flounces need to be cut out and stitched onto the bottom of the dress so that the bottom of the garment is shorter than one of the flounces.
- From strips 10-15 cm longer than the girl's waist, you need to cut out a belt 4 cm wide, connect it along the side seams, iron them and turn them inside out.
- The trim piece should be stitched, ironed, after having previously processed the seams with an overlock, and attached to the dress with a brooch.
A retro-style dress is a bright and original outfit for a girl, ideal for matinees or special family events. Made from satin, organza or crepe satin, it requires independent construction of a pattern taken from the Internet or a fashion magazine and can be made in the form of a trapezoid or repeat an adult outfit in the New Look style with a fluffy skirt and a wide belt.
Video about retro dress
How to sew a retro style dress: