Knitting can be a complex process, but for learning from scratch, adults and children use the simplest patternsAnd it is at the beginning of training that you should understand how to select the necessary materials and tools, so that it will be easier to work later.
Necessary tools and materials
Learning to knit from scratch always begins with choosing what to work with and what to work from.
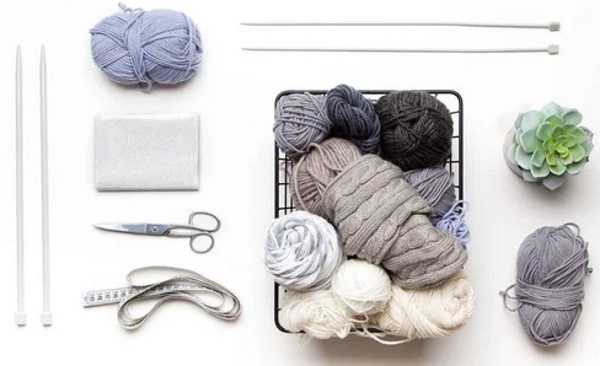
For any product you will need:
- knitting needles;
- sharp scissors;
- yarn;
- depending on the situation - a safety pin and a needle with a wide eye.
The easiest way is to choose scissors. They can be of any size, the blades can be of any shape, the handles can be plastic or not. The main requirement for them is their ability to cut the material evenly, efficiently, so that the end of the thread does not get stuck.
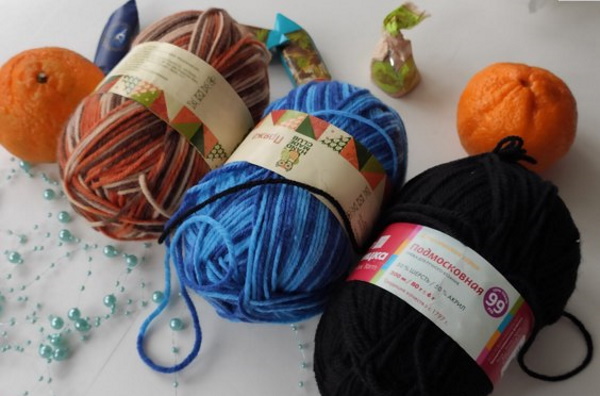
The choice of yarn is a bit more complicated. Color is entirely a matter of taste, but the composition and thickness of the thread should be selected for a specific product. The main types of knitting material are 100% wool, a mixture of wool and synthetic fiber, cotton and 100% synthetic threads.
| Type of thread | Peculiarities |
| Cotton | Not very warm, but suitable for knitting any items, from hats to socks and sweaters. But the items will not keep you warm in frosty weather, although they are suitable for moderately cool weather. Thin cotton threads should be used for summer items. They can be of medium thickness and very thin. One of the important advantages of cotton is that it does not prickle when worn. |
| 100% wool | A very warm option, can be of any thickness. Camel, sheep, goat wool are found, sometimes you can find yarn made of alpaca wool on sale. It is best to knit scarves, sweaters, winter mittens and socks from pure wool. But you need to remember that such things will wear out faster, due to the specifics of the material. In addition, woolen clothes can itch, which not everyone likes. There are also known cases of allergies to this material. |
| Mixture | Warm, soft yarn, can be fluffy or smooth, thin and thick. Suitable for making any winter items. Socks and mittens made from a mixture of wool and synthetics will last longer than those made from pure wool. |
| 100% synthetic yarn | It can be warm or not so warm, and has a wide variety of textures and thicknesses. |
The thickness of the future product, as well as the ability to create some patterns, depends on the thickness of the threads. For example, an openwork item cannot be knitted from thick yarn, and a thick, dense and warm scarf cannot be made from thin material.
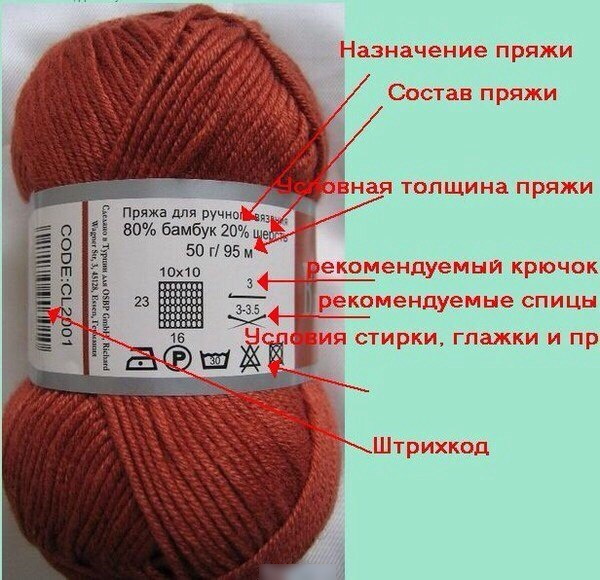
Usually, the instructions indicate the best type of thread, and it is advisable to choose them. If the store does not have exactly this material, in most cases, sellers can help you choose a suitable analogue. Choosing knitting needles is the most important part of preparation. Sometimes the required type is indicated in the knitting instructions, but sometimes it is not.
Therefore, there are general rules that will help you find the right option:
- to knit socks or mittens, you will need a set of 5 identical knitting needles, they should be sharp at both ends;
- to knit scarves, shawls and most other items you need 2 identical knitting needles that have a good stopper for the stitches at one end so that they do not slip;
- the thicker the thread, the larger the diameter of the tool you will need;
- the surface must be smooth, without roughness or burrs;
- Bamboo and wooden varieties, as well as Teflon-coated tools, are well suited for knitting with highly slippery types of thread;
- Metal needles won't break like plastic, wood or bamboo ones, but steel ones can be too heavy and aluminum ones will stain the yarn.
It is equally important to pay attention to the sharpness of the ends. Too sharp needles are inconvenient to use, they will injure your fingers while working.
Schemes with description
Learning to knit from scratch involves using the simplest patterns to master basic techniques and improve skills. Therefore, for the first steps, choose small, simple things that are convenient to practice on, mistakes are clearly visible, easy to correct if something does not work out.
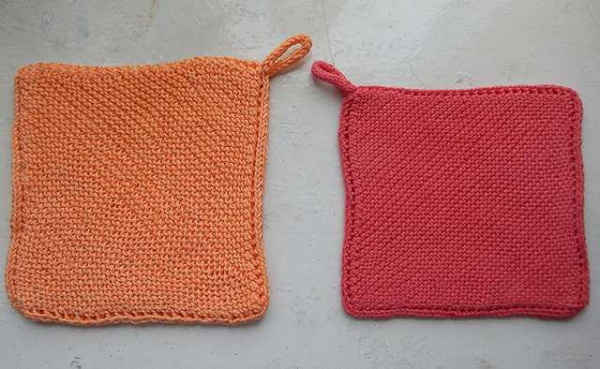
Potholders
This type of kitchen utensil is convenient for learning garter stitch, stocking stitch, and closing the final row.
You need to start by casting on loops:
- Unwind a thread from the ball twice as long as the planned width of the product, take it in your left hand. In this case, it is 30–35 cm.
- Wrap the thread around your thumb counterclockwise.
- Place the thread on your slightly bent index finger.
- Pinch the end with the remaining fingers.
- Place the needles together. This will make knitting the 1st row easier.
- Insert them under the thread from the inside of the thumb.
- Take the ends of the knitting needles from the index finger, pull out the loop from the thumb.
- Drop the loop from your thumb and pass it under the thread.
- Spread your fingers apart and pull the first loop in the row tightly.
- Move your thumb to the left, forming a kind of loop.
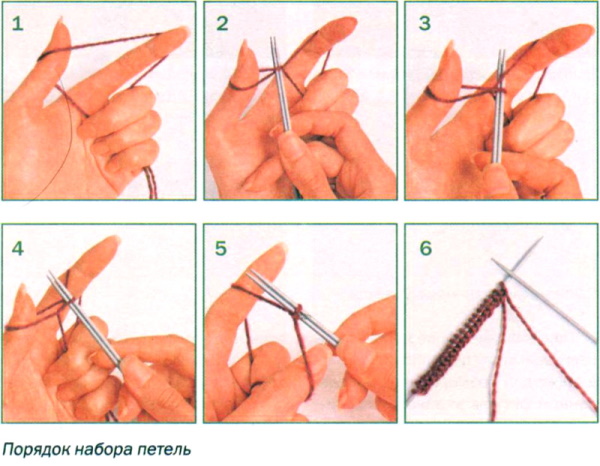
- Insert the knitting needles into it from the bottom up, from the palm side.
- Take the thread from your index finger.
- Pull it up.
- Repeat the movements necessary to create the first loop.
- Continue until only a small piece of thread remains.
After this, one of the knitting needles is removed and they begin knitting the product itself.
You can start by using garter stitch:
- Knit the 1st row: remove 1 loop, then knit all the front loops (l. p.). To do this, hold the working thread behind the fabric and the needles and pull it through each cast-on loop with a free needle. At the end of the row, make 1 purl loop (p.). To do this, move the thread forward, placing it in front of the work.
- Turn the knitting over and knit the 2nd row in exactly the same way: remove 1 loop, knit all but the last loop and the last one purl.
- Continue until you have a square.
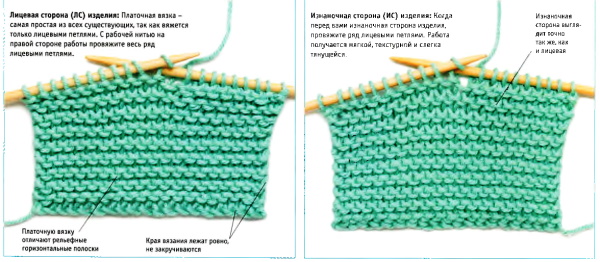
- Close the loops. To do this, knit the 1st loop, then the 2nd and pull it through the 1st. 1 loop remains on the working needle. Then make the 3rd loop, pull it through the 2nd. 1 loop remains on the working needle again. Continue to the end of the row. At the very end, cut the thread, not too short, pull it through the last loop.
- To create a potholder, knit another similar square and sew them together. From the threads that remain after closing the last row, you can make a loop to hang the product.
The result will be a fabric with a pattern that is the same on both sides, similar to waves.
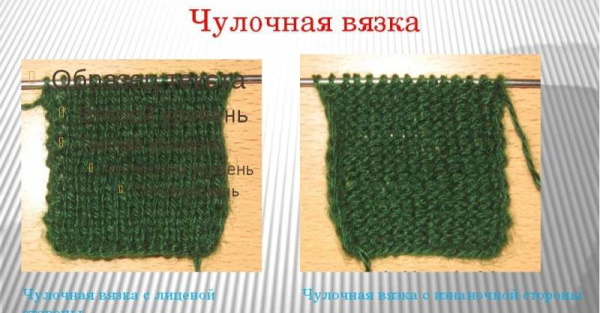
Stockinette stitch or garter stitch is a little more difficult to do:
- Cast on stitches to make the side of the square 15 cm, release 1 knitting needle.
- In row No. 1, remove 1 loop, knit all loops except the last one, knit, knit the last one purlwise.
- Turn the work over and knit row #2: remove 1 stitch and purl the rest to the end of the row.
- Row No. 3 is knitted in the same way as row No. 1.
- Row #4 is done exactly the same as row #2.
- Continue until you have an even square.
- Close the loops.
- Knit a similar square and sew them together.
The front surface has a different pattern depending on the side. On the back, these are waves, like in garter stitch, only denser. On the front side, this is a smooth surface with a pattern that can be seen on any knitwear, similar to Christmas trees or arrows. Which side to sew the potholder on the outside depends only on personal preference.
Scarf
Learning to knit won't be complete without learning how to make an elastic band with knitting needles. And the first thing you should try your hand at when mastering the skills from scratch is a scarf. For work, you will need 2 knitting needles No. 4, 100-200 g of yarn from a mixture of acrylic and wool, medium thickness, and scissors.
Instructions:
- Cast on 32 stitches on 2 knitting needles placed together. In this case, the scarf will be of medium width.
- Pull out 1 needle and knit the 1st row: slip the 1st loop and knit another 30 front loops.
- Knit row #2: slip 1 stitch, make 1 sl st, 1 sl st, 1 sl st, and alternate to the end of the row, which should end with 2 purl stitches.
- In row 3 knit: remove 1 loop, 1 i. p., 1 l. p., 1 i. p. and so on until the end of the row, it should end with 1 l. p., 1 i. p.
- Row No. 4 is knitted similarly to row No. 2.
- Knitting should be continued until the length of the scarf is satisfactory.
- Close the loops, thread the needle or hook into the edge of the knitting.
You can also use pure wool for knitting scarves, not just a blend. But this is only suitable if the prickly material does not cause discomfort when worn.
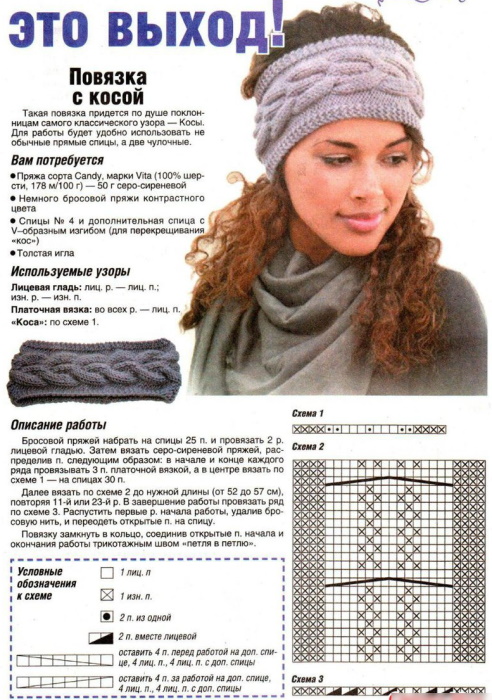
Headband
The braid pattern may seem complicated, but in practice everything is much simpler than it seems when looking at the finished product.
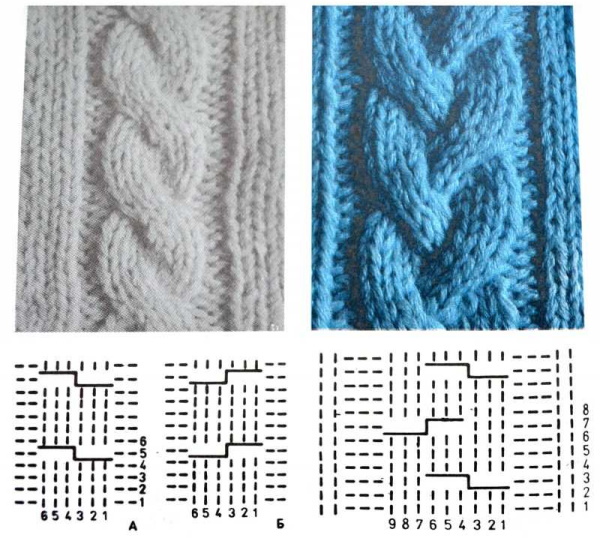
To complete the drawing you need:
- knitting needles No. 3, 2 main and 1 additional;
- fine yarn, 30% acrylic and 30% wool, approximately 70–80 g;
- needle with a wide eye.
The step-by-step instructions for completing the work look like this:
- Cast on 50 stitches.
- Knit the 1st row according to the pattern 15 i. p., 20 l. p., 15 i. p.
- Make the 2nd row: 15 l. p., 20 i. p., 15 l. p.
- Knit the next 14 rows according to this pattern.
- Start knitting the pattern from row #17.
Creating the pattern will require the use of an additional knitting needle:
- Remove 5 loops onto an additional knitting needle and place behind the fabric.
- Knit 5 sts from the main needle, knit from the loop from the additional needle, knit.
- Slip the next 5 stitches onto a spare needle.
- Place them in front of the work.
- Knit 5 l. p. from the main needle and 5 l. p. from the additional one.
- The next row is knitted entirely in purl stitches.
- Then knit the entire row.
- Next again with purl stitches.
- Return to knitting the pattern with an additional needle.
- Knit a total of 142 rows according to this pattern.
- Close the loops and sew the edges of the product.
You can choose the color of the yarn at your discretion. If the head circumference is more or less than average, you can decrease or increase the number of rows.
Socks
Learning to knit from scratch necessarily implies the opportunity to try your hand at creating warm socks.
Before you start working, you need to calculate how many loops you will need to cast on:
- Measure the circumference of the leg near the ankle bone and at the instep.
- Determine the average leg circumference by adding up the totals and dividing the resulting figure by 2. For example, the 1st measurement was 23 cm, and the 2nd was 27 cm. It turns out that 23+27=50, 50/2=25.
- Determine how many loops you need to make. In this case, it is 3 x 23 = 69 loops.
- Round the number to an even number divisible by 4. In this case, it will be 72. Then, on each of the needles, there will be 18 loops.
After all the calculations have been made, the process of creating the item begins. For the first socks, it is better to choose a medium-thickness yarn made from a mixture of synthetic and woolen fibers. You will also need a set of 5 stocking needles.
The knitting pattern looks like this:
- Cast on 72 stitches on 2 needles. Remove 1 needle.
- Knit 18 loops tightly onto it. The 1st should be a front loop, then alternate 1 ip and 1 lp until all 18 loops are knitted.
- Take the next knitting needle and repeat everything that was done with the previous one.
- Continue until you have 4 needles with 1 row of ribbing knitted, each with 18 stitches.
- Knit the end of the thread remaining after casting on the stitches and the working thread. This way the knitting needles will be closed in a circle.
- Knit with a rib pattern (alternate 1 l. p, 1 i. p. in a circle) 6 cm.
- Knit another 5 cm of fabric using only front loops.
This is the top part of the sock that will cover the foot up to the ankle.
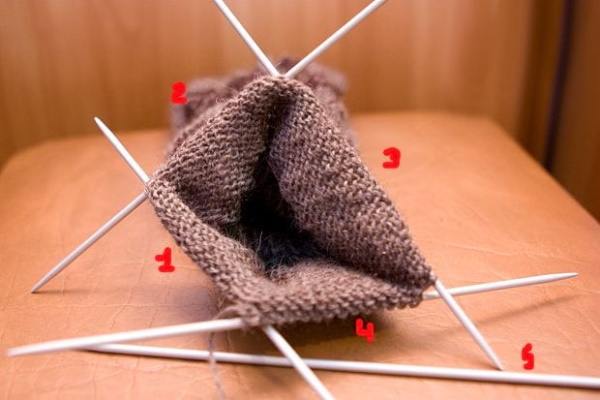
After this, they move on to creating the heel part:
- Take knitting needles #3 and #4 and knit all the loops from them onto 1 common knitting needle. The entire row should be knitted with purl loops.
- Continue knitting with stocking stitch until the height of the fabric reaches 36 rows. The last of them should be knitted with face loops.
- Start decreasing stitches to create the shape of the heel.
- Mentally divide the total number of loops on the knitting needle into 3 parts, in this case there will be 12 parts in each.
- Knit 12 ip of the outer part, 11 ip of the middle part, knit 1 loop together with the adjacent one, so that in the 2nd outer part there are 11 loops left unknitted.
- Turn the knitting over.
- Knit a front row. Remove 1 loop, knit 11 sts of the middle part, knit the 12th together with the loop from the side part, front.
- Turn the work over.
- Continue decreasing in this pattern until only 12 stitches remain from the middle section.
The heel shape is ready, after this we knit the transition part, after which we will need to start decreasing the loops on the toe:
- With a knitting needle that has 12 loops left, pick up 10 loops from the heel edge. To do this, pull the working thread through the edge loops, as if knitting new loops through them.
- Knit with a free needle 10 loops on one needle, then another 10 loops on the next.
- Pick up 10 stitches from the unused side of the edge with another knitting needle and knit 4 stitches from the middle part.
- There should be 4 knitting needles in the work again, and there should be more loops on the 3rd and 4th than on No. 1 and No. 2. This is important so that the finished sock passes effortlessly over the instep.
- Knit in a circle as usual, but knit the 1st and 2nd loops on the #3 needle together and do the same with the last 2 on the #4 needle.
- Finish decreasing when there are 18 stitches on all the needles, as at the beginning.
- Knit another 6 cm, until the end of the little finger.
- Begin decreasing the number of stitches to complete the work: knit 2 stitches (as if to purl) together, on the end of each of the 4 needles, until there is 1 stitch left on all 4 needles.
- Cut the thread, thread it through the remaining loops, pull them together, if possible, tie them and tuck them into the sock with a hook.

It is better not to break it, but to cut the end so that it turns out neat and the thread is neither too short nor too long.
The 2nd sock is knitted in exactly the same way. At the same time, the finished products, and those that have never been worn, are no different and any of them will fit the right or left foot. The differences will appear during the wearing process.
Secrets
Learning to knit from scratch is more interesting and easier if you take into account 6 simple tips.
It is not necessary to use them all, it is enough to highlight only those that seem most relevant:
- The first patterns should be the simplest ones. Only after the basic techniques have been mastered well enough and things can be made easily according to basic instructions, should you move on to more complex options.
- To avoid the process seeming boring, you should not choose simple things that are unclear what to use later. For example, knitting a scarf or potholders is very simple, but after the second scarf and the third potholder it becomes clear that if you continue practicing on them, it will be a waste of time.
- It is easier to start knitting using smooth, lint-free yarn. It is easy to unravel if a mistake is made.
- Some people recommend using special markers to mark the pattern. This is not necessary. To understand whether it is convenient or not and to make a decision, it is worth trying to knit a small square with patterns twice. The first time with markers, instead of them you can use regular safety pins, the second time without them. This will help you figure out whether it is worth buying these devices.
- Products can be decorated with store-bought or homemade pom-poms (scarves), beads (headbands) or braid (potholders) can be sewn onto them.
- The cuffs of the socks can be diversified by attaching a narrow strip of faux fur or several laces with pompoms or tassels. You won’t be able to wear such a product under trousers and winter shoes, but it can look interesting as a home option. To practice your skills, you can knit 3-4 pairs and decorate each one differently.
In addition, if there is a training video, it is better to knit the first items directly with the presenter, exactly repeating all the actions at the same moment when they happen on the screen.
You can start learning any creative process or craft from scratch. Knitting is no exception. Learning may seem boring and long, but if you try your hand at creating different products, by the time you get tired of learning simple patterns, mastering complex options will no longer be a problem.
Video about learning knitting from scratch
Basic knowledge of knitting - how to cast on stitches on knitting needles: