The rooster is one of the most beautiful birds on Earth. The distinctive features of these birds are a long multi-colored tail, a high comb, large size and a proud appearance. In beauty, this bird is not inferior even to the peacock. It is not surprising that the rooster often becomes an object of drawing for artists: both professional and beginners and children.
Drawing tools
A cockerel (a drawing for children can be done simply if you follow the step-by-step instructions) can decorate not only in reality, but also on paper. However, before you start drawing it, you need to find everything you need for this.
Pencil
The main drawing tool will be a simple pencil. It will be used to create contours.
For work it is better to take not 1, but at least 2 pencils:
- 1st should be solid. It will be used for sketching;
- 2nd, soft – required for applying shadows.
For contours, it is recommended to take a pencil marked 2H (or 2T, if it is made in Russia). It is most convenient to work with shadows with a hard-soft pencil marked HB (or TM, if it is domestic).
Eraser
When drawing, there will inevitably be extra lines that need to be removed. In many works, artists intentionally create such lines to simplify the drawing process. Lines are used to mark out a sheet of paper and make initial sketches. Such lines, which are created intentionally, are removed as they fulfill their role. They are called auxiliary.
An eraser is used to remove lines. It is recommended to take an eraser with different sides of different hardness: one side should be harder than the other. In this case, you can remove pencil lines of varying intensity.
Pen
It is recommended to use it to outline the final contours to make them clearer. In addition, the pen is convenient to work with small details. It is best to buy a black gel pen, a black marker (or felt-tip pen), a black marker will be needed to outline the drawing. This can also be done with a black felt-tip pen.
Coloring tools
You can color a drawing made with a pencil, pen, or black marker using any materials and tools intended for this purpose. The main thing is that the process is enjoyable and the picture ends up looking beautiful. For example, it will be more convenient for a child to work with felt-tip pens and colored pencils. You can also do this with wax crayons.
However, a better effect can be achieved by using paints. If you decide to use paints for coloring, you should also prepare brushes. It is best to buy thin and medium brushes with soft bristles. The color of the markers and paints depends on the technique that will be used to create the drawings.
Paper
For pencil drawings, a regular sheet of paper from a drawing album will do. If you are going to use paints in your work, you will need thicker paper that absorbs water well.
Master classes
A cockerel (a drawing for children can be black and white or colored) can be depicted schematically, without small details. This method is well suited for those who are just beginning to master the basics of fine art. Children will not lose their interest in such work, because it is done quickly. For example, a child can easily sit still for 10-15 minutes.
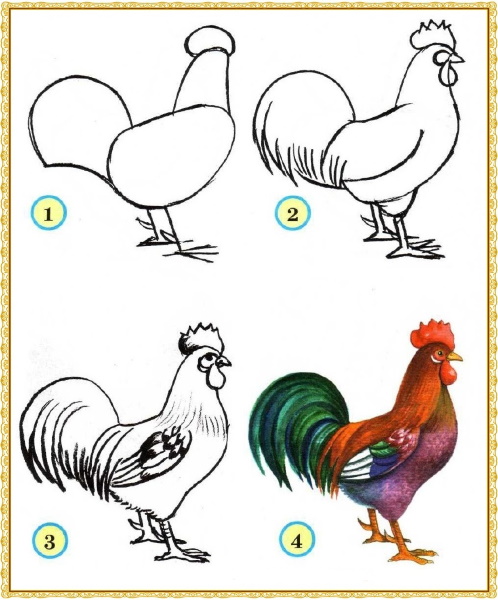
Simple pencil drawing
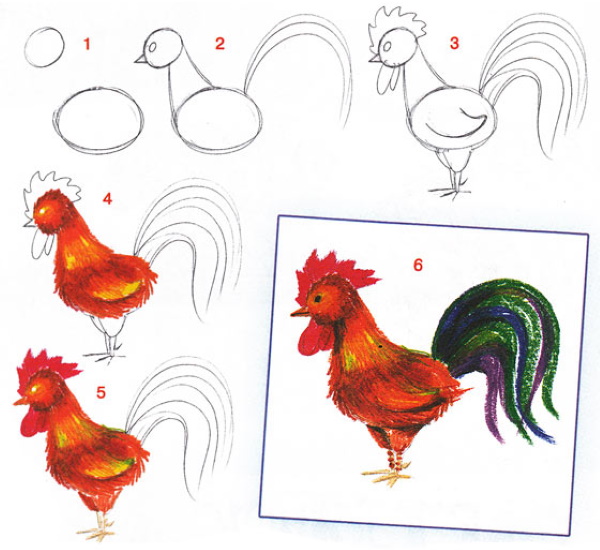
You can draw a rooster in a few minutes. The finished drawing will be black and white, but beautiful and realistic. Both adults and children can handle this work. To create the image, you will need a pair of simple pencils (hard and hard-soft), as well as an eraser.

The entire creative process goes through the following stages:
| No. | Stage | Sequence of actions |
| 1 | Creating a sketch | 1. Armed with a hard pencil, draw a small oval in the center of the paper sheet. This will be the bird's body. 2. Draw a small circle slightly above and slightly to the right of the oval. This will be the head. 3. Connect both drawn figures. To do this, draw 2 smooth lines from one to the other. They will become the contours of the neck. 4. Draw a comb on the head. It is simply a semi-oval, but only with wavy lines. Under the head, draw a beard in the same way. 5. Add a sharp beak. It should be represented by a small triangle protruding to the right from the outline of the head. 6. Go to the left side and draw a lush tail there – the one that is the real pride of the rooster. To begin with, this part of the body can be depicted schematically as one group of feathers. 7. Draw a pair of chicken legs under the body. They are straight, but at the end of them are fingers with hooked claws. |
| 2 | Shadow casting | Before you start working on the shadows, you need to erase the lines of the original circle and the oval inside the neck with an eraser.
Using a hard-soft pencil, apply shadow: · on the lower part of the rooster's body; · under the tail; · on the lower part of the breast; · on the neck under the chin; · on the head under the comb; · on the lower part of the beak; · on the inside of both legs. Apply the shadows carefully, without pressing hard on the pencil. Blend along the lines. You can use a cotton swab or your fingers for this. Touching the graphite is absolutely harmless. |
| 3 | Detailing | After applying the shadows, all that remains is to add some details. Their number in this drawing is small. To add them, use the hard-soft pencil that was used in the previous stage when working with shadows. However, now you need to press harder on this writing instrument so that the marks it leaves on the paper are clearer.
Necessary: 1. Using zigzag lines drawn inside the body, mark the shape of the wing. Draw 2 or 3 feathers on it. 2. Outline the shape of the tail feathers. 3. Draw a few small curved lines on the neck. This will imitate small feathers. 4. Put several dots: one will be the eye, and the others will be the nostrils on the beak. 5. Draw wrinkles, which can be represented by horizontal stripes. 6. It is also recommended to finish by tracing the drawing along the contour, pressing lightly on the pencil. 7. Finally, trace the outline of the drawing, pressing lightly with the pencil. |
The result is a great drawing of a rooster. It is black and white, but completely finished.
If desired, you can color it using:
- paints;
- felt-tip pens;
- colored pencils.
Watercolor painting
The technique of painting a rooster with paints is suitable for children of primary school age. Watercolor will be used in the work. To apply it to paper, you will need 2 brushes - medium and thin.
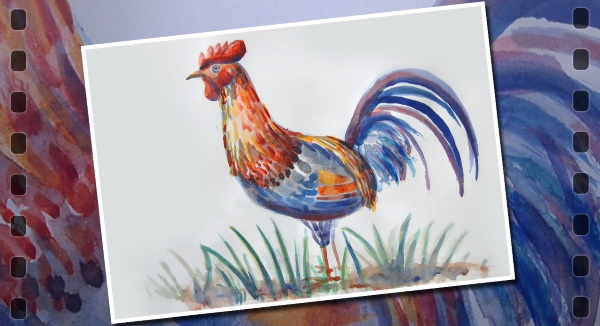
The work takes place in the following stages:
- Take a medium brush and wet a piece of paper with water.
- Use pink watercolors to paint the rooster's head and neck.
- While the paint is drying, add some blue drops. Do this in such a way that the blue color flows over the pink.
- Paint the body with orange paint. At the bottom, add a small amount of yellow spots.
- Draw the legs and mark the neck line with a zigzag line. A mixture of blue watercolor with a small amount of black will be used for this. This work is done with a thin brush.
- Let the paints dry.
- When the drawing is no longer wet, take a thin brush and paint the tail with blue paint. To do this, draw several arc stripes of different sizes.
- Use yellow watercolor to paint a sharp beak.
- Draw the comb and beard in red.
- Add the eyes with black paint, and then use the same color to paint the top of the beak.
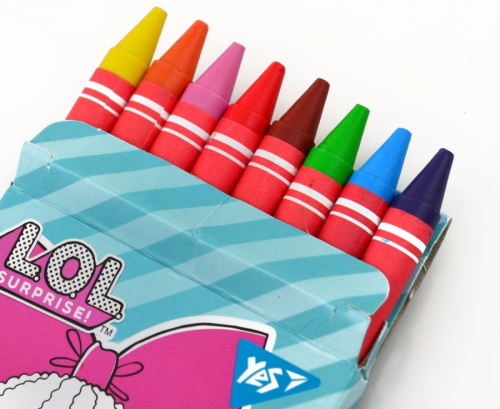
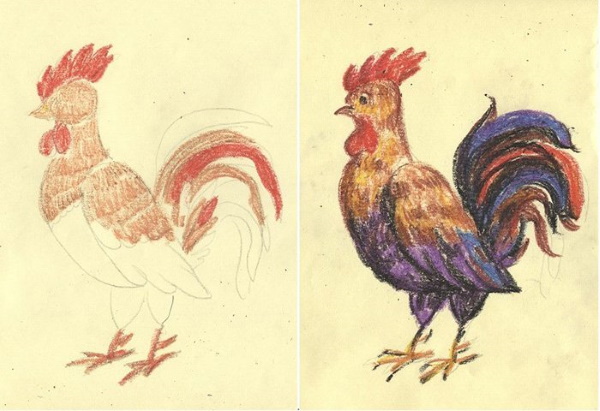
Drawing with wax crayons
A drawing of a rooster made with wax crayons will be bright and colorful. Even preschoolers can do this work, because all the actions are very simple. In addition to wax crayons, you will need a simple pencil. It will be used to create a sketch, and wax crayons will be used for coloring.
The rooster drawing will be ready after completing the following steps:
- Draw an oval with a simple pencil. This will be the body.
- With the same pencil, draw a small circle slightly above and to the right of the oval. This will be the head. It is immediately connected to the oval by a pair of lines.
- Complete the head with a comb and beard.
- Draw a beak in the shape of a small triangle.
- Finish drawing the tail and a pair of legs with hooked toes.
- Use zigzags to outline the shape of the wing, and then draw feathers on it.
- Draw an eye near the beak and nostrils on the beak.
- When the outline is completely done, put aside the pencil, take wax crayons and start coloring. This part of the work is especially liked by children: before their eyes and under the influence of their own hands, the drawing will become brighter - as if coming to life.
- Start coloring from the head and upper chest. These areas are shaded with brown and yellow pencils.
- Similar to the previous step, paint the upper part of the wing with the same color.
- To color the lower part, take purple and blue wax crayons. You also need to apply strokes.
- The comb and beard that adorn the head should be made red.
- Paint the legs brown.
- Give a few feathers on the wing a blue color.
- Draw the tail, which should be represented by many multi-colored strokes.
- Use a black wax pencil to outline the bottom of the drawing and also add a few thin black feathers to the tail.
Oil pastel drawing
The cockerel (a drawing for children can be colorful and bright) should be colored correctly with pastels.
To display it, you need to do the following:
- Make the contours of the rooster. You can use red pastel for this. The comb, eyes and beak are highlighted with the same color.
- Color the feathers. First, use light tones, then gradually add darker shades. First, use yellow, orange, and red to draw the upper feathers. Each feather is a thick arc line. Then, use blue and light blue colors of different shades to similarly draw the lower part of the body. The result should be a bright drawing.
- To make the painting more vivid, paint the background with different colors, making very thick strokes.
Drawing in the style of Gorodets painting
The drawing made in the style of Gorodets painting looks beautiful. Its characteristic features are a combination of black, red and white colors. It is recommended to take not a white sheet of paper as a basis, as in all the previous examples, but yellow: the brighter, the better.
The ideal option is to use colored cardboard as a canvas.
To work you will need 2 brushes (medium and thin) with soft bristles, as well as black, red and white gouache.
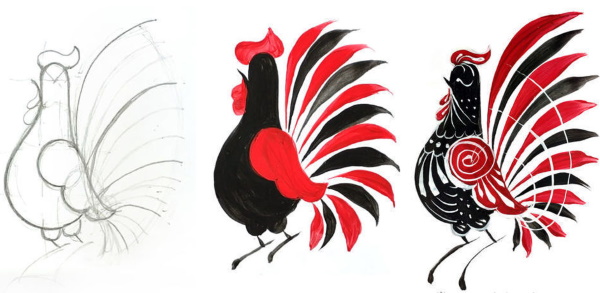
The stages of creating a drawing are as follows:
- Using a medium brush, pick up some black paint and draw the body, which will look like a pear.
- Using black paint, add a thin line at the top – a sharp beak looking up.
- Using a thin brush, draw the legs at the bottom, as well as many tail feathers.
- Use red gouache to paint the comb and beard.
- Color the tail feathers. Black should alternate with red.
- After the paint has dried, use a thin brush dipped in white to apply stripes, monograms and dots – the characteristic features of Gorodets painting.
The desire to draw a rooster appears due to the bright coloring and beauty of this bird. It is the coloring that is the main difficulty in the drawing process, especially for children. However, this is where all the charm lies. You will need the brightest pencils and paints to create a masterpiece on which a rooster will proudly show off, generously awarded by nature with multi-colored feathers.
Video on how to draw a cockerel
How to draw a cockerel for children: