Overlock stitch (from German ketteln — to weave the base into a chain, to knit) - This knitted seam, which is performed on open loops. Correctly performed kettlevka imitates a machine stitch, similar to a factory one.
This finish looks very neat and professional and is therefore considered the most perfect connecting seam in knitting.
Most often, this stitch is used to connect small parts to the main knitted product. For example, they attach a collar, cuffs, pockets, strips or yokes. In addition, this method can be used to decorate the edge of the product with a hem, make a drawstring and even process the slit loops.
| Name | Technological feature | Application |
| Simple overcast stitch | Only one piece with open loops. | Drawstring, hem, loop closure. |
| Through stitch | The hinges on both parts are open. | Pockets, strips, cuffs, neckline processing. |
Making a simple seam
The overlock stitch in knitting is used to decorate the edge with a fold or as a closure for the loops of the last row of the product. This method allows you to create a beautiful elastic edge and is therefore ideal for decorating elastic bands.
To ensure that the seam is neat, you need to adhere to the following rules:
- The thread should be slightly thinner than the yarn from which the product is knitted. When knitting with a winding, the winding thread should be removed and the seam should be made only with the main thread. When knitting in several folds, sew the parts with a smaller number of folds of thread. If replacing the thread is not possible, do the work with the main thread.
- The length of the thread should be at least three times the length of the part to be kettled. There should be no knots on the seam, so it is better to take a thread with a reserve.
- The sewing needle should have a large eye and a rounded tip so as not to damage the thread. Such needles are called knitting needles.
- Before starting work, parts with open hinges must be steamed.
- The pieces for the kettle must not be stretched or gathered. They must be laid out evenly so that the loops match each other exactly.
- If the details are made with openwork or another complex pattern, it is better to knit the last few rows with the front surface so as not to disturb the pattern and get an even line of the knitting.
- Before starting work, lay out the knitting parts on a flat surface. If necessary, you can pin or baste the parts to each other for additional fixation.
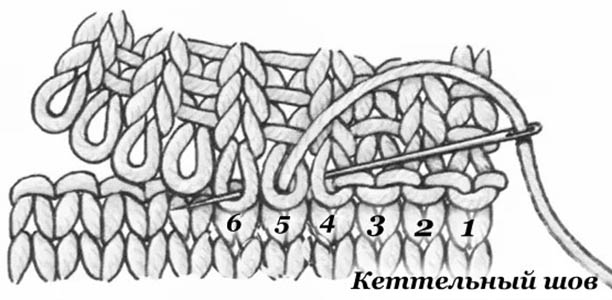
The process of quetting is similar to making a stitch called a back stitch.
The work is done from right to left, face up, in the following sequence:
- Match the edges of the parts precisely.
- Pull the needle from the wrong side to the front side into the second loop from the right edge.
- Pass the needle through the first loop to the wrong side.
- Bring the needle out of the third loop to the front of the work, then return to the back through the previous loop. Continue in the same way until the end of the seam.
- Steam the finished seam.
The overlock stitch when closing the edge of the knitting is done in the same sequence, but for convenience, the loops can be removed from the knitting needles not all at once, but gradually, as the seam is completed.
The seam can also be figured. This version of a simple overlock seam decorates the connection line with neat teeth and is used for additional decoration. Unlike the technology described above, open loops should be connected 2 or 3 together.
This version of the seam is performed in the following sequence:
- The working thread comes out to the front side through the second loop. After that, the thread goes to the back side through the first loop.
- From the fourth loop, the thread is pulled to the front side of the work and taken to the back side through the third loop.
- Loop number 5 should be skipped. The thread is pulled straight through the sixth loop to the face of the work. The stages are repeated, connecting pairs of loops to the end of the seam.
If you need larger teeth, you can connect the loops 3 together. In this case, work begins in the same way as when performing a simple seam without decoration, but skip loop number 4. That is, the working thread, having secured the third loop, comes out on the front side from the back side from the second to the fifth loop.
How to make a through seam
A knitting overlock stitch that connects two pieces, both of which have open loops, is called a through stitch. It looks the same on both the front and back sides. This stitch is most often used to attach a collar to a neckline or to finish a garment with a placket.
Sometimes shoulder seams are made this way. If the product is made with transverse knitting, the side seams can also be connected with a through knit.
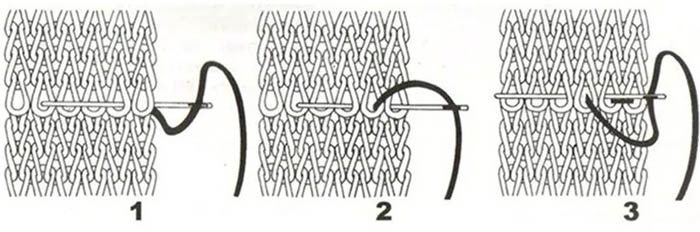
The through overcast stitch is performed as follows:
- The parts are joined together by open loops with the front or back sides facing each other. The row located on top, closer to the knitter, should be considered external, the row from the bottom part - internal.
- The needle passes through the first loops of two rows from the outer to the inner.
- Then the needle enters the second internal loop and then the first external loop with a movement towards itself.
- The needle is inserted away from you into the second loop in the outer row and goes into the inner row into the second loop.
- By moving the needle towards itself, it is pulled into the third loop of the inner row and then into the second loop of the outer row. All actions are repeated similarly until the end of the seam.
- When there are 2 unconnected loops left at the end of the seam, they are connected together. The needle is pulled "away from you" into the loop of the outer row, then inserted into the loop of the inner row with a "towards you" movement. The thread is carefully pulled and secured.
Thus, in the process of joining the parts, the needle will pass through each loop 2 times. In order for the seam to be as neat as possible, you should carefully monitor the tension of the working thread. It should be the same throughout the entire seam.
There is no need to tighten or loosen the thread too much. The seam should be strong and dense, but not pull the fabric together.
Tying the neck
The overlock stitch in knitting is most often found when decorating the neck with a collar. This finish, similar to a factory one, not only gives the product a neat finished look, but is also very practical. The stitch securely fixes the collar and does not allow the neck to stretch.
The collar is attached to the finished neckline, i.e. the shoulder seams should already be done. If the collar has vertical seams, they are also done before the hemming process. The separately knitted collar is sewn to the neckline with a through hemming stitch. To do this, the loops of the neckline and the lower edge of the collar should be open.
If the product is knitted from the bottom up, the neck loops are simply left on the knitting needle or waste yarn, without closing. But if the knitting is from the top down, for example, raglan, you need to make a cast-on row on waste yarn. This can be done in any convenient way, both with knitting needles and a crochet hook.
Before attaching the collar, the cast-on row is unraveled to create open loops for making a blanket stitch. The same is done when knitting the collar.
To attach the collar to the garment, simply attach it with a regular overlock stitch, where both pieces are folded face to face and stitched along the open loops. In this case, the collar will be separated from the garment by a row of machine-like stitching.
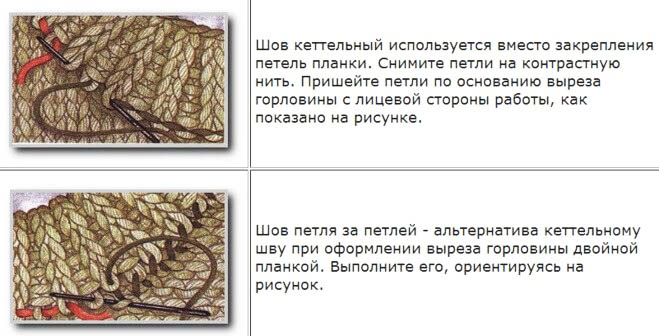
But there is a more interesting, though slightly more complicated, version of the treatment. It is called "pocket" kettlevka. In this case, the lower part of the collar should be double. The edge of the neckline is hidden between the two parts of the collar edge and all three layers are stitched through the collar loops, closing the "pocket".
This method significantly improves the appearance of the product and serves as proof of the skill of the knitter who made it.
When choosing this method of processing, the loops of the neckline should be closed. Knitting begins from the bottom of the collar, the future "pocket". It is important to calculate the number of loops for the collar so that its length along the seam exactly matches the length of the neckline.
The loops are cast on a waste thread, several rows are knitted with the front surface (to the desired height of the "pocket") - this will be the front part of the future kettlevka. Then one row is knitted with purl loops - this is the fold of the "pocket". And continue with the front surface of the inner side of the kettlevka.
that side should be 1 row shorter than the front one. Otherwise, when the part is folded in half, the inner part will be longer than the outer one and the trim will be deformed. The edge of the inner side is also closed with waste thread. From the purl row in the center of the part, loops are collected and a collar of the required length is knitted.
After the loops of the top edge of the collar are closed, the parts are combined with each other. The neck is placed between the halves of the double edge and the seam is made along the loops of the two parts of the edge through and through.
In some cases, to avoid losing loops, the waste thread along the edges of the double edge is not immediately unraveled. The through seam is made as usual, along the edge loops on the border with the auxiliary thread. After completing the seam, the auxiliary thread is carefully removed.
Using the same methods, you can connect the neck not only to the collar, but also to the hood.
There is another version of a similar kettlevka for the neck. Along the edge of the neck, you should lay a chain stitch. Then pick up loops from it from the front side and knit several rows with the front surface. Repeat the same on the back side. Combine the resulting parts and connect with a through kettlen seam.
There are certain rules for processing the neck.
They should be observed regardless of which method of kettle is chosen:
- The length of the collar should be equal to the length of the neckline.
- Before processing the neckline, you need to find the center points of the back and front on both pieces and precisely align them.
- It is advisable to baste the collar or at least pin it to the garment to avoid shifting.
- Before you start processing the neck, it is better to knit several small samples and practice on them. Especially for the pocket kettle. Using the samples, you can understand what width of the double edge is needed and how the collar will look on it. If necessary, choose a suitable pattern and method of closing the loops.
- It is important to remember that the through overlock seam is very dense, it does not allow the neckline to stretch much, so you should make sure that the seam is long enough for the head to pass through the neckline.
A simple overlock stitch can also be used to decorate the neckline. To do this, you need to cast on loops along the edge of the neckline and knit the required number of rows. Most often, in this case, the collar is knitted with an elastic band. The elastic band needs to be folded to the front side and a simple overlock stitch should be made along the front side. If desired, you can use a figured stitch.
For the sleeve
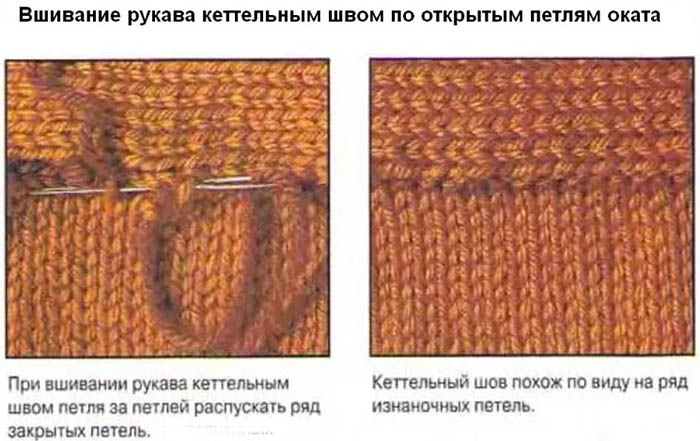
To design the sleeve, you can also use a blanket stitch. The sleeve is processed in the same way as the neck.
Separately knitted cuffs are attached with a through overlock stitch. Overlock stitching into a "pocket" for sleeves is not usually used.
A simple overlock stitch is the most convenient way to finish the bottom of sleeves knitted from the top down. The simplest option for finishing a sleeve is to close the loops of the last row with an overlock stitch. This method is best suited for lightweight summer items. For projects made from thicker yarn, it is better to make a hem.
In this case, the edge of the fabric is folded with open loops to the wrong side, and the seam will be made on the wrong side. The sleeve seams should be made before the hem. That is, the edge will be hemmed in a circle.
The work is carried out in the following sequence:
- It is necessary to determine the row to which the open loops will be sewn. It is very important not to shift during the sewing process, otherwise the seam will be crooked and spoil the appearance of the work.
- In this row, you need to find the loop that is located exactly above the open loop from which the hem will begin.
- The needle is inserted into the open loop towards you.
- The needle is pulled into the purl row from the bottom up one loop back. That is, not into the loop located exactly above the first edge loop, but into the previous one.
- From top to bottom, through the loop defined in point 2, the needle with the working thread is pulled out and returned to the first open loop with a movement away from you. The stages are repeated until the circle is closed.
To make the fold look more aesthetically pleasing, the row along which the lower edge of the product will pass after the hem can be knitted with purl stitches.
If desired, you can make a seam on the front side of the sleeve. To do this, you need to cast on loops along the edge of the part, knit the facing part of the required length from the back side, fold it to the front side and hem it with a simple hemstitch.
The overlock stitch is not very common in modern knitting. After all, it is not very easy to do it perfectly the first time. In addition, seamless knitting and the so-called "false overlock stitch" are gaining popularity, when the parts are knitted directly from the product, and for decorative purposes, an imitation of a connecting seam is made.
However, it is definitely useful to know the technique of overlock stitch, at least in order to compare it with other finishing methods and choose the most convenient one.
Author: Nina Tereshchenko
Video about knitting
Thank you. Just what I needed - I was looking for it - as it is done in the photo - HERE! I found it!