In knitting, closing the loops will help make the knitted seam invisible. It is also called "invisible" because it allows you to neatly connect the parts of the product. Experts note that it is not difficult to knit a thing, but not everyone can beautifully close the work or assemble a sweater, hat or gloves. Using step-by-step instructions, even a novice needlewoman can master the technique of knitted seam.
Necessary tools and materials
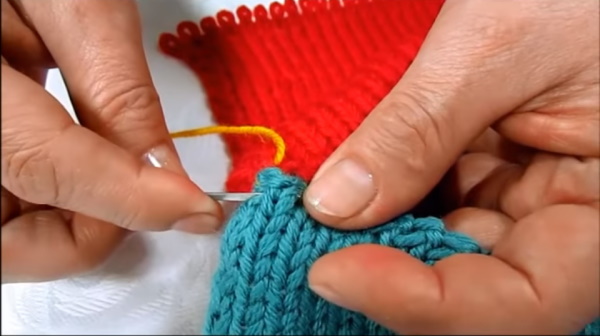
A knitted seam in knitting (closing the loops in this case is possible in an unnoticeable way) allows you to professionally finish the item. In addition, this method will allow you to shorten or reduce the item without unraveling it completely.
To perform a knitted seam you will need:
- yarn;
- knitting needles;
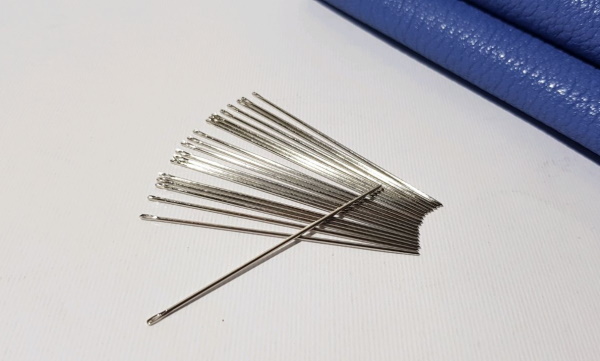
- needle;
- scissors.
In most cases, the yarn used to sew the product is the same as the one it is made of. This is necessary so that the seam does not stand out and does not contrast with the main fabric. If you work in the "Without Needles" technique, then use a thread of a different color. This is done to make it easier to find the seam and unravel it when assembling.
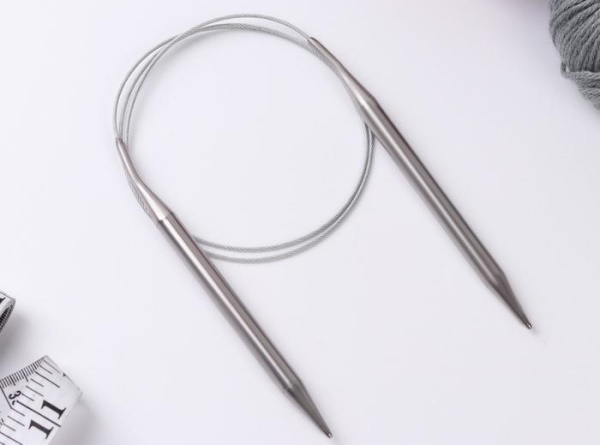
Knitting needles are also necessary for knitting. They leave uncovered parts that need to be connected. For convenience, you can take additional fixing tools, such as large pins or wire. The needle for assembling the product is selected according to the diameter of the thread, that is, a very thin one is not taken for thick yarn and vice versa. The result of the work and how it will look depends on this tool.
To complete the work, you will also need scissors. They are used to cut the thread and protruding "tails". They will also help with the appearance of knots and other defective elements.
To practice making a seam, you can knit several samples and connect them using a needle and thread. Some people use old knitted items as a trainer, such as socks with holes or a scarf. The main thing in making a knitted seam is to get your hand in and skillfully use the needle.
Schemes with description of works for beginners
The knitted stitch in knitting (closing loops in this way is described in this article) is used to connect and finish many items. It is convenient, for example, to sew on sleeves or a collar in this way. It can also be used to sew together parts of a knitted toy or slippers.
Even when knitting appeared, ancient craftsmen faced the problem of joining the parts of the product. Historians have established that initially things were simply sewn together in the usual way, and only later they figured out how to make the seams beautiful and invisible using the described technology.
It is interesting that the word "knitwear" is translated from French as "knitted goods" or "things made of yarn". If you look closely, the threads in the fabric are also intertwined in the same way as in a knitted skirt or sweater. This is where the name of the method of joining loops in 1 seam comes from.
There are several types of invisible seams:
- "Loop in loop."
- "Mattress".
- "Interior".
- "For the sides."
- "Kettelny".
- "For the elastic band."
Each of the listed techniques allows you to finish work on any knitted product. By the names, you can determine which seam and for what in most cases is used. At the same time, experts have established that the most ancient seam of this series is horizontal or "loop in loop". The other methods appeared later, and the youngest is considered to be the technology of sewing by connecting elastic.
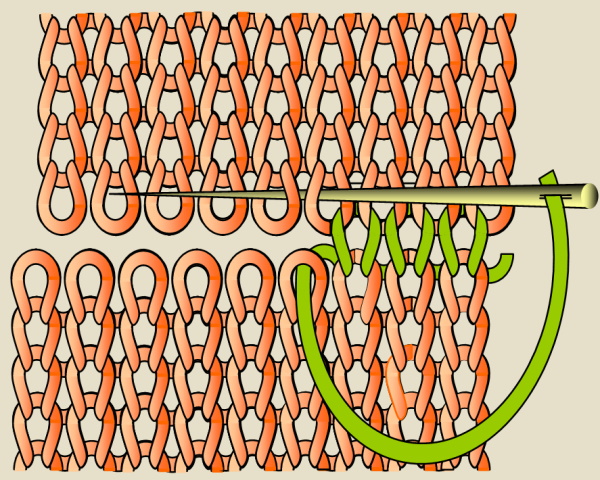
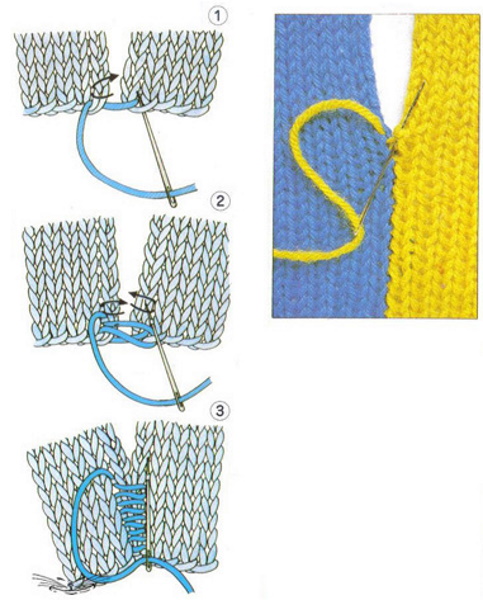
Loop to loop
The knitted seam in knitting (closing the loops, allowing you to assemble the item after creation, is presented in this technique) is made using the popular method "Loop in loop", "Eye in eye" or "Fake row", which repeats the process of creating the main fabric. The seam from it is similar to an additionally knitted front or back row of loops.
To connect the parts of the product, you need to:
- Complete the work to the last row.
- Leave the stitches on the knitting needles unclosed.
- Thread the thread through the eye of the point.
- Insert the needle from the wrong side into the first loop of the top part of the product.
- Bring the tip to the front side.
- Pass the tool through the first loop of the bottom part of the product.
- Pass the needle from the front to the back.
- Pass the point through the second loop of the bottom part.
- Push the tool to the front side.
- Pull the thread tight.
- Insert the needle from the front side into the first loop of the top part.
- Push the tip to the wrong side.
- Pass the tool through the second loop of the top part.
- Pull the thread, bringing the halves of the product closer to each other.
Externally, the process of work resembles knitting face loops. In this case, the thread should not be pulled too tight, so that it does not stand out against the general background. It is suitable for things made from thick or bulky yarn. In addition, this method is convenient for sewing openwork parts.
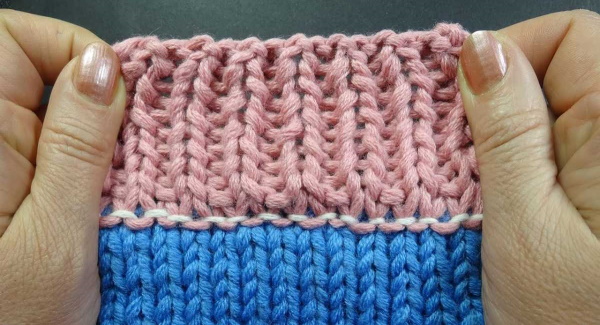
Mattress
Closing loops in knitting can be done with a knitted stitch, its mattress variation. Using this technique, it is convenient to sew parts end-to-end. It is also used to connect parts knitted with a purl stitch.
To make a mattress seam you need:
- Knit the parts of the product to the end.
- Do not close the loops.
- Turn the pieces over to the front side.
- Place opposite each other.
- Connect the loops of the bottom row.

- Take a needle and thread it.
- Start sewing the halves together from the second 2 loops.
- Work the needle in a zigzag pattern, alternately passing over both parts to be joined.
Externally, the seam will resemble a purl row. To use this technique, each of the sewn parts must have an equal number of loops. It will not be possible to connect unequal pieces using the mattress method.
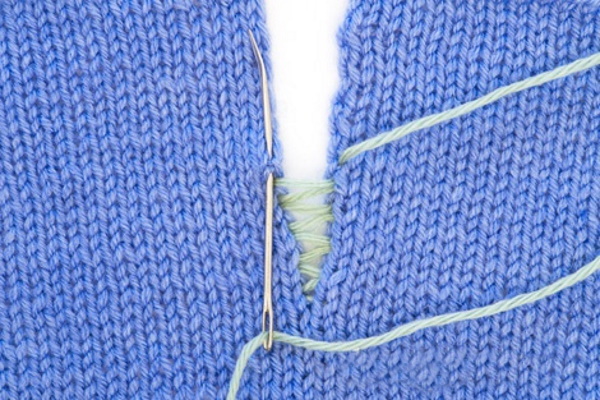
Interior
A knitted seam in knitting (a closure that can be used to join parts of a garment inside the fabric, provided for reference) is performed when the garment is not planned to be unraveled, as it complicates this process.
To create an internal seam you need:
- Tie the necessary parts to the required height.
- Thread the needle.
- Place the knitted halves next to each other.
- Pass the needle inside the fabric (through its thickness) and bring it out on the side, where the second part of the product is located.
- Pass the tip through the outer loop and bring it out on the other side.
- Pull the thread tight.
- Insert the needle again into the first part and wrap the thread around the side loop.
- Repeat the work for the required length of the canvas.
- Pull the seam together and secure the thread so that it does not interfere and is not visible.
The product is ready for further work on it. If the halves being sewn are multi-colored, you can take some contrasting thread, which will give the canvas originality.
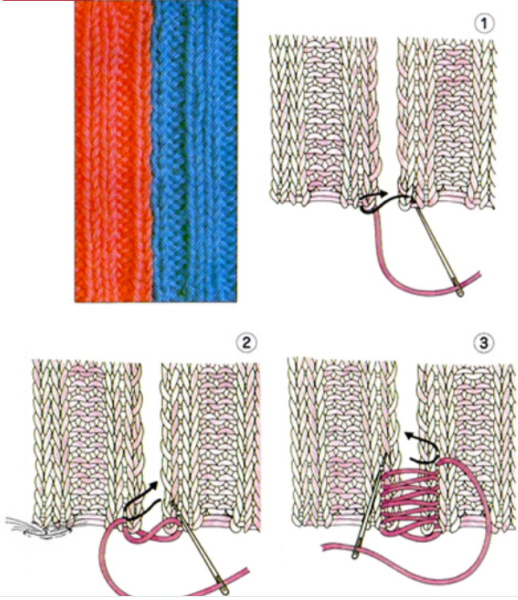
For the sides
The side knitted seam is used in most cases for sewing together items knitted with garter stitch. Externally, the stitches resemble the purl weave of the threads.
To make a side seam, you need:
- Knit the connected parts to the end.
- Close the loops.
- Thread the needle.
- Arrange the parts so that the connecting parts “look” at each other.
- Pass the point so that it catches the first side loop.
- Move the needle and thread to the second part of the product.
- Make sure that the tip with the thread goes around the side loop and comes out on the other side.
- Pass the needle through part #1 and do the same with the second outer loop as you did in part #2 just now.
- Pull the thread carefully so that parts #1 and #2 come very close to each other.
- Continue the stitching process to the entire required length.
From the side, the seam will look as if the loops from one half are thrown over to the other. It looks interesting when sewing halves from contrasting yarn. You can also sew pockets or collars in this way.
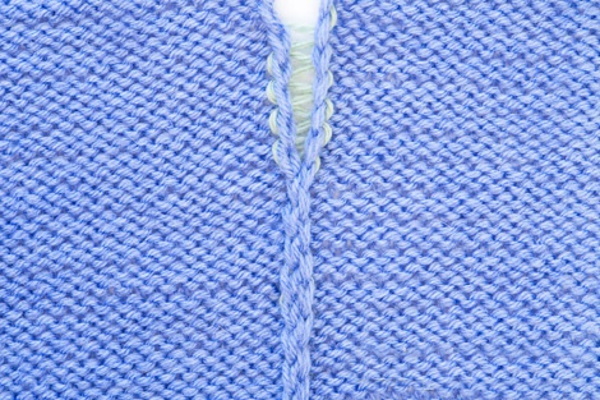
Kettle
The overlock stitch, as a type of knitted stitch, allows you to connect parts of a detail with unclosed loops much faster than previous technologies. It uses a thread thinner than the one from which the product is knitted.
To connect the parts you need:
- Knit the pieces to the end to the required length.
- Do not close the loops.
- Place the pieces next to each other so that the loops touch each other.
- Thread the needle.
- Position the tip so that it enters 2 loops above the edge of the piece.
- Wrap the thread around the wall of the desired loop.
- Bring the needle out to the other loop of part 1.
- Catch the wall of the loop with the thread.
- Pull the thread tight.
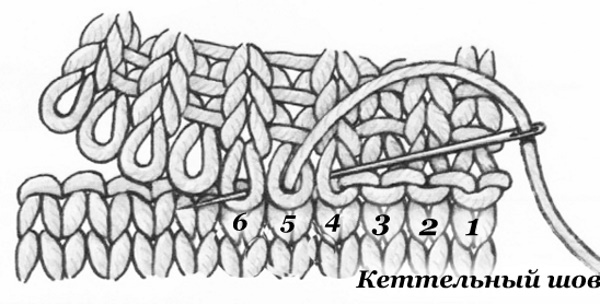
- Lower the needle 1 loop down.
- Pass the same part 1 with the tip.
- Pass the needle and thread through part 2, into the loop that faces this one.
- Pull the thread tight.
- Point the needle up to 1 loop.
- Repeat the manipulations described above.
The sewing process in this case resembles a dance rule, where the pas consists of 2 steps forward and 1 back. In the same way, you need to work in this method of joining parts of the fabric into one whole.
For elastic
Sometimes craftswomen have to sew the edges of the product, made with the "Elastic" pattern with different pitches. It is not difficult to do, and the seam itself is usually hidden to the back.
To sew the elastic you need:
- Completely finish parts of the product.
- Thread the needle.
- Place the halves opposite each other.
- Pass the point behind the first closed edge loop.
- Bring the needle out and insert it into part 2 on the wrong side.
- Pass the tip with the thread through the second loop after the closed edge loop.
- Bring the needle out to the opposite side of part 2.
- Return the tip behind the edge of part 1 so that the thread describes a figure 8 or an infinity sign.
- Pull the thread tight.
- Sew the product to the desired height using the described method.
At the end of the work, after the final tightening, the thread will be hidden inside the loops. If desired, it can be brought out to the wrong side of the product so that it is not conspicuous. In this way, all products knitted with an elastic band are sewn together, both 1 by 1, and 2 by 2, and 3 by 3.
Secrets for Beginners
The described technologies allow even novice needlewomen to beautifully mask the joining seams and skillfully connect parts of products. At the same time, there are several secrets in the knitted seam that will help everyone to do the work more efficiently.
These include:
- The pieces should be placed exactly opposite each other and not folded, connecting the ends.
- In most techniques, the loops of the last row are not closed.
- When casting on stitches for the initial row, leave some extra thread.
- For fluffy yarn, choose a lint-free thread.
- A needle with a blunt end is suitable for this work.
- It is better to mask all flaws and work defects on the inside.
- The joined pieces must be of equal length.
- Uniform needle work.
- Thread tension in progress.
- The edges of the product must be wetted and ironed.
- Smoothing out loops before sewing.
For ease of work, experienced craftswomen recommend that beginners place the sewn parts exactly opposite each other. This is necessary so that after assembly the product does not stick out and has even edges. If the halves are folded and sewn, a scar will form that will steal part of the fabric and will interfere with wearing.
To make a beautiful and unnoticeable seam, the loops of the last row on the parts to be joined do not need to be closed. This makes it easier for the needle to pass through the holes, and for the threads to sew the halves together. In addition, closed loops create a seam when sewing, and open loops allow you to create the illusion of circular knitting.
Before casting on stitches for work, experts recommend leaving a thread hanging at the beginning of row 1 with a margin. This practice will allow you to sew the product at the end, making the seam invisible. In addition, you will not need to think about how to hide the knot and where to start working so that the halves are connected evenly, without bevels and displacements.
If the product is knitted with fleecy yarn, it is recommended to use a smooth thread for its assembly. This is necessary to make the work easier. Otherwise, the pile will cling to each other and get tangled, and the thread will break or leave uneven stitches on the canvas.
At the same time, it is not recommended to sew parts made of fluffy yarn with very thin threads. This is due to the fact that it can get tangled in the pile and also tear. It is also difficult to connect a voluminous thing with a small diameter thread unnoticeably.
For ease of working with knitted fabric, experienced craftswomen recommend taking a needle with a blunt end. Firstly, this will allow you to prick your fingers less. Secondly, such a tip allows the needle to pass freely from loop to loop, without catching on its constituent parts-villi.
To make the product look beautiful and whole, and to avoid knots, threads and protruding tails on the front side of the fabric, it is recommended to pull them to the back. This is where seams, long thread transitions or uneven stitches are usually hidden. When working with knitting techniques, you need to ensure that the parts being connected are the same length. Otherwise, the seam will not be invisible, and the edges may stick out or pull.
When working with a needle, you need to move along the edge of the fabric evenly so that the stitches are the same. You also need to tighten the thread with the same intensity and frequency during the process, so as not to get an edge that is too tight on one side or an unevenly stitched fabric. The process should follow the pattern: stitch - tighten - stitch - tighten.
Before sewing the parts, their edges need to be wetted and carefully ironed. This will allow the fabric to straighten out and make the assembly process easier. It is also recommended to carefully stretch and straighten the unclosed loops with your hands. This is necessary to align and straighten them. At the same time, some craftswomen make sure that the unclosed "ears" of yarn are the same height, which also makes it easier to work with the parts of the fabric.
Before assembling the item, it is recommended to pay attention to other components of the process:
| Tool | Characteristics |
| needle | made of high-quality material, not brittle or fragile |
| thread | solid, smooth, without knots, constrictions and unevenness along the entire length |
| scissors | sharp, cutting the thread in one go |
Also, when choosing yarn, it is recommended to pay attention to its quality. To do this, it is crumpled in the hands, applied to a bare area of the skin and tested for the content of unnatural components. When buying material, experts recommend listening to your own feelings. If a rash appears on the skin after contact with the yarn, then it is better not to buy these threads.
Before buying, you need to read the recommendations on the label. Here, the manufacturer usually indicates the composition and properties of the material, as well as how to care for it and what it can be combined with. When starting knitting, you need to make sure that, in addition to knitting needles and yarn, you always have a thimble, pins and plastic marks at hand. These additional tools will make the needlewoman's work easier and reduce the time spent on creating the item.
In knitting, a knitted seam will help to make the closing of loops invisible. The more invisible the joint, the more beautiful and better the item looks and the higher the professionalism of the needlewoman who worked on it.
Video on how to knit a knit stitch
How to make a knitted seam: