Drawing a rooster using different techniques will help develop a child’s creative thinking. Before classes, parents should prepare all necessary materials and tools, read several step-by-step master classes, and also look at photographs of finished works and choose a picture to copy.
What you need to draw a rooster
What materials and tools are needed to draw a rooster:
| Simple pencil | To create sketches you need a hard pencil (T2), and to apply shadows and draw details on a black and white drawing you need a pencil with a hard-soft lead (TM). |
| Eraser | It is advisable to buy an eraser where one side is harder than the other. With its help you can erase pencil lines of different intensity. |
| Black gel pen | Needed for final outlining and working with small details. |
| Marker or black felt-tip pen | To outline a drawing along its contour. |
| Paper | For pencil drawings, a regular album is suitable, but for paints, you need thick sheets that absorb excess moisture well. |
| Art brushes | You will need thin and medium-width brushes with soft bristles. |
| Materials for coloring | These can be paints, markers, pencils or wax crayons. |
The color of the materials for coloring depends on the drawing technique. In the master classes, which can be viewed further in the article, all the necessary shades and additional tools will be listed.
Step by step instructions on how to draw a rooster
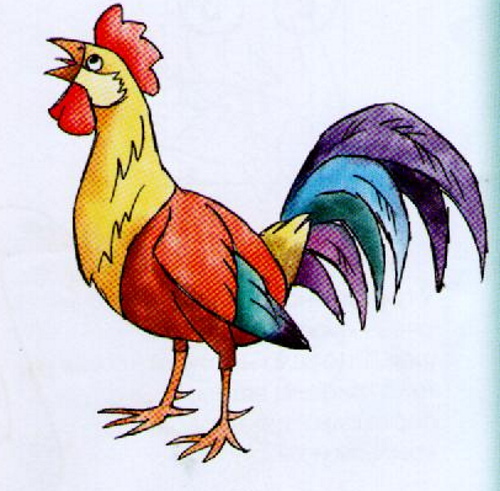
The rooster (a photo for children will help to study all the elements of the drawing in order to display it in more detail) in the picture can be colorless, depicted schematically, without detailed detailing.
This style of drawing is suitable for children who cannot sit still for long and quickly lose interest in painstaking work. Drawing this picture will take no more than 5 minutes.
Sketch
The sketch is drawn with a hard pencil.
Procedure:
- Draw a small oval in the center of the sheet. This is the rooster's body.
- Above the oval, stepping slightly to the side, you need to draw a small circle. This is the base of the head.
- The circle and oval need to be connected with 2 smooth lines, which will become the neck.
- Draw a comb and a beard on the head.
- Add a sharp beak.
- Draw the tail at the back. It can be depicted schematically as 1 group of feathers.
- Draw 2 legs with toes and hooked claws.

Use an eraser to remove the lines from the circle and oval inside the neck.
Shadows
Using a pencil marked "TM", you need to darken some parts of the drawing:
- Lower body.
- Under the tail.
- On the lower part of the breast.
- On the neck, under the chin.
- On the head under the comb.
- The lower part of the beak.
- The inside of each paw.
The strokes should be applied carefully, without pressing on the pencil, and then shaded lengthwise. This can be done with your fingers or a cotton swab.
Detailing
There are a few small elements in this drawing. They are drawn with a hard-soft pencil, pressing lightly on it so that the lines are clear.
Procedure:
- Use zigzag lines to outline the shape of the wing. Draw 2-3 feathers on it.
- On the tail, mark the shape of the feathers.
- Draw several short, curved lines on the neck. They will imitate small feathers.
- Draw an eye and nostrils on the rooster's beak.
- On the paws, depict wrinkles in the form of horizontal stripes.
At the end, you need to trace the outline of the picture, pressing lightly on the pencil.
Pattern variations
A rooster (photos for children, presented in the article, will help them get an idea of different drawing techniques), drawn in a picture, can be multi-colored and completely different from a real bird.
Children love to fantasize and experiment with various creative materials. Such activities help develop creative thinking, so parents should not insist that roosters are not pink, blue or red.
If a child is interested in drawing, then let him choose the colors that he likes. Adults can only direct a child’s creativity in the right direction by choosing the appropriate drawing technique.
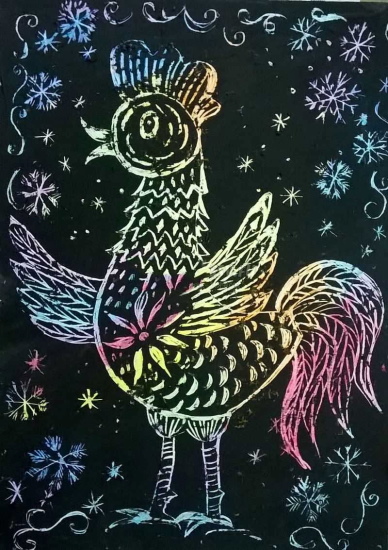
Rooster in scratchboard technique
Many children like to draw colorful, chaotic lines, while some prefer black paint and paint entire album sheets with it. The grattage technique can satisfy these opposing children's preferences.
To work you will need:
- colored wax crayons;
- black gouache;
- black artistic ink;
- wide brush with medium-hard bristles;
- a special scraper, toothpick or stack for plasticine.
How to draw a picture:
- An ordinary album sheet is completely colored with crayons. You can use any colors and apply strokes in a chaotic order, the main thing is to color the paper as densely as possible so that there are no gaps.
- Mix gouache and ink in a 1:1 ratio.
- Using a wide brush, paint the entire sheet with black paint.
- Dry the paper.
- Use a sharp object, like a toothpick or a plasticine stack, to scratch out the design. First, outline the oval body of the rooster.
- Then draw a round head.
- Add a neck, draw wings, legs and a tail.
- Draw a comb, beard, beak and eyes.
- Next, you can scratch various patterns, flowers and zigzag lines on the rooster.
The result will be a bright outline of a rooster with patterns on a black background. When conducting such activities with children under 7 years old, adults should help scratch the outline on a sheet of paper.
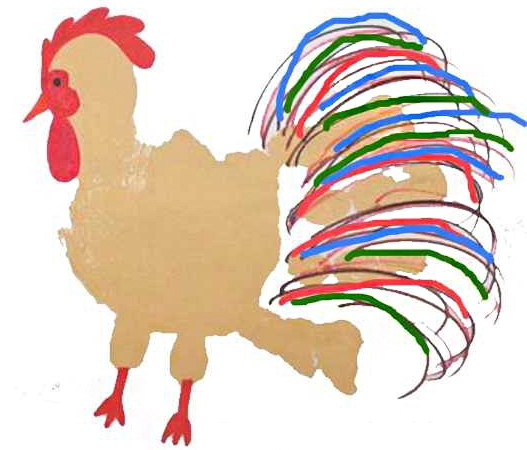
Finger painting
This drawing technique is suitable for children from 1.5 to 3 years old. For work you will need special paints that are easy to wash off your hands and do not cause allergies on your skin. They can be purchased at craft stores.
What you will need for drawing:
- light brown paint;
- red paint;
- thin and wide brush with soft bristles;
- felt-tip pens of different colors.
How to draw:
- Using a wide brush, apply light brown paint to the child's palm.
- Print your palm on a white sheet of paper. The thumb is the rooster's head, and the rest are the tail.
- Use your index finger to smudge the paint slightly in the thumbprint area to make the bird's head appear larger.
- Wash your hands, dip the tips of your index, middle and ring fingers in red paint.
- Place the prints above the rooster's head. This will be the comb.
- Mark the index and middle fingers in red paint in the beard area.
- Using a thin brush, pick up some red color and paint the rooster's legs.
- Wash your hands and dry the drawing.
- Use a black marker to draw an eye on the bird.
- Use a yellow marker to draw a sharp beak in the shape of a triangle.
- Using multi-colored markers, draw many arched lines to imitate a fluffy tail.
Finger paints can be easily removed from the skin with wet wipes, so there is no need to take your child to the sink every time.
Drawing by cells
You can decorate the margins of a notebook or personal diary with such a drawing. For work you need colored pens or markers, a simple pencil, and also a sheet of paper in a cage.
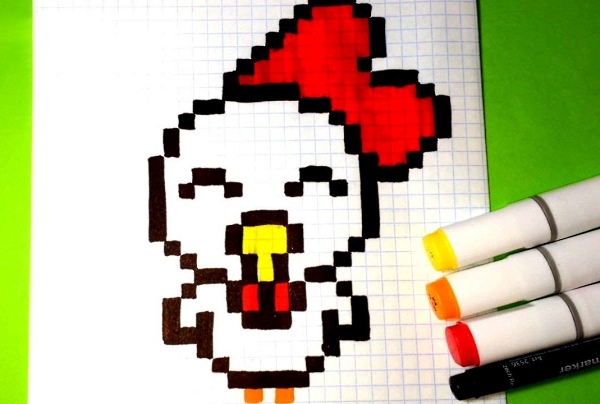
Procedure:
- Using a simple pencil, draw a rectangle 30 cells high and 25 cells wide.
- Count 11 cells from the left edge of the rectangle and paint 2 cells orange so that there is 1 empty square between them. These will be the rooster's paws.
- In the next row, paint a row of 5 cells black so that there is 1 black cell on each side, above the paws.
- Move up to the next row, leave 5 cells in the center empty, move 1 cell from 2 sides and paint them.
- In the new row, leave 7 cells empty in the center, paint 1 on each side.
- In the center of the next row, leave 7 cells empty, and paint 3 cells in a row on each side.
- Now you need to paint 3 cells in the center black, move 2 cells to both sides, paint 1 cell on each side, skip 1 cell and paint 1 more cell.
- Above the row of 3 black cells, paint 2 side cells red, make 1 black in the center. On the sides, from the red ones, paint 1 black. Step back 3 cells on both sides, and paint 1 black.
- In the new row, paint 2 cells red again, and in the center - black. Paint 1 black cell on both sides. Step back 2 cells on both sides, paint 1 black.
- The body, legs, wings and beard are drawn. Now you need to draw the head. First draw the left side. Above the outer black cells, fill in the gap with black.
- Move up to the next row, step 1 cell to the left and paint it. Paint 1 cell in the new row in the same way.
- Go up again, step back 1 cell to the side. From there, count 5 cells up and paint them.
- In the new row, step back 1 cell to the right, paint it. Repeat the steps in the next row.
- Move up, move 1 cell to the right, and paint the next 2 cells.
- Step back to the right again, paint a horizontal row of 5 cells. This is the top of the head. Now you need to finish drawing the 2nd half of the head in the same way.
- To draw a comb, you need to paint 1 cell of the crown line, 6 cells in “steps”, directing them to the right.
- The last step will be made up of 3 black cells arranged horizontally in a row.
- Now the cells need to be painted from top to bottom. Step back 1 square and paint the next one black.
- Skip 1 cell again, paint 2 black, vertically.
- Move 1 cell to the left. Paint the next one.
- Move 1 cell to the right and paint the next 3 horizontally.
- Repeat steps 18 through 20.
- Above the red cells that imitate the beard, paint 2 black cells vertically.
- From the top, move 1 cell to the sides, paint the next 2 vertically.
- In a new row, connect the resulting columns horizontally.
- Paint the inside of the resulting figure yellow.
- Paint the comb red.
- Draw 2 eyes in black. Go up 2 lines from the beak. Leave 3 cells empty in the center. Paint the next cells, make 1 gap, paint 1 more cell.
- Connect these squares on the top row with 3 cells, colored horizontally.
The technique of drawing on cells is quite painstaking. It is suitable for children over 8 years old.
Rooster head drawn with felt-tip pens
To work you will need felt-tip pens of 5 colors: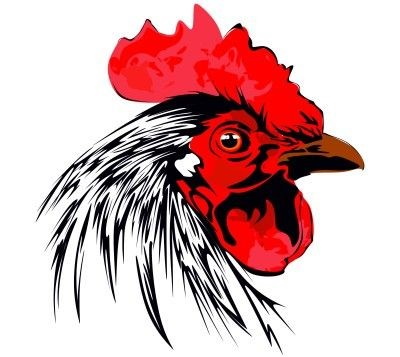
- black;
- dark pink;
- red;
- brown;
- orange.
You also need a simple pencil.
How to draw:
- Draw the rooster's head with a simple pencil. Mark the comb, skin around the eyes, eyes with pupil and iris. Finish drawing the beak, beard and earrings.
- Use a red marker to color the comb, beard and skin around the eyes.
- Use dark pink to mark the shadows.
- Use an orange marker to color the iris of the eye.
- Paint the upper part of the beak with brown and outline the iris of the eye.
- Use a black marker to color the pupil and the lower part of the beak.
- Draw feathers in the form of smooth, thin lines. They should be of different thickness and length. Their ends should be narrower than the base.
- Use black to highlight the shadows on the beard. Paint the area above the eye, outline the shadow at the base of the beak.
Outline the rooster's comb and beard with a thin black line. You can use a gel pen.
Drawing with wax crayons
A rooster (a photo for children with an image of the finished work can be viewed further in the article), drawn with wax crayons, will turn out colorful and bright.
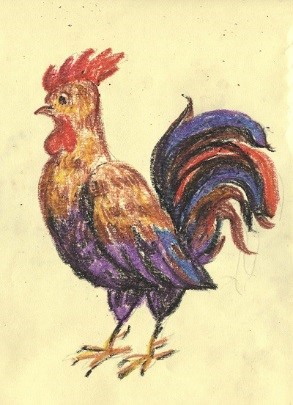
You will need the following colors of pencils:
- yellow;
- brown;
- red;
- violet;
- blue;
- black.
You will also need a hard pencil to create the sketch.
Procedure:
- Draw an oval body using a simple pencil.
- Finish drawing the head and neck.
- Draw a comb and a beard on the head.
- Add a triangle shaped beak.
- Draw the tail and 2 legs with toes.
- Use zigzag lines to outline the shape of the wing. Draw feathers on it.
- Draw an eye and nostrils on the rooster's beak.
- Paint the head, upper parts of the chest and wings with strokes of brown and yellow.
- Paint the lower part of the body with purple and blue strokes.
- Paint the comb and beard red.
- Use a brown pencil to color the paws.
- Remove the color and paint over a few feathers on the wing.
- Draw the tail using multi-colored strokes.
Use black chalk to outline the bottom of the drawing and add a few thin feathers to the tail.
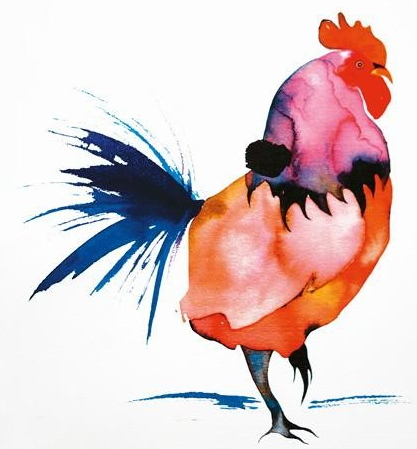
Drawing done in watercolor
This drawing technique is suitable for children from 7 years old. For work you will need 2 brushes: medium and thin.
Necessary watercolor colors:
- hot pink;
- blue;
- black;
- orange;
- yellow;
- red.
How to draw:
- Take a medium sized brush and wet a sheet of paper with water.
- Draw the rooster's head and neck in pink.
- While the paint is still wet, add a few drops of blue watercolor so that it spreads slightly over the pink.
- Paint the body with orange watercolors. Add some yellow spots at the bottom.
- Mix blue paint with a drop of black, use a thin brush to paint the rooster's legs and mark the border of the neck with a zigzag line.
- Dry the drawing.
- Dip a thin brush in blue paint and draw the rooster's tail from several arched stripes of different sizes.
- Draw a sharp beak in yellow.
- Draw the comb and beard in red.
Use black paint to draw the eye and color the upper part of the beak.
Gorodets painting
The rooster (a photo for children with a step-by-step drawing will help you draw the picture correctly) in the Gorodets painting style looks good on a bright yellow background, so you can use colored cardboard as a basis for the drawing.
For work you will need a medium and thin brush with soft bristles and gouache of 3 colors:
- black;
- red;
- white.
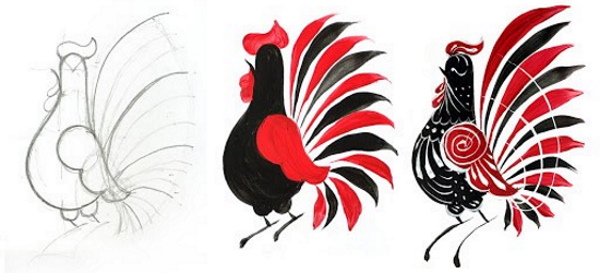
How to draw:
- Using a medium-thick brush, pick up some black paint and draw a pear-shaped body.
- Draw a thin, sharp beak looking upwards.
- Using a thin brush, draw the legs and tail feathers.
- Draw the comb, beard, and tail feathers in red, placing them between the black feathers.
- Dry the drawing.
Dip a thin brush in white paint and decorate the rooster with patterns in the form of stripes, monograms and dots.
Gzhel
Children over 7 years old can be offered to draw a rooster in the style of painting "Gzhel". For work you will need gouache of white, light blue and blue colors, as well as 2 brushes, thick and thin.
To understand how to draw such a rooster correctly, you need to look at the photo with a step-by-step drawing, which is at the end of the article.
Algorithm of actions:
- Using a medium-thick brush, paint the curved body and wings in blue.
- Use blue paint to outline all the elements on 1 side.
- Use a thin brush to finish drawing the feathers, beak, and eyes.
- Draw the tail in the form of wide, curved stripes.
- Decorate the wings with a dotted mesh pattern.
- On the tail, draw dark blue feathers in the form of branches with leaves.
- Work on all the small details. Draw feathers, monograms around the tail and ornate lines.
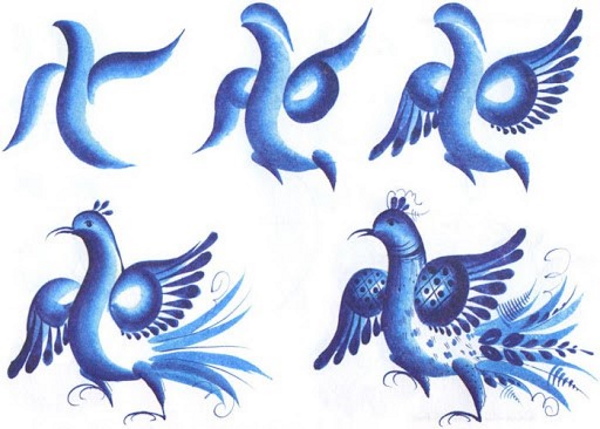
When the drawing dries, a thin brush should be dipped in white paint and used to add dotted patterns on the rooster's chest, as well as on the wings and tail.
Examples of images for copying, tips for beginners
Helpful tips for parents and young artists:
- For a drawing using the grattage technique, ink is a must. Without it, the gouache will roll off the wax layer and form drops.
- With children under 3, it is better to use finger paints in the bathroom. It is easier to wash off colored splashes from tiles than from carpets and furniture.
- The notebook pages for drawing on the squares are very thin. To prevent the marker pigment soaking through the paper from staining other pages, you need to put a piece of cardboard under the sheet on which the drawing will be.
- When drawing with felt-tip pens, all subsequent layers of pigment should be applied to each other with neat strokes. You cannot paint one part of the drawing for a long time, because the paper in this place will roll up and tear.
Photos of finished works depicting a rooster will help parents choose the appropriate drawing technique for their child, in accordance with his or her skills and age.
Adults should conduct classes together with children, comment on the work process, and suggest how to correctly use various materials and tools.
Video on the topic: photo of a rooster - drawing for children
Rooster drawing for kids: