The peacock is considered by ornithologists to be a chicken breed. The most beautiful part of the peacock's body is its rump. Males have luxurious tails, which are often shown in photographs and drawings for children.
How to draw with a pencil
One way to draw a beautiful bird is with a regular pencil. In this case, the image will be cartoonish.
The drawing process is divided into the following stages:
- Make a sketch. First, draw an oval in the center of the sheet, slightly elongated to the left and right. Step back a few centimeters from the top edge of the sheet and draw a circle. The oval will be the bird's body, and the circle will be its head.
- Divide the circle into 2 halves by drawing an inclined line inside it. It should start at the bottom left and end at the top right.
- Connect both geometric figures - an oval and a circle with a small line. This will be the middle of the peacock's neck.
- Connect both figures with 2 smooth lines. This will be the curved neck of the peacock. In the front there is a sharp beak with a rounded top.
- Draw the outline of the wing. To do this, place it in the center of the head. Draw it so that it is pointed on both sides. Draw the pupil inside the eye, and add beautiful eyelashes on top.
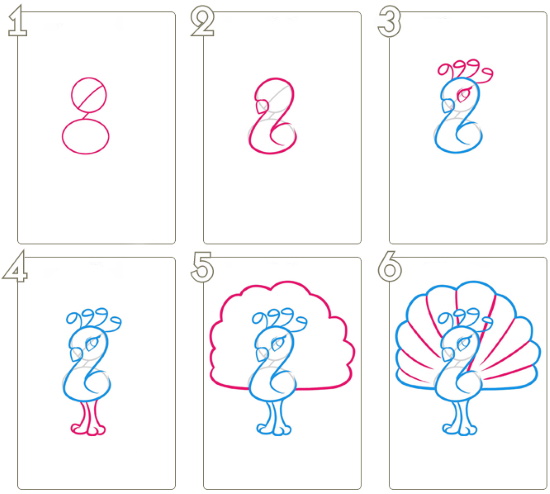
The picture shows step by step for children how to create a peacock drawing. - On the top of the bird's head, depict a crest, which should be represented by 4 arced lines with small ovals at the upper ends.
- Draw the paws. To do this, draw 3 smooth lines down from the lower part of the body. At the bottom, connect these lines with semicircles and arcs, indicating the fingers.
- In the background, draw a loose tail in a shape similar to a fan. In the lower part of the body, on both sides, you need to draw 2 stripes. Then from 1 of them, draw a wavy stripe. It, rounding, goes up and connects with another stripe on the opposite side.
- Divide the tail into sections by drawing several lines.
- Remove excess details using an eraser.
Black and white version
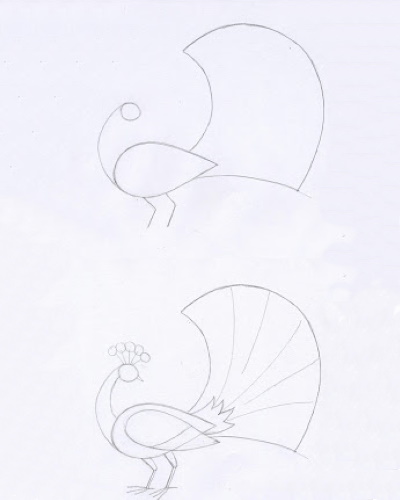
Peacock (a drawing for children can be created with one simple pencil) in black and white is created in the following stages:
- Draw a large oval in the center of the sheet.
- Stepping back a little up and to the left, draw a small oval, which will be the basis for the head.
- From the large oval to the bottom edge of the sheet, draw several long arced lines.
- Connect the 2 main parts of the bird's body, each of which is represented by an oval. We are talking about the head and the body. They are connected by 2 smooth lines. They will represent the peacock's neck. When drawing them, it is important to remember that the neck narrows towards the head and widens as it approaches the body.
- Draw the peacock's wing. It starts on the body near the neck and ends near the tail.
- Draw a peacock feather from the head.
- Draw a curl to the left of the body.
- Draw the head in detail. There should be 1 eye, since the bird is shown in profile, a small beak, and also several flowing curls extending from the top of the head.
- Move to the bottom of the drawing and add fluffiness to the tail. To do this, draw several smoothly curving arc lines here. Place them on both sides of the body.
- To make the drawing more creative, fit the peacock into a figure similar to a hieroglyph. To do this, it is enough to draw several graceful lines, at the ends of which there is a sharp or rounded curl.
- Make a hatching. When shading the resulting figure, you need to press hard on the pencil.
- If desired, add some bright colors using watercolors or pencils.
With colored pencils
In the example described below, in addition to pencils, a simple pencil and a black fountain pen are used.
The drawing is done on kraft paper.
You should also prepare an eraser, which will be needed at the beginning of the work, when you will create contours with a simple pencil.
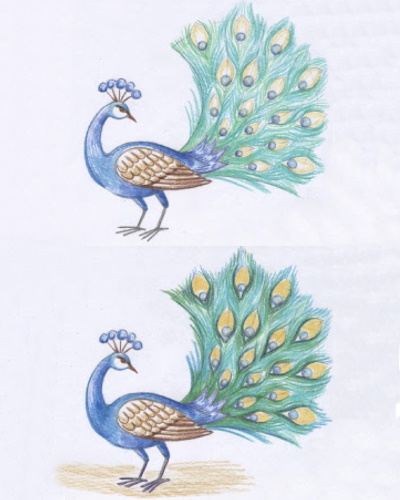
Peacock (a drawing for children with pencils is distinguished by its brightness and color) in a multi-colored version is done as follows:
- In the center of the sheet, draw 2 circles of different sizes, with the small circle inside the large one. These figures do not necessarily have to be strictly round, so you can draw by hand, use a compass or round objects to trace.
- Draw a vertical line through the resulting figure so that the figure is divided into 2 equal halves.
- Place another circle inside the figure, below and above. The center of each of them should be the point of intersection of the vertical line with the small (inner) circle. The upper circle will help to draw the peacock's head in the future, and the lower one will become the basis for the body.
- Add detail to the drawing. Connect the head and body by drawing a couple of smooth lines.
- Draw out the beak, making its upper part rounded on the sides, while the front part should be pointed.
- Place 2 eyes above the beak. They are represented by small circles. Draw pupils inside them.
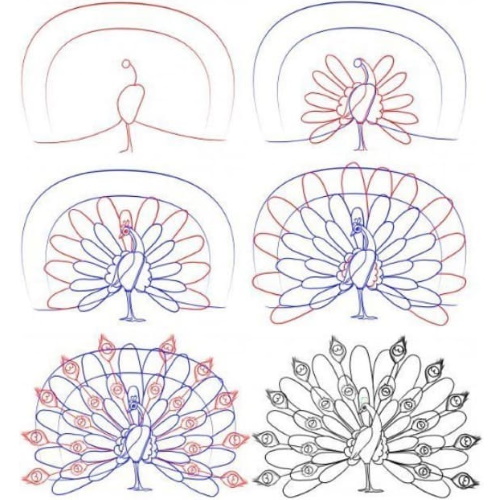
- Paint the eyes so that small highlights remain.
- Create several stripes on the peacock's chest and, starting from them, draw wings on the sides. The wings should be directed in different directions: up and down.
- Using stripes, detail the tips of the wings.
- Start drawing the peacock's tail. First, take the part located in the center. The tail feathers should extend from the body to the outer edges. At the same time, they should not fit tightly to each other. Small gaps should be left between them.
- Work on the big circle. To do this, draw big feathers – the same ones that were drawn earlier. They should not touch each other.
- Use a black pen to outline the contours and then delete any unnecessary elements.
- Apply a pattern to the tip of the tail; the peacock's head should have a beautiful crest consisting of 3 feathers.
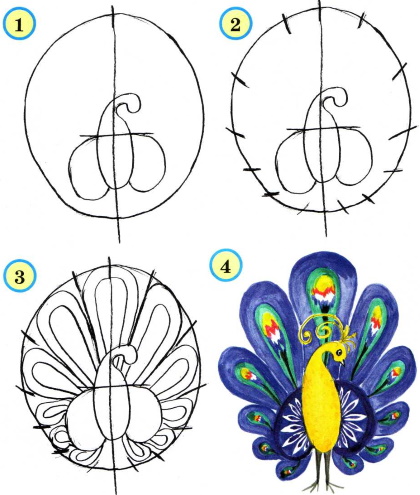
The final step is to color the peacock.
For example:
- for the body and crest you will need blue and light blue colors;
- the paws and beak should be made orange and yellow;
- the peacock's tongue can be colored with a pink pencil;
- feathers, it is better to make them turquoise;
- It is recommended to give the front tail a green color;
- To create a pattern on the plumage, use a pink pencil.
After the operations are done, the drawing will be almost ready. For its realism, you can use light green and white pencils.
With paints
Drawing a peacock with gouache for children requires placing the paper sheet vertically.
The steps to create an image will be as follows:
- At the top of the sheet, outline the blue outline of the head. It will be represented by a small circle.
- Draw the outline of the body at the bottom of the sheet. It is represented by an oval. Only its upper half should be visible. It is assumed that its lower half is outside the sheet. This semi-oval, like the circle, should be drawn with blue gouache.
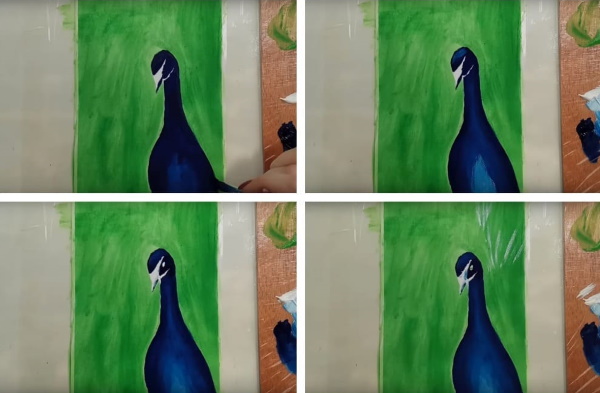
- Connect the oval and the circle. To do this, draw 2 smooth blue lines from one to the other, indicating the contours of the peacock's neck.
- Paint the resulting silhouette completely with blue gouache.
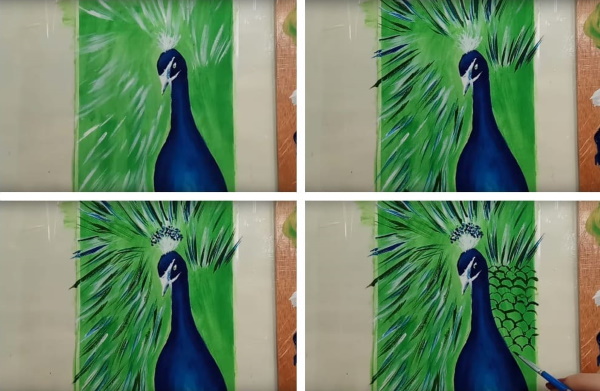
- Proceed to drawing the peacock's main pride - its tail. To do this, fill the remaining white space with many dark green circles. You can draw, for example, 12 pcs. Then, from the bottom of each of them, draw 1 line going to the peacock itself. The circles will be the tail feathers, and the lines will be their shafts.
- Based on the fact that the peacock's tail resembles a fan, divide it into parts - dark and light sectors. Dark green sectors should alternate with light green ones.
- Draw the edges of the feathers with blue gouache.
- To make the feathers more voluminous, apply many strokes of white and yellow paint.
- Draw oval "eyes" of the feathers. Blue and yellow gouache are used for this.
- Refine the design on the feather “eyes”.
- Proceed to detailing the bird's head. Outline the white beak, which should be represented by a small triangle. The peacock's crest, which proudly flaunts on the bird's head, should also be white. The eye, which should be represented by a small crescent, is also depicted using white paint.
- Refine the shape of the 3 head parts added in the previous step, using black gouache for this. The same color is used to darken the edges of the body and neck.
- Use blue gouache to enhance the shadows on the body and neck.
- Using a thin brush, add small white feathers to the chest.
- Refine the shape of the white feathers you just drew. To do this, make small dark strokes.
This completes the process of creating a multi-colored peacock.
Watercolor
To depict a peacock with watercolors, in addition to paints, you will need the following materials and tools:
- watercolor thick paper;
- simple pencil;
- synthetic brushes No. 4 and No. 1;
- eraser;
- a small vessel with water;
- brush cloth;
- tablet;
- adhesive tape for fixing paper to the tablet.
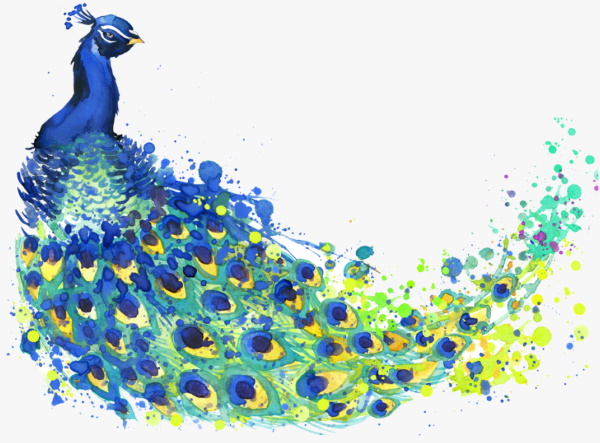
The work takes place in the following 2 stages:
| No. | Stage | Description |
| 1 | Make a sketch |
|
| 2 | Working with watercolors |
|
Peacock feather
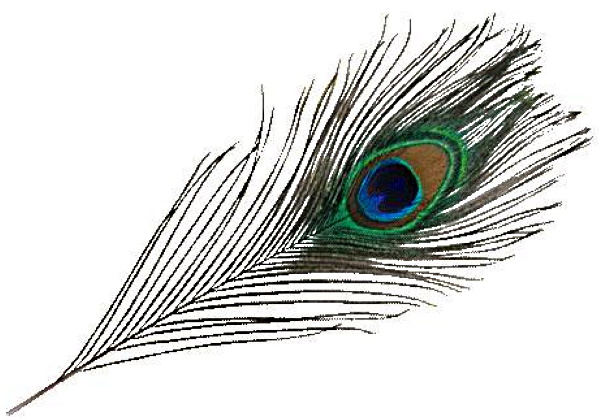
The peacock (a drawing of this bird for children will be attractive due to its amazing plumage) actually has black feathers. The beautiful shimmer on them is a play of light, an optical illusion. This effect needs to be shown in the drawing, so the feather drawn should be colored.
To draw a peacock feather, you need to prepare the following tools:
- simple pencil;
- several colored pencils;
- eraser;
- sharpener;
- sheet of paper.
The entire process of drawing a peacock feather is divided into the following stages:
- Draw a diagonal line starting from the bottom left corner of the paper and going up at an angle to the right. This will be the pen shaft.
- At its upper end, draw a figure that resembles an egg. Inside this "egg", draw 2 more figures. One of them is an oval, the other is inside this oval. Moreover, it is also an oval, but only with a small depression, located on the side where it joins the rod.
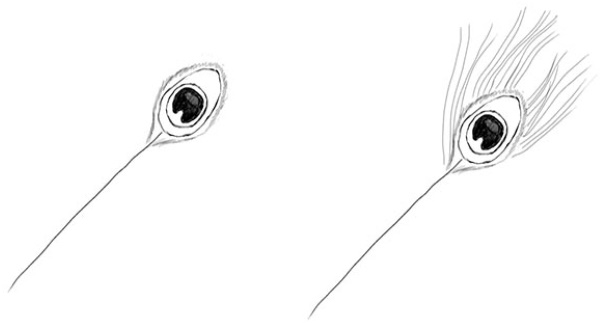
- Shade the central, smallest figure completely with a simple pencil.
- Draw many long hairs around the perimeter of this "egg". They should be curved lines and directed upwards.
- Add similar hairs along the entire length of the feather shaft.
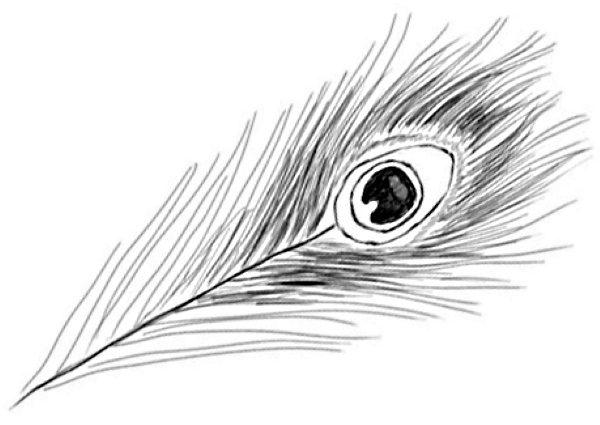
- Add shadows. They are concentrated mainly around the egg-shaped tip of the rod. Here you need to draw with a simple pencil.
- Color the image.
The opportunity to admire the beauty of a real peacock is rare. It is not every day that you can see this bird, so you can draw it yourself or with children.
Video about drawing a peacock
How to draw a peacock with colored pencils: