Preparing for the first birthday of their baby, parents try to think through everything to the smallest detail. At the same time, special attention is paid to the decoration of the room. On this day, everything should emphasize that the guests have gathered here for a reason. Therefore, the main attribute will be the number 1 for the first year, made with your own hands.
What can you make a one-year unit from?
There are many options for making figurines in the form of the number one to decorate the place where the baby's first birthday will be held.
For this purpose the following can be used:
- balls;
- cardboard;
- corrugated paper;
- flowers;
- textile;
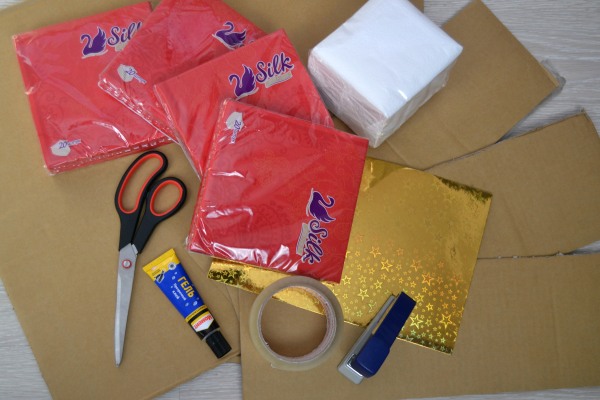
- napkins.
And some mothers prepare a celebratory cake in the shape of the number one.
What sizes to choose
The choice of size depends on the availability of free space in the apartment. The average height of a single figure is usually from 0.5 to 1.5 meters. Such a figure can be used as a decoration for a room or a hall in a cafe where the celebration will take place.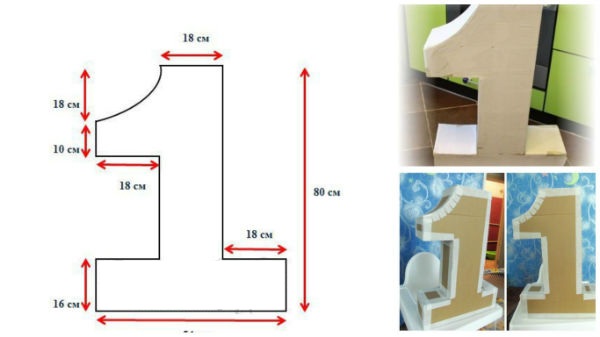
If the room size does not allow using a structure of this size, then you can make a smaller one, from 20 to 60 cm high, and place it in the center of the festive table. Small ones, folded from napkins, will also look beautiful on the table.
From polystyrene foam - how to make
A DIY number 1 for a year old made from polystyrene foam will be three-dimensional and will help decorate a room for a party, a photo zone or a site in the garden if the event is held outdoors. It is most convenient to use a sheet of thick polystyrene foam for its manufacture.
A number is cut out from a sheet of paper using previously prepared sketches, which is then decorated in any convenient way.
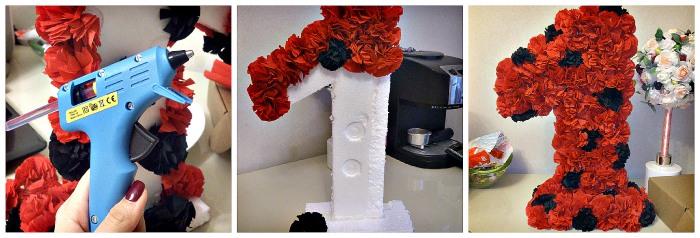 For decoration, corrugated paper, flowers made from napkins or using scrapbooking technique are used. etc. In this case, you will need to work hard to create beautiful flowers, of which you will need a lot. If there is very little time left before the event, then the number can simply be pasted on all sides with fringe or paper with a beautiful pattern.
Cardboard Unit: Step-by-Step Instructions
The easiest way to make a flat figure is to use regular cardboard. A regular cardboard box is suitable for this purpose, on which the outline of the number is applied, and then it is cut out with sharp scissors. Decorate in any convenient way. At a minimum, it is painted with paints, wrapped in foil or pasted over with beautiful bright paper.
The creation will become even more festive if you attach a crown, flowers, butterfly figures or any other decoration to the top of the figure. If the birthday is for a boy, then the figure is usually decorated with drawings or figures of airplanes, ships or cars. Such decor is easily attached to the wall, curtains or to the birthday boy's chair using double-sided tape.
A volumetric unit will look much more attractive. First, a frame is made, which will then be decorated. Thick cardboard or large volumetric boxes are used for the frame.
Next you need to:
- Make a template, drawing a model of the future figure on paper. It is best to use a sheet of paper from a squared notebook or special paper with markings. In this case, you should take into account the scale of the product, its height and width.
- The figure is transferred onto cardboard, having previously enlarged it. Exactly the same figure, only in a mirror-inverted image, should be cut out of another piece of cardboard.
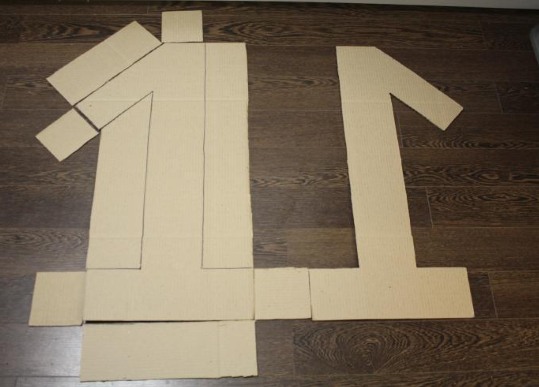
- To make the structure stable, it is necessary make a bottom. In this case, you should take into account the parameters of the figure (its thickness and width). The wider they are, the more stable the number one will be, but you will also need more decor for it. If you plan to hang the figure on the wall, then the thickness can be minimal. In this case, the length of the bottom should be the same as the width at the bottom of the number.
- Using paper and glue or tape, attach the bottom to one of the sides of the figureSuch manipulations can only be carried out from the inside of the future unit.
- After this, you can glue the second half of the number using wide tape, additionally strengthening the fold line.
- The top is made in the same way constructions.
- Using scotch tape, connect all parts of the figure between themselves (the top and two sides).
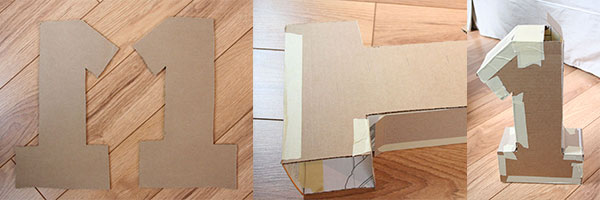
- To make the frame strong, all The outer folds should be sealed with tape.
- In the end, all sides are closedIt is important that the dimensions of all the blanks correspond to the dimensions of the bottom.
If you do everything correctly, you will end up with a beautiful, three-dimensional unit that can be used to decorate a festive room.
Number 1 from fabric: master class
You can sew the number 1 for a one-year-old with your own hands.
For this you will need the following materials:
- beautiful fabric;
- filler (this can be synthetic padding, cotton wool, foam rubber, etc.);
- needle and thread or sewing machine;
- scissors;
- chalk for marking.
The process of making such a figure is as follows:
- First of all, you need todecide on the size of the future unit. The layout can be
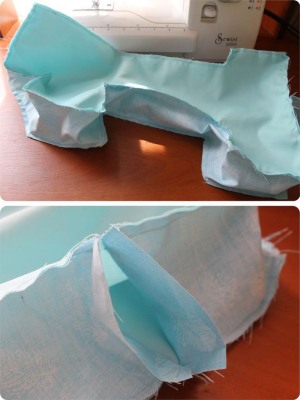 draw it yourself on a large sheet of paper or print it out. After that, transfer it to the fabric folded in 2 layers.
 - After this you need to cut out, not forgetting about the allowances necessary for sewing individual parts of the figure.
- Additionally the sides are cut out.
- When all the parts are ready, you can start sewing. It is more convenient to start from the bottom. In this case, the seam that connects the front and side parts will be less noticeable.
- Next the back part should be sewn on, leaving one side unstitched. Through this opening the unit will be turned inside out and then filled with stuffing.
- Before turning the number inside out, you need to do it in the rounded places make small cuts. Thanks to this, there will be no folds or thickenings on the edges of the figure, and the unit itself will be even on all sides.
- After turning the numbers inside out, you can start filling it. This must be done tightly, tamping the material selected for this purpose inside. It must be kneaded periodically so that no bumps form.
- When the number is completely filled, you need to sew up the remaining hole using a blind stitch.
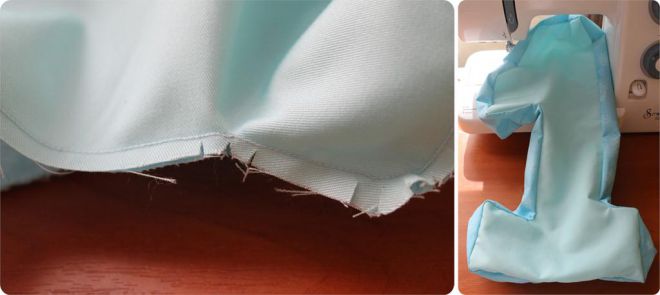
- At the end you can get a unit decorate with ribbons, lace, buttons, beads or any other decoration.
Decor from corrugated paper
Having made the number 1 for a year with your own hands, you need to take care of its decoration. The easiest way to do this is to use corrugated paper. Many squares of the same size are cut out for it. The base of the number, on which the pieces of paper will be glued, is smeared with glue. Flowers are formed using an ordinary pencil.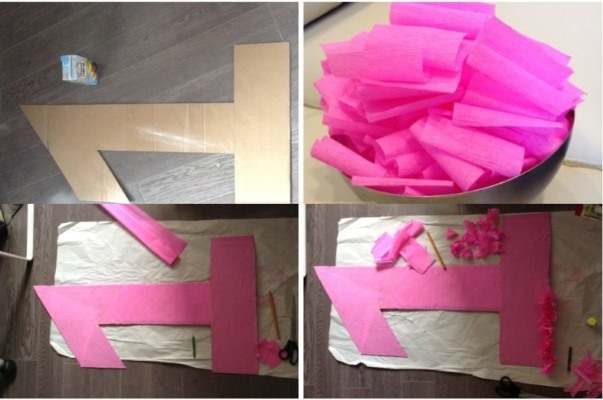
To do this, wind a piece of paper around it so that the pencil tip is in the center. Dip the bottom of the flower in glue and stick it to the number, while carefully straightening the edges. It is necessary to pay attention to the fact that the petals should cover the entire surface of the number one. But there is an even simpler way to decorate. To do this, cut strips out of paper.
On one edge of each strip, make cuts in the form of a fringe. Such a fringe is glued, starting from the bottom edge. When gluing the first strip, glue is applied to its entire surface. After the first strip is glued, it is necessary to make a small indentation at the top, where the second strip is glued. It is important that each subsequent strip completely overlaps the top of the previous one.
The color of the stripes should be changed periodically to make the figurine more attractive and festive.
Napkin decor - flowers
The number 1 for a year, decorated with napkins with your own hands, looks very beautiful and lush. To make it, you will need colored napkins and patience. Only single-layer napkins of different colors are suitable for flowers. The napkin is folded in half. There is no need to unfold it beforehand. In the middle, the workpiece is fastened with a stapler.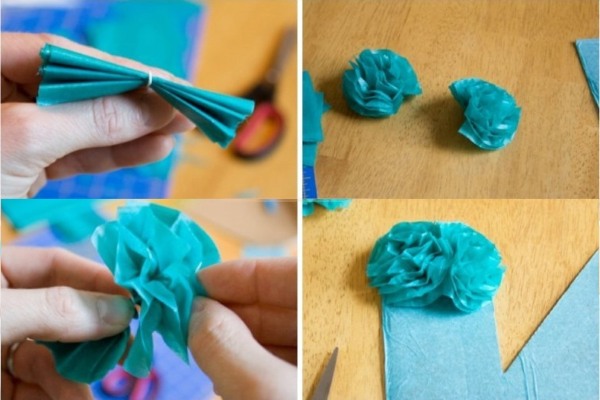
A thin wire can be used to secure the base of the flower. Using scissors, trim the edges of the napkin to form a circle.
The top layer of the napkin is carefully gathered in such a way that petals are formed. Gradually, all subsequent layers are formed in a similar way. After all edges of the napkin are raised, the petals are carefully straightened. Using a glue gun, all the napkin flowers are glued to the pre-prepared blank.
Decor in scrapbooking technique
One of the options for decorating the figure is scrapbooking. This requires wet wipes that are pre-dried.
In addition, the following items are used:
- stencil for forming a flower;
- wet wipes that are already pre-dried;
- scissors;
- paraffin candle;
- glue gun;
- paint of a suitable color;
- artificial stamens.
Using a stencil, several blanks are cut out. If several stencils are used at the same time, which are slightly different in size, then the finished flowers will look like real ones. In order for the buds to look as realistic as possible, it is recommended to make their edges not quite even.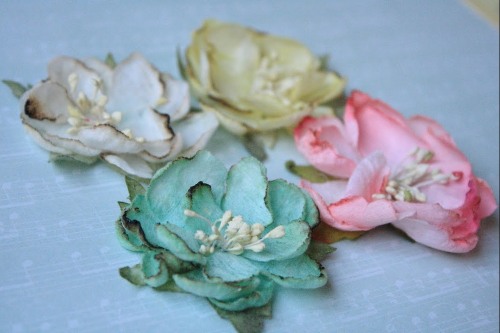
In a small container, dilute the paint and lower the blanks into it one by one. Each painted blank is wrung out and dried. To speed up the process, you can use a regular hair dryer. Before collecting the petals, forming a bud, their edges should be singe, holding them over a burning candle, bending them into the center. A hole is cut in the center of each blank.
Take several blanks together, assemble them together, straighten their edges, and place the prepared stamen in the middle. It is not necessary to glue the entire blank of the number one with such flowers. You can simply glue several flowers in the middle, making a composition out of them. The rest of the surface of the number can be decorated using any other decorating technique.
Unit for a boy - how to make
To make a unit for a boy you need to take:
- corrugated paper;
- silicone glue;
- cardboard;
- double-sided tape.
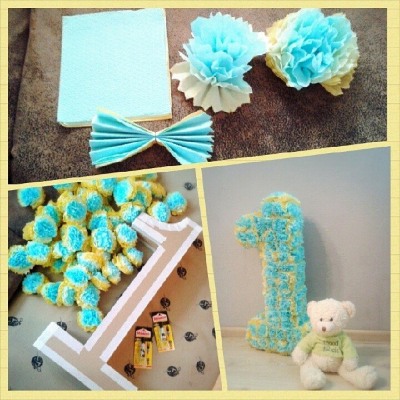
Creation process:
- Make a three-dimensional unit out of cardboard.
- Cover the finished figurine on all sides with blue corrugated paper.
- Cut 5x5 cm squares out of paper.
- Using a pencil, make a tube out of each square, which you then glue to the number. Decorate the entire number one in this way.
- Decorate the figurine with a bow tie, car or airplane figurines, or any other decoration that the birthday boy or girl will like.
Unit for a girl - instructions
The number one for the baby's birthday can be decorated with fabric in the same color as her dress. To do this, you will need cardboard, fabric, a gun with silicone glue, scissors, a pencil and a ruler.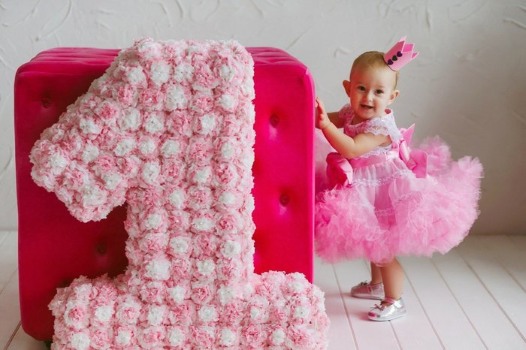
The number should be made as follows:
- Make a template of the number one out of cardboard.
- In order for the fabric to lie nicely on the base, the width of the cut should be 3 times larger than the width of the number.
- The base of the figure is coated with glue and, forming random folds on the fabric, it is glued to the number.
- In this way, the entire front part of the figure should be decorated.
- Once the front is ready, the fabric is carefully folded and its edges are glued to the back of the figure.
Balloon Unit
All kids are simply crazy about balloons, so they will be delighted with this one.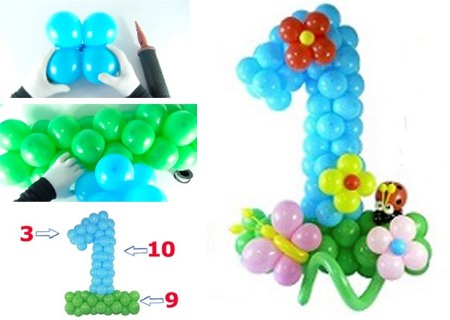
To do this, you need to prepare:
- 52 balls, no more than 10 cm in diameter, of one color and 36 of another shade;
- balloon pump;
- fishing line for tying inflated balloons.
The process of making the number is as follows:
- Inflate all the balloons so that they are the same size.
- Tie each of them.
- Tie 2 balls of the same color together.
- 2 blanks, twisting, connect together. This turns out to be 1 segment of the unit.
- Connect all the balls in the same way.
- This results in 13 segments of one color and 9 of another.
- The base is made from the smaller balls.
- On the first segment, secure the fishing line, wrapping it several times between the balls.
- Attach another segment to this one, securing it with a fishing line. This will connect all the segments for the base.
- A fishing line is tied in the center to secure the upper part of the structure.
- The vertical part of the number is made in the same way as the base.
Edible unit
The number one can be edible. For this, any baked cakes are used, from which the number is cut out. It is coated with cream or mastic on all sides. You can also form figures from mastic, which will then decorate the number one on top. You can also bake gingerbread in the shape of a number one, and cover it with sugar or chocolate glaze on top.
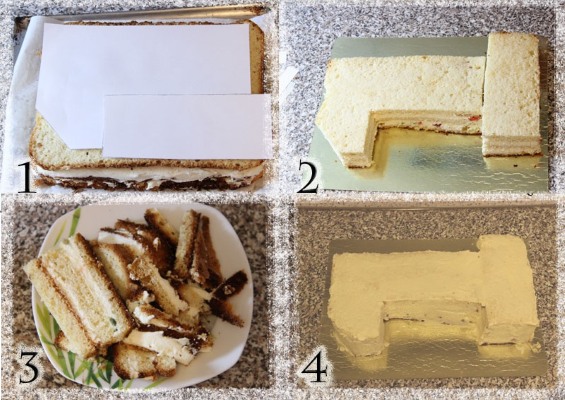
For decoration, you can use figurines of animals or fairy-tale characters made from mastic.
By making the number 1 for their baby's first birthday with their own hands, parents will be able to create a special festive atmosphere. A room decorated in this way will please the hero of the occasion himself and will be remembered for a long time by all the guests.
Video: DIY number 1 for a one-year-old boy, girl
How to make a volumetric number one for a first birthday with your own hands, find out in the video:
https://www.youtube.com/watch?v=z7psQKDhMGs
1 for a one-year-old child with your own hands, step-by-step execution in the video:

Great! I'll definitely make this for my daughter's birthday!
thanks for giving size for no. 1. but what is the deep we have to keep.