Owls are amazing creatures of nature that attract attention with their unusual appearance and mysterious way of life. In art, they occupy an important place, being a source of inspiration for artists of various directions.
Drawing this bird requires a child to be attentive to details, precise in lines and convey mood.
Necessary materials and tools
All tools and materials have their own characteristics and require experience, practice and experimentation to use. Their diversity does not limit mixing, selection of shades and implementation of author's ideas in the art of drawing with pencils.
| Tools and materials | Brief description |
| Graphite pencil | It is designated by the letters HB or B. Hard pencils (from 9H to 2H) are used for sketching. For sketching, you can choose H or F pencils. Soft pencils (B, 2B, 4B, etc.) are used for dark areas. Among soft pencils, the softest is marked 8B and 6B. A variety of graphite pencils is widely represented by such manufacturers as Faber-Castell, Marco, Staff, KOH-I-NOOR, Nevskaya Palitra and many others. |
| Sanguine | It is a soft, reddish-brown drawing material that can be matte or shiny. Sanguine is suitable for creating smooth transitions of light and shadow. It is often used in portraiture, figure painting, and landscape painting. |
| Sepia | A soft material with a warm brown tint, sepia combines well with other drawing materials and is often used to create atmospheric landscapes, illustrations and comics. |
| Charcoal pencils | Provide the artist with ample opportunity to create lines of varying thickness and pressure. Charcoal pencils come in hard and soft, allowing for a variety of effects. |
| Sauce | A material used to blend colors and shades. The sauce helps to achieve the effect of depth and volume. |
| Sharpeners | Large ones are suitable for sharpening a pencil from any end, convenient for both right- and left-handed people. Small sharpeners are the best option for thin pencils. Single-sided ones are suitable for quick and small sharpening, double-sided ones are for thick lead and deeper sharpening. |
| Stencil | Using this tool allows you to diversify the drawing, create repeating elements, and also speed up the process of visual activity. |
| Rulers | Special rulers made of flexible plastic, marked in centimeters, are produced for artists. For example, children can create patterns by repeating geometric figures, or learn to draw perspective by simulating spatial plans using parallel lines. |
| Colored pencils | · Skeletal sharp-angled ones usually have a woody shell and are covered with a thick layer of colored pigment. They are used to create clear lines and shading. · Wide colored pencils are suitable for both shading and detailed drawing. · "Marble" or "pastel" pencils are semi-soft with a colored lead, combining the properties of both colored and pastel crayons. · Colored contour pencils are used for artistic coloring. They have increased rigidity and allow you to create thin and clear lines. · Watercolor pencils that, when washed with water, give the effect of painting. |
Master classes
In most cases, the owl is depicted full-face, because this is how it can be seen most often: looking straight at a person with big eyes. However, it can be depicted from the side or slightly from above.
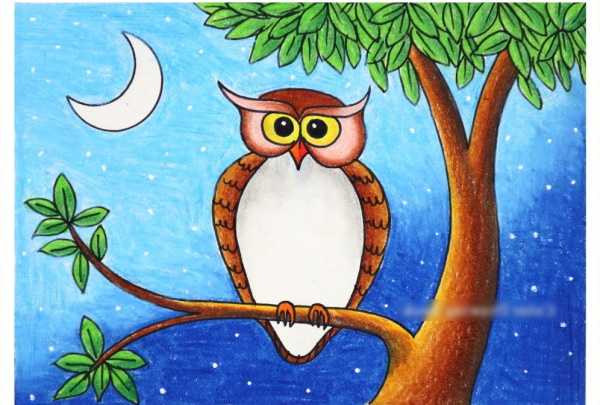
Cartoon owl
An owl in a drawing for children may differ from a realistic image when done in a more simplified manner. You can get an image of a chick with round eyes and a typical appearance for this bird. The owlet will resemble a character from a fairy tale or cartoon.
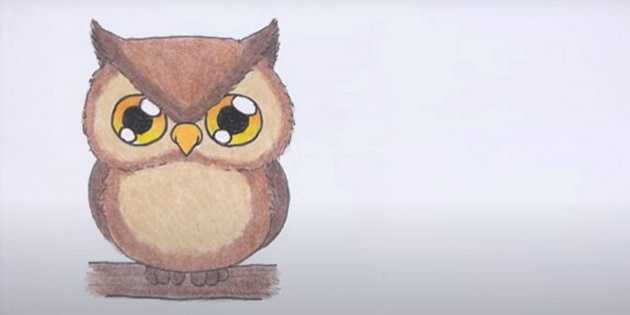
There are graphic elements and a color palette, obvious associations are selected.
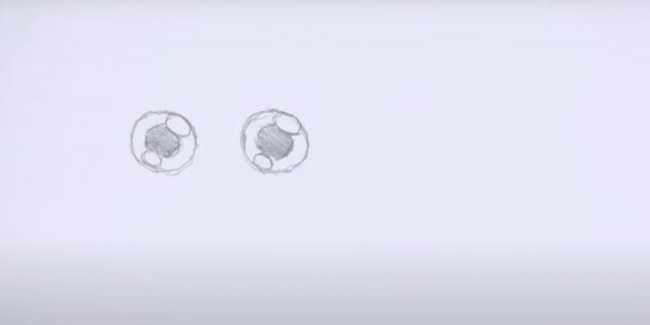
- Draw 2 circles that will symbolize the owl's eyes. Draw pupils in the center, and 2 highlights near the contours. The owl's eyes are large and round. Add 2 bright highlights in the form of dots on each side of the eye.
To do this, draw an arc from the outer part of one pupil to the outer part of the other. Divide the line of each arc into 2 equal parts and draw highlights at 2 points at a distance from the pupils.
- Draw a beak that resembles a triangle with the tip pointing down. It should look quite massive and at the same time have a rounded shape. Place the beak between the bird's eyes.
- The triangles symbolize the ears. Place them vertically with the apex pointing upwards.
- Draw a small triangle with its base facing the beak and its apex facing the ear. This will be the top of the head.
- Draw a small, round body, paying attention to proportionality in relation to other parts of the head.
- Draw a horizontal line so that the body is divided in half in relation to this line. Add a segment vertically to this line on the left and right at an angle of approximately 45°. This is an image of folded wings.
- Complete the sketch of the owl's paws, consisting of 3 fingers with claws, directed downwards from the body. They are depicted as 8 curved strokes.
- Draw 2 lines of approximately the same length. One of them should be slightly higher than the other. This will be the branch on which the owlet sits.
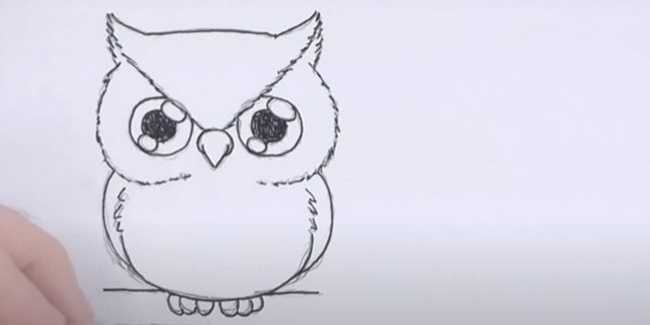
- Outline the drawing with a black pencil to enhance the contrast with the future flowers.
- Erase the auxiliary lines, leaving only the outline of the owl and the branch.
- Shade the chick's chest area with a large beige spot, adding softness to its image. Place an additional beige spot on the forehead in the eyebrow area to indicate the front part of the head. Leave another spot next to the right eye.
- Add details with a light brown pencil. Shade the top of the head, the sides of the head and the body of the owl. Use strokes of different lengths and thicknesses to convey the gradient of shades.
- To make the owl's face look more realistic, use an orange pencil to color the irises and beak. They should look voluminous and shiny.
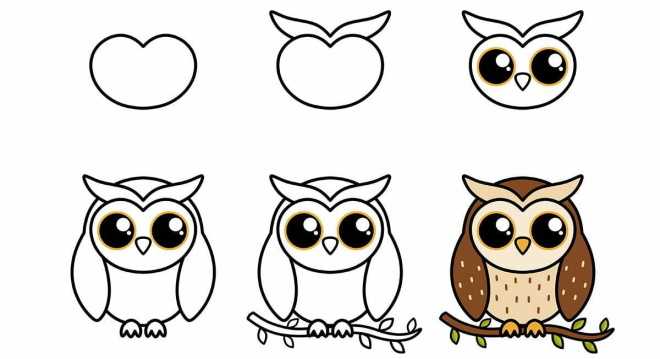
- Use a dark brown pencil to color the wings. To emphasize their volume, use a combination of thin and thick lines. The bird's wing has a fairly complex structure, including flight and covert feathers, so it is not worth leaving it monochromatic.
You can add shadows by applying it more densely or use shading to make the color transition natural and smooth, and to avoid sloppy lines. Use dark brown lines to highlight the fingers and the branches depicted.
Draw the sharp edges of the sheets with a darker shade to create the impression of volume.
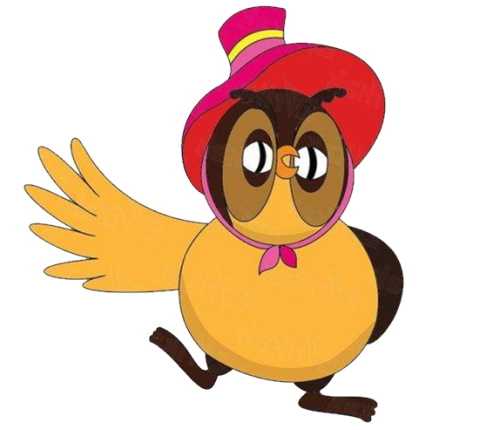
From the Soviet cartoon "Winnie the Pooh"
An owl in a drawing for children from the cartoon about Winnie the Pooh requires a well-thought-out composition and adherence to basic proportions.
If you follow these steps:
- On a sheet of paper, using a simple pencil, draw 2 intersecting circles. One circle should be quite large and almost completely located under the horizontal line, which is also present in the sketch. The second, smaller one will be the bird's head.
- Erase unnecessary auxiliary sketch lines. Only circles should remain.
- Sketch the bird's body. Finish drawing the eyes, which should occupy almost the entire area of the head of the drawn character. Start with large ellipses, schematically add 2 smaller ovals inside them.
Below the eyes, draw arched lines that connect to the bottom of the Owl's figure, thus forming a beak.
- The bird's paws are long. There should be 3 fingers, and the left paw should be extended upwards. Draw the pupils of the bird. In the ovals depicting the eyes, add circles, and in the circles - 2 vertical lines. Between the eyes, we designate a small beak of the bird.
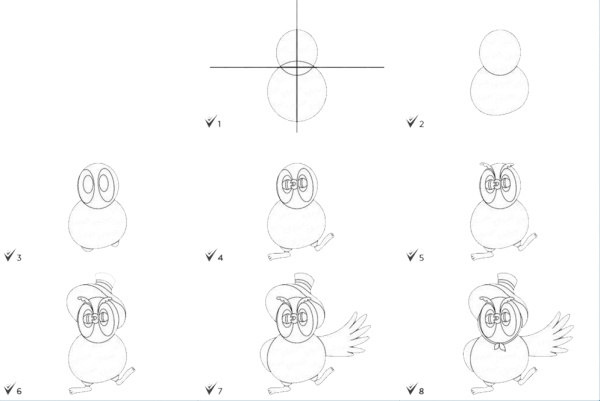
- Draw eyebrows above the eyes.
- Draw a hat on the Owl's head. It should resemble a small cylinder with a ribbon.
- Extend the bird's left wing to the side, adding 6 feathers of different lengths to it. Leave the right wing behind the character's back, marking it with a curved line.
- To complete the look, add ribbons to secure the hat to the Owl's head.
- Paint the Owl's body and beak in orange and brown. The eyebrows and pupils should be black for contrast. The hat is red with pink added, and the ribbon on the top hat is yellow.
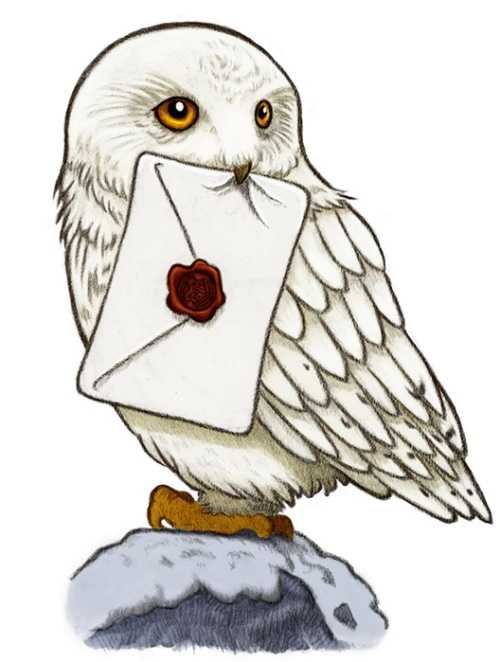
Hedwig from the Harry Potter films
The owl in the children's drawing from the Harry Potter films may differ from its prototype, since there is no single artistic image of Hedwig in the books and films. She has a large round body, a wide chest, and a fairly large round head.
Step by step:
- Mark the owl's head with an oval. We orient it to the central line of the sheet.
- The 2nd oval, narrower and larger, will represent the body. It should intersect with the 1st. Observe the proportions: the head is small, the neck seems very short, and the body is voluminous.
- Mark the area where the owl's paws will be.
- On the head, draw a central direction line that will help to correctly construct the eyes and beak.
- Conventionally designate a stone. The owl from the wizarding world often sits with letters on them.
- Draw a large elongated triangle on the body - this will be the outline of the bird's wing.
- Connect the head to the body with smooth, soft lines, indicating the neck.
- Draw the bird's head in detail: tufted ears, eyes, beak, and feathers on the head. The owl's eyes are closer to the beak than those of other birds.
- Draw the paws with claws. The owl is sitting on a rock and leaning on it with its paw - depict this. Mark the claws, which should start a little earlier than the end of the fingers. They will be slightly longer than the length of the free edge of the paw.
- Draw a wing with feathers. It is not very long, but it gives volume and expressiveness.
- Draw the bird's huge eyes and the upper part of the beak. The beak shape can be curved, the lower part is not visible due to the writing.
- Add a small tail fragment. Place it right behind the wing, so that it is partially hidden behind it.
- Work on the stone, making it three-dimensional.
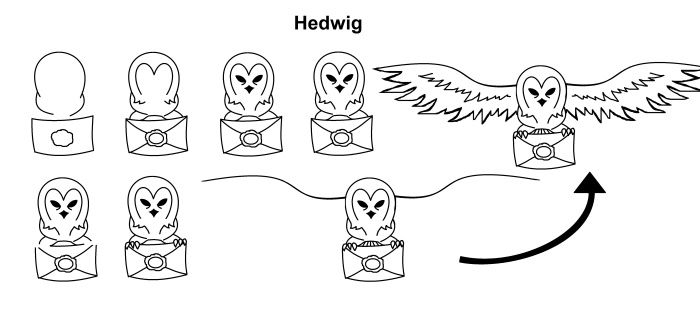
- Draw an envelope with a seal that the owl is holding. The seal can be similar to the Hogwarts crest. You can make the drawing more complex by adding texture to the envelope (for example, by depicting folds in the paper formed by the beak).
- For volume, use a gradient from light to dark, as well as shadows falling from individual parts onto the surface. Use different shades of gray or other colors depending on the type of paper.
Use different techniques to create texture, such as layering shading or using softer, more fluid lines in certain areas of the drawing.
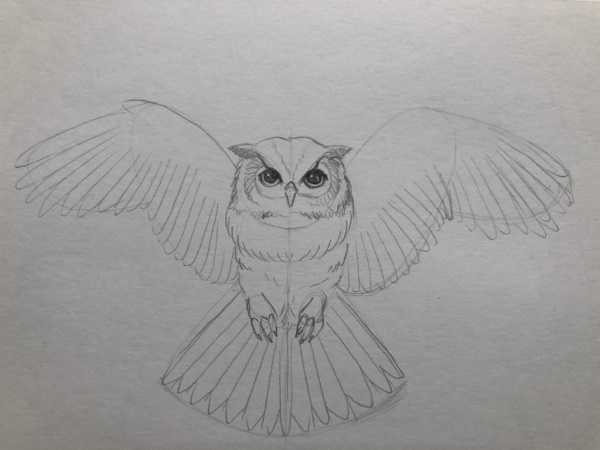
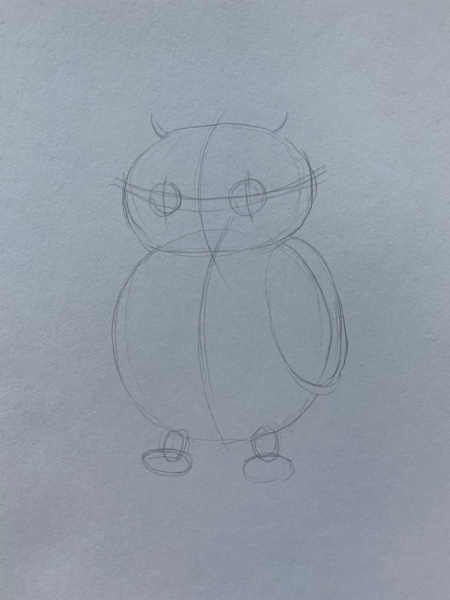
With wings spread
An owl drawing for kids can be drawn using the following steps:
- Determine the position and general proportions of the figure: head, body, wings and tail. The outline of the head and body should form an egg shape, about the size of a fist. You can start with the head, as it is the most important for recognizability of the owl.
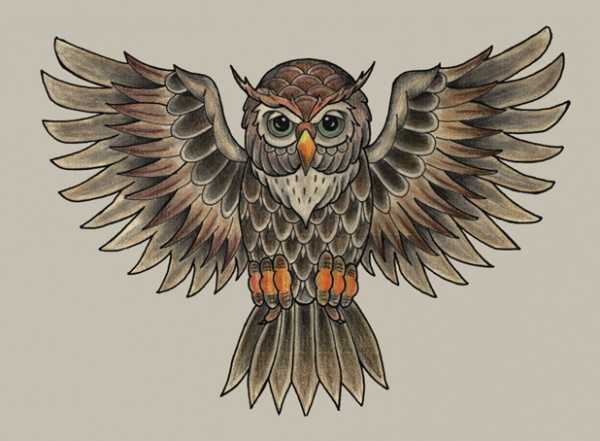
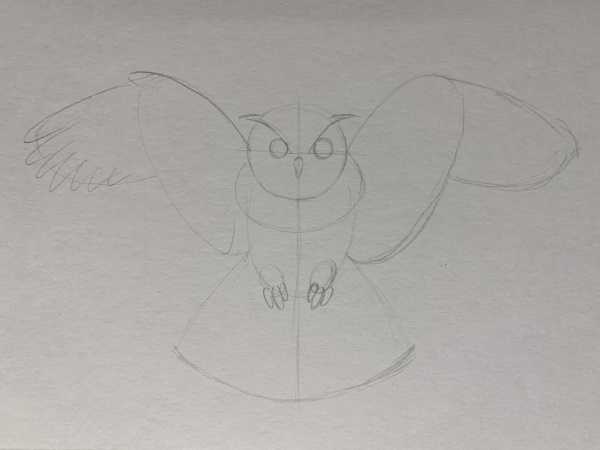
- Draw the feathers on the wings: on the outer side of the wing they have a more distinct shape and pointed tips, and on the inner side they are rounded, soft and tightly adjacent to each other. The feathers should be directed in one direction and evenly distributed over the entire wing.
- Draw the shape of the eyes - they should be large and round, with a narrow slit of the pupil inside. Add highlights on the surface of the eye using a light shade. This will help make the owl's gaze more expressive.
- Outline the beak, giving it the shape of a curved triangle or a hooked shape at the base. Mark the sharp edges of the beak and its thickness, which should be greater at the base than at the end.
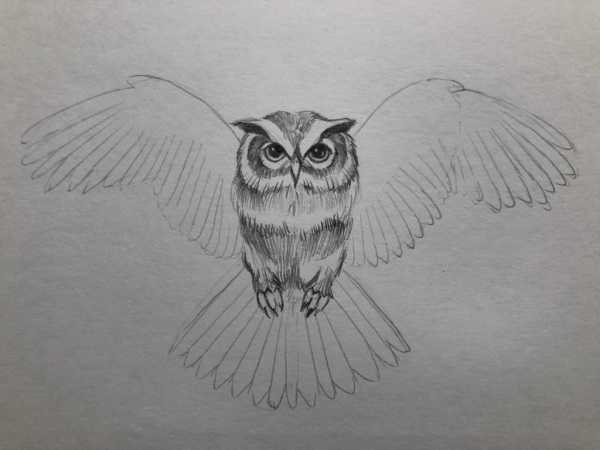
- Reflect the peculiarity of the owl's neck structure - quite wide and short. Draw a smooth line from the head to the body, leaving space for further details.
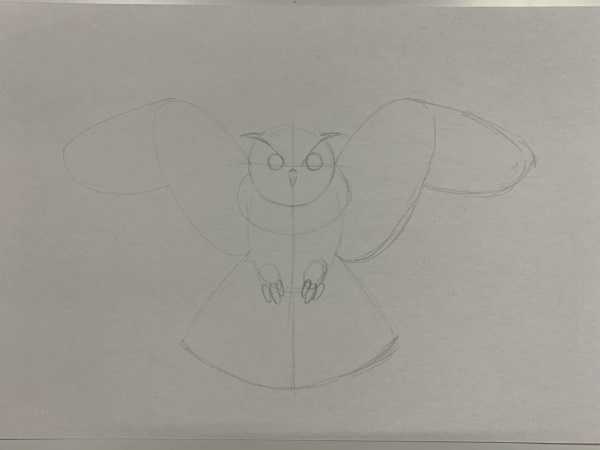
- The owl's ears are almost invisible, but you can draw them as small oval protrusions on the head. Make them small, placing them closer to the bird's eyes.
- Draw the owl's paws in such a shape as if the bird had tucked them in. They should look strong, with short fingers and sharp claws.
- Work on the feather details on the owl's head, body, and tail. Use thin lines to create small details, such as individual feathers, shade transitions, and complex contours. Pay special attention to the tail - its feathers should have a clear shape and direction.
- Determine which lines or details are no longer needed to create the overall image. Remove them so that the details become more expressive and understandable.
- Shade starting from the contours of the head and body and gradually moving to the inside. Use small strokes to create volume and shadows, making transitions between light and dark areas.
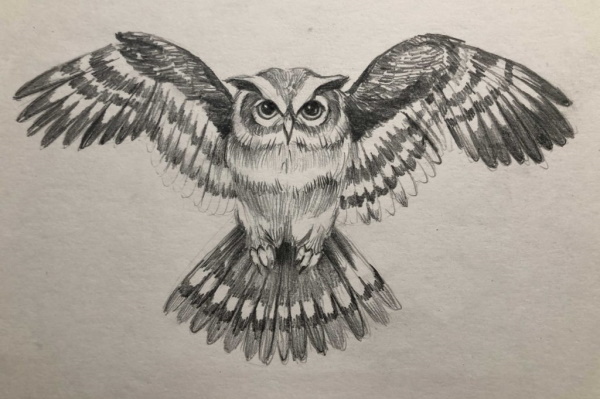
- Moving from hatching to shadows, emphasize the corners and contours of the head and body. Provide light and shadows on them. This will add liveliness and character to the drawing, emphasizing the volume. Check the balance of contrasts and shadows.
On the branch
In the picture, the child can create a realistic and expressive owl using colored pencils according to the stages of the master class:
- Start by drawing an oval that will represent the owl's head. It should be clearly visible on the sheet. You can draw it with any graphite pencil.
- Draw a larger oval under the head — this will be the body. Both figures should intersect. For the correct orientation of the head and the position of the owl's body, it is convenient to draw a central line on the head, which will serve as a guide for the bird's eyes and beak.
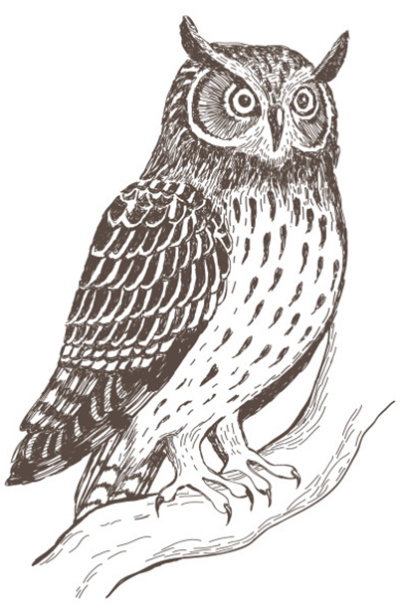
- Roughly designate the branch. It should be positioned in such a way as to coincide with the supposed fan-shaped arrangement of the owl's paws and fit into the overall compositional solution of the drawing. It can be drawn with a few strokes without detailing.
- Mark a triangle for the bird's wing. The side of the figure should be directed toward the center of the owl's body, and the upper corner should coincide with the top of the oval head.
- Draw lines from the head to the body, connecting them together. The owl's neck should be inside the oval of the body. Use light lines to outline the outline of the owl's body.
- Draw the bird's head in more detail, using the central line to maintain symmetry and correct proportions.
- Draw the owl's legs under the body. Draw the claws on the paws. The owl stands on a branch on 2 legs, so they should be directed in different directions and differ in length. The shape of the foot is quite flat and wide, almost round.

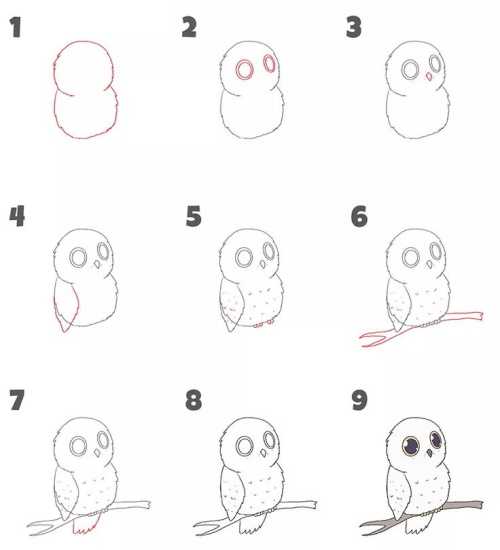
- Finish the bird's wing, refining the outline and shape. The wings should be wide and flow into the tail and body. Draw feathers on them using intersecting lines. Add details on the inner part of the wing
- Mark the eyes, nose and beak.
- Work out the details in detail: the pupil, beak and plumage.
- From the lower part of the owl's body, draw lines depicting a small tail hidden under the wing.
- Give the branch a realistic volume by drawing the bark. The branch can be slightly curved. Add small leaves and branches.
- Make the drawing colorful using appropriate shades of gray, brown and black.
- Apply shadow, working out the volume of the bird and the branch. Use a dark pencil to create it.
Tips for Beginners
Recommendations that can help in the process of drawing an owl:
- First, you need to decide how to place the bird on the sheet of paper. If it takes up most of the sheet, this will give the drawing dynamics and expression.
- Use the horizon line to give volume and perspective to your drawing.
- The owl's head is large and round, with large eyes. It needs to be given volume using shadows and light.
- The owl's body is compact and streamlined. Care must be taken to ensure smooth curves to create a realistic image.
- To maintain realism, use shades of green and brown in the owl's plumage area, gray and dark gray for the details of the raven and beak. Eyes and pupils can be drawn in black or dark brown.
- The shadow should not be too dark, as this will distort the drawing.
- If necessary, add a highlight to the eyes and a reflective point to the beak. This will enhance the visual perception.
- The background can add depth to the drawing. It could be a tree trunk or just faint lines of branches behind the owl.
- Hatching helps convey surface texture and create volume. You should try different types of hatching, such as vertical, horizontal, diagonal and circular, to add variety to your drawing.
The owl is one of the most recognizable symbols of wisdom. Drawing this bird can be a fun activity that develops a child's artistic taste and drawing skills.
To create a beautiful and accurate image of birds, attention to the peculiarities of pencil drawing technique, knowledge of the basics of constructing and perceiving form, as well as the ability to work with composition are required.
Video about drawing
Owl drawing for kids: