Scrapbooking is a technique of creating cards with your own hands for those who want to make an original gift to a loved one or surprise friends or colleagues at work with their talent.
Tools and materials for scrapbooking
Scrapbooking (hand-made cards) is an activity that allows you to create unique gifts for any holiday.
Training in technique should be carried out using high-quality materials and tools:
- Rug, capable of self-healing. It will not only prevent scratching or damaging the tabletop, but also will not allow the tools intended for cutting to become dull.
- Stationery knife. It is better to buy this part in a hardware store. Such a knife will cost more, but the quality of the product is much higher.
- Knife for artistic cuttingFor those who can afford to buy only one of the two knives, the artistic one should be preferred, but it is much more convenient to use two types.
- Scissors. Don't skimp. Scissors should fit comfortably in your hand and not lose their functionality.
- Tweezers (tweezers). It is better to buy several at once, because in the process of work they will all come in handy for giving the correct shapes to the future postcard. There are three types of tweezers for scrapbooking - regular, reverse and curved.
- Ruler.
- Puncher - regular or curly.
The set of tools described above is a basic one to get you started.
Materials:
- Paper – the basis for creating postcards, so you will need several varieties: cardstock – a very dense material resembling cardboard, useful for boxes, postcards, album covers and notebooks; decorative paper (there are many varieties); pictures for cutting, available for sale in the form of a set that offers a wide variety of figures for decoration.
- Rubber and silicone stamps. Silicone stamps have a shelf life of 3 years, after which they fail. Rubber ones are more durable.
- Ink different colors for stamps.
- Crayons, pencils and paints.
- Mmaterials for decoration and embellishmentYou can select parts for a specific job or purchase a batch of various decorations at once.
Types of cards in scrapbooking technique
Scrapbooking highlights one of the areas – creating cards with your own hands. This is not only a unique and inimitable gift for any celebration, but also an opportunity to create a thematic greeting card, which can be made taking into account the preferences of the recipient. Such cards are available for all occasions – from children's to weddings.
Children's
When creating a card together with a child, one of the most popular options is the decorative design of a child's handprint on a heart made of thick cardboard. Congratulations are written on the back. Such a gift will be ideal for a baby's mother or grandmother on March 8 or a birthday.
Technique:
- The child should place an open palm on the prepared heart. Then the outline of the hand is carefully traced with a simple pencil.
- The palm can be decorated with pieces of decorative paper by gluing them over the entire area.
- The rest of the heart can be decorated with a wide variety of materials and details.
- If desired, you can attach a decorative string to the card for hanging, for example, using a stapler.
To create a postcard for a child you need:
- hard cardboard;
- double-sided adhesive tape;
- hole punch;
- confetti;
- hard glue;
- beads;
- paper flower;
- openwork paper.
Steps to create:
- The cardboard sheet needs to be folded in half, and white lace paper needs to be glued to the inside (a little later the congratulatory text will be written on it).
- The front side must be covered with openwork paper exactly to the middle. Then, along the bottom, you need to glue the tape, in the middle, install a pre-printed pattern template. In the corner of the template, you need to glue a paper flower, in the middle of which a bead will be installed. Along the edges, the template is smeared with glue and generously sprinkled with confetti. After the glue has completely dried, the remaining confetti is blown off with extreme care.
For women
Scrapbooking (the technique of creating cards with your own hands) is one of the ways to congratulate the most beloved of all women in the world - mom. It will be nice for children to present a card made with their own hands. And for the mother it will be a symbol of true love.
This gift will be ideal for any holiday.
The technique is always the same, you can only change the colors and words of congratulations.
Option #1
To do this you will need:
- multi-colored paper;
- paper with watercolor coating;
- lace fabric;
- satin ribbon;
- artificial flowers;
- a set of multi-colored buttons;
- scissors;
- glue;
- plastic ruler;
- felt-tip pen.
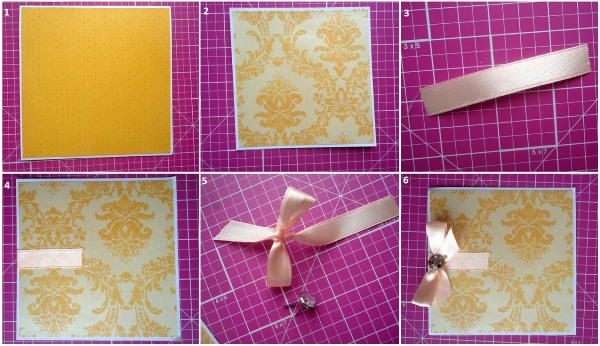
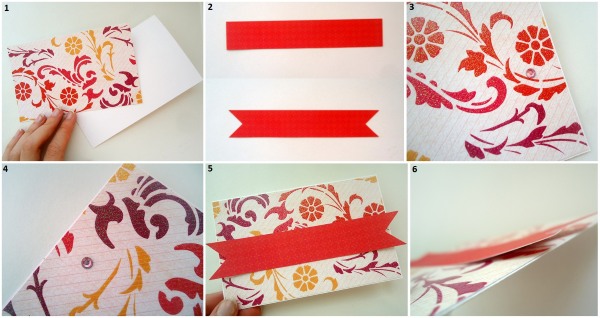
The work process should take place in a calm environment:
- The sheet of paper is folded in half.
- 4 rectangles must be cut out of colored paper of any shade.
- Various lilac-colored elements are glued onto others so that both sides of the folded sheet look identical.
- You need to write the words of congratulations in beautiful handwriting and circle them in a beautiful frame using a felt-tip pen.
- You need to step back about 1 cm from the congratulatory text and paste over it with rectangular blanks from point No. 2.
- Now it's time to attach the lace fabric and tie a ribbon on top.
- All the colored parts need to be glued to the paper blank (which was folded in half).
- Using the remaining satin ribbon, you need to form a beautiful bow and use glue to attach it to the surface of the card.
- Glue on flowers and colorful buttons.
- The final touch is to draw a monogram along the edges of the finished card.
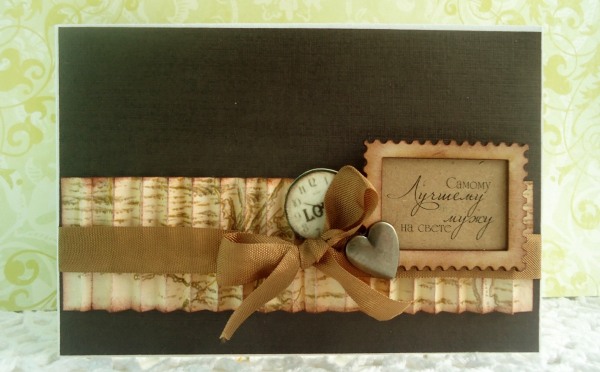
Option #2
Another option for creating a postcard for women. Scrapbooking is an incredibly wonderful technique for creating postcards with your own hands. By correctly following the steps for creating greeting cards, you can not only surprise your beloved women (mother or grandmother), but also make your modest gift a real work of art.
To do this you will need:
- retro style template;
- thick cardboard;
- paper with a corresponding pattern applied;
- sponges;
- paints;
- colored inks and stamps;
- brads and scissors;
- paper glue;
- double-sided tape.
During the work process you will only need to take a couple of simple steps:
- Using decorative elements, it is necessary to create the basis of the picture. In this case, the paper should be slightly crumpled and toned.
- The composition comes together into one whole.
- All parts must be glued to a cardboard base - some with glue, the rest with double-sided tape.
For men
When choosing a gift for a male, a situation often arises in which it is very difficult to decide on the subject of the gift, because it is more difficult to surprise and delight men. In order to surprise your beloved man, you need to think over the design of the future card in advance.
Scrapbooking offers handmade cards for men, made in a neutral version, but if desired, you can add several decorative items, and a thematic gift with a deep meaning will be ready. This version of the card when folded will have a size of 15X15.
Therefore, to create it you will need:
- scrapbooking paper;
- powder;
- hair dryer;
- darkening elements;
- scissors;
- paper glue;
- decorative scissors or ornamental hole punch;
- textured paper.
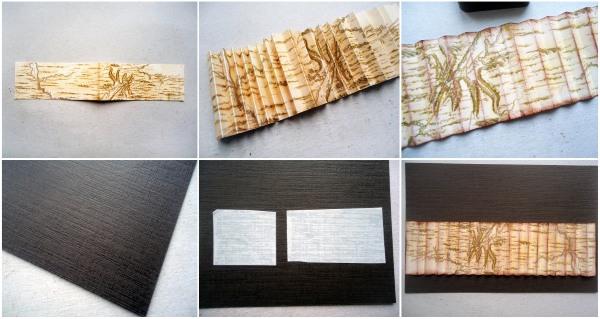

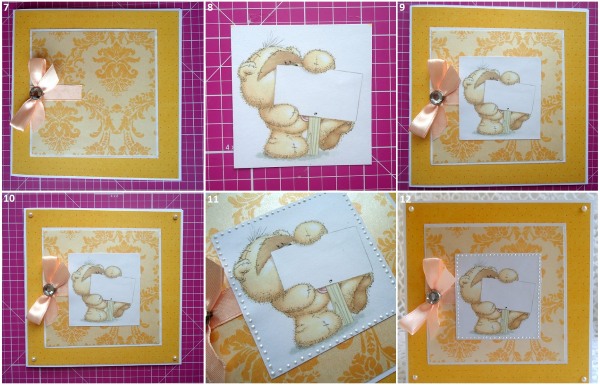
In the process of creating a brutal postcard, you will need to take a few simple steps:
- Scrapbooking paper is folded in half.
- Next, you need to create a drawing for the background of the future postcard. For this, a special transparent powder and a stamping tool are used. The powder is applied to the surface of the paper, and then heated with a hair dryer, after which the surface is tinted with a dark color.
- On the sheet for the background, stripes approximately 3 cm wide are marked, the edges are given a torn appearance.
- To create a tag with slogans, you need to print the text on textured paper, then cover it with tint, and then cut it out using a hole punch or decorative scissors.
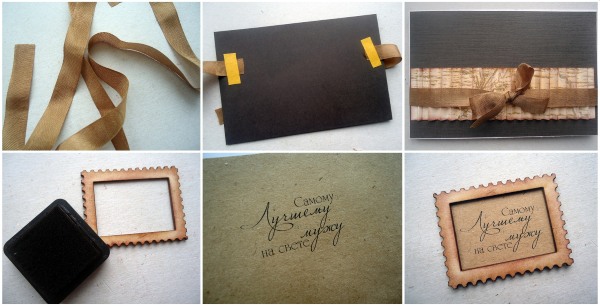
- The resulting composition must be glued to the base of the postcard and the corners of the composition must be decorated.
- To add brutality, it is permissible to use metal inserts and other decorative elements.
- The interior is designed according to individual preferences.
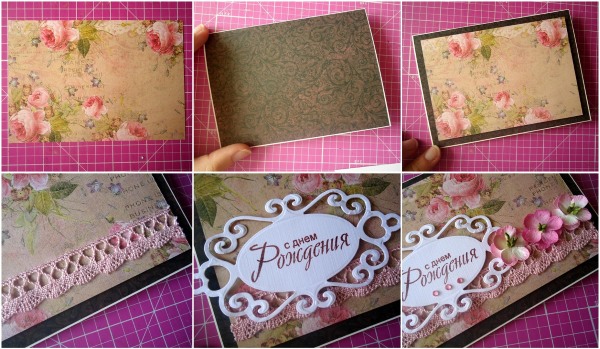
Congratulatory
Scrapbooking is a type of applied art for creating unique cards with your own hands.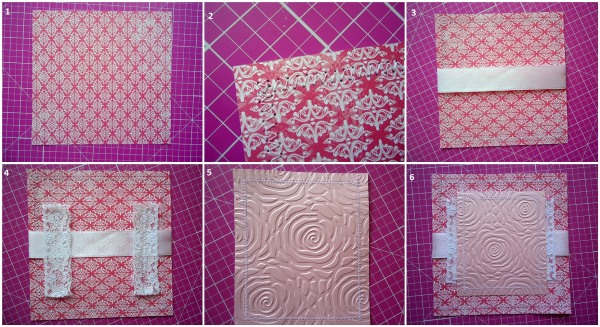
By following the step-by-step instructions below, you can delight your family and friends with an original greeting card:
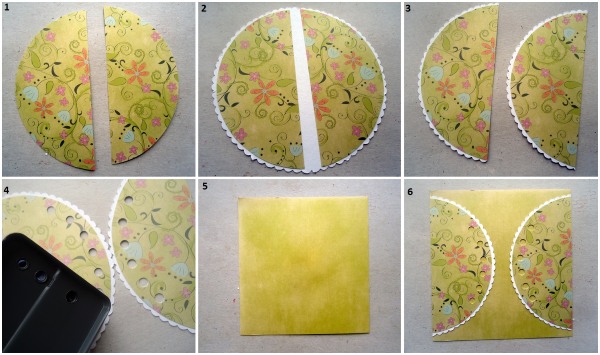
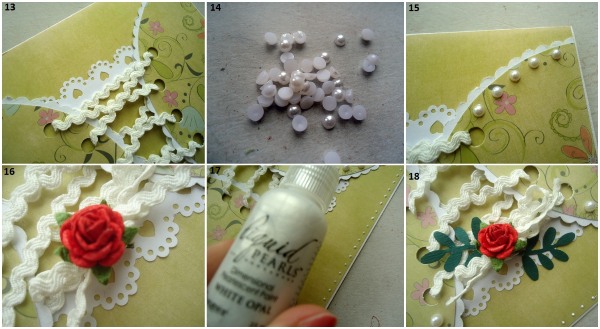
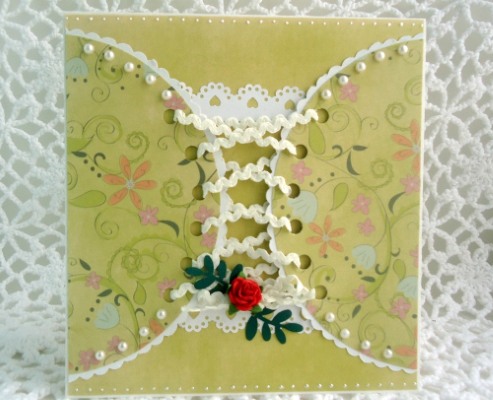
- From watercolor paper, you need to cut out the base for the future postcard and put it aside. Then from the same paper, cut out the backing for the background, it should be 4 mm smaller than the base. Using scrapbook paper, you need to cut out the necessary background 4 mm smaller than the backing. Using other scrapbooking paper, you need to cut out a rectangle, the length of which will be equal to the width of the background, and the width is one third less than the length of the background.
- From the resulting rectangle, you need to cut out a pattern using a border punch.
- The edges of the future postcard are tinted using a stamp pad in the required color.
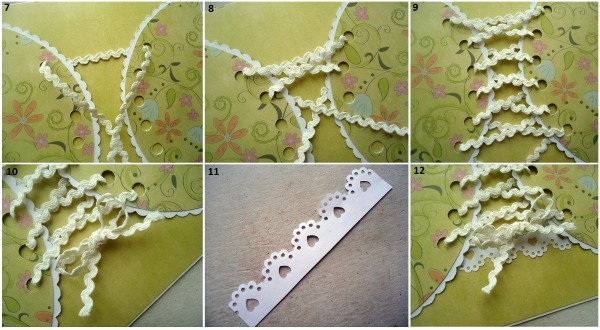
- Using a decorative hole punch, create a pattern of leaves and branches on scrapbooking paper for decoration.
- The flower blanks are made from scrapbooking paper in a rich, bright color. A flower punch is used for the creation.
- Using embossing tools, the finished flowers are given volume and glued together in pairs.
- From thick watercolor paper you need to cut out 2 circles of different diameters. Flowers will be glued to them.
- You need to glue the leaves onto a smaller circle, alternating them with twigs. The objects should be located in close proximity to each other - this way you can achieve the effect of splendor.
- The resulting flowers need to be glued onto a larger circle. A half bead is fixed in the center of each of them. After that, the circle with flowers is glued onto the circle with leaves.
- The rectangle with curly edges should be fixed to the background part (which is already attached to the base). The text of the congratulation should be written in beautiful handwriting. The flower arrangement should be fixed to the center of the card with double-sided tape. Flowers, leaves, and twigs can be placed on both sides. The entire arrangement is glued to the base of the card.
When creating, you can experiment with colors, creating a unique masterpiece of handicraft.
For the wedding
You can congratulate the newlyweds using the scrapbooking technique and creating a card with your own hands.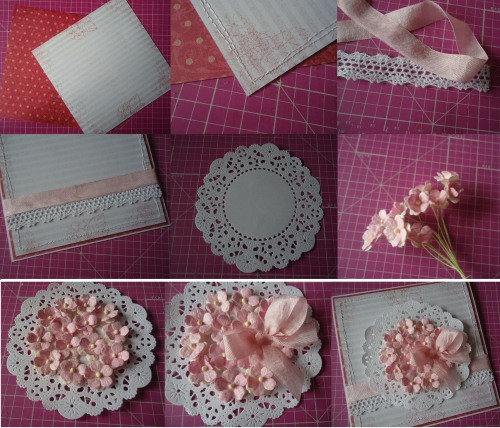
To do this you will need:
- white watercolor paper;
- scrapbooking paper in pastel colors;
- white satin ribbon and snow-white lace;
- various decorations;
- ink paint for tinting;
- hot glue gun;
- pencils, ruler, sponge;
- scissors and a stationery knife for paper.
Steps to create:
- On the cut out base for the card, you need to make bends along the edges.
- Using scrap paper, cut out all sorts of decorative elements for the future postcard.
- All cut out elements are tinted with ink and glued onto paper.
- A white satin ribbon is glued to the back of the card.
- The card is covered with decorations on the inside and outside, except for the front part.
- It is permissible to glue a rectangle cut out of a notebook sheet inside to write a congratulatory text.
- The unused base is covered with lace, after which the card is filled with text and tied with a ribbon.
- The final touch will be decorating the card with beads, rhinestones and flowers.
For my birthday
Materials you will need to create a birthday card:
- colored paper;
- watercolor paper;
- colored cardboard;
- brushes and watercolor paints;
- colored pencils;
- double-sided tape, paper glue;
- ruler, pencil and paper knife;
- bubble wrap and file;
- inscriptions and pictures are selected at will;
- multi-colored buttons for decoration;
- needles and threads.
Steps to create a masterpiece:
- First of all, using a ruler and a paper cutter, you need to cut the colored cardboard and watercolor paper into shapes of the required size.
- Then the backgrounds are prepared. To do this, you need to wet the sheet with a brush, after which the paper is painted in the desired color.
- After this, stains of paint, the shade of which is darker than the background, are made on a polyethylene file for documentation.
- The painted rectangle is applied to the file and pressed lightly.
- Next, stamping is added. This will require bubble wrap, the protrusions of which are painted with paint darker than the previous ones. Then the film with dye is applied to the background, pressing lightly.
- Similar actions should be carried out with all blanks. After which the prepared products are left to dry.
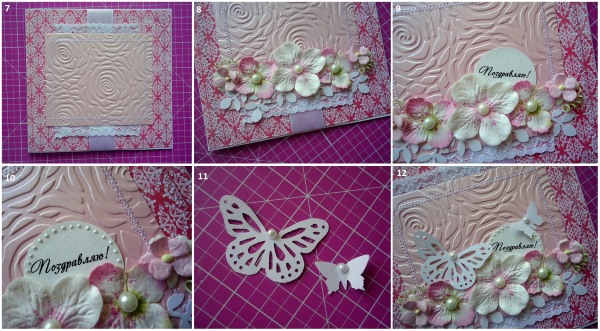
- The inscriptions and blanks need to be given a shade. To do this, take the desired color of the pencil and shade the surface at an angle, after which you need to use a cloth to shade the painted surface.
- Decorative elements are created (they can be different), for example, circles of different colors and sizes.
- The parts are glued to the backing. You can draw an imitation of a sewing machine stitch on top.
- Then the base for the card is prepared. It is necessary to create a creasing - the intended bending point.
- The finished backgrounds must be pasted onto the inside of the card.
- The design includes gluing pictures, inscriptions and circles in alternating order.
- At the very end, you need to sew multi-colored buttons to the glued circles.
This unusual postcard will be a great gift or addition to the main surprise for any birthday.
On March 8th
When creating a postcard for March 8, the seasonality of the holiday is taken into account. It should be bright and colorful.
Here's what you'll need to make Women's Day cards:
- decorative tape;
- A8 paper (thick);
- scrapbooking sheets (multicolored);
- sewing machine;
- scissors;
- glue stick;
- double-sided tape;
- threads and needles;
- decorative elements (buttons, flowers, circles, etc.);
- herbariums of flowers;
- pre-printed inscription;
- brads;
- hemp.
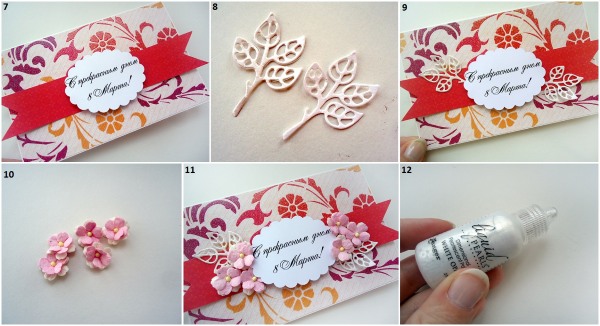
Stages of making a postcard:
- A base of a suitable size for a postcard is cut out of thick paper.
- Scrapbooking paper is selected and a rectangle is cut out of it. The fragment should be smaller than the front side of the card base.
- The contours of the rectangle need to be stitched.
- The resulting element is glued to the base of the postcard.
- The decorative tape is glued to the tape. From the remains of the same tape a flower is formed, the edges of which are secured with threads and a needle.
- After this, you need to add decorative elements – colored buttons.
- Dried flowers should be secured with double-sided tape.
- It is advisable to design the inscription with beautiful curls of the letters.
- Brads are threaded through the left side of the inscription.
- Then the inscription with the text is glued to the finished postcard using tape.
These simple steps will allow you to create a unique postcard and please a loved one.
Valentines
February 14 is the International Valentine's Day. According to tradition, every lover should present his Valentine with a heart-shaped card. You don't have to buy ready-made templates, but make them yourself.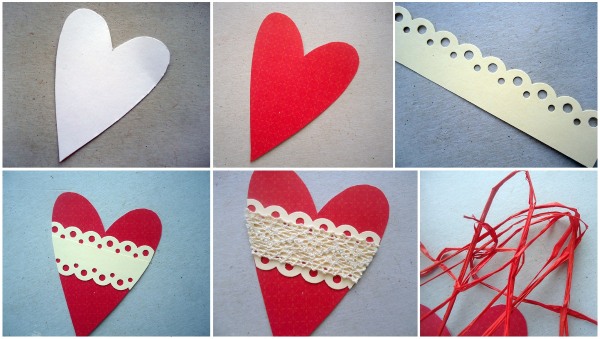
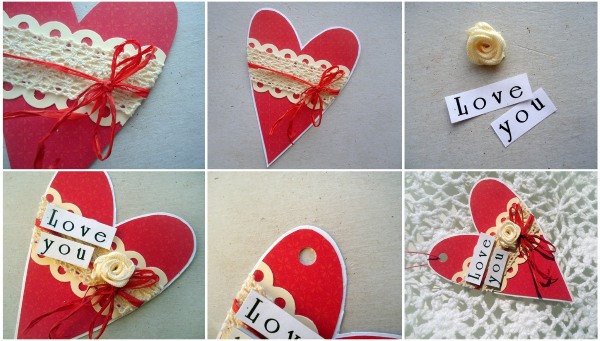
This technique does not require any special scrapbooking skills, but some points must be observed:
- the colors of the cards should be pink or red;
- small sized postcards look best;
- It is best to make postcards in the shape of a heart (as a last resort, you can use decorations in the form of small hearts);
- Avoiding common phrases when writing text will help create a memorable postcard.
Master class on creating a postcard
The popularity of origami, a type of Japanese art, has led to entire communities being created all over the place offering master classes. As a rule, they offer training in basic skills that are available on the Internet, and folk craftsmen have gone further and created entire structures for making unique and inimitable cards for all occasions.
Scrapbooking is a dynamic system for creating cards with your own hands.
It does not require special skills, the main thing is diligence and imagination. And those who have mastered the art of creating creative cards to perfection can open their own business producing greeting cards. It is enough to watch one master class on creating cards in the scrapbooking style, after which the desire to create beauty from paper will become irresistible.
Video: scrapbooking - cards with your own hands
Simple scrapbooking cards, see the master class:
Let's make a scrapbooking postcard for March 8: