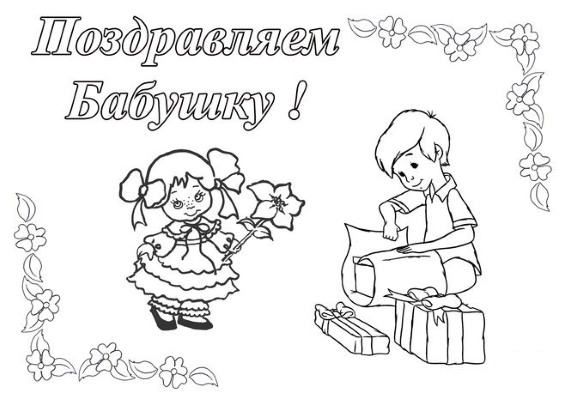
On grandma's birthday, you want to give her not just a purchased gift, but something that will make her especially happy. A great option is a handmade card. Such a birthday gift will be a pleasant surprise for grandma, showing her grandchildren's love.
How to draw a postcard with pencils
The simplest option is a hand-drawn postcard. Even an inept drawing with crooked letters by a small child will be dear to grandma. And with a little help from parents, you can make a beautiful, neat postcard.
To do this you need:
- prepare a sheet of thick paper, pencils, markers, paints;
- fold a sheet of paper in half to form a postcard;
- Decorate the title and inside of the card with children's drawings. This could be a drawing of a person, a flower or a bouquet of flowers, balloons and other simple drawings;
- If the child already knows the letters, you can add the inscription “To my beloved grandmother”, “Congratulations”, etc.
Parents can help with the design: give the card an interesting shape, glue a colored base for the inscription, help the child draw the letters. An older child will be interested in drawing a picture using templates, step by step following the suggested instructions: for example, a cute teddy bear, a bouquet of daisies, a festive cake.
Simple ones made of colored paper
Colored paper appliques will help make a card bright and festive. A child attending a kindergarten, and especially a schoolchild, already has experience with such crafts.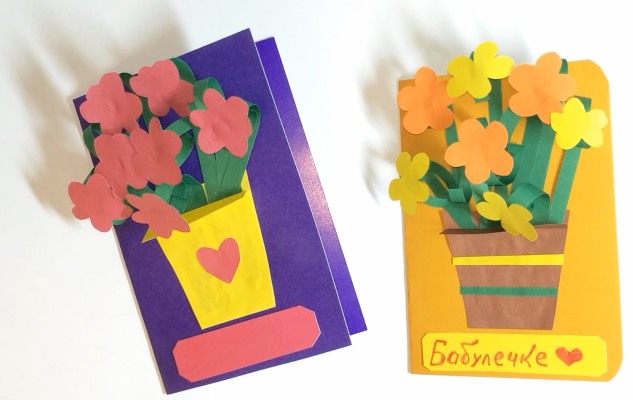
To create a postcard with a bouquet of tulips, you need:
- prepare cardboard measuring 20x24 cm for the base, colored paper, glue, scissors;
- Fold the cardboard in half to make the base of the card. If desired, you can cover it with colored paper;
- To create tulips from colored paper, cut out petals in the form of ovals with sharp tips measuring 4×1.5 cm – for one tulip you will need three ovals of the same color. Cut out straight stems from green paper;
- on the title side, form a bouquet of 5-7 tulips. To create a tulip, three petals are glued together at the lower ends, the upper ones are moved apart to form a bud. A stem is glued to each tulip;
- glue a bow made of two ovals onto the stems at the bottom;
- Decorate the inside with a frame made of colored paper, into which you should write your congratulations. You can add a small tulip, a butterfly, and other decorations.
For a birthday cake card:
- glue three tiers of the cake one after the other onto the title side – three brown rectangles with rounded top corners measuring 10×4, 8×4, 5×3 cm;
- glue cake decorations - roses, diamonds, etc. - from colored paper. For a volume effect, you can use double-sided tape;
- decorate the inside.
Postcards with volumetric flowers
Flowers are a must-have for grandma's birthday. They are also appropriate on a handmade card.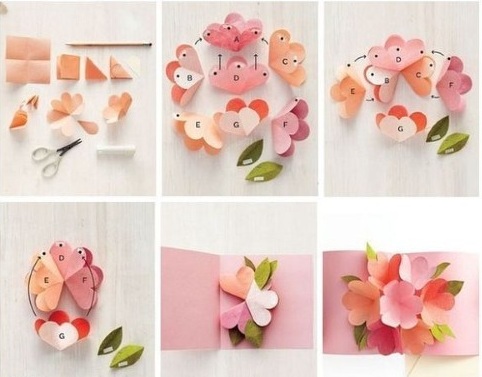
To create a voluminous bouquet, you need:
- prepare the base of the postcard from colored cardboard folded in half;
- fold a square of double-sided colored paper (the size corresponds to the diameter of the future flower) in half twice, and bend the resulting square diagonally;
- in the resulting triangle, cut the upper edge into a semicircle, forming the top of the petals;
- unfold the resulting flower of eight petals. You can slightly cut the fold lines for more volume;
- make flowers multi-layered by cutting out blanks of different sizes and successively gluing them into each other;
- glue the resulting flowers to the cover of the card only in the area of the middle or one petal. Flowers can be secured to the card with threads, placing a bead in the center and sewing it on;
- make the stems from thin tubes of green paper. After slightly flattening them, glue them in the right places;
- Cut out leaves from green paper - one per stem. Fold the leaf in half and glue one half.
Another way to create a voluminous bouquet is to bend separately cut petals lengthwise and glue them one after another only along the fold, either one end or one half.
Postcards with animals
As a decoration for a postcard, you can choose an image of a cute cat, a cartoon bear or another cute animal. Images of three-dimensional animals, created by duplicating individual parts and using double-sided three-dimensional tape, attract attention.
You can draw the figure yourself, find it on the Internet and print it on a color printer, or buy a ready-made template.
To create a postcard:
- The base for the postcard is made from thick paper or cardboard.
- The necessary background is created. For example, the outline of the grass in which the animal will sit is cut out of green paper and glued on. You can simply use paper with a beautiful pattern, glue on multi-colored circles, glitter, etc.;
- The base figure is glued onto the background.
- Duplicate parts are carefully attached to the base using double-sided tape, ensuring complete alignment along the contour.
- A congratulatory inscription is being drawn up.
You can create volume without duplicating parts. For example, when depicting a bird, the wings can be attached with volumetric double-sided tape. You can place a chick under these wings, or a bouquet of flowers that the bird holds with its wings.
With knitting threads
A handmade birthday card for grandma can be decorated with knitting threads. And you don't have to know how to knit to create a card using them. They lay out flowers and patterns, glue tightly packed pieces of thread to a drawn outline of a sweater, or lay the threads in the form of a frame.
To create a card with a doll applique:
- a postcard is cut out of a sheet of cardboard, and background paper is glued on if necessary;
- the doll's face is glued onto the card - drawn or cut out from a template;
- the face is decorated with thread hair - the child chooses the color and length himself. You can braid the threads into a pigtail and decorate with a bow;

- the outline of a dress or blouse is drawn under the face;
- the outline is carefully filled with pieces of thread pressed tightly against each other and glued to the base. If you have knitting skills, one option is to knit a small blouse and attach it to the postcard;
- the postcard is decorated with a frame made of threads or knitted ribbon;
- the inscription is added.
A funny and stylish addition would be a tiny ball of yarn with needles made of toothpicks and small beads stuck in. The ball is attached both next to the doll and on the back, under the congratulations.
What kind of postcard to make from a 3 year old child
The baby will need help from his parents, but he will take the most active part in creating the card. The grandmother will definitely be delighted by the image of the child's hand. They outline the child's hand and let him color it. The imprint of a small palm is touching when a child's hand is smeared with paint and applied to the paper.
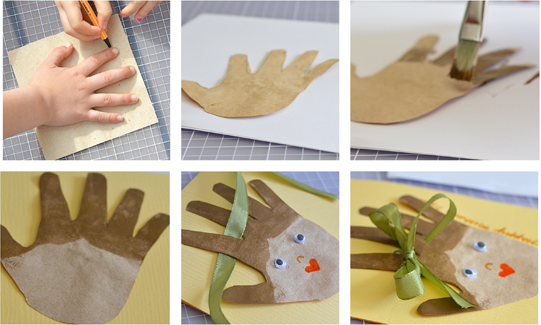
The kid can create a picture by drawing it with fingerprints:
- A postcard is cut out and decorated from thick paper or cardboard.
- The child's hand is outlined on it. You can draw another outline: a house, a heart, the sun, a daisy, etc.
- The child colors this picture by dipping his finger into the paint and then leaving an imprint on the paper.
The card can be more complex if you decorate it with a bouquet of ball flowers. Squares of colored paper of different sizes and colors are rolled into balls. These balls are used to glue the outlines of flowers and a vase. The child will not be able to do this without the help of adults, but he will roll the balls with enthusiasm.
Quilling postcard from a child 5-6 years old and older
A handmade birthday card for grandma can also be made using the quilling technique. Cards created in this style can be very colorful and beautiful. This technique requires skill and patience, and is not suitable for very young children. But at 5-6 years old, a child can create simple elements, gradually developing the skill.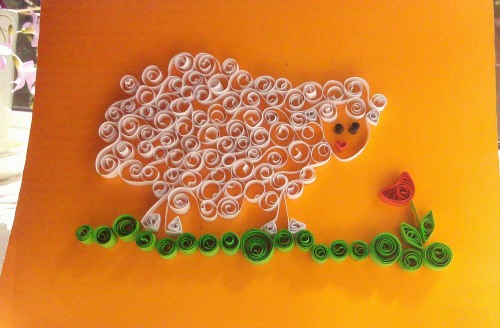
Children enjoy creating flowers, cartoon characters, and funny animals from paper circles.
A postcard with a simple quilling sheep is made like this:
- Prepare colored cardboard 20x15 cm, white paper for quilling 5 mm wide, green paper for grass, black paper for the sheep's face, multi-colored paper for decorating the frame, scissors, a special ruler for quilling with holes of different diameters, PVA glue.
- An outline of grass is cut out along the top edge of a rectangle of green paper (8×3 cm) and glued to the cardboard.
- Seven rolls of white paper are wound onto a toothpick, unraveled to a diameter of 15 mm, and the ends of the ribbons are carefully secured.
- The body of the sheep is formed above the top edge of the grass - one roll in the center, the rest around.
- A sheep's face cut out of black paper with attached eyes is glued to the top roll.
- The sheep's legs are glued on - two black strips from rolls on top of the grass.
- The image of the sheep is pasted over with a frame.
- A congratulatory inscription is added.
- You can additionally decorate with small clouds, balls, hearts, etc.
An older child can create a more complex image of a sheep from a large number of small rolls. A card with a flower arrangement will give a festive feeling.
For example, it is easy to make a chamomile:
- For this you will need paper strips of white, yellow and green colors.
- To create elongated petals, white rolls formed and spread to the desired diameter (1.5-2 cm) are compressed at both ends to give an oval shape. Green leaves are formed in the same way.
- The center of the flower will be especially effective if the yellow strip is cut into a fine fringe before twisting.
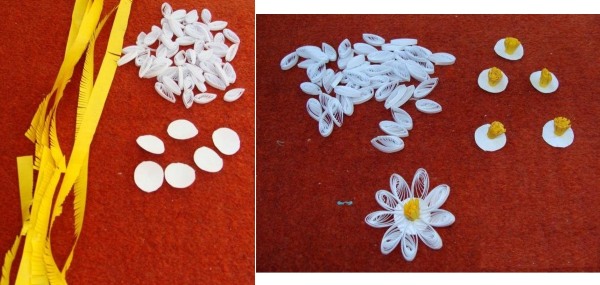
- Having twisted a tight yellow roll and slightly unraveled it to a diameter of 1.5 cm, glue it to the base and slightly straighten the cut fringe to get a fluffy center.
- Then five or six white petals are glued around.
- The stem is laid out from a green ribbon, and two green leaves are glued to its sides.
- The chamomile is ready.
You can make a daisy bouquet or a bouquet of multi-colored flowers, adding elegantly laid out stems and leaves.
Scrapbooking card
You can use ready-made scrapbooking kits, a large selection of which are offered by specialized stores. Or you can make do with improvised materials, because there are probably scraps, buttons, beads, artificial flowers, etc. in the house. Scrapbooking requires precision and perseverance, so children will need help.
A scrapbooking card in the shape of a kitchen apron looks cute and touching:
- On a sheet of cardboard measuring 20x12 cm, draw the outline of the kitchen apron, and carefully cut the sheet along the outline.

- Now you need to decorate the resulting apron. To do this, carefully glue it on both sides with fabric - a delicate fabric with a small flower pattern will do, but the color can be any.
- The edges of the card are decorated with a ribbon or tape folded in half to hide the cuts. The edging is glued or sewn on with even, beautiful stitches.
- In the chest part, holes are made in the upper corners and a 40 cm long ribbon is threaded through them, imitating the ties of an apron. In this case, 20 cm are allocated for the resulting semicircular loop, and the remaining length will go to beautiful bows on both sides, securing the ribbon and masking the holes.
- From the same fabric (or another suitable piece) cut out a pocket measuring 8x10 cm. The pocket is secured with glue to the bottom of the apron and decorated along the contour with beautiful lace.
- Delicate bows made of lace or ribbon are attached to the upper corners of the pocket. The bows are decorated with beads or small flowers.
- A beautiful sign with a congratulatory inscription is glued to the chest part of the apron or in the middle of the pocket. You can make the sign yourself or buy a ready-made one.
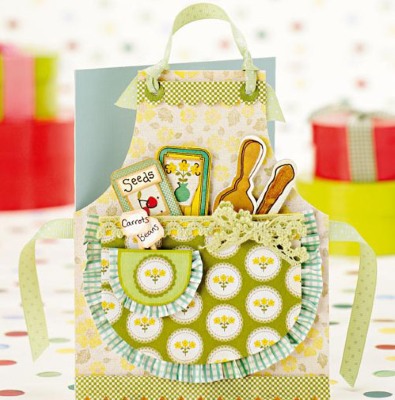
- Congratulatory poems, a small chocolate bar, or another pleasant surprise for grandma can be hidden in the pocket.
- A stand is attached to the back of the card so that the card can stand.
A teapot, apple, candy card, etc. are made in a similar way. Flat envelope-boxes made using the scrapbooking technique look interesting.
Postcard for grandma on anniversary
A handmade birthday card for grandma is a worthy gift. And an anniversary is a special date. It is worth spending time and making a complex card with an opening volumetric drawing.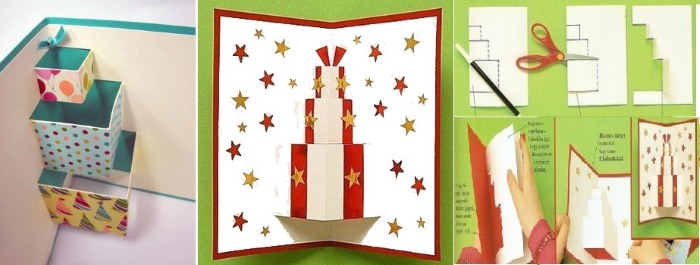
To create it:
- A sheet of thick colored paper is folded in half to make a postcard measuring 18x12 cm.
- On the fold side in the center of the postcard, make two parallel cuts 3 cm deep at a distance of 2 cm from each other. The resulting rectangle is pressed inward and folded so that when the postcard is opened, this fragment rises. Similarly, cut out two more fragments - on the left and on the right, stepping back 2 cm from the edge, 1 cm deep and 1.5 cm wide. Now, when opening the postcard, three steps rise in it - a large one and two smaller ones.
- Cut-out figures are glued to the vertical part of these steps. This can be an image of a birthday cake, balloons, a bouquet of flowers, cartoon characters, etc. It is important that they are bright, beautiful and durable. For example, a large birthday cake is glued to the central step, and small bunches of multi-colored balloons are glued to the sides. Or a Winnie the Pooh figure is glued in the center, and Eeyore and Piglet are glued to the sides. When the card is opened, these figures will take a vertical position.
- Then they design the inscription congratulating the anniversary. The inside of the card is complete.
- To make the outer part, a sheet of thick colored cardboard measuring 20x28 cm is folded in half.
- The volumetric part is carefully glued inside.
- The title side of the postcard is designed using quilling, scrapbooking or other techniques.
Original ideas for postcards from granddaughter
If the grandmother has already taught her granddaughter to knit, sew, embroider, then she will be doubly pleased to see her granddaughter's handicrafts on a greeting card. For example, you can sew a small but very elegant dress from bright fabric, decorate it with lace, beads, etc., and use it as a decoration on a card using the scrapbooking technique.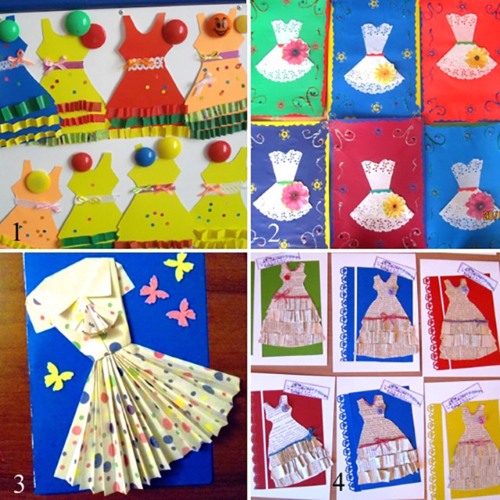
They do the same with a tiny knitted item - for example, they decorate the card with a small lace crocheted doily or make beautiful embroidery and place it on the cardboard base of the card. Grandma will show such a card to all her friends, proud of her needlewoman granddaughter.
Postcard ideas from grandson
A grandson can please his grandmother no less. If he is fond of wood carving, then a board with a wooden bouquet of flowers will become a very expensive gift for his grandmother. It can be an engraving, or a picture burned on wood, or a bas-relief postcard made of clay.
Or you can make an unusual paper postcard:
- fold a strip of thick paper 10×35 cm like an accordion – the length of one section is 7 cm;
- decorate the title part of the card with an applique or in some other way;
- place wishes, drawings, appliques on the inner pages, or stick a photo of your grandmother on each fold of the accordion;
- attach two ribbon ties or secure the accordion with a beautiful clip. The card is ready.
How else can you decorate a postcard?
Here's another way you can decorate a card for grandma:
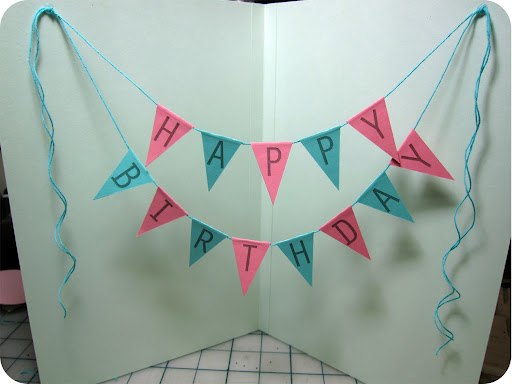
- Hang flags inside the card: a thick thread is secured in a semicircle, and small flags are attached to it. For example, with letters that form the word "Congratulations".
- Accordion inserts look very interesting, when a narrow strip of colored paper is folded like an accordion and glued inside the card with the ends facing both sides. This accordion will unfold each time the card is opened.
- Using accordions of different sizes, it is easy to form a multi-tiered cake that will be hidden inside the card.
- You can use decoupage blanks, buttons, beads, feathers, glitter. Cotton wool can be used to make wonderful clouds, and vermicelli can be used to make amazing butterflies in the form of bows.
- Postcards are made not only in two folds, but also in three, in four. And you can also fold them asymmetrically, diagonally, etc.
Grandma's birthday is a great occasion to tell her about your love. And a handmade card will make grandma much happier than a store-bought one, because love and care are put into it.
Video: Birthday Card for Grandma
How to make a birthday card for your grandmother, watch the video:
DIY 3D Birthday Cards in Video:
For 567891011 and so on?
very difficult 🙁
it's difficult 🙁
I don't like this
Yes, I agree with you
it's very complicated
It's very easy and simple. Please learn to write words very smoothly is written separately very smoothly does not like is written correctly does not like. I'm 12, and I write more competently than you do, you're 20 or even 30, who taught you to write? I have nothing against the Ukrainian language, because I myself have only recently lived in Ukraine, and in general I'm from Bulgaria.
I really like it. We'll do it now!))
- MMM, now imagine, no one cares.
By the way... I'll disappoint you... you're not literate(