After finishing crocheting or knitting a seam needs to be made, which will connect the parts of the knitted product together. This is considered an important stage of needlework, as it affects the appearance of the finished product. There are several ways to make invisible stitches on knitted products such as hats, sweaters and other clothing.
Necessary tools and materials
An invisible seam for a hat can be made using the following tools and materials:
- needle or hook;
- an item on which it is necessary to make an invisible stitch;
- scissors with pins;
- yarn that matches the fabric or textile material in shade.
The size of the needle and hook should match the thickness of the knitting threads. To make the stitching completely invisible, you need to take the yarn that was used to create the product. However, if the yarn is too thick, it is advisable to use thin threads to get an invisible seam. Thanks to this, the stitching will be neater. Sometimes, threads of a different shade are used for stitching to specifically shade the stitching.
For stitching, it is better to use tapestry needles No. 24. They have a long service life and a large eye, which allows you to quickly thread the thread.
The blind stitch is used in 2 cases:
| Way | Features of implementation |
| For hemming the product | In this case, a back blind stitch will do, so the sewing process should be done in such a way that the seam is not visible on the front side of the fabric. The stitches will vary in length, while on the front side of the hat the needle should only catch 1 or 2 threads. |
| For connecting parts | A face blind stitch is required. To do this, the cuts of the ends of the parts must be folded to the wrong side, passing the yarn through the bends of the parts. In order for the stitch to be completely invisible, the shade of the yarn must completely match the tone of the fabric. The length of the stitches must be the same on each side. |
Schemes with description of works for beginners
An invisible seam for a hat can be made using several techniques for joining ready-made knitted fabrics: knitting needles, crochet hooks and needles. Before the procedure, the product must be ironed well. To create an invisible stitch, it is not recommended to use excessively long yarn. The length of the thread should be within 45 cm.
Loop to loop on open loops
For beginners, knitting patterns often suggest sewing knitted items using the stitch "Loop in loop on open loops". In this case, the item will have to be connected in such a way that the remaining holes are completely joined.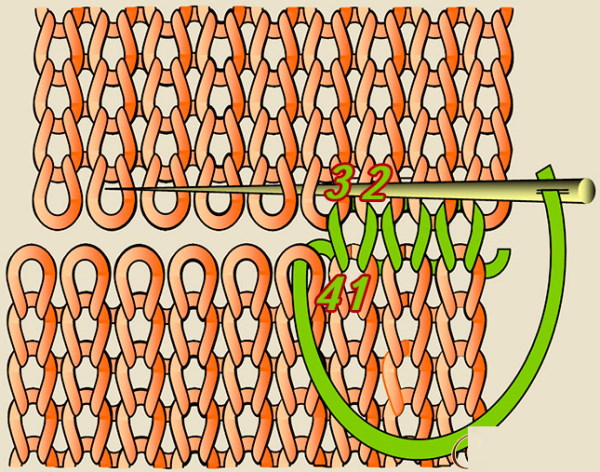
Step by step instructions:
- Insert the knitting needle into the first hole of the bottom piece.
- Insert the tool into the corresponding hole in the upper part, bringing it out into the next element.
- Insert the needle into the previous hole of the bottom piece and bring it out into the next loop.
Loop to loop on closed loops
To connect the closed edges, it is recommended to use the stitch "Loop in loop on closed holes". When the walls of the elements are pulled up, they will close. As a result, a solid beautiful product should be formed.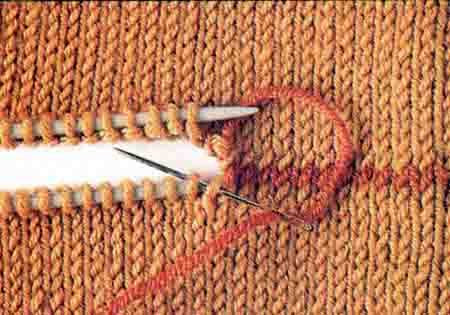
Step by step instructions:
- Place the closed ends tightly against each other. The outer sides of the garment should be on top.
- Insert a knitting needle into half of the edge hole of the bottom fabric, pulling the yarn through.
- Insert the tool into the edge hole of the top sheet.
- Bring the needle out to the center of the future hole, below the closed edge.
- Insert the tool into the hole in the bottom side of the canvas under the closed edge, cutting into the future element.
- Under the closed edge, grab the last wall and the wall of the future loop.
- After 2.5 cm, tighten the thread.
Mattress seam
The mattress stitch is suitable for sewing a knitted hat, as well as for joining side seams and sleeve seams. In this case, the garment must be positioned so that the outer sides are parallel to each other and are on top.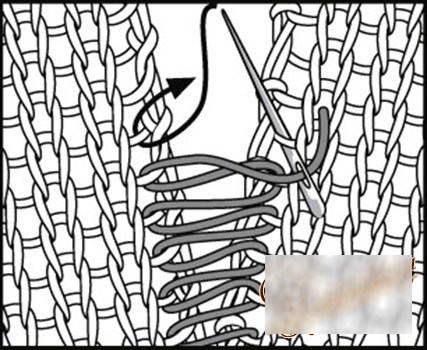
Step by step instructions:
- Using a special needle, grab the yarn between the first and edge elements, pulling the yarn through.
- On the adjacent side, grab the tool located opposite the broach between the first and edge holes, pulling the thread through.
- Perform the listed manipulations in turn: once on one side, the second time on the other.
- After 2.5 cm, pull the working yarn so that the two sides of the product are joined together without a noticeable transition.
Overlock stitch
A blanket stitch with a needle is perfect for a hat, as it allows you to create an invisible stitch. Thanks to this method, the clothes will retain their shape for a long period of time.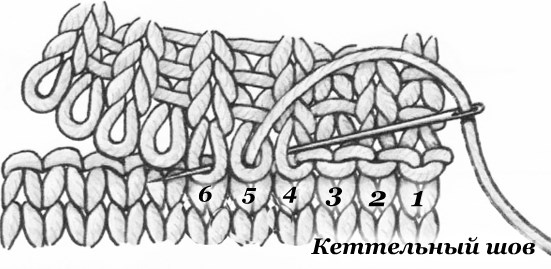
Step by step instructions:
- Using a knitting needle, pierce the piece from the inside in the area of the second stitch.
- Insert the tool into the first hole and bring it out through the third element.
- Insert the needle into the second hole from top to bottom and pull it through the fourth element from bottom to top.
Kitchener's seam
The Kitchener seam allows you to join clothing parts beautifully and with sufficient quality.
To do this, you need to perform the following manipulations:
- Insert the knitting needle into the nearest element on the needle, removing as in the front side.
- Insert the tool into the second hole as on the wrong side, tightening the yarn.
- Insert the needle into the first piece on the second knitting rod using the front method, with the hole down.
- Insert the needle into the second hole on the second knitting rod as from the wrong side, leaving it. Pull the yarn tight.
Back the needle
The back stitch must be done from the wrong side.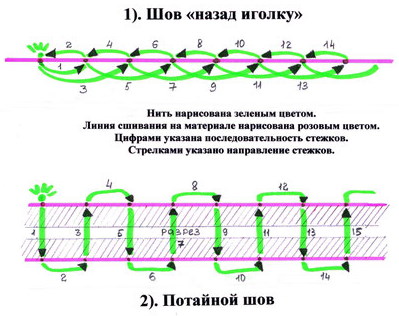
To do this, you will need to do the following:
- Connect the two sides of the product with the front sides facing each other, securing the yarn at the outer holes.
- Thread the needle with yarn, stepping back 0.5 cm from the last stitch.
- Insert the needle into the area where the previous stitch ends and bring it out again 0.5 cm from the stitch.
- Pull out the yarn, continuing to perform similar manipulations until the finished product is formed.
Ladder
The Ladder blind stitch is a versatile stitch that takes little time to complete, making it suitable for beginners.
An invisible seam can be used in the following cases:
- if the product is torn along the seam;
- sew the lining onto the jacket;
- make a belt, stuffed toy or other product that will turn out through the holes;
- connect the sides of the knitted garment together.
When sewing, the needle and thread must be passed exactly into the fold.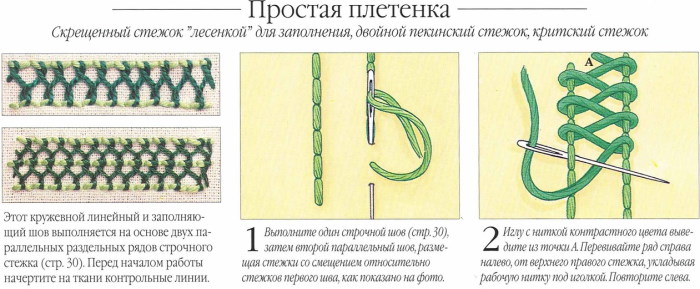
Step by step instructions:
- Iron the allowances from the wrong side. Thread the needle with yarn that matches the shade of the fabric and make a knot at the end.
- Insert the tool with yarn under the allowance, pulling it out near the edge of the sewn part from the front area. The knot should be hidden in the fold.
- Insert the knitting tool into the edge of the second piece so that it is positioned on the opposite side from the first puncture.
- Under the fold, in the area of the back, make a small stitch of 0.5 cm. Pierce the opposite side. The knitting tool should go into the edge of the fold. The punctures should be located opposite each other.
- Make a 0.5 cm stitch under the seam allowance. Perform similar manipulations to get 5 stitches.
- Slowly pull the yarn, tightening the ends of the pieces.
- Continue working in a similar manner until the sweets are finished. Secure the yarn with a knot, cutting the thread.
Reverse stitch
To create an invisible seam on the hat, you can back stitch.
In this case, it is recommended to adhere to the following actions:
- Place the two sides of the product face to face.
- Combine the upper end of the part, thread the needle. Pass the knitting tool from the right side of the last row of the fabric through the area between the first and second holes. Pull out the thread, tying it with a square knot.
- Insert the needle forward from the back side through the two parts into the area that is located on the left side of the passed section in a similar row by one hole. Pull the thread through.
- Going back one element, insert the tool from the right side of the current section from front to back one hole.
- Pass the tool from back to front in a place that is located one hole to the left of the current section. As a result, the needle should go forward by one element.
- Pull the thread tightly to ensure a neat stitch.
- Repeat steps 4 and 5 again, reaching the last hole on the left side of the line. Insert the needle from front to back into the area that is located one stitch to the right of the current point and pull the thread through it.
- Make a loop around the last hole. Secure the thread and weave it into the tail.
When using thick threads to knit the product, the stitch is quite large. To improve the appearance of the seam, it is permissible to join the two sides, fixing the open holes of one part on top of the other.
Sewing open loops with closed loops
To sew open holes with closed ones, you do not need to close the elements of one of the sides. They need to be held on a knitting needle, cutting the threads and leaving a tail that will be 3 times longer than the future line. The work must be completed with a purl row so that the tail is located from the front part of the product.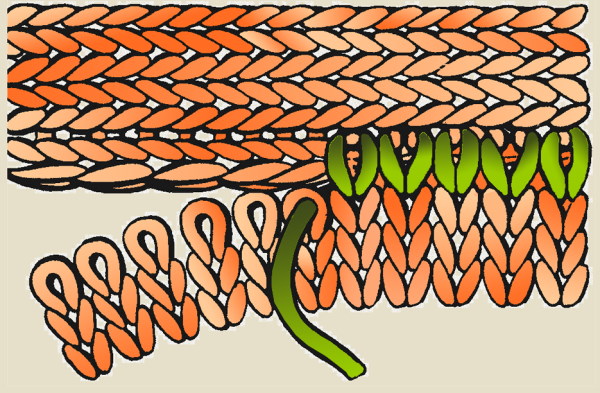
Step by step instructions:
- Place the sides up with the right areas, so that the part with the open holes is at the bottom, the other one is at the top. The end of the threads should be on the right side of the product. Thread the end of the yarn through a needle intended for wool.
- Attach the open holes to the row elements that are close to the edge of the work.
- Insert needle from back to front into first hole on right of row 1 of top and into first open hole from right to left.
- Remove the hole from the knitting rod and pull the thread through.
- Insert the needle with yarn from back to front into the second hole in the same row of the top part. Push the tool into the next open element from right to left.
- Remove the hole from the knitting rod and pull the thread through.
- Insert the needle into the previously opened hole from front to back and into the area to which it is fixed.
- Pass the tool from back to front into the point located on the left side of the current section on the top part by one element, and also into the next open hole from right to left.
- Remove the element from the needle, pulling the thread tightly so that the stitch is neat. Repeat the 2 steps above again, reaching the last element on the left side of the seam.
- Insert the needle from front to back into the point located one stitch to the right of the current point, pulling the thread through it.
- Make a loop around the last holes, secure the thread and weave into the tail.
The end result should be a neat seam that is flat and without any extra volume.
Secrets for Beginners
An invisible seam for a hat will look neat and completely invisible if you know a few secrets:
- To ensure a straight and even seam, it is necessary to pass the yarn through the holes, which are located at the same distance.
- To connect a knitted product, you need to use the threads from which it was made, or flat yarn of the same color.
- For ease of stitching, it is initially permissible to baste with threads of a different shade. It is not recommended to use too long yarn for stitching, as it may break, and you do not need to tighten it tightly. The optimal thread length should be within 45-50 cm.
- If there are errors in knitting, it is permissible to make a small allowance to adjust the knitted parts. However, such adjustments are subject to fragments that have a difference in length of no more than 1.5 cm.
- First, you need to smooth out the edges of the product well. Then you need to try on the hat, marking the stitching areas.
- Before sewing, the product must be washed with a special conditioner, which is intended for knitted fabrics. Instead of conditioner, it is permissible to use shampoo. To dry the hat, it is recommended to wrap it in a towel.
An invisible seam can be made manually or with a sewing machine. The first method is considered more popular than the second option. To sew a hat, toy or other items, you can use a needle or a hook. Such tools allow you to make the stitching completely invisible if the stitches are neat and small.
Video about invisible seams
Hidden, invisible or blind stitch: