Making figures from multi-colored modules will diversify leisure time and become a common interest for family members. Even a novice master, having mastered the basics of origami, will be able to surprise others with exclusive crafts.
What is modular origami
Origami is an oriental art of creating decorative figures from paper, which includes several types. Modular origami is its component part.
Types of origami:
| Name | Description |
| Modular |
|
| Simple |
|
| Wet folding |
|
| By pattern |
|
There are at least 10 types of origami modules. Flat ones are used to create mosaics, while three-dimensional parts are used to form balls and figures. Modules in the form of a trefoil and triangle are common. Pyramid-shaped blanks are used to create kusudama – bright balls.
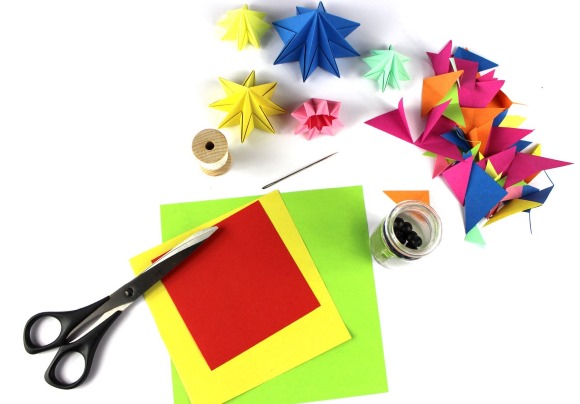
Materials for work
The paper for modular origami is chosen to be strong, not glossy, to avoid unnecessary slipping. The paint in the folds should not rub off.
Recommended paper:
- office white and colored, quite durable and rough;
- stickers, notepads;
- kami – Japanese paper for origami;
- magazine matte;
- wrapping;
- gift (packaging);
- foil-coated.
Colored school paper is not suitable for work, it is thin and turns white at the folds. Cardboard modules do not roll up well. Newspapers are suitable for beginners, they are not durable and turn yellow over time.
Preparing for work
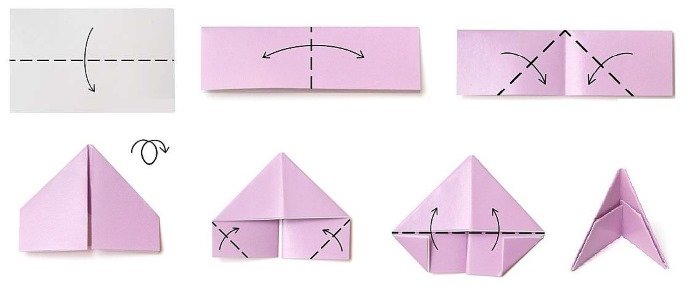
Before starting to create modular figures, stock up on paper of the required colors and make modules. Triangular modules are folded from rectangular sheets with a side ratio of 3:2.
Manufacturing:
- The A4 sheet is folded in half, then 3 more times. The paper has 32 rectangles. They are used to assemble modules of the popular size 1/32. If larger parts are needed, 8 or 16 parts are left.
- Cut the paper into rectangles using scissors or a utility knife.
- The piece is folded lengthwise, then widthwise. A control line is outlined in the middle.
- Fold the sides of the rectangle towards the middle, as when assembling an airplane, and turn the workpiece over to the other side.
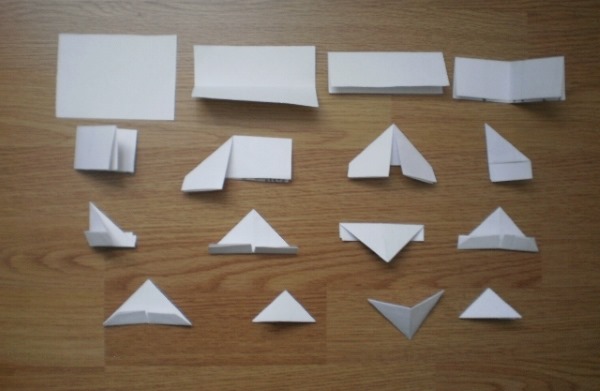
- The extreme corners of the protruding parts from below are folded upward, to the base of the triangle.
- The lower part of the workpiece is lifted. A triangle is obtained.
- Bend the triangle along the middle line. The module is ready.
The detail has 2 corners in the front and 2 pockets in the back. They are used to connect the modules together.
Technique of assembling modules
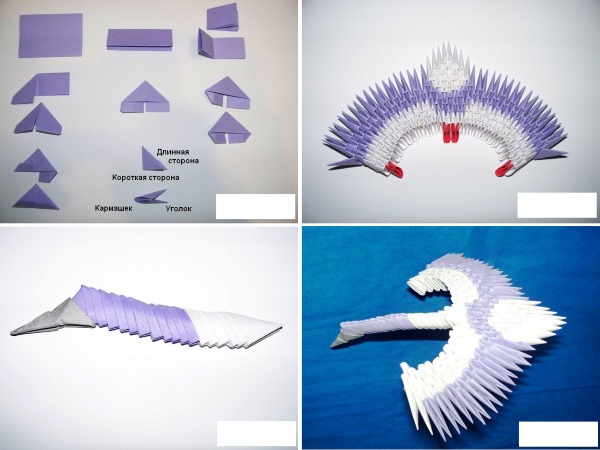
The folded module is a right triangle. The hypotenuse is called the long side, the leg without pockets is the short side.
The configuration of the craft depends on the method of connecting the modules:
- The corners of one triangle are inserted into the pockets of another, respectively. Thus, from several parts a flat strip is obtained, which is used to make tails, necks, legs of figures.
- The top of one triangle is inserted into the pocket of the second, then the top of the second is inserted into the pocket of the third. The connection serves to create long chains, the bases of figures.
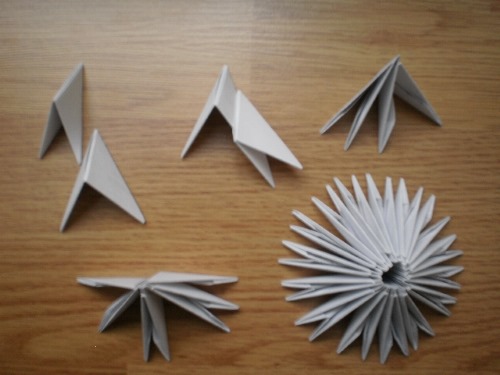
- To connect 3 modules, the adjacent vertices of two parts are inserted into the pockets of the third.
- The rows are obtained by stringing a triangle on the adjacent corners of the lower row pieces. Depending on the pattern, the module is put on 1, 2 or 3 vertices.
The long side up method means that the module is put on with the hypotenuse facing forward, towards the assembler. The short side forward means that the triangle is put on with the leg facing forward. The usual method for assembling rows is with the long side up.
Flowers from paper
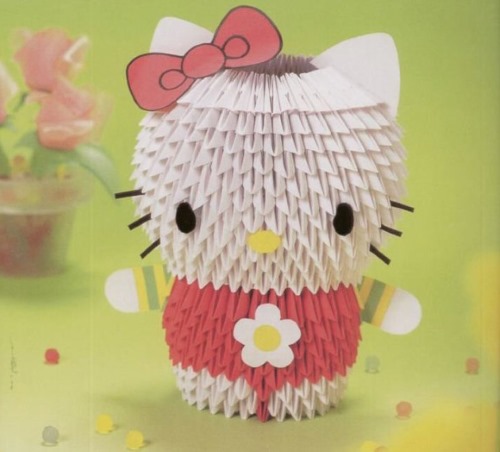
Modular origami for beginners is mastered by creating simple figures. Using this technique, you can recreate a flower or come up with your own image of a plant. Such crafts are made from modules measuring 1/32so that the figure turns out graceful and close to the original.
They are used to decorate a festive table, as gifts for March 8 or a birthday. Large modules are used to make large flowers that are used to decorate the room for a celebration.
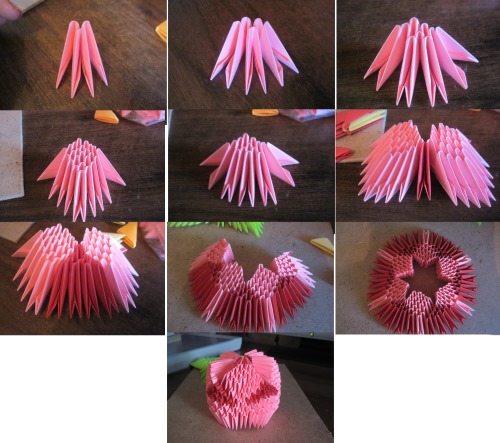
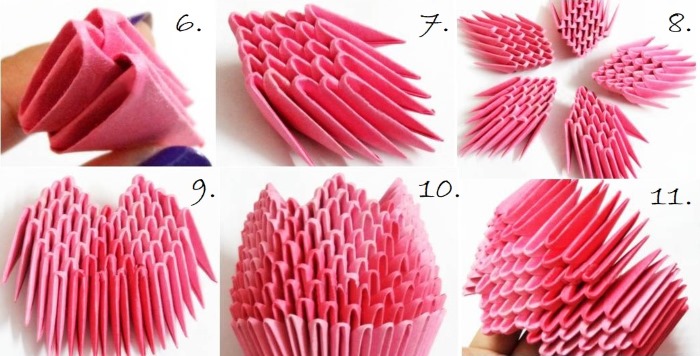
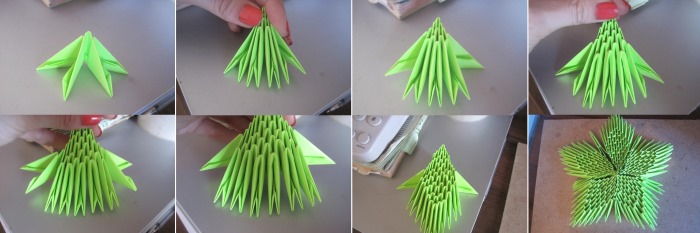
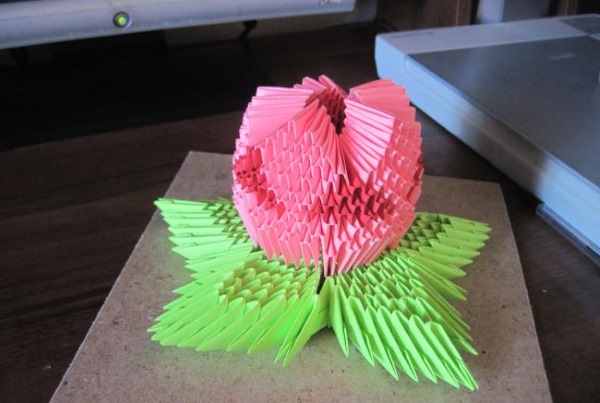
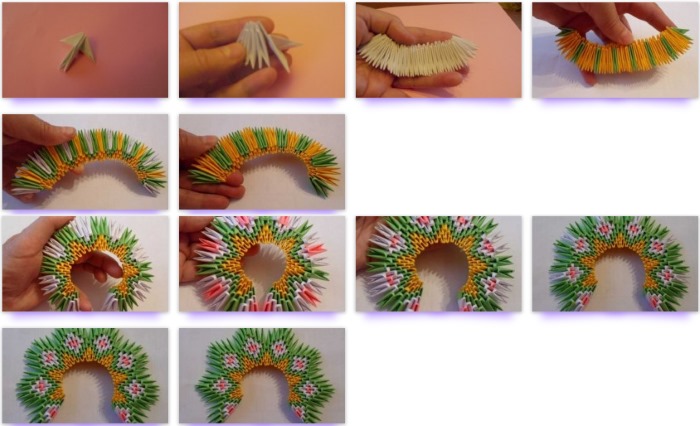
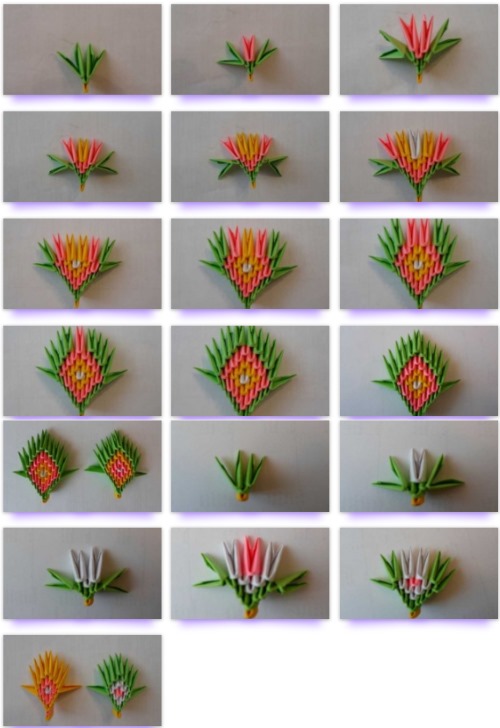
Lotus or water lily
The lotus, made using the modular origami technique, consists of 6 green leaves, on which a two-color bud with a core is placed. For work, 240 pink, 126 dark pink, 50 yellow and 318 green triangles are prepared.
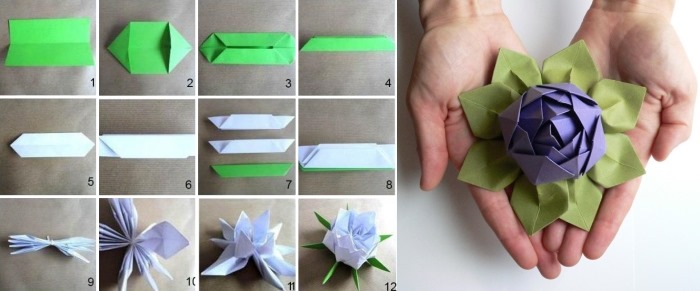
Procedure:
- Start by making leaves in the shape of a rhombus. Insert 2 elements into the first green module, add 1 triangle in each of the remaining rows. After a strip of 7 triangles, reduce their number by 1 in each subsequent row. To connect two leaves, use 4 additional modules, which are inserted with the back side. Fasten all 6 blanks together.
- Similarly, 6 petals of the bud are made from pink triangles; the longest row of the blank consists of 5 modules.
- The finished parts are laid out in a row and the petals are connected with the first dark pink module in the middle. Then the remaining space is filled and the two-color strip is closed into a ring. Three rows are laid along the bottom of the flower, alternating light and dark triangles.
- The core is made from yellow elements, 5-6 pieces in a row. The bud is placed on the leaves and the middle is inserted into it.
The bud can be made variegated or monochromatic, with rows of dark or light modules laid along the edge of the leaves. If you remove the core from the flower, the lotus will turn into a vase.
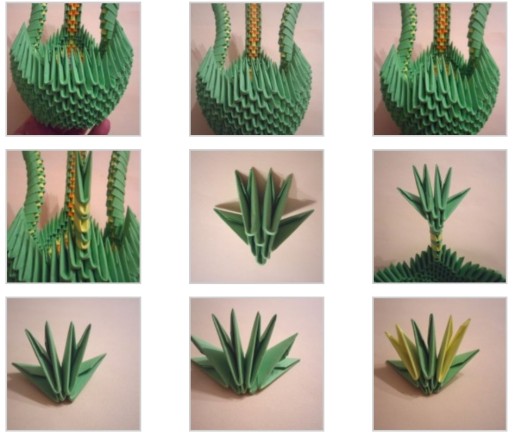
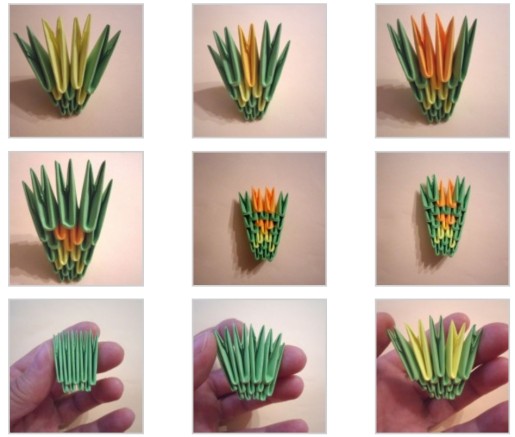
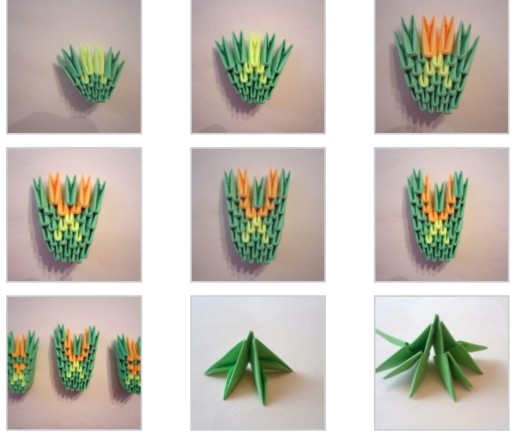
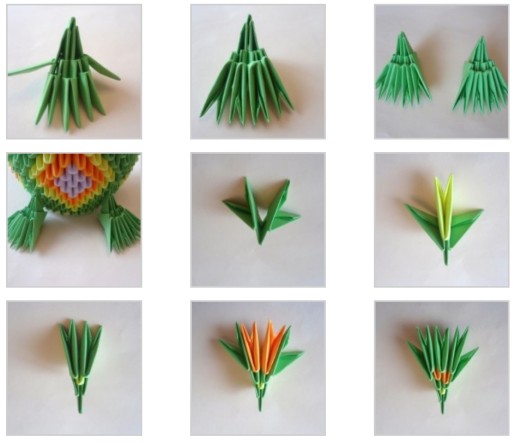
Lily
The motley royal flower will be made from 230 orange and 50 brown blanks. The lily consists of 5 petals, long stamens made of paper or other materials are inserted in the middle of the flower. The stem is formed from 3 cocktail tubes.


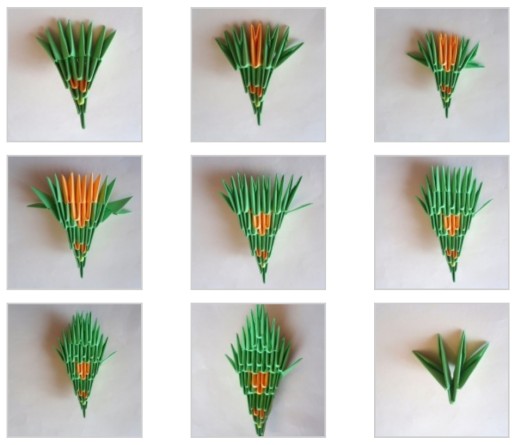
Procedure:
- All petal modules are inserted into pockets with the long side. The first 3 rows are made from orange modules, gradually connecting 2, 3 and 4 parts.
- In the 4th row, add a brown element - 1 orange, 1 brown, 1 orange triangle. At the edges, leave one corner of the modules of the previous row free.
- The 5th row consists of 4 orange modules, the 2 outer parts are put on, capturing the free corners from the 3rd row so that the side of the petal is smooth.
- Row 6 is assembled from 5 modules: orange, brown, orange, brown, orange. Row 7 is assembled from 6 orange pieces.
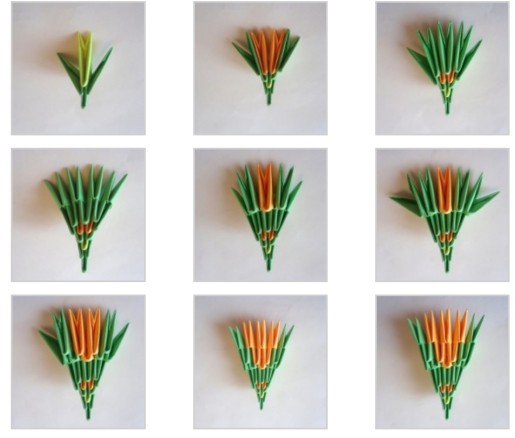
- In the 8th row, alternate 4 orange and 3 brown modules, starting and ending the row with yellow elements.
- The 9th row consists of 6 orange triangles; to decrease in this and the following rows, the outer modules are placed on the 3 tops of the pieces in the 8th row.
- In row 10, 3 orange and 2 brown pieces are placed in a checkerboard pattern.
- Row 11 is formed from 4 orange modules, row 12 – orange, brown, orange elements. The petal is finished with rows of 2 and 1 modules.
- The finished petals are bent to resemble a real flower and connected at the base with brown parts. Wire is inserted into the stamens and passed through the middle of the lily.
- For the stem, 3 tubes are secured with wire from the flower stamens and pasted over with corrugated paper. Leaves are placed on the stem.
A delicate lily will be made from white and pink modules. A flower made from contrasting shades looks original.
Narcissus
To make a daffodil, you need 16 white modules and a 2.5 cm wide strip of double-sided yellow paper for the core. A cocktail tube is used as a stem.
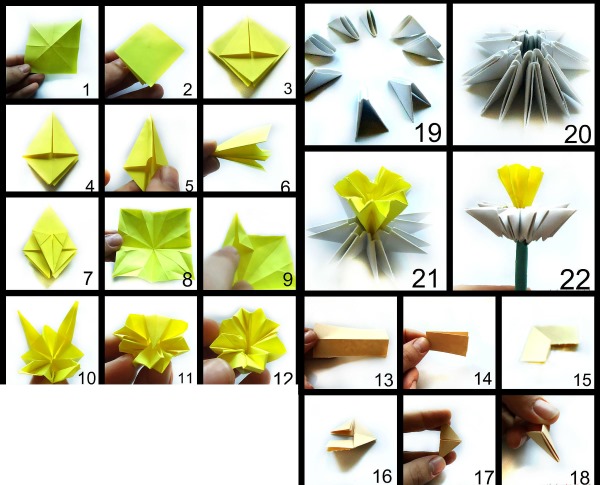
Procedure:
- Lay out 8 modules in a circle, with the short side to the middle, and attach the remaining 8 triangles to them. To do this, insert the corners of two adjacent pieces of the 1st row in a circle into the pockets of the same module of the outer chain. You get a two-row ring, these are petals.
- One side of the yellow paper strip is cut into a fringe, rolled into a tube and lightly glued. The finished middle is inserted into the head of the daffodil.
- The cocktail straw is wrapped in a strip of green corrugated paper and glued, leaving 1 cm from the end of the tube.
- The free end of the tube is cut into 5 parts, coated with glue and inserted into the flower.
- A strip of corrugated paper is glued in half, allowed to dry, and a long sheet is cut out, which is glued to the stem.
A few daffodils will make a spring bouquet for your mother, grandmother or sister.
Rose
The rose is made from 95 modules and a cocktail straw. You can take juice tubes, then you need to insert them one into another to lengthen them.
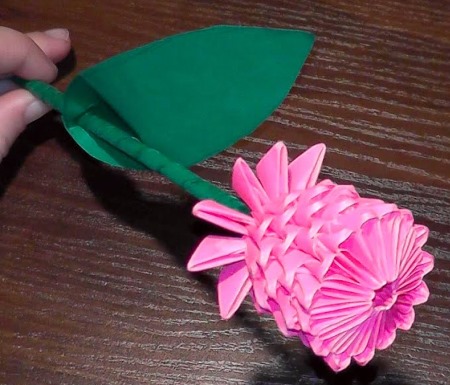
Procedure:
- The bud is collected from top to bottom, gradually narrowing the figure. Rows 1, 2 and 3 consist of 15 triangles. The elements of row 2 are put on with the long side up, and row 3 - with the short side up. A three-row ring is formed, this is the top of the flower.
- The 4th row continues in a circle, the triangles are put on the 3 corners of the module of the previous row. The 5th, 6th, 7th rows consist of 10 elements connected to the previous row in the usual way - 1 module on 2 adjacent ends.
- 10 modules are inserted into the lower part of the flower, like petals. They are glued for reliability.
The straw is wrapped in a strip of paper in a spiral and sealed. At the top of the stem, a thickening is formed from paper, equal in diameter to the hole in the rose. Leaves are cut out of paper and glued to the stem. The top of the stem is coated with glue, inserted into the bud, and pressed for a few seconds.
White rose
The snow-white flower will be made from 110 modules measuring 1/32. Regular office paper will do.
Procedure:
- The ring is assembled from 3 rows of 18 modules each. In the 1st and 3rd rows, they are placed with the short side forward. The pieces of the 2nd row are placed with the long side up.
- In the 4th row, each element is put on 3 tails of the lower row pieces. Then collect 2 rows of 12 pieces and 1 row of 12 triangles, short one in front.
- In the last row, 8 triangles are placed with the short side facing outwards, inserting them into the 3 corners of the previous strip.
The bud is ready, the cocktail tube is wrapped with a strip of paper, the cut out leaves are glued on. The rose is put on the stem, smeared with glue.
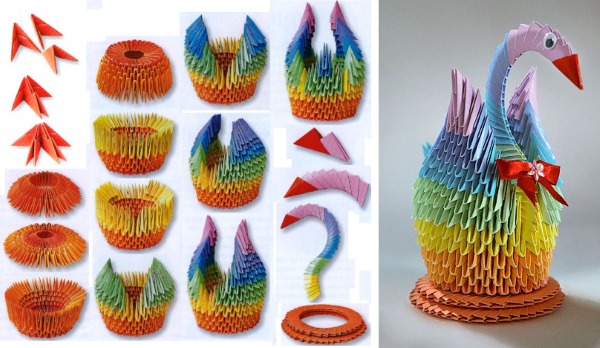
Swan
Modular origami for beginners will interest people who want to create three-dimensional figures of birds and animals. To make a swan, you will need 458 white modules and 1 red one for the beak. A large figure will be made from triangles measuring 1/16. For strength, the tops of the parts are lubricated with glue.
Procedure:
- Assembly begins with the bird's body. In row 1, 30 triangles are placed with the long side outward, 30 modules of rows 2 and 3 are put on them with the short side outward. The corners of 2 adjacent modules enter the pockets of one triangle of the next row. The strip is closed into a ring and rows 4 and 5 are laid similarly. The figure is turned inside out, and a bowl-shaped blank is obtained. Row 6 of 30 pieces is added.
- The wings are formed from the 7th row. Leave 2 tops of the adjacent triangles free - this is the place for the neck. Put on 12 modules to the left and right of the gap. There is a free area at the back for the tail. Assemble the wings, for which in each subsequent level the number of parts is reduced by 1. The last row consists of 1 module. The wings are bent to create the effect of a bird taking off.
- The tail is made in the same way as the wings, reducing the number of modules in rows to 1 triangle.
- The neck consists of 31 blanks, it is assembled from the beak, inserting the corners of one module into the pockets of another. To prevent the beak from looking double, it is glued. During the assembly process, the bird's neck is bent. The eyes are glued next to the swan's beak and the neck is inserted into the gap between the wings.
If you make a beak and a crown from golden paper, you will get a swan princess. A black bird with wings edged with white stripes and a butterfly on its chest looks presentable. Children like multi-colored swans.
Watermelon
To create a watermelon slice, you need 114 red, 66 green, 17 white and 16 black blanks. They are inserted with the long side up, except for the first row - its parts are placed with the short side up.
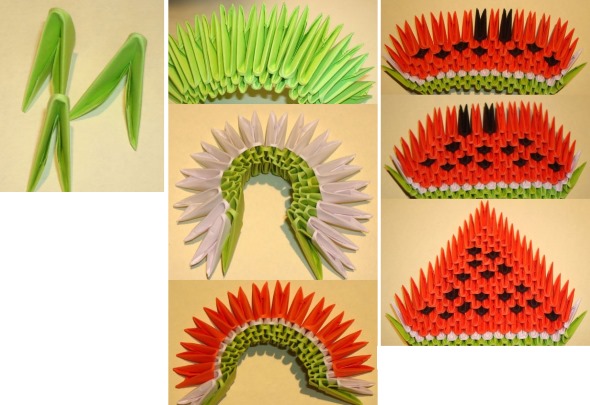
Procedure:
- Assembly begins with 15 green modules. Rows 2, 3, 4 are assembled from green triangles of 14, 15, 16 pieces.
- In the 5th row: 2 green, 13 white, 2 green. 1 green triangle is placed at the beginning and end of the 6th row, 1 white one is inserted next to them, the middle of the chain consists of 12 red modules. The 7th row begins and ends with 1 white element, 13 red pieces are placed inside.
- Row 8 consists of 14 modules, red alternates with black. Row 9 is formed from 13 red, the following rows are reduced by 1 module.
- In rows 10 and 12, red and black pieces are placed sequentially, according to the pattern. Row 11 and from 13 to 21 are assembled from red modules. The last 21 row consists of 1 triangle.
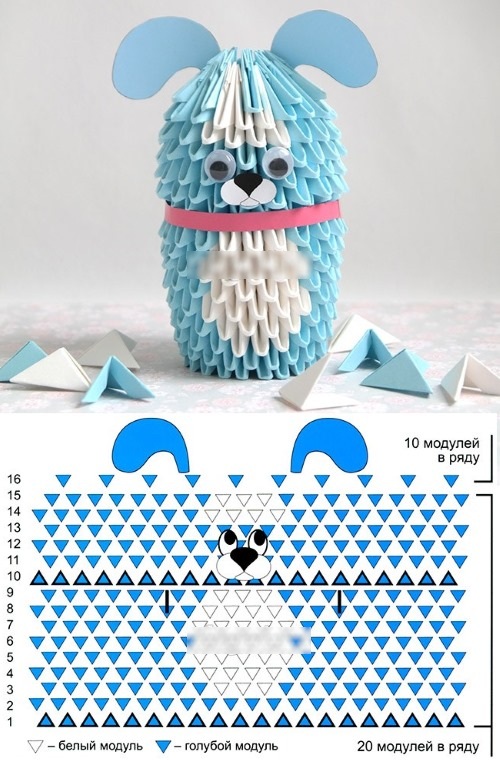
Hare
To make a bunny in a sweater, 402 white and 120 multi-colored modules are folded. For a figure without clothes, 520 pieces of one color are taken.
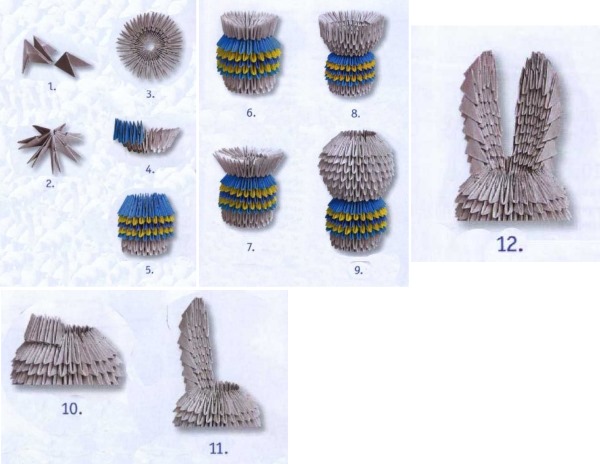
Procedure:
- For the first 3 rows, take 24 pieces, form a three-row strip and close into a ring. Turn inside out, and you get a blank in the form of a wide vessel.
- The 4th row is assembled from 24 colored parts – the beginning of the sweater. They are not inserted all the way, but are secured higher and the lower corner is moved forward to add volume. Another 4 strips are laid in the same way.
- For the first row of the head, take 24 triangles and put them on with the short side forward. In the second row, add 6 pieces. In this and the next 6 rows, the pieces are strung on with the long side up.
- The ear is assembled from 6 triangles. They are connected to the last row of the head with the short base forward. Row 2 consists of 5, row 3 – of 6 parts. The outer triangles are strung on the last vertices of the 2 lower modules. 7 rows are assembled in this way. Row 8 consists of 5 triangles, the outer parts are placed on the 3 vertices of row 7. Row 9 – 4 triangles, the 2 middle ones are placed above the 2 outer ones. 2 head modules are skipped and another ear is assembled.
Cut out and glue the eyes and nose, collar and bow tie to the hare. Cut out the arms from cardboard and attach them to the sides of the body. If you cut a strip of paper into a fringe, twist it around a pencil and glue it, you will get a fringe.
Penguin
Modular origami for beginners allows you to practice this technique from an early age. For example, a child can assemble a penguin. To assemble this bird, take 129 black, 1 orange and 76 white modules.
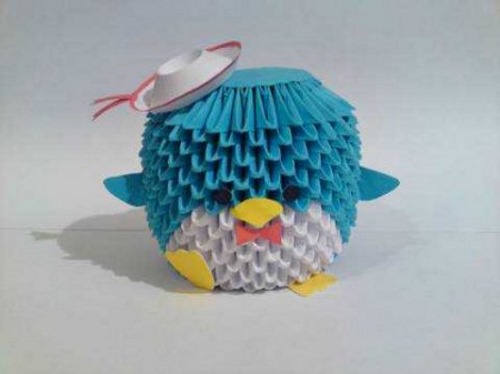
Sequence of actions:
- Row 1 is assembled from 10 black and 6 white pieces, placed with the short side up. Row 2 has 7 white and 10 black pieces, placed with the long side up.
- In the 3rd row, 6 white and 10 black blanks are put on with the long base facing up. The three-row strip is folded into a ring and a bowl is formed.
- In the 4th row – 9 black and 7 white, in the 5th row – 10 black and 6 white, in the 6th row – 7 white and 9 black triangles. Row 7 – 10 black and 6 white elements.
- Row 8 — the beginning of the head, 9 black and 7 white parts. In the 9th row, 10 black and 6 white parts are placed. In the 10th row — 9 black and 7 white blanks.
- Row 11 – 10 black and 6 white, the next strip is similar to row 10. Row 13 has 11 black modules. The top of the figure is compressed.
The orange beak module is inserted into the center of the head, black triangles are placed on the sides – wings. The eyes are cut out and glued to the penguin.
Owl
The little two-color owl is assembled from 62 white, 7 orange, 157 blue and 2 black modules.
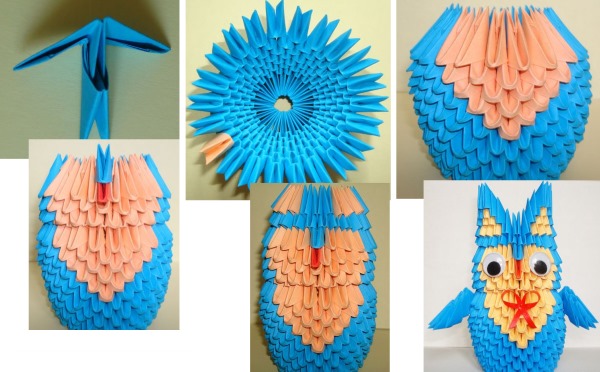
Procedure:
- Row 1 – 13 blue and 5 white triangles with the short side forward. The white blanks are placed between the blue ones, this is the beginning of the chest. Row 2 is formed from 6 white and 12 triangles with the short base forward and closes the ring.
- In the 3rd row, place 5 white and 13 blue pieces with the short base facing forward.
- In rows 4, 5, 6, the pieces are placed with the long base facing up. Row 4 – 6 white and 12 blue, row 5 – 5 white and 13 blue, row 6 – 6 white and 12 blue triangles.
- Row 7 is made from 5 white and 13 blue pieces with the short base forward.
- In the 8th row, the 2 central white modules are placed with the short side forward, 4 white and 12 blue ones – with the long base forward.
- In the 9th row, in the center of the white section, insert an orange triangle-beak, to the right and left of it, 2 white and 13 blue parts.
- In the 10th row, 2 white triangles are placed in the middle, 1 white and 1 black element are inserted on each side of them, and 12 blue triangles are continued. In the 10th and subsequent rows, the triangles are put on with the long side forward.
- In the 11th row, 1 blue element is placed above the beak. On both sides of it, 2 white modules are laid. The row ends with 13 blue triangles of the back.
- Row 12 consists of 8 blue elements located in the center of the figure. To make ears, 3 blue parts are hung on each side of this row. Then 1 blue triangle is placed on each of them.
At the bottom of the bird, insert 2 paws consisting of 3 orange triangles. At the back, attach 2 blue parts - the tail. The wings are assembled from 3 modules and attached to the sides of the owl.
Crane
To make a white bird with black plumage and a black neck, you need 118 white, 84 black and 9 red modules. The parts are glued together for strength.
Procedure:
- Assembly begins from the base of the neck. 2 white parts are inserted sequentially, with corners in the pockets. Row 2 consists of 2 modules, row 3 – 1 triangle.
- To the left and right of the base form the wings, 3 rows of 10 modules. The body is filled, alternating 1 and 2 parts. The rows of the tail part consist of 4, 3, 2 and 1 triangles. To get the plumage, 2 rows are laid along the wings, and 8 black elements along the tail. The edges of the wings are decorated with three rows of 3 black parts.
- The tail is folded from black triangles according to the 3, 2, 4 pattern and connected to the bird’s body.
- The neck consists of 11 black parts, inserted one into another. At the end, place a white module, turned in the other direction - this is the head. Add a red triangle - a beak. Attach the neck to the crane in the designated place.
- The legs are assembled from 3 black, 5 white and 4 red modules. The lower red part is put on the other side for stability.
Eyes are glued or drawn onto the crane. The figure is decorated with a bow and a hat.
Rooster
The rooster craft is made from 11 yellow, 34 red, 185 orange, 66 green modules measuring 1/32 and 4 red modules measuring 1/64. To prevent the figure from falling apart, the joints of the blanks are glued.
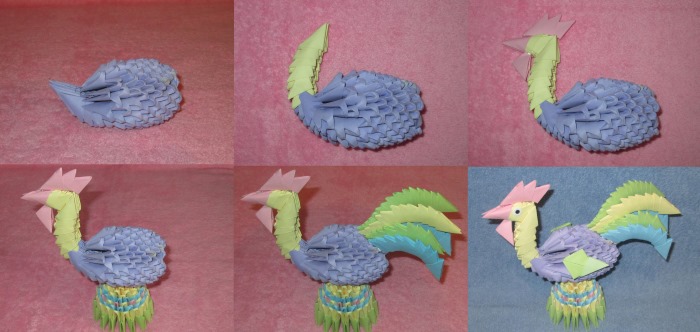
Procedure:
- Connect 3 rows of 11 orange pieces, roll into a ring and lay 7 more rows. To form the chest and neck, add a row of 6 triangles, then continue according to the pattern 5-4-5-4-3-4-3-2-3-2-3-2-3-2-1-2-1. Squeeze and bend the neck.
- For the wings, assemble the green modules in rows of 3-4-3-2-1-2-1 pieces. The legs are made from 3 yellow pieces, lowering the corners into the pockets of the next triangle. Add 2 modules, which are inserted with both tops into 1 pocket of the last module. The legs are inserted from the bottom of the body.
- The head is formed from 3 orange modules, connecting them sequentially, the comb is formed from 3 red ones. The comb is placed on the head and the yellow beak module is put on, which holds the parts together. A red triangle-beard is added at the bottom. The head is connected to the bird's neck.
Make 5 colored tail feathers, 17 modules each. Glue the wings to the rooster base, insert the tail.
Chick
To make a chick, prepare 207 yellow and 6 red modules. For the beak, you need 1 red triangle, half the size of the main parts.
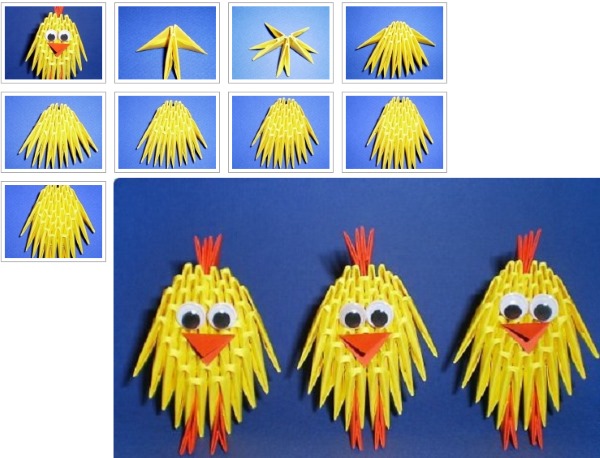
Procedure:
- They assemble a ring from 2 rows of 16 modules, and add 5 more such rows.
- Row 8 consists of 16 pieces, put on with the short side forward to separate the body from the head. Lay out 4 more rows of 16 pieces, with the long sides forward.
- The last row consists of 10 modules, put on 2 or 3 corners of the pieces of the bottom row. The top of the head is squeezed to give it a rounded shape.
- The wings are assembled from two modules and glued to the sides of the chicken, adding a tail from 1 triangle.
- The paws are made from 3 red modules, the tops of one are inserted into the pockets of the other 2 and attached to the bottom of the body.
Glue the chick's eyes and insert the beak. Cut the paper into fringe and shape the chick's hair.
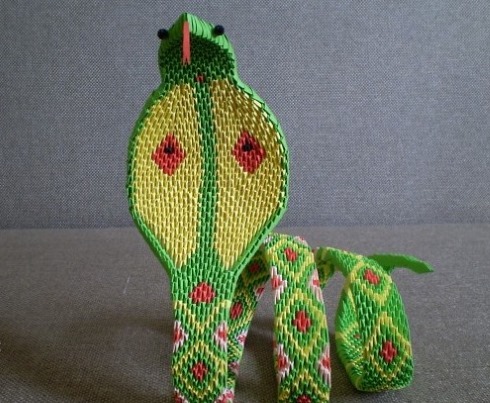
Snake
The snake from modules is made curving or straight. The head and tail are assembled in the same way, and the body is made differently in the technique of execution and the number of parts. For a straight snake you will need 237 triangles, for a curved one you will need 251 modules.
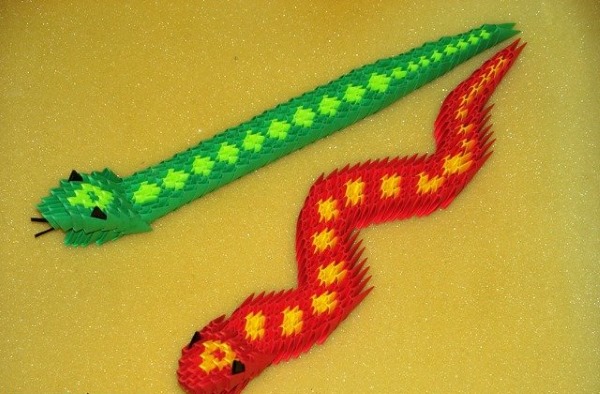
Procedure:
- Start assembling from the tail. Insert 2 modules with both tops into the pockets of the first triangle and continue like this for 8 rows, alternating 1 and 2 elements. Hide the side corners of the tail.
- Row 9 consists of 3, row 10 of 2, and row 11 of 3 modules. The straight snake continues to be assembled, alternating 2 and 3 elements in rows.
- The snake's curve is achieved by shifting the rows of modules. In row 12, 3 triangles are shifted to the right so that the extreme corner of the module remains free. Row 13 consists of 3 parts, put on without shifting. The next 3 rows are laid with a shift, 3 modules in a chain. In row 18, 3 parts are placed straight, row 19 is assembled with a shift. In row 20, 4 modules are placed. One turn of the body is obtained.
- Similarly, shift rows from 21 to 25 to the left, collecting 3-4-3-4-4 parts in them. Then collect the shifted rows of 4 modules. Turns to the right or left are made from 35 to 38, from 47 to 50 rows. The last turn from 57 to 58 row goes to the head. In row 57 - 3 modules, in 58 - 4 triangles.
- The snake heads are assembled in the same way. Lay out 2 chains of 4 modules, then follow the pattern 3, 4, 3, 2, 1. This is the lower part, to which the forked paper tongue is attached.
- For the upper jaw, 5 modules are placed on the lower part with the pockets facing upwards, leaving the extreme corners of the side triangles free. The jaw is assembled according to the 5-4-5-4-5-4-3-2 scheme.
The head is connected to the body. Small black eye modules are inserted.
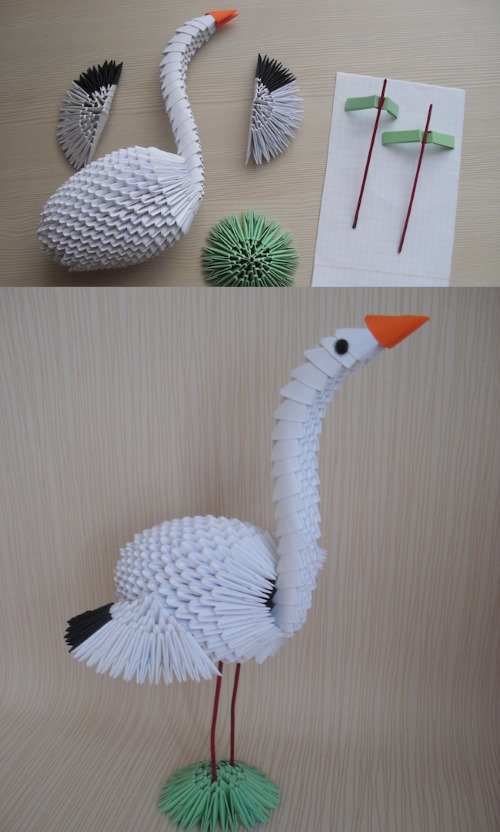
Stork
To make a stork sitting in a nest, you need 40 black, 222 white and 104 brown modules. The beak for the bird is cut out of red paper.
Procedure:
- Assemble a chain of 3 rows, 9 modules in each, and close it in a circle. Turn inside out, add 3 more rows.
- Row 7 consists of 11 elements, 4 of which are put on 1 corner, and 7 on 2 corners of the bottom row.
- Rows 8 and 9 are assembled from 11 triangles, and row 10 contains 12 modules.
- On the body, choose a place for the chest and put on 4 parts. On top, lay 3 rows according to the pattern 3, 2, 1. Bend the corner of the chest upwards.
- For the wing, 16 modules are connected, the corner of one is inserted into the pocket of another. Row 2 consists of 15, row 3 – of 14 modules.
- Row 4 of the wing is assembled from 12 black triangles. Row 5 – 6 black, located in three pairs at equal distances.
- Insert 4 black modules into the base of the body – this is the tail.
- The neck is assembled from 23 white modules and bent. The beak and eyes are glued on.
- They make a nest - a brown circle of 3 rows, 26 modules in each.
The wings are glued to the sides of the body, the neck is connected to the chest. The stork is placed on the nest.
Dog
A two-color dog can be assembled from 37 white and 98 yellow modules. It is better to buy plastic eyes and nose. The modules are connected with the long side up.
Procedure:
- For the base, assemble a ring of 2 rows, with 8 yellow modules in each. In the 3rd row, place 7 yellow triangles and 1 white one for the beginning of the chest.
- 4th row – 6 yellow and 2 white.
- In the 5th row on the chest add 2 modules, in total there are 4 white and 5 yellow. In this way collect 2 more rows.
- In the 8th row, 9 modules are put on with the short side facing out. The next 4 rows of the head are assembled from 9 triangles with the long side up, forming the white muzzle of the dog.
- Row 13 has 4 yellow modules. They are placed above the puppy's muzzle with the short side forward - this is the dog's forehead.
- The ear is assembled from 2 modules, the top of one part is inserted into the pocket of the other so that a curved blank is obtained.
- The tail consists of 3 yellow and 1 white modules, connected in series. The upper legs are assembled from 2 yellow and 1 white triangle.
The paws, ears and tail are inserted between the dog's body modules. The eyes, nose and pink paper tongue are glued to the muzzle.
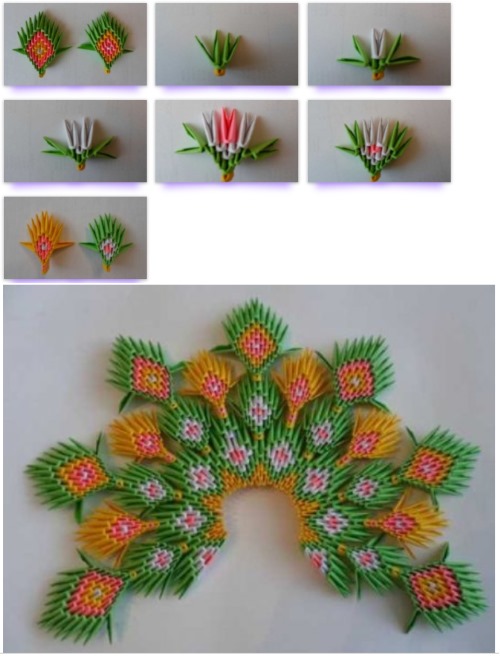
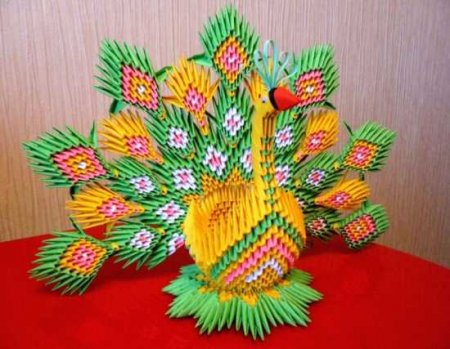
Peacock
Modular origami for beginners with the help of master classes allows you to learn how to make complex figures. Peacock is one of such crafts.
To create the royal bird, the following modules are prepared: 252 green, 128 purple, 217 blue, 45 white, 1 light blue, 15 orange. The tail of the model is wide open and consists of separate bright feathers.
Procedure:
- To assemble the feather, 3 purple modules are connected in sequence. Then 2 blue ones are put on and 2 more blue triangles are added to their extreme tops. An orange module folded into the shape of an eye is glued between them.
- An arch is assembled from 9 green modules, where 2 chains of 4 triangles are connected by a module at the top. The sides of the feather are jagged.
- The arch is connected to the feather blank, attaching it to two inner corners of the blue modules. The result is a feather on a short stem, 7 of which are made.
- The long feather is made in a similar way, only the leg and arch consist of 11 modules. You need 8 such blanks.
- For the body, collect 3 rows of 15 white triangles and connect them into a ring, turn inside out. Add 8 rows, 15 blue triangles in each.
- Determine the place for the paws and insert 2 green pieces. From the bottom of the back, count the third blue row and fix 10 green modules in it - this is the place for the tail.
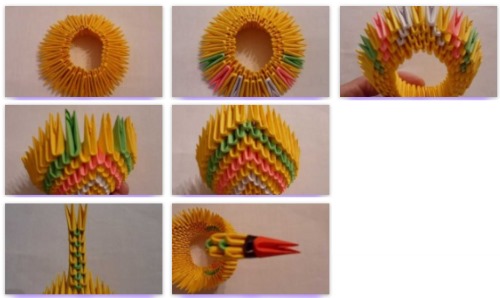

- Make a corner piece from 3 green triangles, inserting the vertices of one into the pockets of 2 triangles. Assemble 9 such parts and place them on 10 modules of the tail base. Lay a row of 17 purple modules on top with the short side towards the body.
- Below this fan, 11 green modules are attached, and 10 green corner blanks are put on them, as in the previous stage. A row of 19 green triangles is assembled on top. At the bottom of the back, 2 fans are obtained.
- Determine the place for the neck and put on 3 blue modules in the first row and 4 in the second. The following rows correspond to the pattern 3-4-3-2-3-2-3-2-1.
- The neck is assembled from 7 blue triangles, dropping the corners of the next element into the pockets of the previous one. The head is added - a blue module and the neck is connected to the body.
- Short feathers are fixed on the first part of the tail, along the purple row. Long feathers are placed on the back fan. 2 purple modules are inserted into the head - this is the crest.
Eyes are cut out and glued onto the peacock. A paper crown is placed on the crest.
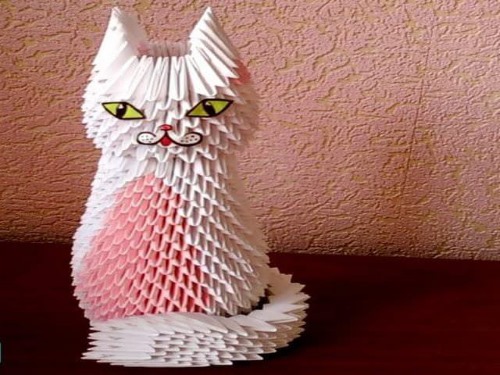
Cat
To make a sitting cat, you need 386 modules of any color. All parts of the figure are assembled separately and connected at the end of the work.
Procedure:
- For the base of the body, assemble a three-row chain of 19 modules in a row and connect it into a circle, turn it inside out.
- Add 2 similar rows, insert the elements with the long side outward. Rows 6 through 10 consist of 16 triangles, rows 11 through 13 contain 13 modules each.
- The base of the head consists of 3 rows of 16 triangles connected into a ring. The workpiece is turned inside out and another 3 rows of 16 modules are laid, then 3 rows of 13 elements. The head is glued to the body.
- Assembly of the paw begins from the bottom with 3 parts and continues according to the pattern 2, 1, 2, 1, 2,1. Make 2 paws and glue them to the body from the front.
- The ears are assembled from 3, 2, 1 triangles. The free side corners are glued to obtain a sharp shape.
- The tail consists of 13 modules.
The ears are glued to the head, the tail is glued with the flat side so that it sticks out from behind the cat's body. The muzzle is decorated with eyes, whiskers and a nose. A pink tongue is inserted.
Dragon
Modular origami offers dozens of options for creating dragons. Beginners will be interested in the technique of making this fairy-tale character. The Chinese dragon will be made from 473 red, 110 yellow and 18 black modules. A yellow stripe will run along its belly.

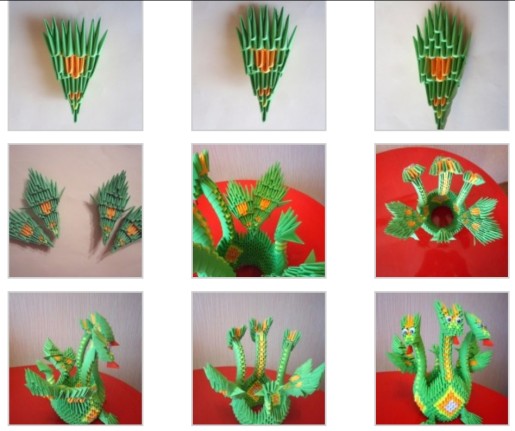
Procedure:
- The body assembly begins with 3 red modules, placed with the long side up. In the 2nd row, 2 yellow triangles are put on in the center with the short side up, and 2 red modules are put on the edges, each on one vertex.
- In the 3rd row there are 3 red triangles, 4 are collected similarly to the 2nd row, then there is a strip of 3 pieces. In this way, rows 6 through 110 alternate, resulting in 55 three-module and four-module rows. The dragon's body is bent.
- The paw consists of a foot and an upper part. The upper part is formed according to the scheme 2, 3, 2, 1.
- In the first 6 rows of the foot in the chains, 2 and 3 parts are changed. In the 7th row - 3 modules, in the 8th row a black triangle is put on them. 4 upper and 4 lower parts are collected.
- Row 1 of the head consists of 4 pieces, 5 triangles are put on them. Then the rows are alternated according to the scheme 4, 3, 4,5,4. Row 8 consists of 3 modules, located in the middle with the short side forward, and 2 black ones, which are placed at the edges at one corner, with the long side up.
- In the 9th row there are 4 pieces in the middle, short side forward, and 2 black ones on the edges. The 3 central modules of the 10th row are inserted with the long side up. On the 1st and 3rd elements of the 10th row, horns are formed, consisting of 1, 1 and 2 triangles. They are finished with 4 modules, assembled one into one.
- The lower part of the head is assembled according to the 2-3-4-3-2-3 scheme. 4 small white modules are folded - teeth.
- The beginning of the tail consists of 6 successively nested triangles, from the 7th row it is expanded, alternating 1 and 2 modules. From the 15th to the 22nd row the tail is assembled with two-module and three-module chains. Its end is decorated with black elements, gluing them in the form of a Christmas tree. The tail is attached to the body.
- Connect the head parts, insert the teeth into the jaws from the top and bottom, glue the eyes. Assemble the 4 legs.
The head and paws are glued to the body. On the back, 10 black modules are placed, these are the dragon's spikes.
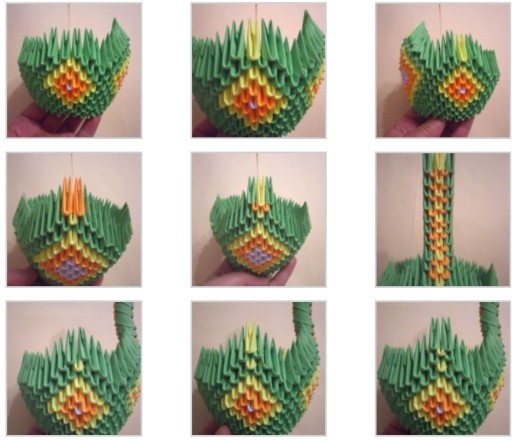
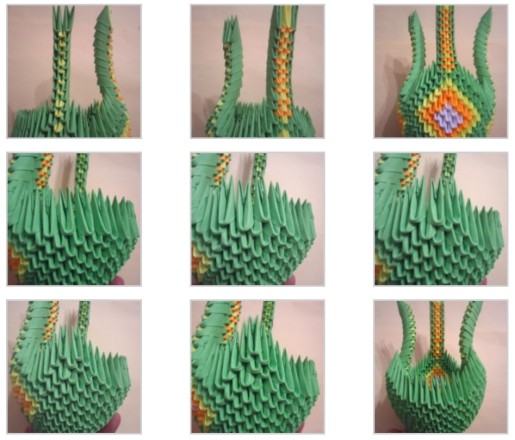
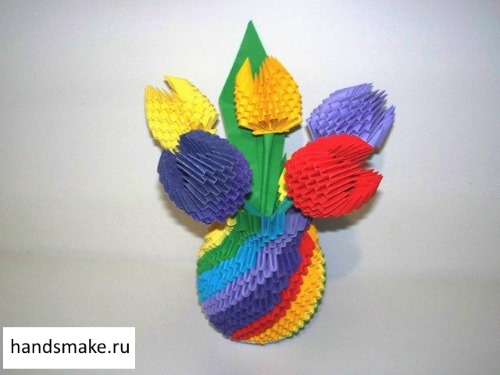
Rainbow Vase
The rainbow vase's multi-colored stripes are arranged vertically and narrow at its top. The effect of color transition from one to another is created by shifting the modules. For the craft, 320 triangles of red, orange, yellow, green, blue, and purple are prepared.
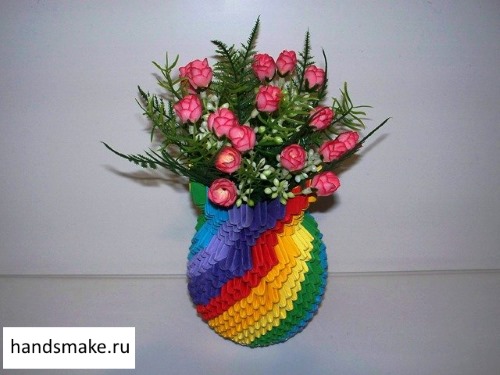
Procedure:
- In the 1st row, there are 12 modules – 2 red, 2 orange, 3 yellow and so on, like on a rainbow. In the 2nd row, the triangles are shifted to the right, capturing the lower tops of a different color. Only 3 rows are made, resulting in a blank of 6 colors. Collect 6 such structures and close them into a ring – this is the base of the vase.
- Lay out 11 rows according to the pattern, shifting each pair of modules by 1 corner to the right. The craft takes the form of a round vessel, its walls are carefully adjusted.
- The neck of the vase is formed from the 12th row, in which half as many triangles are laid. Between the parts of one color, 1 module of the same color is inserted and another 1 row is made.
- In the following rows the number of modules does not change, but in each chain they are shifted by 1 corner to the left. So the vase is assembled to the end.
In addition to a pleasant pastime, modular origami classes bring real benefits. A novice master can decorate a room for a holiday, diversify the table setting. And his relatives and friends will not be left without an original gift.
Article formatting:Natalie Podolskaya
Video about modular origami
Modular origami for beginners - how to make a 1/32 module:
nothing worked out
In the 11th row, form the neck of the figure. To do this, attach one orange DSN in the middle between the white modules, and one white DSN on each side of it. Attach the remaining 15 orange modules in a circle of KSN. In the 17th row, next to the KSN modules of the previous row, attach 1 orange DSN, and then from them, 3 orange KSN. The KSN modules of this row should be attached to the KSN modules of the 16th row.
I love your site
Few crafts