A knitted cardigan for girls is a collarless item. It can be zipped, buttoned, or simply tied with a belt. A cardigan will become an indispensable wardrobe item for a girl. You can wear a turtleneck, a tank top, or a light T-shirt underneath. The threads for knitting it can be woolen or thin.
General rules for knitting a cardigan
A cardigan for a girl, which is more difficult to knit with knitting needles than with a crochet hook, is a bright thing that attracts attention. When knitting it, even a small mistake can greatly spoil its appearance.
In this regard, it is worthwhile to carefully consider all the details before starting work:
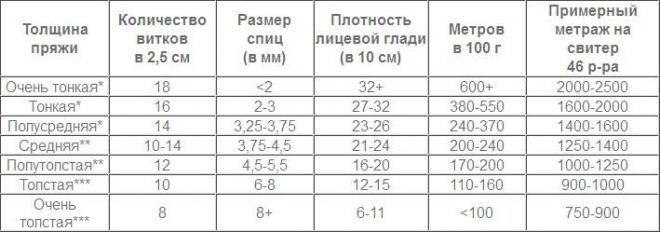
- Beginning of the process. If the knitting of the cardigan is done according to an already developed model, then this significantly simplifies the work process. The main thing is that the knitting needles and yarn correspond to the recommended sizes.
It is also important to maintain the correct knitting density.
As a rule, a cardigan is a long thing, so if the density does not match the length, it will stretch a lot, which will spoil its appearance. The heavier the thread, the greater the density should be. Thus, the heaviness and rigidity of the cardigan will be balanced.
- Model selection. To knit a cardigan at home, you can knit any model. It is necessary to determine what functions the wardrobe item in question will perform. It can be intended for warmth, or it can be just a decoration. A version of the model made of yarn with lurex can become an evening item of clothing.
- Creating a design. The cardigan consists of a back, two fronts, sleeves and trim. Before you start working, you need to decide what will be the basis of the item. It can have a large braid pattern, an ornament. If the item is intended for going out, it can be decorated with an openwork pattern, flowers made of yarn.
- For beginner knitters, it is worth starting with simpler things. For example, knitting a cardigan vest.
Selecting yarn and tools
A cardigan for a girl can be knitted or crocheted.
When purchasing materials, experts recommend adhering to the following rules:
- to work on a children's cardigan, it is necessary to use special yarn for children, which contains a large amount of natural wool;
- for younger children it is worth choosing lighter shades of thread, and for older children you can choose bright and rich shades;
- When buying threads, you need to pay attention to the label. It should indicate that the fibers have a natural composition;
- if the child has allergies, then it is necessary to purchase hypoallergenic threads;
- the item of clothing in question should not prick. In this regard, mohair and other yarn with long pile cannot be used for work;
- at home, you can check the naturalness of the threads. To do this, set fire to the end of the thread. If a plastic ball forms when burning, then it is not natural;
- for knitting a warm winter cardigan, it is better to use wool with a natural composition, and for a thin summer version - cotton threads;
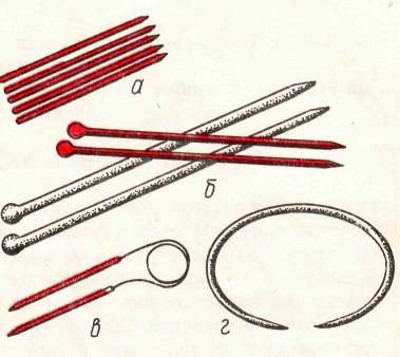
- Depending on the thickness of the threads, knitting needles are selected. Their thickness should be 1-2 sizes larger than the thickness of the threads. The thickness of the knitting needles is indicated on their tip, and the thickness of the yarn is on the label.
In addition, the label contains information about the recommended thickness of the needles for a given yarn. If they are selected incorrectly, the finished item will be either too loose and lack shape, or very dense and rough;
- if you plan to create a cardigan from different colors, then all the threads should be of the same composition and the same thickness;
- Hooks differ in material and size. The more expensive the hook, the better quality. Wooden hooks are suitable for soft, thick threads. Plastic tools are the lightest, but they can easily break. The strongest hooks are made of metal.
They range in size from 0.6 to 9 mm. The thicker the hook, the thicker the threads it is suitable for. The manufacturer indicates on the yarn labels what size hook to use.
Calculating the amount of yarn for a cardigan for a girl from 3 to 12 years old. Formulas and examples
Before you start working, you need to calculate how much yarn you will need.
Before doing this, it is worth taking into account some nuances:
- thicker thread is used in smaller quantities;
- It is more economical to use threads with a weak twist than threads with a strong twist;
- knitting with the stockinette stitch requires less yarn than knitting with patterns;
- knitting the stockinette stitch requires more thread than knitting openwork;
- With the same thickness of threads, their consumption will be less if you do the work with thicker knitting needles. However, such knitting needles can only be used for fleecy and fluffy yarn.
To calculate how much yarn is needed, it is worth making a pattern for the product.
There are the following methods for calculating the amount of thread required:
- Knitting a sample from the selected threads and the selected pattern. Then it is washed, dried and ironed.
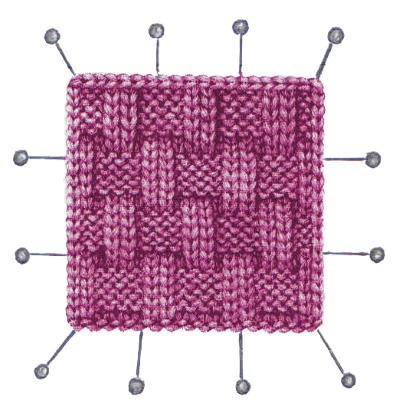
Next, calculations are made according to one of two options:
- calculation of thread weight. The sample is weighed on kitchen scales. Then its area is calculated. Next, a pattern of the product is made and its area is also calculated. Then calculations are made using the formula: thread weight = (product area multiplied by sample weight) divided by sample area;
- calculation of footage. Here the calculation of thread consumption for the sample is carried out. To do this, it is necessary to measure by the meter and attach a bright thread. When the sample is ready, the total number of full meters is added up, and a tail is also added. The length of the tail is equal to a full meter minus what is left of the full meter.
Then the sample is washed, dried and ironed. Then the area of the sample and the area of the finished product are calculated. Then the footage is calculated: the required thread length = (product area multiplied by thread length) divided by the area of the sample.
- Using tables that contain information about the required weight and length of yarn for a specific type of product. You can also use an online calculator that will perform all the necessary calculations.
Cardigan styles and models
A cardigan for a girl, which can be knitted using various models and styles, will be an integral part of the wardrobe. The most interesting options are the models presented in the table below.
| Name | Photo |
| Pink cardigan from Phildar magazine. It is suitable for a child from 2 to 6 years old. Patterns: elastic, stockinette stitch, large pearl. | 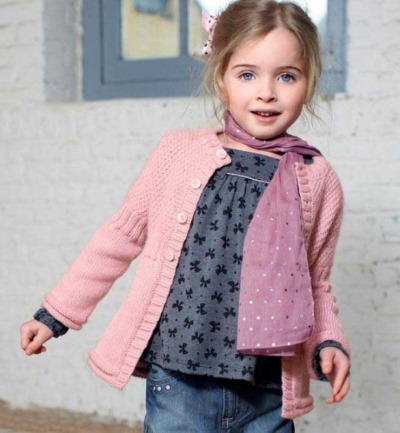 |
| The cardigan is red. It will fit a height of 116-122 cm. | 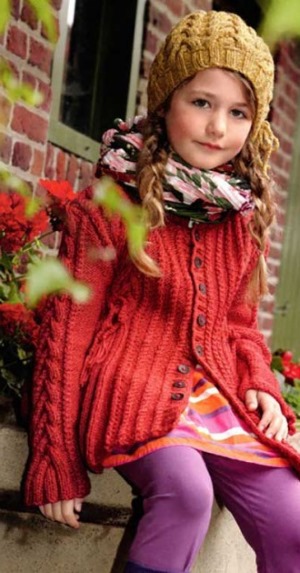 |
| Cardigan with openwork pattern | 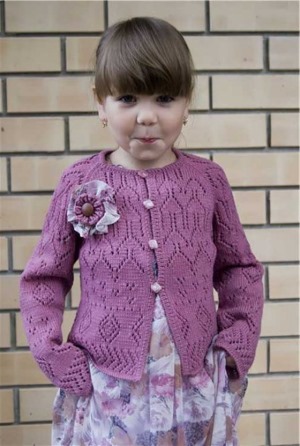 |
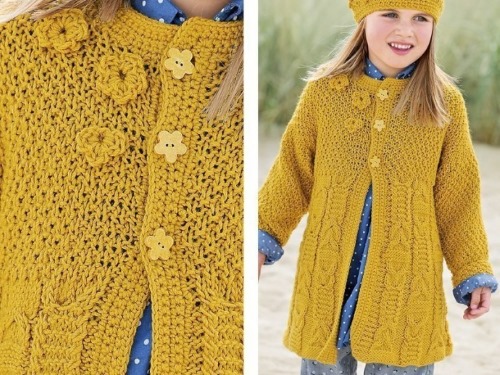
| Cardigan in yellow. Suitable for height 104-132 cm. | 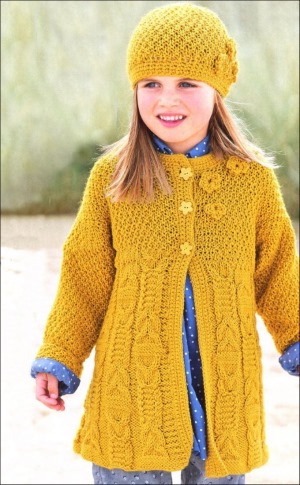 |
| Cardigan "Sea Princess". The model has no seams and is made of a single piece. This option is very comfortable to wear. | 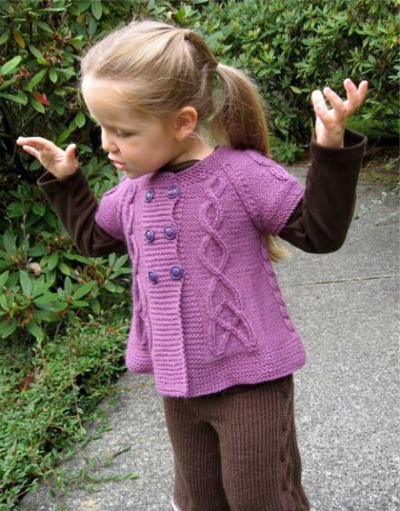 |
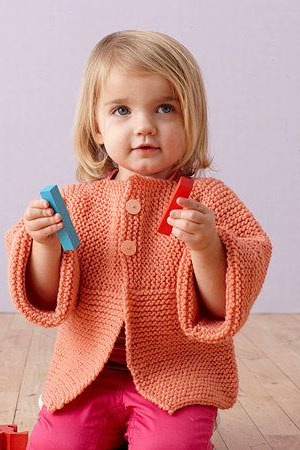
| Knitted cardigan for girls. Cinnamon-colored sweater. The model is suitable from 1 year to 6 years. | 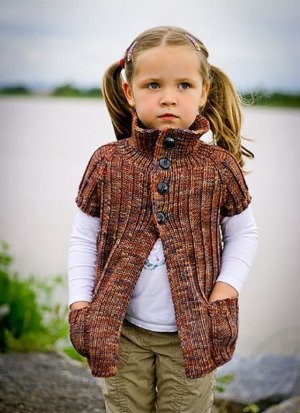 |
| Extended model. From 2 to 10 years. | 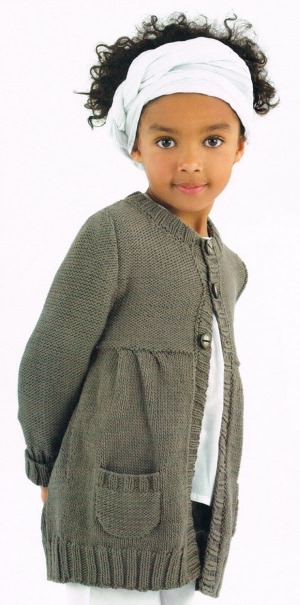 |
| Cardigan for girls in the form of a coat. This model is made according to the model of Ralph Lauren. It is designed for ages from 3.5 to 6 years. | 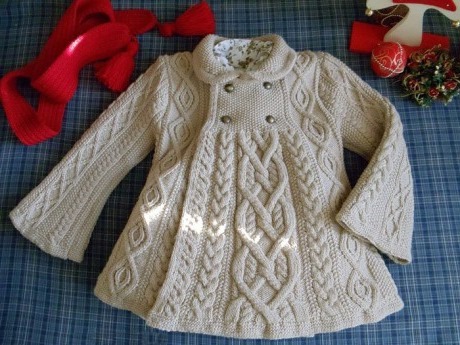 |
| A cardigan model made in oriental style. | 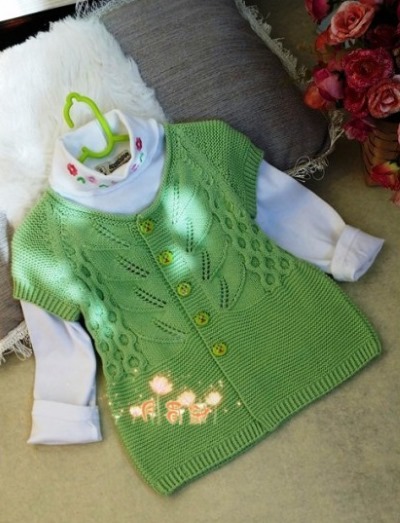 |
| Blue cardigan for height 92 cm. | 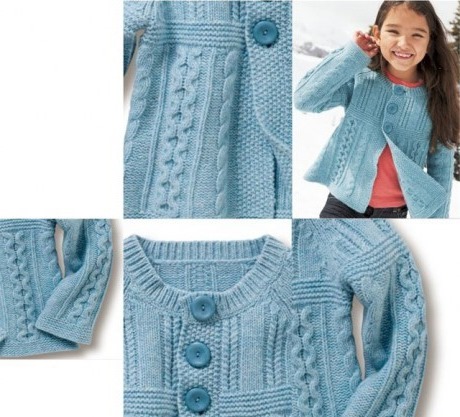 |
Cardigan patterns. Crochet and knitting patterns and descriptions
A cardigan for a girl, which can be knitted with knitting needles using various patterns, will become a fashionable and stylish item.
Some pattern options:
- In the form of braids. The rapport consists of 10 rows and 18 loops. Rows 1-10 are repeated.
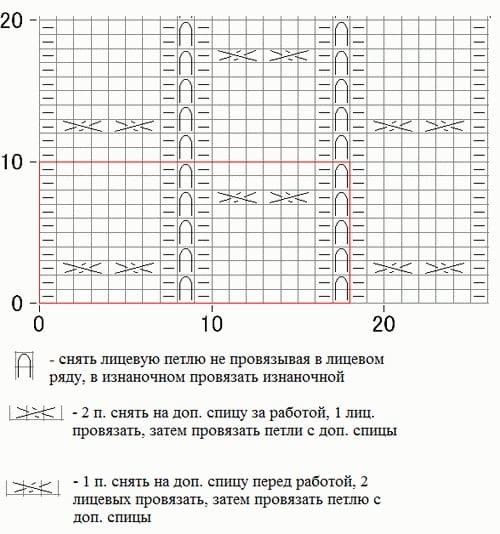
The diagram illustrates the appearance of both types of loops from the front side. Therefore, rows consisting of front loops are knitted according to the diagram, and rows with the back type according to the pattern. The front rows are read from left to right, and the back rows from right to left.
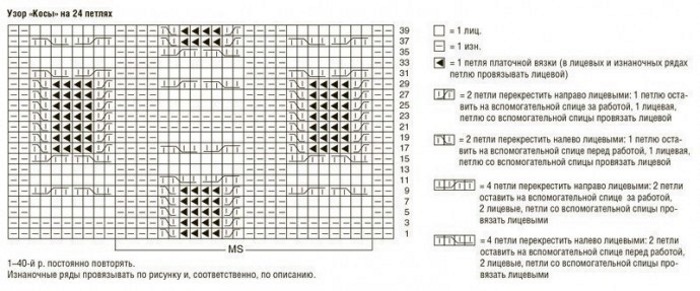
- Openwork pattern. It alternates between an openwork motif and a braid motif, like a chessboard. Braid motif: after knitting, 4 loops are removed to an additional knitting needle, 4 front loops are knitted, then the loops are removed from the additional knitting needle.
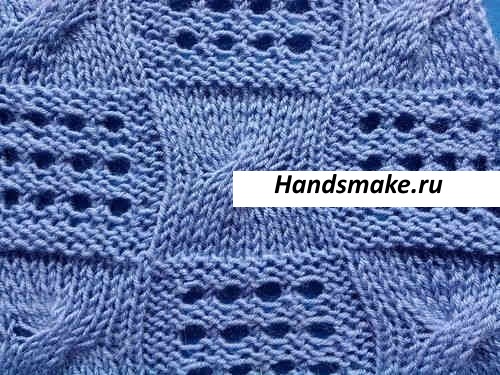
The pattern repeat is 32 rows of 24 loops. The diagram depicts face loops. The back side is made according to the drawing. During the cast-on, 2 edge loops are additionally cast on.
- A pattern in which the loops are moved. Pattern repeat: 14 loops, 2 loops for proportionality and for edges.
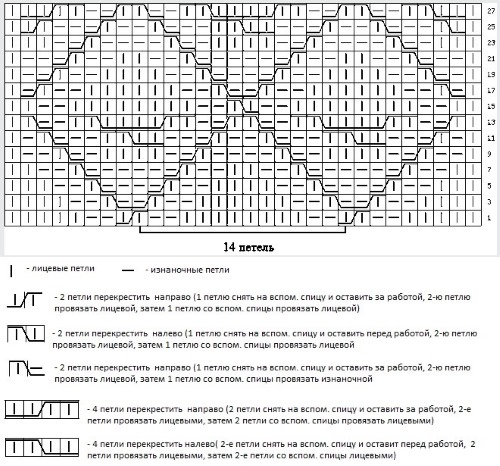
Work begins with loops before the rapport, then the required number of rapports is repeated. Each row ends with loops after the rapport. The execution of purl type loops is carried out according to the pattern. The repetition of rows occurs from 1-28.
- Braid pattern. Pattern repeat: 5 loops plus 2 loops for aligning the pattern at the end, plus 2 edge loops.
Repeat from row 1 to row 4. Loops from the wrong side are made according to the pattern.
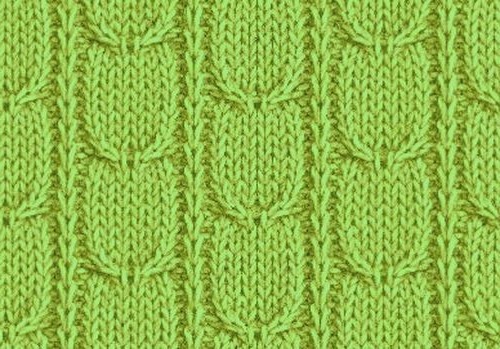
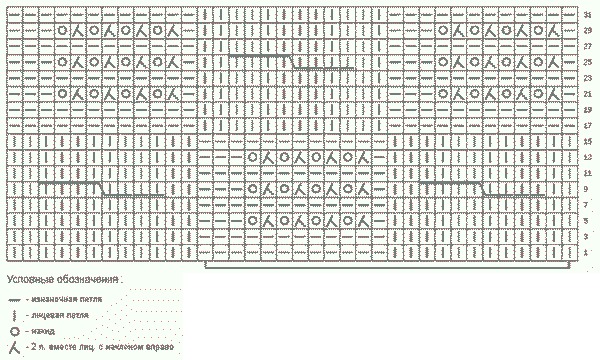
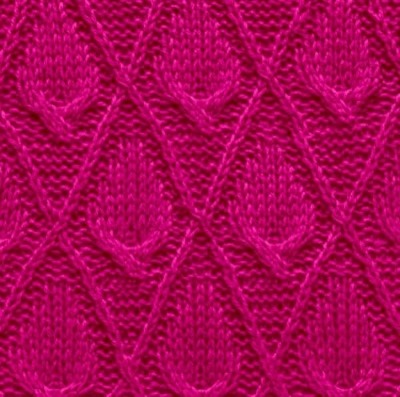
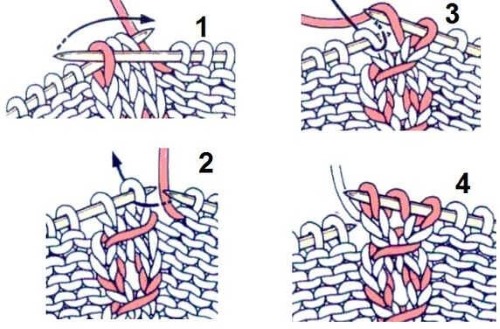
- Openwork pattern in the form of leaves. Rapport 12 loops and 16 rows. Repeat from 1 to 16 rows.
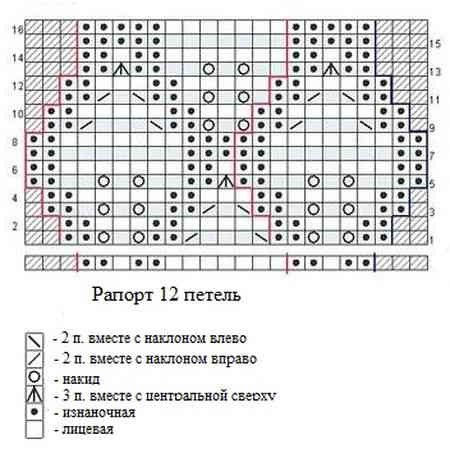
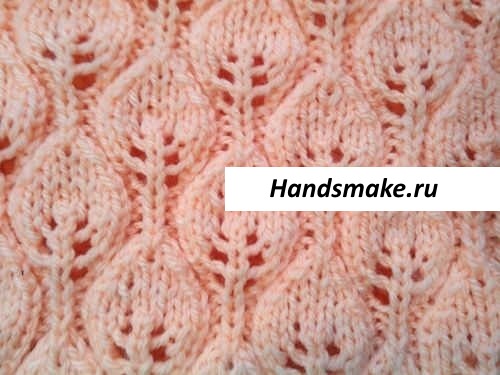
The diagram shows the rows of the purl type as they look from the outside, i.e. the purl rows are made according to the pattern, the yarn overs are made purl. The pattern is on one side.
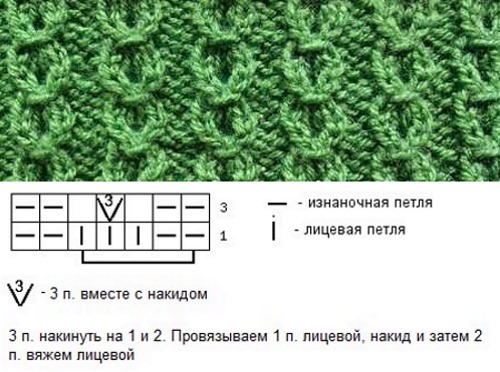
- Large pearl pattern. This pattern looks simple, but it is universal and suits knitting or garter stitch, different types of elastic, braids and other types of patterns.
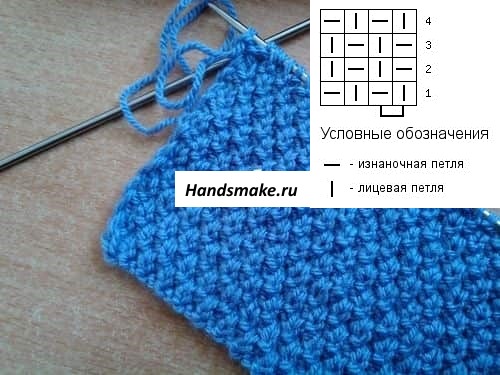
The pattern is created by alternating both types of loops. Rapport: 2 loops and 4 rows. In the diagram, the front rows are read from right to left, and the back rows are read from left to right.
- Raspberry pattern. It can also be used for hats and sweaters. This pattern is easy to make. The pattern is 8 stitches plus 2 for the edges.

Rows:
- 1 row: purl 2 pcs., knit 1 pc., purl 2 pcs., 5 pcs. p. from one.
- Row 2 and all even rows: perform according to the pattern, and 5 pieces of st, connected from the 1st, are performed as persons.
- 3,5,9,11,15,17 rows: performed according to the pattern.
- 7 row: purl 2 pcs, 5 pcs p. from one, purl 2 pcs, 5 pcs p. together crossed persons;
- Row 13: purl 2 pcs., 5 pcs. p. together crossed knit, purl 2 pcs., 5 pcs. p. from one.
- Row 19: repeat from row 7.
If the work is done using a hook, the following types of patterns can be made:
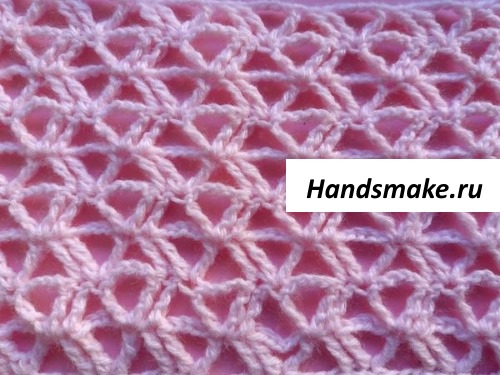
- A simple openwork pattern. Pattern repeat: 6 air loops, plus 2 edge loops.
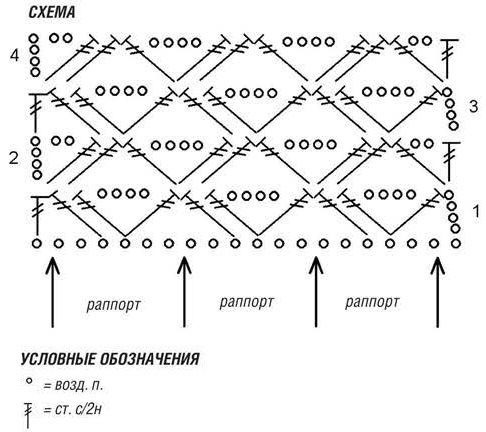
Repeat in height 1 time from rows 1 to 4, then from rows 3 to 4.
- Openwork pattern "Original". Rapport: 4 pcs. air loops, plus 5 pcs. loops.
The reading of the diagram of the rows that are odd must be done from the right side to the left, and the even ones - from the left side to the right.
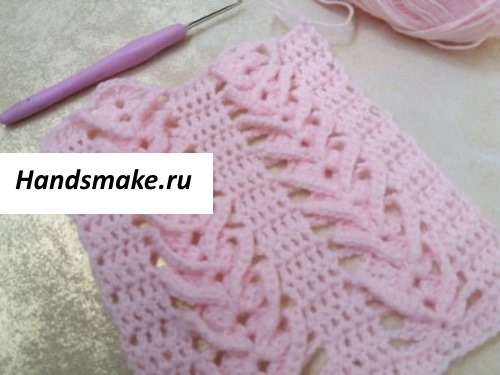
- Pattern "Shells". Rapport: 6 loops + 1 air loop.
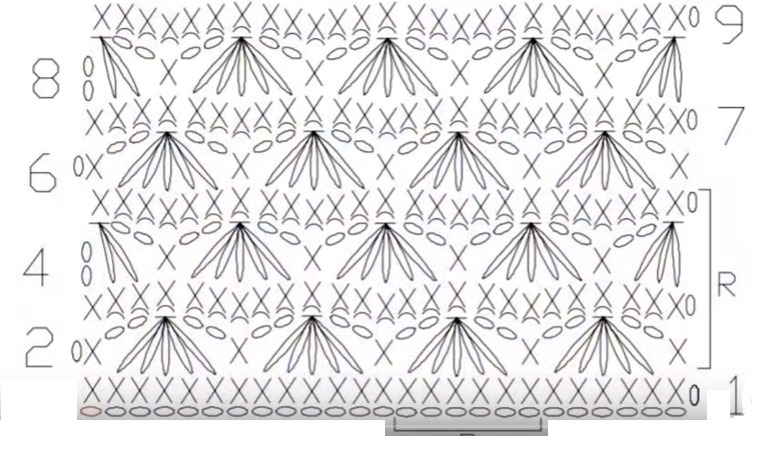
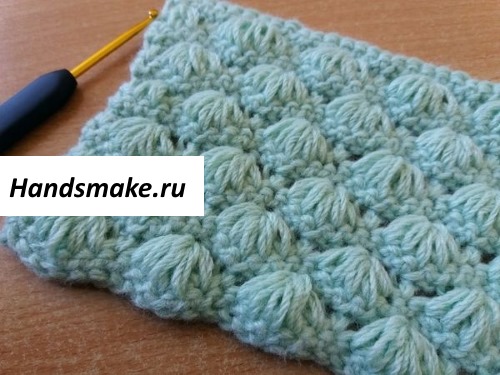
Rows:
- 1st: lifting loops, single crochets (sc);
- 2nd: 1 lifting st, 1 sc, 2 ch. Next, yarn over and pull the loop out of each column 5 times. Pull the thread through the pulled loops and fasten. 2 ch. st, sc.
- 3rd: lifting loop, behind the wall of the loop at the back, sc.
- 4th: ch 2 pcs., yarn over, 2 rows. pulled loop in each column, ch 2 pcs., sc, yarn over 1 pulled loop in each column 5 rows. Then pull the thread through all the loops and secure. Then 2 ch 1 sc.
- 5th: 1 p. lift, sc behind the wall from behind.
- 6th: repeat 1 through 5.
How to crochet a cardigan: step-by-step instructions
The model of the cardigan described below is designed for a height of 104 cm.
To make it you will need:
- yellow yarn 550 g (50% merino, 50% polyacrylic);
- knitting needles No. 5.5;
- hook No. 5;
- buttons 3 pcs.;
- extra knitting needle 1 pc.
Back
To knit the back, you need to do the following:
- Cast on 86 stitches.

- Making a braid pattern inside the edge stitches. To add volume, in the 14th, 20th, 30th rows, each inner section of the purl pattern repeat, perform 4 X 2 sts. together with the wrong side.
- From the first row of loops at a distance of 27 cm make a double pearl pattern. In the 1st row remove 9 sts. This must be done measuredly.
- From the beginning of the pearl pattern, at a distance of 18 (19) 20 cm, 11 sts are closed in the middle for the neckline.
- The shoulders are finished separately. In the 2nd row, close 1x4 sts along the edge of the neck.
- Close the remaining shoulder loops after 20 cm from the beginning of the pearl pattern.
Shelves
To make the shelf that is on the right, you should do the following steps:
- Cast on 43 stitches.
- Make a braid pattern inside the edge stitches, starting the row with purl st. 5 pcs. For volume in row 14, before the pattern repeat and in its inner part, make 2 sts together purl st.
- Make a double pearl pattern at a distance of 27 cm from the first row, while removing 4 sts in the 1st row.
- From the beginning of the pearl pattern, at a distance of 14 cm, close 1x4 sts for the neckline from the right edge, and also in every 2nd row 1x3 sts, 1x2 sts, 1x1 st.
- Close the remaining shoulder loops.
The left part is also performed as a mirror image of the right part.
Sleeves
To knit the sleeves you will need:
- Cast on 25 sts for left and right sleeves.
- Work double pearl pattern inside edge loops.
- To make the bevel, add 5x1 sts in each 6th row on both sides, and 6 x 1 sts in each 4th row.
- At a distance of 29 cm from the 1st row, all loops are closed.
Assembly
To carry out the assembly you need:
- Moisten the pieces and attach to the pattern.
- Make shoulder seams.
- A hook is used to make the neck and fastener strips. 2 cm sc is knitted along the sides and neck.
- On the right side of the bar, make 3 holes for buttons, each 3 single crochets wide.
- The sleeves are sewn in, making sure that the middle coincides with the shoulder seam.
- Make seams on the sides and sleeves.
- Upon completion, all seams are steamed.
- Attach buttons.
How to knit a cardigan with knitting needles: step-by-step instructions
Size from 6 months.
To make it you need:
- Baby Wool Yarn 4 skeins;
- buttons 2 pcs.;
- loop marks;
- knitting needles No. 5.
Garter stitch pattern: all stitches are knit.
Sleeves
 To make the right sleeve you need:
- Cast on 34 sts and work a 14 cm pattern.
- Place the marks in the row, which is the last one, at its beginning and end.
- From the marks continue working on the 6.5 cm pattern.
- Divisions: make 17 persons. sts for the right shelf. Place these loops on the third knitting needle, make another 17 persons. for the back.
Yoke-back
To knit a yoke you will need:
- Continue working the pattern. Only over 17 sts of the back – 12.5 cm from the beginning of the neckline.
- The back loops are placed on an additional knitting needle.
Shelves
To make the shelf on the right you need:
- Return to the remaining 17 sts and continue to work the pattern 6.5 cm from the beginning of the neck.
- Make holes for buttons from the front sts: knit 5 pcs., yarn over 1 pc., knit 2 together, knit 4, yarn over 1, knit together 2 sts, end knit sts.
- Garter stitch - 3 rows.
- Close the loops.
Shelf on the left, joints and sleeve on the left
To knit the shelves, you need:
- Cast on 17 sts.
- Make a 7.5 cm pattern. End with a purl stitch.
- Connecting row with front sts: make 17 front sts along the left shelf, then make 17 sts along the yoke.
- Make a 6.5 cm crochet stitch from the connecting row. In the last row, make a mark at its beginning and end.
- Perform a plait knot 14 cm from the mark.
- Perform loop closure.
Back
To perform the back, you need to:
- Cast on 42 sts from RS along the edge of the yoke-back inside the markers.
- Make a garter stitch of 14 cm.
- The loops are closed.
Before
To perform the transfer you need:
- Cast on 24 stitches along the front sides with the front st.
- Complete the plait up to the height of the back.
- The loops are closed.
- Repeat for the 2nd shelf.
Assembly
To carry out the assembly you need:
- Sew the sides.
- Complete the seams of the sleeves.
- Attach buttons.
A cardigan for a girl using knitting needles can be made with various patterns and ornaments. There are a huge number of models of this wardrobe item. This item will look stylish and at the same time warm in winter. It does not require much effort and time to make.
Article formatting:Natalie Podolskaya
Video about knitting a cardigan for a girl
Cardigan for girls with knitting needles: