If you want to create masterpieces from yarn, beginner needlewomen can use master classes that explain in detail how to properly felt wool. Products made in this way are popular and are instantly sold out.
What you need to know before starting wool felting
Few newcomers to this business know how to felt wool for beginners.
When studying the process of dumping, it is worth familiarizing yourself with its features:
- After pulling the wool out of the combed, smoothed tape, it is recommended to rub it in your palms. This will help the fibers to tangle, after which they will felt better.
- It is better to find out whether the required density has been formed by compression. After deformation, the item takes its original configuration. It is advisable not to overdo it, as woolen threads may break.
- When felting large crafts, experts advise using sliver for the inner segment. This will help save expensive threads.
- For felting it is recommended to use only natural raw materials, without adding synthetic materials.
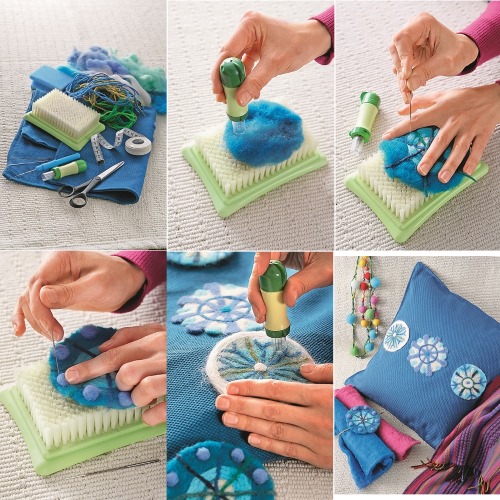
Materials and tools
For felting you will need the following materials and tools:
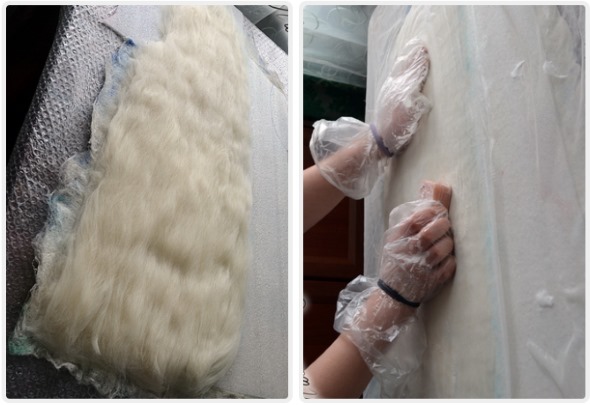
- Natural wool. This can be the hair of a sheep, yak, llama or camel. For the basis of crafts, it is advisable to purchase sliver - unpainted sheep's undercoat.
- Special needles that are shaped like the letter "G" and have serrations on the sharp end.
There are 3 types of needles:
| Needle No. | Peculiarities | When is it used? |
| 36 | rough | at the beginning of production |
| 38 | more subtle | at the main stage of felting |
| 40 | the finest | for processing small and decorative components |
- needle with reverse notches;
- the mat or backing can be a sponge made of soft and thick foam rubber for washing plates, a wide bristled brush, foam plastic or felt material;
- for the wet method you will need soap, a bamboo mat and a convex film;
- safety pins;
- acrylic paints.
Dry felting technique
Many needlewomen know how to felt wool for beginners.
To felt a product using the dry method (felting), you must follow the following step-by-step instructions:
- After separating the wool fibers from the unspun source material, they should be lightly rubbed between the palms of the hands, tangling the threads.
- After this, the raw material must be rolled into a tight cylinder.
- Now the felting process begins - the needle must be inserted deeply, first compacting the product inside. It is recommended to hold the tool perpendicular to the future figure.
- Gradually turn the workpiece placed on the foam rubber, rolling it uniformly.
- The configuration will be pulled tightly together and its surface will straighten out.
- As the craft becomes more compact, it is necessary to replace the thick needle with a thinner instrument. If the formed figure does not deform when compressed, then felting can be finished.
- To give the silhouette a relief, you should use a sharp tool to process one place many times.
- The resulting defects are eliminated by adding new elements.
Wet felting technique
Step-by-step implementation of the wet felting technique:
- From the wool strip, separate equal strands of wool, the length of which is about 8 cm.
- Place the blanks facing one direction on bubble wrap. They should be laid out so that they slightly overlap each other.
- Lay out 3-4 tiers in a similar manner, with the fibers in each subsequent layer arranged perpendicular to the previous row.
- In the final layer, it is worth depicting a pattern from the remains of wool and threads.
- Next, you need to prepare the soap composition. Dissolve the soap intended for this procedure (or any other) in heated clean water.
- Wet the prepared workpiece and place a mesh or film on it.
- Using light circular movements, smooth the wool in all directions.
- Gradually increase the smoothing pressure.
- Once the fibers are no longer separating from the fabric, this stage must be completed.
- Without removing the film, place the future craft on a bamboo mat and roll it into a tight roll.
- Wrap the configuration in a towel to remove excess moisture and roll it many times.
- Unfold the product, then rotate it 900 and form a roll again.
- During the felting process, the workpiece will decrease in volume by approximately 30%.
- Rinse the finished craft in warm water and dry. To remove some of the water, it is advisable to lightly squeeze the canvas.
Felting in a washing machine
The technique of felting in a washing machine involves the following steps:
- To work, you will need tight rolling forms, which are covered with woolen hairs and placed in a nylon golf (or in a piece of nylon tights).
- The workpiece must be placed in a bag intended for washing and placed in the washing machine.
- Pour the detergent for woolen items into the special recess and set the program without soaking and drying.
- It is recommended to set the temperature to 500.
- After the washing procedure is complete, the finished felted craft should be removed. The felting form is pulled out of the workpiece using scissors.
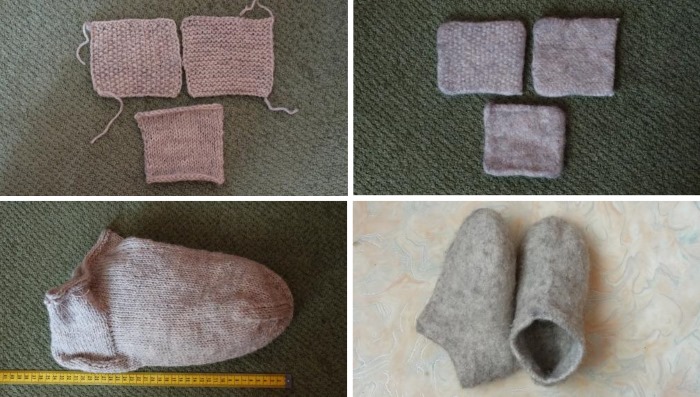
How to felt slippers from wool
Detailed master classes will tell you how to felt wool for beginners.
For example, to make slippers, it is advisable to follow the instructions below:
- Trace the feet on a waterproof material. Then multiply the width and height by 0.3 and divide the result by 2. If the measured number is 22, then multiplying by 0.3 will give you 6.6. Dividing it in half will give you a value that should be added to the length. Calculate the second figure in a similar way and add it to the width. Cut out the template.
- Lay out the wool in fibres on the pattern. Lay out the next tier across. Cover with a net, moisten with soap solution (1 tbsp of soap per 1 l), then it is advisable to compact with a vibration grinder. The protruding edges must be turned, while the workpiece is turned over.
- Place a couple of wool layers on the part perpendicular to each other, then wet them and compact them. Bend the excess villi again. Repeat similar manipulations until 8 layers are laid out on both sides. The more tiers are laid out, the thicker the slippers will be.
- In the finished product, all the villi should be intertwined. This can be easily done with a wooden or metal massager.
- Cut out oval holes and pull the patterns through them. Finish the cuts with a needle tool.
- Turn the product inside out and repeat the same steps with a needle. After that, turn the craft over to the front side and wrap it in a towel.
- Roll the wrapped part like a rolling pin about 40 times. These actions will help to compact and reduce the item to the required size.
- After trying it on, you should find out if the size is right, and after achieving the desired result, it is recommended to rinse the craft in water (cold and hot) and slap them hard on the bathtub.
- Squeeze the slippers and pull them onto some kind of base to form the toe, and it is better to create the heel by hand.
- The finished item will need 24 hours to dry. After half of the specified time, it is advisable to pull out the base and place the item on a radiator.
- If desired, the slippers can be decorated with butterflies or flowers.
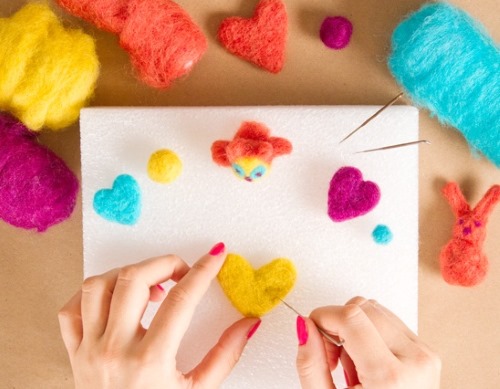
Felting technique for toys
When making toys using the felting method, in addition to the basic materials, you will need synthetic padding and wire for the frame.
General principles for making crafts using dry felting:
- A toy figure must be formed from a twisted bundle of wool.
- If you plan to make an animal, you should “sculpt” the face.
- Multiple punctures must be made to create indentations for the mouth and eye sockets.
- The ears are created on a sponge in the form of a very fine fiber from identical tufts of wool.
- When joining parts, the seams are covered with wool, which fluffs up at the point of attachment.
- Using similar actions, you need to form the blanks of other parts of the craft (horns, tail, paws).
- Carefully glue beads into the eye sockets.
- Finally, use a thin needle to polish the surface of the product, hiding any imperfections by adding wool material.
- The simplest toy is considered to be a caterpillar, on which beginners can develop skills and gain experience.
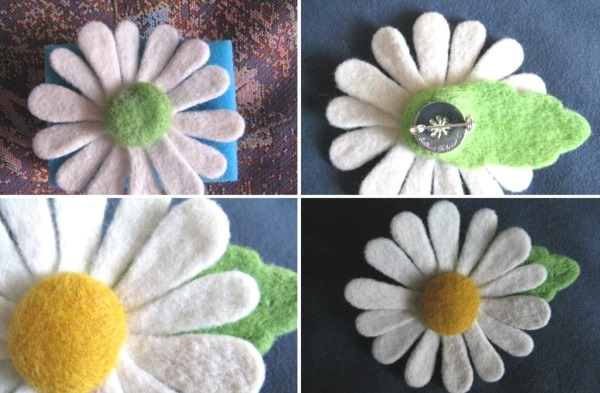
Flowers
You can learn how to felt flowers using a simple chamomile as an example:
- Take white wool and knead its texture, while forming the inflorescence blanks. Usually 11-12 petals are made.
- Then take one piece and place it on the foam rubber or mat. After that, pierce it with barbed needles many times so that the wool becomes denser and elastic.
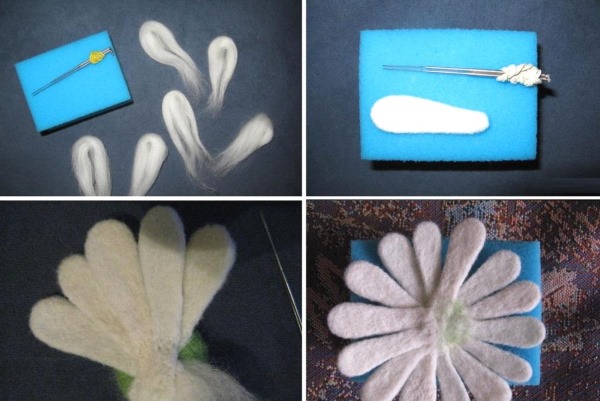
- When the structure of the product becomes dense, it is necessary to give the petals a smooth surface with needles. The thinnest tool will do here, which you need to pierce the selected area for a long time.
- All other blanks need to be felted in the same way.
- From green wool, use the method described above to create a flower bed. You will get a thin circle.
- Then it is recommended to take one ready petal at a time, pin them one by one to the green axial part of the flower and secure with felting needles.
- From the yellow source material, make the center using the same principle as the receptacle.
- Place the yellow piece in the middle of the petals and nail it around the entire perimeter.
- Finally, form a green wool leaf and attach it to the inflorescence.
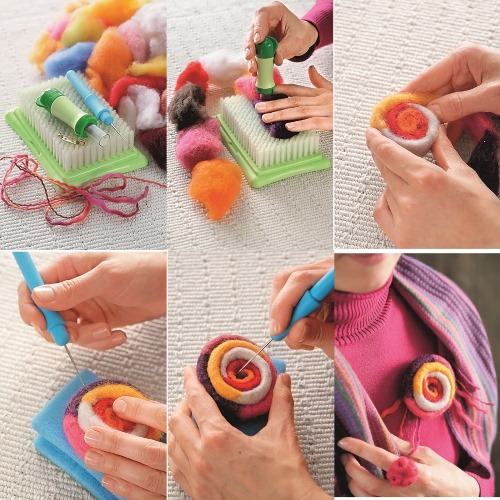
Beads
The following instructions will tell you how to felt beads from wool for beginners using the wet method:
- Pull out small strands from unspun wool threads.
- For one bead you will need 2 strands.
- Take one curl by the edge and twist it to the other end, rolling the workpiece into a ball, like a snowball.
- Wind the second strand on top of the resulting ball.
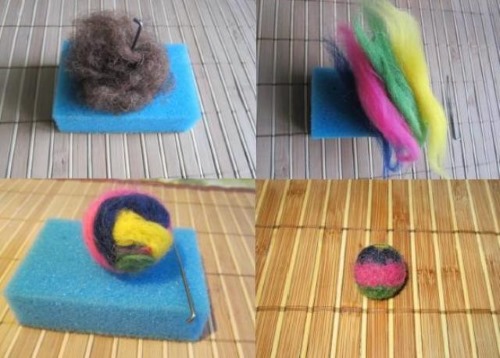
- The procedure for creating a rounded configuration can be made simpler by taking the thickest strand. The result will be a loose ball.
- Use similar actions to form the remaining spheres.
- Then slowly prick the future bead with a needle, twisting the structure from all sides. These manipulations must be performed until the shape of the part is fixed.
- Finally, the ball needs to be decorated with colored wool, silk threads or viscose.
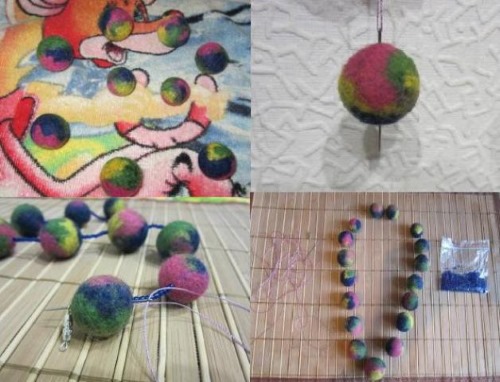
- After this, make a soap solution in hot water.
- Place wool balls on the convex film and pour the prepared solution over them.
- The next step is to carefully roll the circles over the surface.
- Gradually compacting the configuration, it is worth increasing the pressure a little.
- Continue these manipulations until the lumps take the form of dense beads.
- When the blanks have a smooth surface, it is recommended to dip them in clean water to wash off the soap, and then give the beads a contrast shower.
- To make holes, you need to pierce the still wet blanks with a sharp stainless steel tool.
- It is advisable to dry the necklace parts in the sun or near a radiator.
- You can string the balls on a fishing line or satin cord.
Cloth
Felted clothing is popular among modern fashionistas. Many items made using this technique have become true masterpieces of art.
Scarf
The scarf is easy to make in the washing machine.
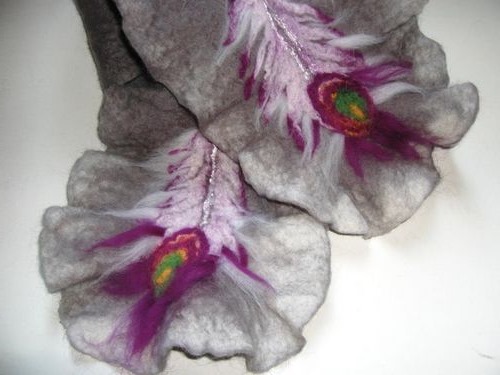
Step-by-step master class on its design:
- Pull the nylon out of the nylon yarn and leave the fuzz.
- Place the pulled threads on one side of a regular sheet, and then the wool fibers.
- Weave cobwebs from the material.
- After this, a layer of wool is laid down again, and finally a thick layer of nylon threads should be laid out.
- Wrap the blank with the free edge of the sheet and sew up the opening.
- Load the item into the washing machine, set the program to cotton at 400C and run it.
- The powder is used only for multi-colored fabrics.
- After 15 minutes of washing, take out the craft, remove it from the sheet and dry.
Beret
Special master classes will help beginners to felt clothing items from wool.
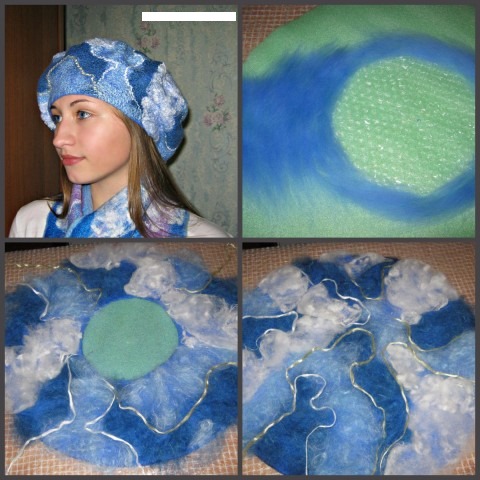
To felt a beret using the wet method, you should follow this technology:
- Cut a circle out of oilcloth, having measured the circumference of your head beforehand. Add 3-4 cm to the resulting figure on all sides for shrinkage. Place the figure on the convex film.
- Place the wool of the chosen colors on the oilcloth circle so that it extends slightly beyond the oilcloth.
- It is necessary to lay out 5 woolen tiers, perpendicular to each other.
- Cover the workpiece with gauze, then pour hot clean water over it so that the threads get wet. Put gloves on your hands and help the material get wet.
- Remove the gauze and turn the workpiece over to the other side. Wrap the protruding ends onto the oilcloth.
- On the reverse side, spread the wool using the same method. Then you need to lightly rub the woolen part with your hands through the gauze.
- It is advisable to rub for 20 minutes. Sometimes the fabric needs to be lifted so that it does not stick to the beret.
- The product must be rubbed on the other side as well, after which it is better to remove the gauze piece and continue rubbing the beret, gradually increasing the pressure. A pancake should form.
- When the wool becomes difficult to remove from the craft, you need to make a cut and pull out the oilcloth.
- Roll the headdress into a roll, then swing it in both directions and crumple it in different ways. These manipulations will help to shrink it.
- Rinse the beret, make a cutout for the head and let it dry.
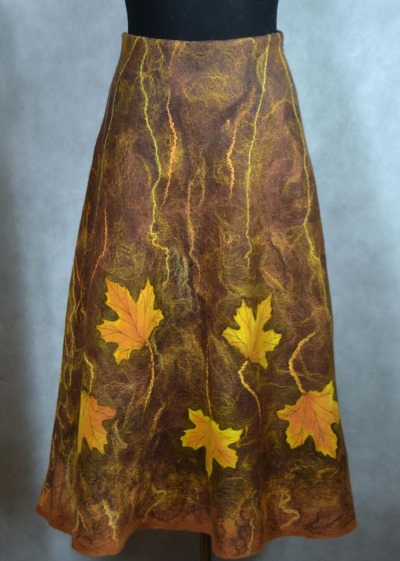
Skirt
Before felting the skirt, you need to create a pattern according to your measurements, and then proceed to the step-by-step process of making the product:
- Transfer the prepared template to a convex film. Lay out scraps of semi-fine wool of the chosen color on the base. The layer should be thin, and the material should be overlapped - the first tier horizontally, the next - vertically. Make sure that the thickness is uniform. Lay out the fibers beyond the template by 6-8 cm, which is due to shrinkage.
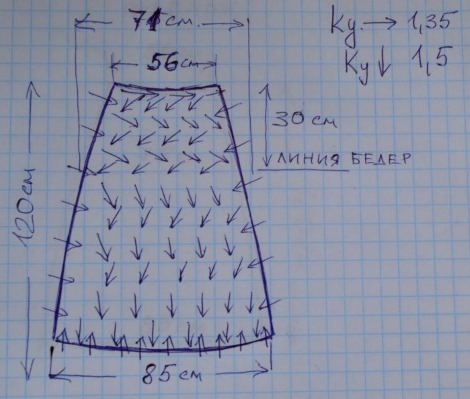
- Wet the part with warm water using a spray bottle, then cover it with mesh fabric. On the left side, it is recommended to add 2-3 cm in width and up to 25 cm in length for the allowance for the fastener. It is advisable to buy a zipper measuring 20 cm.
- Put on gloves and carefully, without displacing the fibers, wet the future product with soap solution. Press the fabric well to the film so that the woolen threads are soaked. Soak up excess liquid with a towel.
- Smooth and rub each segment of the craft. You can use a rolling pin or a special vibrating machine.
- Remove the mesh material, turn the product over and repeat the same process on the other side.
- Continue these steps until a dense, uniform piece of felt is formed.
- Rinse the part in warm clean water until the foam disappears. Lay it out on a dry surface, while forming a fold under the fastener. The front panel is ready.
- The back panel of the skirt needs to be felted in the same way.
- Let the workpiece dry.
- Iron the halves of the craft and compare them with the pattern. Trim if necessary, leaving allowances for the seams. Sew the sides and sew in the zipper.
- Smooth the top edge of the skirt with an adhesive strip to prevent stretching. Sew on the lining.
Jacket
Master class on making a jacket:
- First, it is recommended to make a pattern out of thick paper taking into account your parameters (front, sleeves and back).
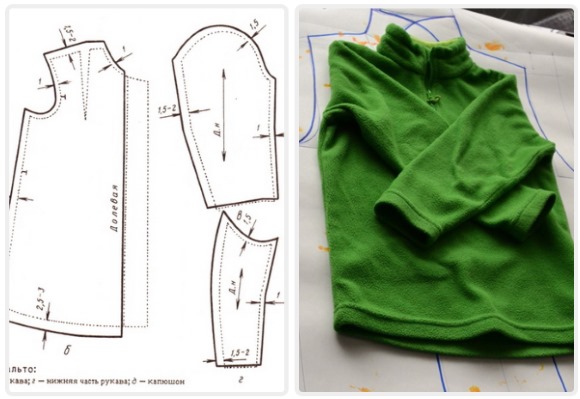
- It is advisable to choose viscose for the lining; it will help hold the fabric and prevent stretching.
- Place pieces of viscose material on the template and spray them with water.
- Place the prepared wool on top of the viscose, then cover it with a mosquito net and generously wet it with soapy water. Blot excess moisture with a towel.
- At this stage, you can optionally decorate the jacket. Alternatively, lay out various ribbons, braid, pieces of original fabric, colored threads or appliques.
- After laying out the decorative elements, cover them with a mesh cloth and spray with soapy solution. Smooth the surface thoroughly with your hands.
- On the other side of the pattern, use a similar method to lay out the material to form the shelves.
- Pick up a large needle and prick the wool threads with it over the entire formed surface. When the fabric becomes dense and looks like fabric, stop pricking.
- It is necessary to check that the entire workpiece is carefully processed with a needle. Allowances of 1.5-2 cm should be left for seams.
- When all the parts are ready, you should retouch the inside of the jacket - use a special grinding machine to remove all the irregularities and lumps.
- Felt 2 sleeves in a similar manner.
- Sew the finished parts together.
- Finally, sew on the buttons.
Usually, for beginners, the process of making crafts from wool seems very complicated. Having figured out how to felt things correctly, as well as having gained patience and perseverance, needlewomen will be able to make beautiful and unique crafts.
Article formatting: Natalie Podolskaya
Video about felting wool
Video instructions on how to felt wool for beginners using the dry felting method:
"To mold a web from the material", "Combed smoothed tape", "Convex film" - there are incomprehensible words at every step. Probably, this article is for advanced people who have some experience and know the terminology. But we must warn about this. Otherwise, a person who wants to get acquainted with the felting technique will remain perplexed.