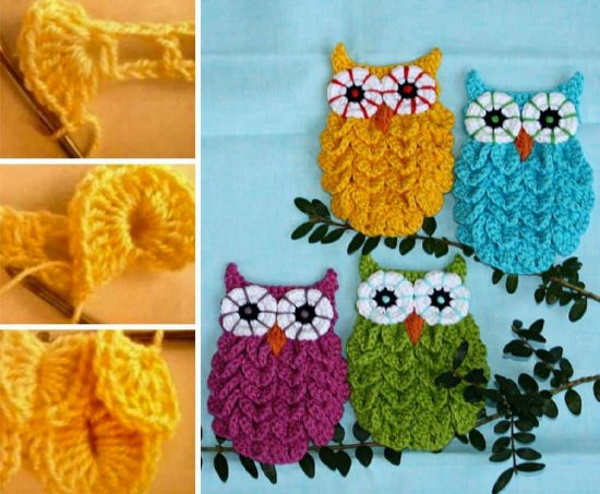
Since ancient times, people have endowed night birds – owls – with mysterious abilities, mentioning them in poems, legends and fairy tales. And these feathered predators are popular in handicrafts: they are made from beads, sewn from fabric, knitted with needles.
Crochet an owl for beginners
Beginners who are learning to crochet can crochet a toy owl. Made with your own hands, it will become a kind of bird of happiness, protecting and bringing wisdom, peace and prudence to its owners.
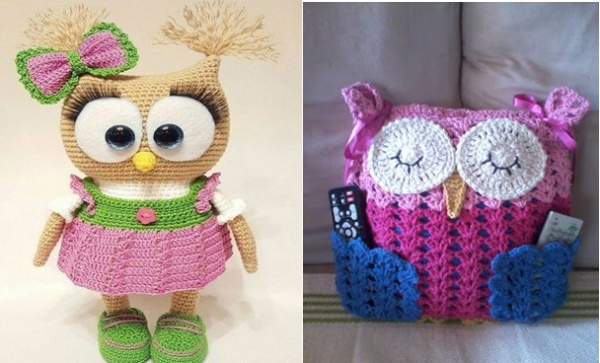
Many interesting and useful crafts are made in the form of a feathered predator:
- phone cases;
- bags and backpacks;
- fine jewelry;
- thought pillows;
- keychains;
- toys;
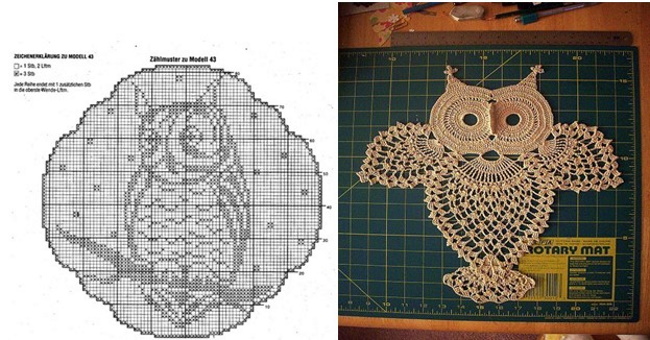
- napkins;
- small rugs for the bathroom or bedside.
You can also crochet an owl for beginners as an applique on clothes. The popular wise bird pattern is often used in knitting hats, mittens, fingerless gloves, and to decorate children's things. All you need is some yarn, a hook, and a desire to try.
Hook
Hooks come in a variety of types:
- wooden;
- bone;
- plastic;
- metal.
Bone and plastic hooks are light and easy to work with, but at the same time very fragile. The tool number is determined by the head: if its thickness is 2 mm, then the tool has No. 2.
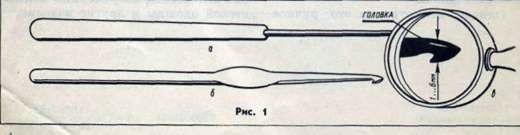
When choosing a hook, you should pay attention to the head: a pointed one can hurt, and a blunt one will make work difficult. The hole in the head should be approximately 2 times larger than the diameter of the yarn used. It is best to store hooks in a box or craft box to avoid damage to the tool.
Yarn
Crochet yarn comes in:
- Natural – of animal and plant origin.
- Artificial – viscose and acetate yarn and synthetic fibers, which include polyacrylic, polyamide and polyester.
- Blended – consists of a mixture of 3 or more types of fiber.
- Shaped – boucle, chenille, velour, ribbon and others.
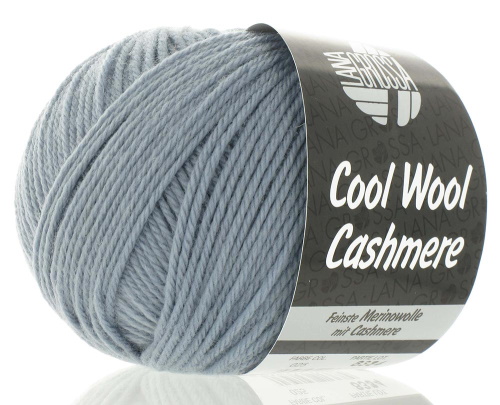
Any yarn is usually sold in skeins, the label of which indicates its type, weight and length of the thread in 50 or 100 g of product.
Knitting toys
Having learned to hold the tool in your hands, having mastered the simple technique of knitting and having applied a bit of imagination, you can decorate many different, useful things for the home with an owl ornament.
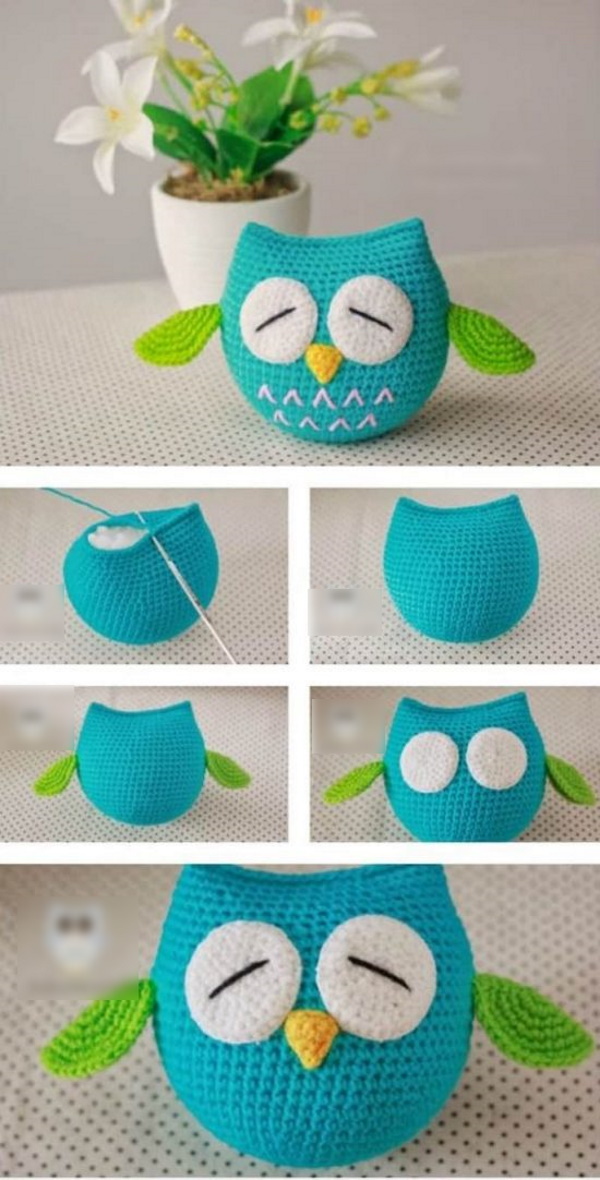
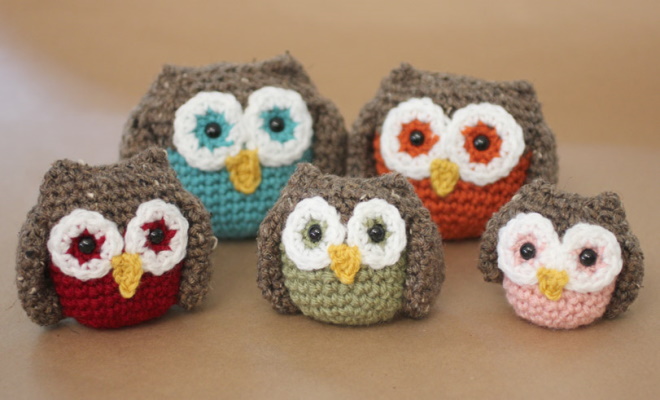
You can crochet an owl for beginners using the amigurumi technique. Often, needlewomen decorate their interiors with charming toys made in this way.
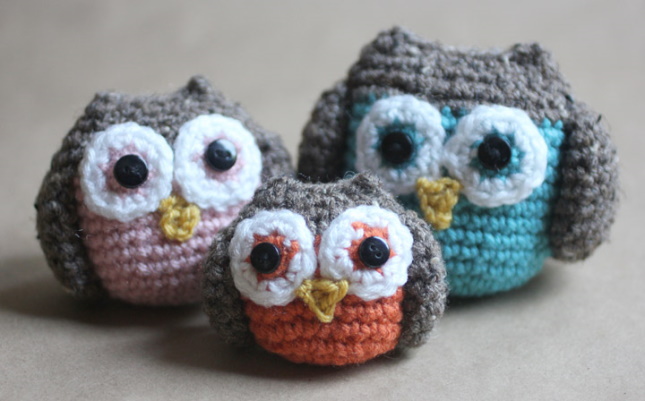
Distinctive features of these toys:
- miniature size: average size – 7 cm;
- unusual proportions;
- cuteness: charming and attractive, toys convey emotions, evoking joy and sadness, thoughtfulness or fun.
Knitting method
When crocheting cute toys, you get a dense fabric. The details are made in a circle without seams, giving the desired shape by adding or decreasing loops. They are then filled with filler to give them volume, and the toy is assembled by connecting the parts using threads or hinges.
If the pattern does not indicate how to knit: for the front or back wall, then amigurumi are usually made for a full loop of 2 walls. This way they turn out more elastic and dense.
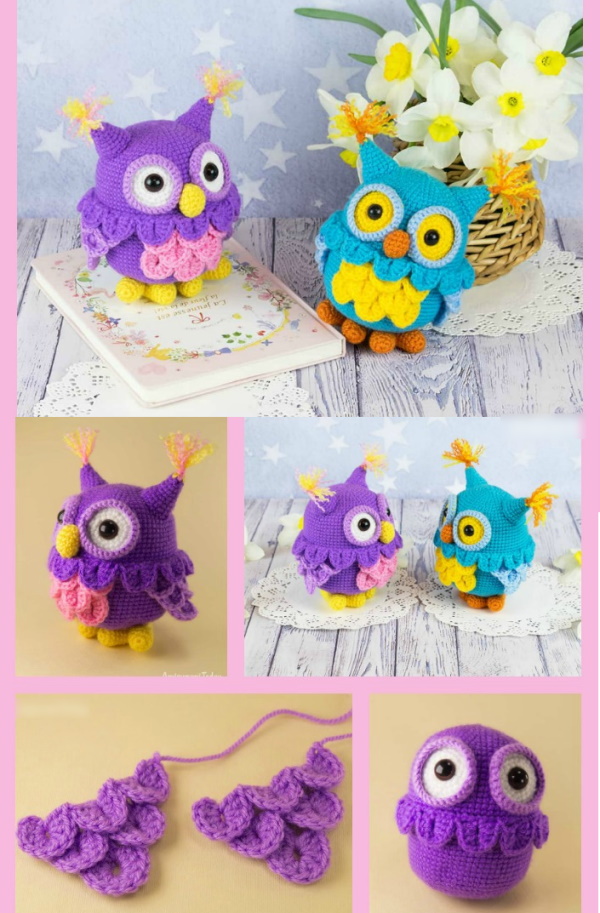
Master class on knitting a toy owl with a crochet hook for beginners
Crocheting an owl for beginners as a toy will be quick and easy.
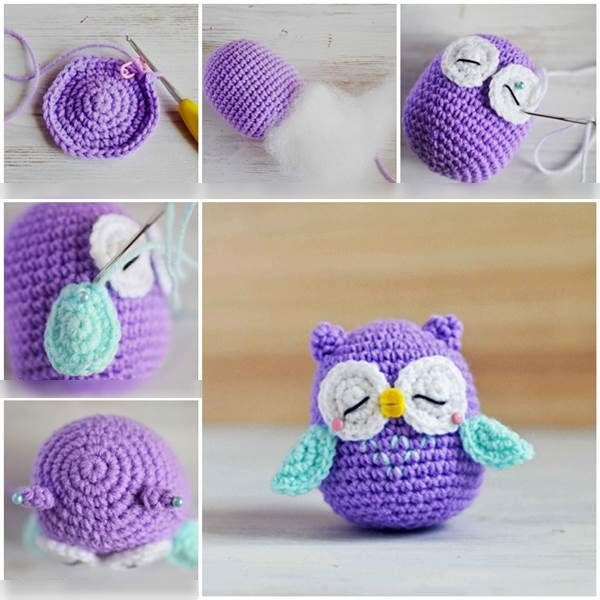
According to Japanese tradition, all amigurumi are given names. This one is called Milosh (from cutie, only he's a boy), he's inquisitive and cheerful.
Selecting yarn, calculating the number of threads, selecting a hook
Everything you might need for work:
- Hook No. 2.
- Filling for toys (hollow fiber, synthetic fluff).
- Thin threads in the same tone as the yarn.
- Needle for stitching.
Selection of yarn:
| Color | Compound | Consumption (g) |
| Blue | Acrylic (50), polyester (50) | 50 |
| Violet | Acrylic | 20 |
| Lilac | Acrylic | 15 |
| White | Acrylic | 15 |
| Terracotta | Acrylic(80), wool(20) | 5 |
Amigurumi ring
Start knitting with an amigurumi ring.
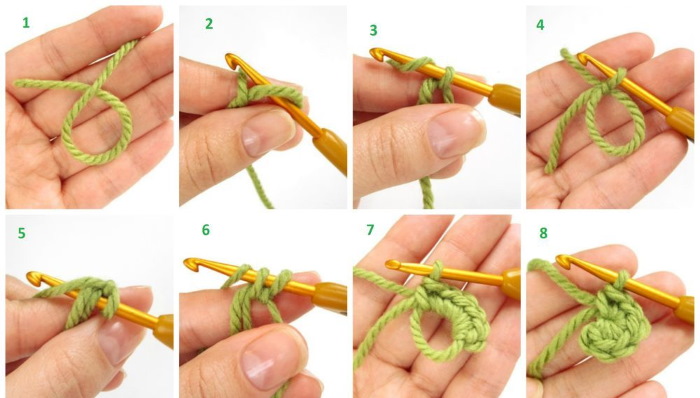
It is performed as follows:
- Wrap the yarn around your finger, making a loop, leaving 2-3 cm from the end.
- Then use the hook to grab and pull out the working thread.
- Pull another one through the resulting air loop. This is the beginning of the row, it is not counted as the first column.
- Pass the tool under both threads that form the large loop and pull out the loop.
- Then pull out another one and pull the thread through both loops on the hook. You have your first single crochet.
- Knit the required number of stitches in the same way.
- Tighten the large loop, pull the end of the thread. You have an amigurumi ring.
Principles of performing the ball
At the beginning of the work, when the increase is done in all rows, it looks like a flat circle. The scheme of making a ball:
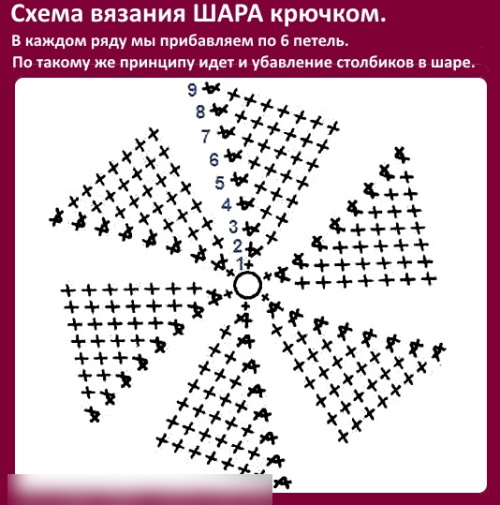
It is important to remember that 6 loops are added in each row. This will create a uniform fabric. Then follows the phase of stable knitting, without changing the number of loops. The next stage is decreasing the ball. It is performed in the same order as increasing.
Step-by-step knitting of a toy
Abbreviations that will be found in the knitting description:
- Вп – air loops.
- Sc – single crochet.
- SN – double crochet stitches.
- Pr – increase (2 sc are knitted from each loop).
- Decrease – decrease (done in 2 ways: skip one loop and knit the next one, or insert the hook under the front walls of two adjacent loops and pull out the working thread).
- Sp – a securing loop, which is knitted at the end of a row with a half-column.
- ( ) – the number in brackets will indicate the number of loops in a row.
Detailed description of knitting toys
It is better to mark the beginning of the row with a pin or a contrasting thread.
Taurus (blue threads)
At the beginning of each row, 2 ch are made for lifting, at the end – a securing loop (sp).
What is between the stars must be repeated as many times as indicated:
- 1st row: 6 sc in the ring (6).
- 2p.: 6pr. (12).
- 3rd row: *inc, sc* repeat 6 times (18).
- 4th row: *inc, 2sc* 6 times (24).
- 5th row: *inc, 3sc* this number of repetitions (30).
- 6th row: *inc, 4sc* repeat the same number of times (36).
- 7-18 p.: stable phase (36).
- 9, 11 and 13 rows: purple threads (36).
- Row 19: *dec, 4sc* 6 times (30).
- 20th row: *dec, 3sc* this number of repetitions (24).
- 21st row: *dec, 2 sc* 6 times (18). Next, the body is filled with synthetic padding or holofiber.
- 22 row: *dec, sc* 6 times (12)
- 23 p.: 6 dec. (6).
Use a needle to thread the yarn through all the loops and tighten it. You can hide the thread by piercing the body of the toy, bringing the needle out from the back side, squeezing the toy tighter, and cutting off the tail. It will remain inside the toy.
Eyes - 2 pieces
Knitting technique:
- 1st row: 6 sc in a ring (purple shade).
- 2nd row: 6pr. (12) – (white threads).
- 3rd row: *inc, sc* – repeat 6 times (18) – (white).
You can tie the entire eye with white threads and sew a black button in the center or glue an artificial eye.
Wings – 2 pieces (lilac threads)
The wings are knitted using lilac threads.
Knitting technique:
- 1st row: 6 sc in a ring (6).
- 2р: 2pr, sbn., 2pr.sn., 2pr.sbn. (12).
- 3rd row: *inc, sc* 2 times, 2 inc.sc, *inc, sc* 2 times (20).
- 4th row: tie with purple threads sc (20).
Ears – 2 pieces (blue threads)
Knitting technique:
- 1 row: 3 sc in a ring (3).
- 2 rows: 3 rows (6).
- Row 3: Fold the resulting circle in half and knit or sew both rows together.
Beak (terracotta threads)
To knit the beak you need terracotta threads.
Step by step:
- 1st row: 3 sc into the amigurumi ring (3).
- 2p: 3 pr. (6).
- Tighten the thread by passing it through the loops of the previous row.
For the beak, you can cut a triangle out of felt.
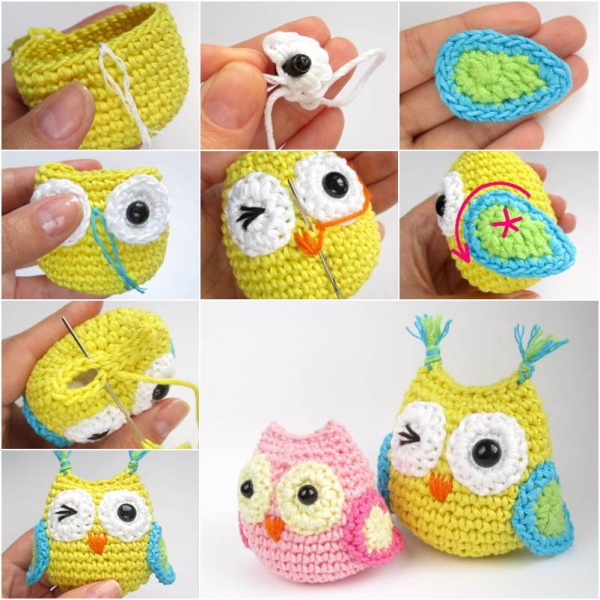
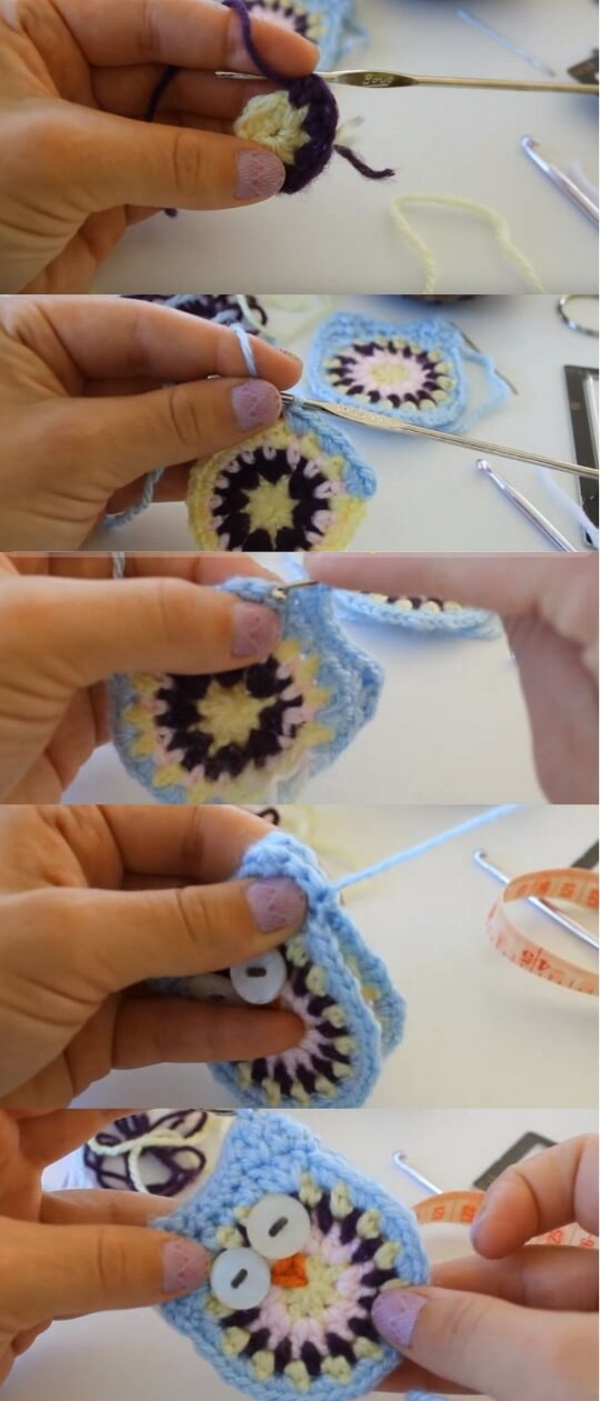
Finished product design
Next, you need to sew all the finished parts to the body in sequence:
- Eyes.
- Beak (if made of felt, then glue it on).
- Wings (can be attached with buttons if desired).
- Ears.
The little owl is ready.
Owl Keychain Crochet
You can crochet an owl for beginners in the form of a keychain - a small decoration that is attached to a bag, keys, bracelets, or wristwatch. A keychain is a small thing, so the product can be made quickly.
At the same time, the skill of working with a crochet hook is developed. Keychains can be made flat or voluminous - in the form of small toys.
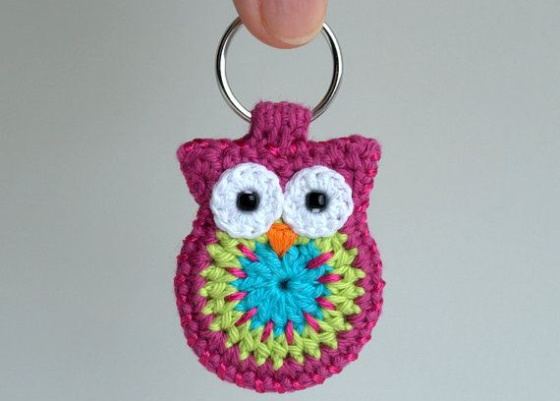
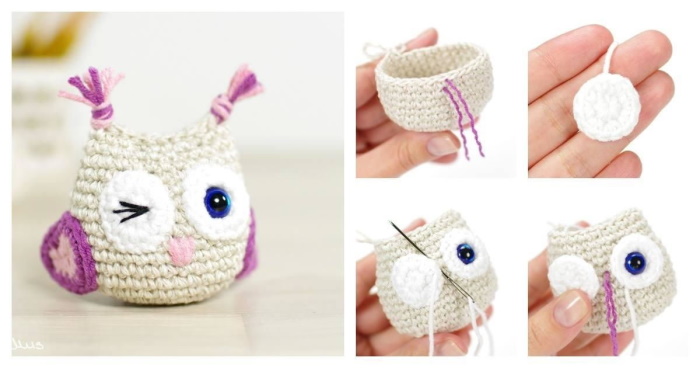
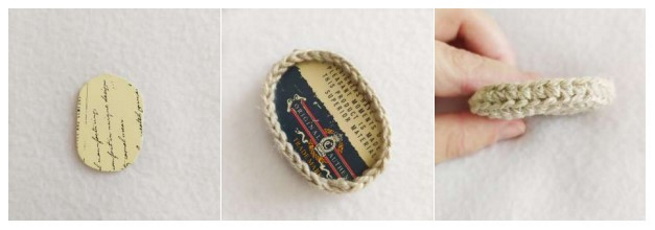
Flat keychain
It is better to start working with a crochet hook with smaller items. Even beginners will find it easy to crochet a flat owl keychain.
Selecting yarn, calculating the number of threads, selecting a hook
Materials needed for knitting:
- Hook (preferably metal) depending on the thickness of the yarn No. 2 or No. 3.
- Multicolored thread remnants.
To make the keychain small and neat, you don't need to use thick yarn. It will also be difficult for beginners to work with too thin threads. Acrylic threads are the most suitable for the job. Leftovers from knitting other things will do.
Step-by-step knitting of a toy
Abbreviations used in the job description:
- Вп – air loop.
- Sc – make a single crochet.
- Sn – dc with yarn over.
- С2н – st-k with 2 yarns.
- Prib – addition.
- Sp – a fastening loop, made at the end of a row with a half-column without a crochet.
- ( ) – the number in brackets will show how many loops there will be in a row.
Job Description
At the beginning of each row, you need to make 2 ch to raise the knitting to the next row, finish with sp. From * to * - you need to repeat as many times as indicated.
Step by step:
- 1st row: 6 sc – into a ring (6).
- 2p.: 6 approx. (12).
- 3rd row: *sc, inc* 6 repetitions (18).
- Row 4: Turn the work and knit 8 sc.
- 5th row: 1 sc, knit into 1 loop: (1 dc, 1 dc2n, 1 dc), 1 sc, sp, 1 sc, (1 dc, 1 dc2n, 1 dc) into 1 loop, 1 sc.
- Row 6: tie around the edges of the product.
On the top of the owl's head you need to make a chain of air loops or sew on a ribbon or a small chain to attach the ring.
Important! To ensure that the product is durable and nothing falls off over time, it is better to sew all the parts rather than glue them.
For the eyes, you can make a ring with 6 sc, or cut out circles from felt, and use beads for the pupils. Do not forget about proportionality, so that the eyes do not occupy almost the entire surface of the keychain. Next, you need to embroider the beak.
Volumetric owl keychain
A cute bird can serve as a talisman or a small toy. It will be a great gift, since hand-made items are always highly valued.
Selecting yarn, calculating the number of threads, selecting a hook
Everything you need to make a small keychain:
- Yarn of different colors (leftovers will do) – 15-20 g each.
- Hook No. 3.
- Darning needle.
- Sewing needle with matching thread.
- Soft filler (holofiber, synthetic padding).

Abbreviations found in the description:
- Вп – air loop.
- Sc – single crochet.
- SN – double crochet stitches.
- С2н – knit a column with 2 yarn overs.
- Pr – make an increase (2 sc are made from each loop).
- Decrease – decrease the number of loops.
- Sp – a fastening loop, made as a half-column without a crochet.
- ( ) – the number of resulting loops in a row.
Step-by-step knitting of a toy
An owl knitted in this way will appeal to children or serve as interior decoration.
Body
At the beginning of the row, 1 ch is made for lifting, at the end – 1 sp. From * to *, you need to repeat the pattern rapport as many times as indicated.
Step by step:
- 1 row: chain of 6 ch (6).
- 2nd row: tie the chain: 4 sc, (3 sc in 1), on the back side – 3 sc, inc (12).
- 3 row: inc, 3 sc, 3 inc, 3 sc, 2 inc (18).
- Row 4: inc, 4 sc, *inc, sc* 3 repeats, 3 sc, *inc, sc* repeat 2 times (24).
- 5th row: inc, 5 sc, *inc, 2 sc* 3 repeats, 3 sc, *inc, 2 sc* 2 times (30).
- 6th row: 14 sc, inc, 14 sc, inc (32)
- Rows 7-14: the number of loops does not change.
- Row 15: 14 sc, dec, 14 sc, dec (30).
- 16th row: 5 sc, dec, 14 sc, dec, 6 sc (28).
- 17th row: 13 sc, dec, 11 sc, dec (26).
- Row 18: 3 sc, dec, 11 sc, dec, 6 sc (24).
- Row 19: *4 sc, dec*, repeat 4 times (20).
- 20 p.: no change (20).
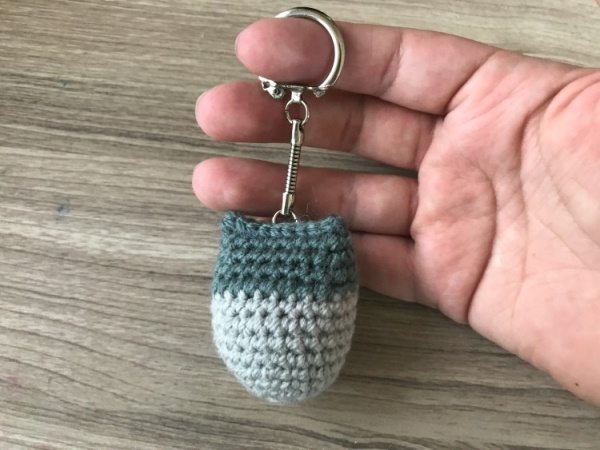
Then you need to fill the resulting product with padding polyester and fold the top in half. Tie the top with a connecting seam. Turn the work, make 1 VP for lifting, knit 5 sp, make a chain of any desired number of VP, connect with the product, finish the row with 1 sp.
Right wing
Step by step instructions:
- 1st row: 6 sc in a ring.
- 2nd row: 4 ch, 1 dc, (2 dc) in one loop, (1 dc, 2 dc) in 1, 2 sp in 1, 3 sc (12).
- Row 3: change threads and make 4 ch, 4 sc, knit into the top of the wing: 1 sp, 1 dc, 1 sp. Then 2 sc into each loop.
Left wing
Step by step instructions:
- 1 row: 6 sc in the ring (6).
- 2nd row: 2 sc, 2 sc, 2 sp, 2 sc, 2 dc, 2 dc (12).
- Row 3: (different color) 1 sc, then increase to the top of the wing. At the top – 1 sp, 1 dc, 1 sp. In the last dc make 4 sc.
Eyes - 2 pieces
Step by step instructions:
- Row 1: connect 6 ch in a ring (6).
- 2nd row: 3 ch, 12 dc, (12).
- Row 3: other thread, inc, 12 sc.
For the pupils, make 7 sc in a ring.
Ears
Threads of all the colors used in the work are cut into lengths of about 6-7 cm and secured in the form of fringe at the location of the ears.
Assembly
The bird's wings are attached to the sides. Next, the eyes need to be connected to each other, embroidered with white highlights and attached to the body. Then the beak is made (it can be embroidered or glued from felt).
Owl in Tilda style
Tilda was invented by Norwegian artist Toni Finnager in 1999. These are cute, unpretentious toys that represent comfort, coziness and warmth of the hearth. The dolls are easy to make. Their eyes are made of knots or small beads. As a rule, tildas are also given names.
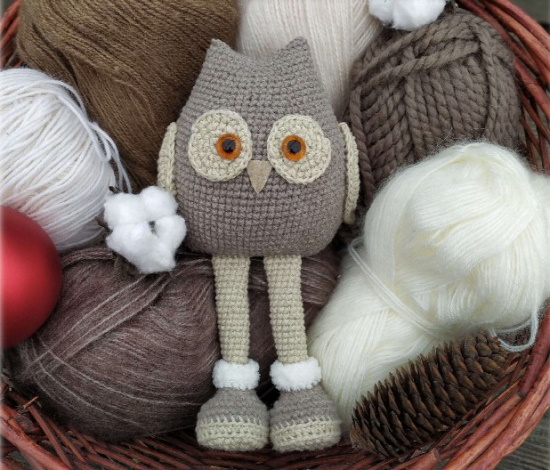
Over time, the popularity of toys only grows. Their own world with funny and charming creatures has been invented. You can crochet an owl for beginners, making it similar to this one, from the new collection of tildes. It will not be difficult to make.
Selecting yarn, calculating the number of threads, selecting a hook
Everything you might need for work:
- Hook No. 4.
- Needle with a large eye.
- Sewing needle with thread in the same color as the yarn.
- Filler for toys (holofiber, synthetic padding).
- Thick yarn, blended, 50 in 100 g.
Color, composition and consumption of the required threads:
| Color | Compound | Consumption (g) |
| Dark grey | Wool, polyamide | 50 |
| Light grey | Wool, polyamide | 50 |
| Brown | Wool, polyamide | 25-30 |
| White | Acrylic | 15 |
Step-by-step knitting of a toy
Conventional symbols used in the description:
- Вп – knit air loops.
- Sc – single crochet.
- SN – double crochet stitches.
- С2н – double crochet.
- С3н – a column with 3 yarns.
- Pr – addition.
- Ub – decrease.
- Sp – half double crochet (securing loop).
- ( ) – the number in brackets is the number of loops obtained in a row.
Detailed description of the work
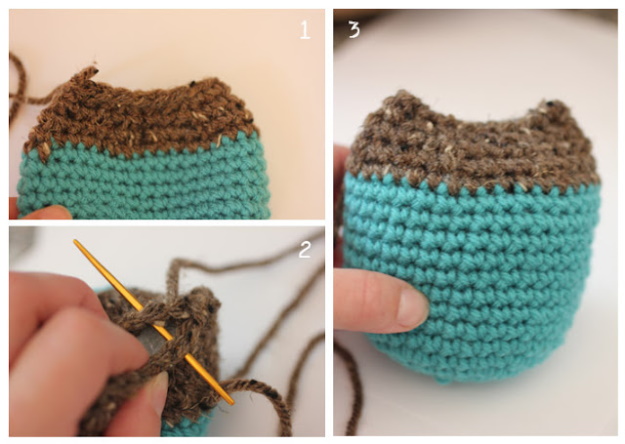
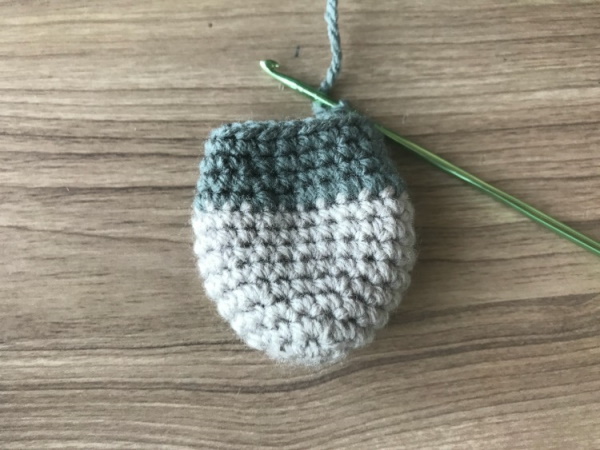
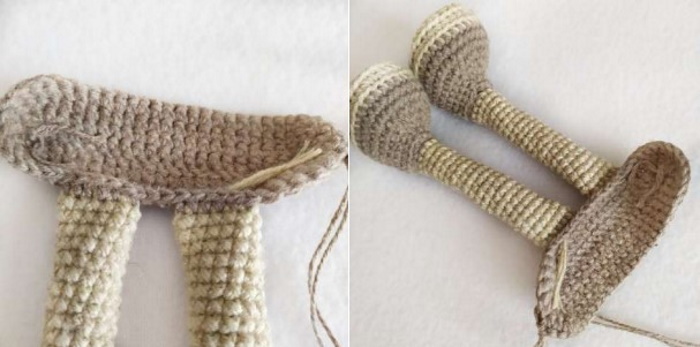
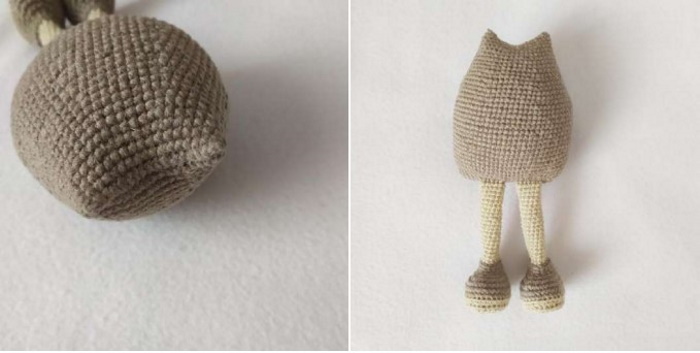
Knitting the body
You should start knitting with dark thread.
At the beginning of the row you need to make 1 air loop for lifting, at the end - a connecting post.
- 1 row: chain of 7 ch (7).
- Row 2: tie a chain: 3 sc in 1 loop, 3 sc, 3 sc in 1, on the other side – 3 sc (12).
- Row 3: inc, 5 sc, inc, 5 sc (14).
- 4th row: 1 sc, inc, 6 sc, inc, 6 sc (16).
- 5th row: – 1 sc, inc, 7 sc, inc, 7 sc (18).
- 6th row: –1 sc, inc, 8 sc, inc, 8 sc (20).
- 7-11 p. – no changes (20).

Next you need to move on to the light thread:
- 12th row: 2 inc, 3 sc, 2 inc, 3 sc, 2 inc, 3 sc (28).
- Row 13: 2 inc, 12 sc, 2 inc, 12 sc (32).
- 14-23 p.: – no changes (32).
- 24 rows: dec, 14 sc, dec, 14 sc (30).
- Row 25: dec, 13 sc, dec, 13 sc (28).
- Row 26: dec, 12 sc, dec, 12 sc (26).
- Row 27: the number of loops remains unchanged (26).
Fill the toy with padding polyester, fold the knitting and tie it with a connecting seam.
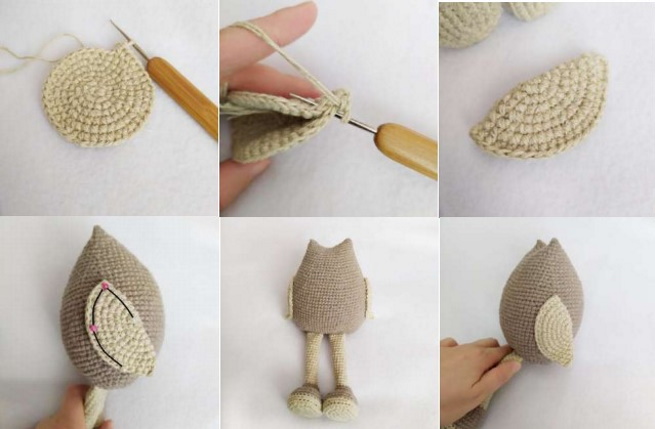
Wings – 2 pieces (brown threads)
Step by step instructions:
- 1st row: – 6 ch into the ring (6).
- 2nd row: – 3 ch, (2dc in 1) – 2 times, (3dc in 1) – 2 times, (2dc in 1) – 2 times) (14).
- 3rd row: – 3ch, (2dc in 1) – 3 times, (2dc in 1) – 3 repetitions, (2dc in 1) – 2 times, (2dc in 1) – 3 times, (2dc in 1) – 3 times (28).
- 4 rows; – 3 ch, (2 dc in 1) – 9 times, (2 dc in 1) – 3 times, (2 dc in 1) – 4 times, (2 dc in 1) – 3 times, (2 dc in 1) – 9 times (56).
- Row 5: tie with grey threads sc (56).
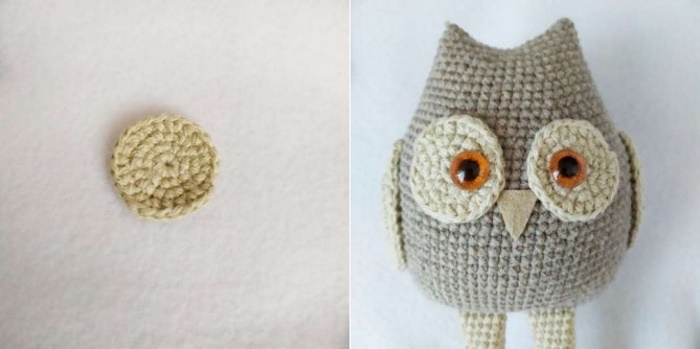
Eyes – 2 pieces (white threads)
Step by step instructions:
- 1 row: – in the ring 6 sc (6).
- 2 rows: – 6 rows (12).
- 3 row: – (pr, sc) – 6 repetitions (18).
Beak
Step by step instructions:
- 1 row: 3 sc in the ring (3).
- 2 rows: 3 pr (6).
- Row 3: Fold the knitting in half and tie both rows with a connecting seam.
- Fasten the thread.
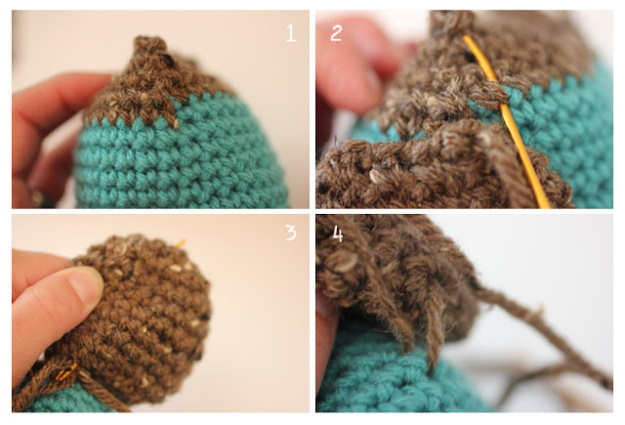
Toy design
Step by step instructions:
- Sew the wings on the sides to the back posts on the 6th row from the top.
- Attach the eyes. You can choose suitable buttons or special eyes for the pupils.
- The beak is sewn on.
- Decorate the ears with fringe.
- If desired, you can embroider or tie on the legs.
The owl is ready. All tildes have names, this one is called Varvasa (Varvara the beauty and Vasilisa the wise in one). You can also knit such birds of happiness:
You can crochet not only an owl, but also many beautiful, interesting and useful things. For beginners, it is better to master needlework with toys. To begin with, you can make an owl, a kind of amulet and a symbol of wisdom.
Video about knitting
How to crochet an owl: