During the preparation for the New Year holidays, one of the necessary attributes for decorating the tree and the room are snowflakes, which are often made of ordinary paper. Folding paper for decoration will not be difficult, and step-by-step instructions for its manufacture will help to make a high-quality craft with a beautiful and unusual pattern.
Preparation of materials, tools for work
To make simple paper snowflakes, thin colored paper is usually used, but you can also use plain writing paper of low density (up to 50 g/m2).
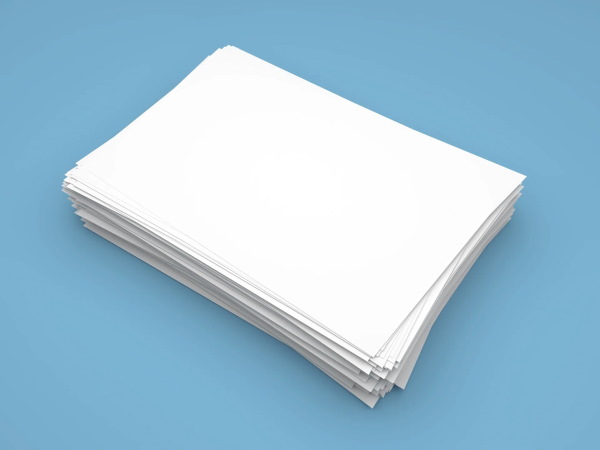
It is not recommended to use A4 paper, as its density is too high (80 g/m2), and if the craft is made by children, it will be very difficult for them to cut out snowflake patterns on a piece of such paper folded in several layers.
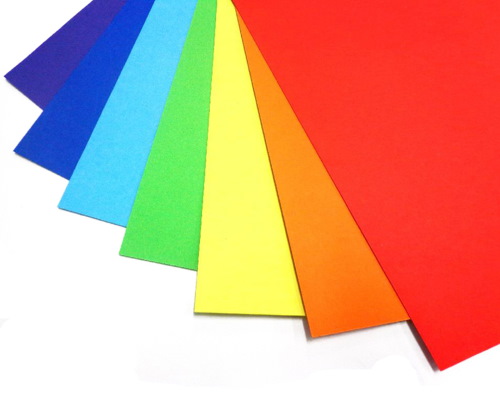
There are different types of colored paper for children:
| Paper type | Characteristics | Application |
| Classical | It can be one-sided or two-sided. | Creation of various crafts and appliques. |
| Velvet | The presence of a three-dimensional texture on the surface. | Making figurines, frames and postcards. |
| Foiled | It has a shiny surface with iridescent colors. | Creation of various decorations and garlands. |
Thick colored paper can be used to create large snowflakes, but for small crafts it is recommended to use thin paper with a low density. As an alternative to thin colored paper, you can use regular newspaper or fax paper.
If the durability of the snowflake is not so important, and its use is not intended for a long time, you can use a regular table napkin as a material. Snowflakes from napkins are very soft and delicate, and it is very easy to cut out the outline of the pattern on them.
Depending on the size of the future snowflake, you need to select a sheet of paper of the appropriate size. For example, when using a regular notebook sheet, you get a snowflake 12-13 cm wide.
Since the paper is folded into several layers during the production of snowflakes, and the patterns that are cut out on such a blank are quite complex, it is advisable to use scissors with long and sharp blades to make the craft. Small manicure scissors with thin blades can be used to cut out narrow and small parts of the pattern.
When forming the blank of the future snowflake, it is necessary to bend the paper at different angles. For these purposes, you need to have a regular school ruler and a protractor at hand. To draw a pattern on the blank of the future snowflake, you can use a regular pencil.
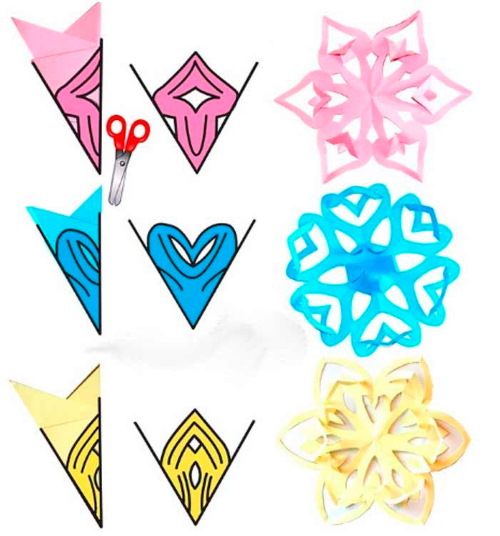
How to fold paper for snowflakes in different ways
You can fold paper for a snowflake in a variety of ways, the step-by-step instructions for making which are quite simple.
The principle of making a simple paper craft usually consists of the following steps:
- Fold the paper in a certain way (the formation of the blank varies depending on how many edges the snowflake should have).
- Apply the required pattern to the workpiece (you can come up with a design or use known options).
- Cut out the necessary pattern elements with scissors.
- Unfold the paper.
When forming the blank, it is necessary to ensure that the paper folds are made as evenly as possible and at the required angles.
Four-sided snowflake
The simplest version of a paper snowflake is a snowflake with four sides. To make it, you will need a sheet of colored paper, scissors, and a simple pencil.
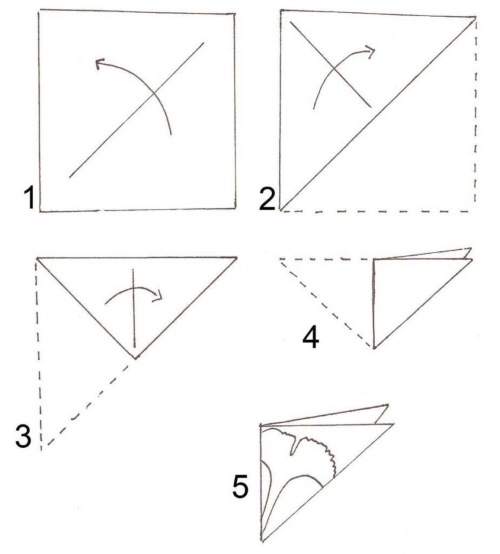
The craft is made as follows:
- Fold the top left corner of the paper to its right edge to form a triangle.
- Use scissors to cut off the remaining part of the paper at the bottom that extends beyond the triangle.
- Fold the triangle in half to create a smaller triangle.
- Apply the required pattern to the resulting piece with a pencil (you can also invent a pattern by applying several oval and angular fragments on each edge of the triangle).
- Cut out the drawn pattern elements from each edge of the blank (triangle).
- Erase the remaining drawing along the edges of the workpiece with an eraser.
- Unfold the workpiece.
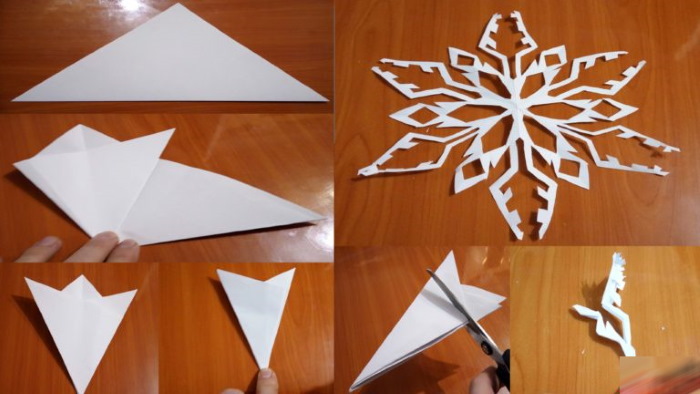
Pentagonal snowflake
A snowflake with five sides is somewhat more complex than a tetrahedral one.
To make it, you need to follow these steps:
- Fold the top left corner of the paper to its right edge to form a triangle.
- If there is some paper left at the bottom, under the triangle, you need to cut it off with scissors.
- Place the resulting isosceles triangle with the apex facing up.
- Fold the triangle in half and then unfold it back (to create a fold line that will be useful later).
- Fold the top corner of the triangle to its bottom edge (the top of the isosceles triangle should connect with its base).
- Unbend the top corner, then bend it again, but this time to the fold line that resulted from the previous bend. Then you need to unbend the top corner again.
- Fold the right part of the triangle to the left until the folded part of the base of the triangle touches the previous fold at the very edge of the left side face of the triangle.
- Perform the previous action with the left part of the triangle, but in this case bend it towards the back of the workpiece.
- Bend the left part of the workpiece to the right until it touches the largest edge of the right part of the workpiece.
- Bend the right side of the workpiece back so that its edge connects with the left edge of the workpiece.
- Use scissors to cut off the part of the paper that extends beyond the top layer of the craft, which is a triangle.
- Apply the required pattern to the workpiece with a pencil (you can also invent a pattern by applying several oval and angular fragments on each edge of the triangle).
- Cut out the drawn pattern elements from each edge of the blank (triangle).
- Erase the remaining drawing along the edges of the workpiece with an eraser.
- Unfold the workpiece.
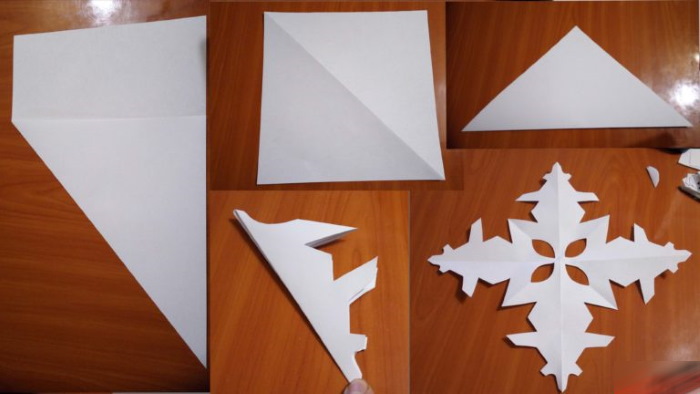
Hexagonal snowflake
Making a snowflake with six sides takes a little longer than snowflakes with 4, 5 and 8 sides, since it is more difficult to fold the sheet for it. For work you will need a thin sheet of paper, scissors, a pencil, and a compass or protractor.
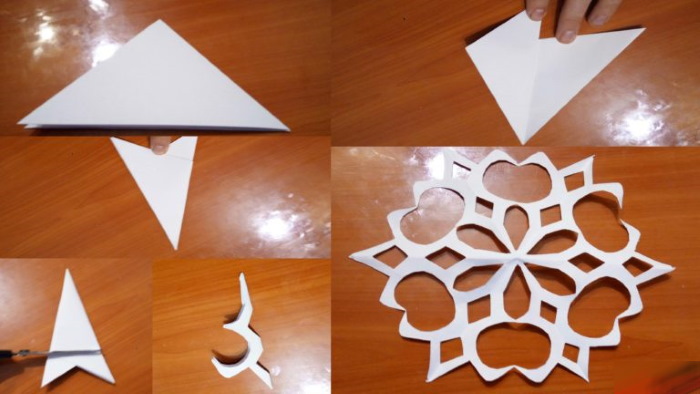
The process of making a snowflake consists of the following steps:
- Fold the top left corner of the paper to its right edge to form a triangle.
- Use scissors to cut off the remaining part of the paper at the bottom that extends beyond the triangle.
- Fold the triangle in half and then straighten it back to its previous state.
- Place the resulting isosceles triangle with its base down.
- Using a compass, draw a semicircle on the triangle, the center of which should be located in the middle of the base of the triangle. The diameter of the semicircle should be maximum, but not go beyond the edges of the workpiece.
- Without changing the diameter of the compass, set it to the point of intersection of the circle with the base on the left side of the workpiece, and then make a notch on the upper left part of the circle (this will result in a 60° mark, which can also be marked using a protractor).
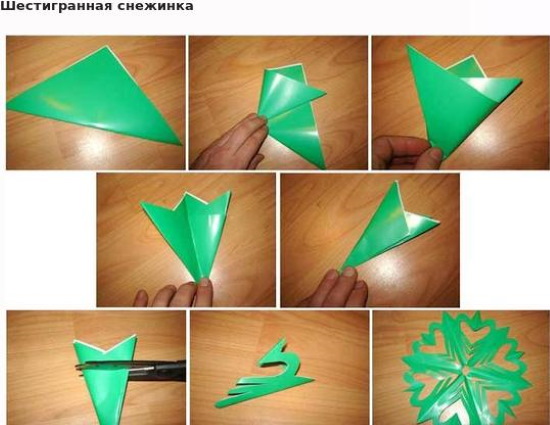
- Without changing the diameter of the compass, set it to the point of intersection of the circle with the base on the right side of the workpiece, and then make a notch on the upper right side of the circle (this will result in a 120° mark, which can also be marked using a protractor).
- Bend the right corner of the workpiece, starting from the center of the base towards the left part of the workpiece so that the edge of the folded part coincides with the left notch.
- Bend the left corner of the workpiece in the opposite direction, starting from the center of the base towards the right part of the workpiece so that the edge of the folded part coincides with the right notch.
- Fold the blank in half, and then use scissors to cut off the part of the paper on top that extends beyond the edge of the triangular outline of the top layer of the blank.
- Apply the required pattern to the workpiece with a pencil (you can also invent a pattern by applying several oval and angular fragments on each edge of the triangle).
- Cut out the drawn pattern elements from each edge of the blank (triangle).
- Erase the remaining drawing along the edges of the workpiece with an eraser.
- Unfold the workpiece.
Octagonal snowflake
You can fold paper for a snowflake, the step-by-step instructions for making which can be mastered even by a child, in a matter of minutes. To make an octagonal snowflake, the same paper folding technique is used as for a tetrahedral one, but with a slight change.

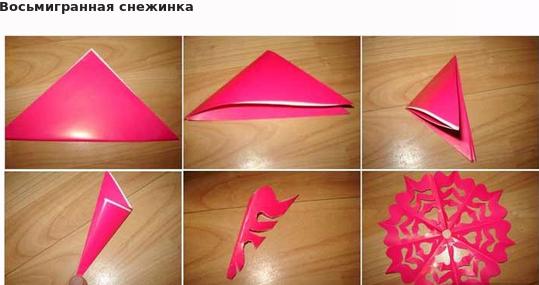
The work process consists of the following stages:
- Fold the top left corner of the paper to its right edge to form a triangle.
- Use scissors to cut off the remaining part of the paper at the bottom that extends beyond the triangle.
- Fold the triangle in half to create a smaller triangle.
- Fold the resulting triangle in half again, and then cut off the excess paper that extends beyond the outline of the new triangle.
- Apply the required pattern to the resulting piece with a pencil (you can also invent a pattern by applying several oval and angular fragments on each edge of the triangle).
- Cut out the drawn pattern elements from each edge of the blank (triangle).
- Erase the remaining drawing along the edges of the workpiece with an eraser.
- Unfold the workpiece.
Volumetric 3D snowflake
Folding paper for a snowflake, the step-by-step instructions for making which can help make it more interesting, is a little more difficult when making 3D snowflakes.
This snowflake looks much more impressive than flat regular snowflakes, but its production requires a lot of time and effort.
To make a 3D snowflake, you will need the following materials:
- thick paper (6 sheets);
- scissors;
- office glue;
- stapler;
- pencil;
- ruler.
The craft is made in several stages. First, 6 parts (facets) of the snowflake are made separately.
These parts are absolutely identical and each of them is performed according to the following scheme:
- Fold a sheet of paper diagonally, then cut off the excess paper that extends beyond the resulting isosceles triangle.
- Mark 3 notches on the left side of the triangle base with a ruler, and then 3 notches on the right side. The distance between the notches should be 1 cm.
- Starting from each notch on the left side of the workpiece, draw lines with a ruler parallel to the left edge of the triangle.
- Starting from each notch on the right side of the workpiece, draw lines with a ruler parallel to the right edge of the triangle.
- Using scissors, starting from the notches, it is necessary to cut the workpiece along the marked lines, but not all the way through.
- Unfold the paper.
- Glue the opposite corners of the inner square together (you will get a tube).
- Glue the opposite corners of the second square, but from the back side of the craft.
- Glue the opposite corners of the third square to the front side of the craft.
- Glue the opposite corners of the fourth square on the back side of the craft.

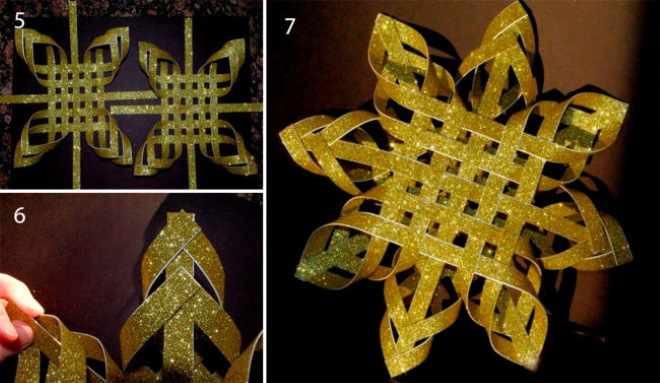
As a result, you will get 6 volumetric parts for the snowflake, which need to be glued together.
This process consists of the following steps:
- Glue the top ends of the 3 parts (faces) of the snowflake together, and then glue the other 3 parts in the same way.
- Glue the resulting 2 triangular parts together, and then fasten all the edges of the snowflake together with a stapler.
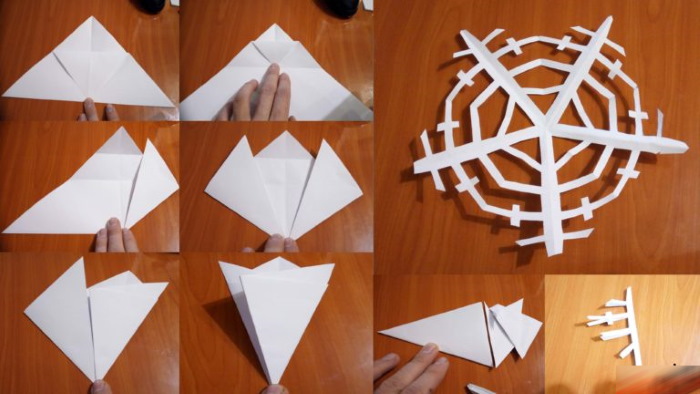
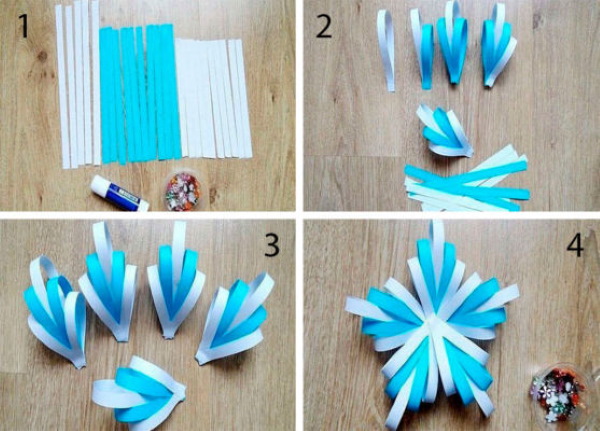
Origami paper snowflake
Folding paper for an origami snowflake is more difficult than for regular snowflakes. The step-by-step instructions for making the craft consist of several modules, each of which is a decorative element assembled from a separate sheet of paper.
To make one of these snowflakes, you need to prepare the following materials:
- 6 white sheets of paper;
- 6 blue sheets of paper;
- a small circle cut out of blue paper;
- office glue.
First of all, you need to assemble 6 identical modules from blue sheets.
The assembly instructions for one such module look like this:
- Fold a sheet of paper diagonally, then cut off the excess paper that extends beyond the resulting isosceles triangle.
- Unfold the sheet to form a square.
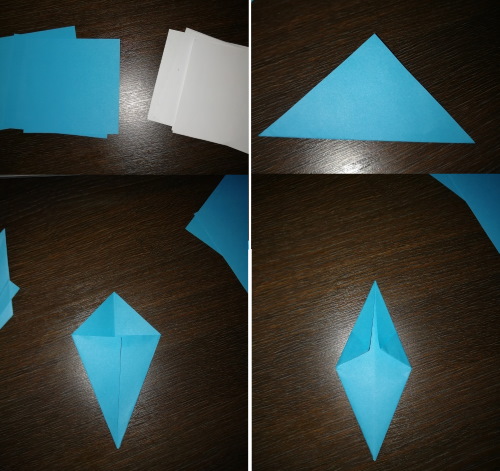
- Position the square so that the resulting fold line on the sheet is vertical.
- Fold the two lower adjacent sides of the square towards the center of the sheet so that their edges are on the central fold line.
- Turn the workpiece over to the other side.
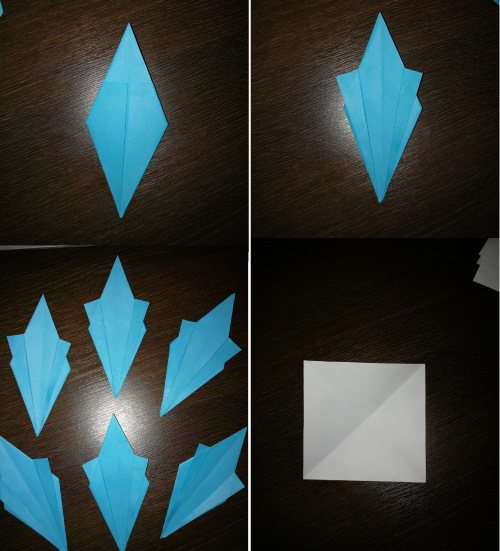
- Fold the two upper adjacent sides of the workpiece to the center fold line. The result should be a rhombus.
- Turn the workpiece over to the other side.
- Fold the top layer of the workpiece, located on its left side, to the left.
- Bend the top layer of the workpiece, located on its right side, to the right.
After 6 such modules are made, it is necessary to make 6 other modules from white sheets.
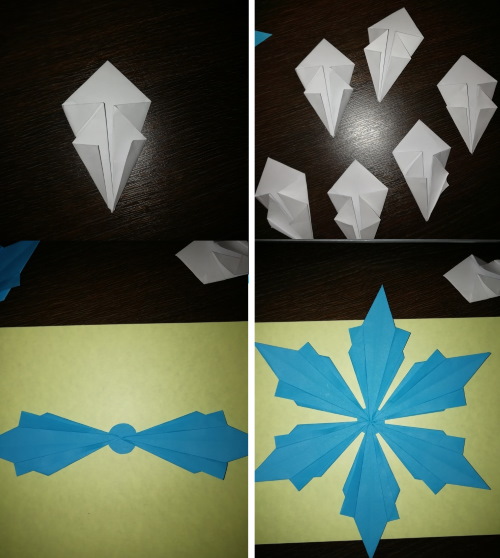
The following scheme is used for their production:
- Fold a sheet of paper diagonally, then cut off the excess paper that extends beyond the resulting isosceles triangle.
- Unfold the sheet to form a square.
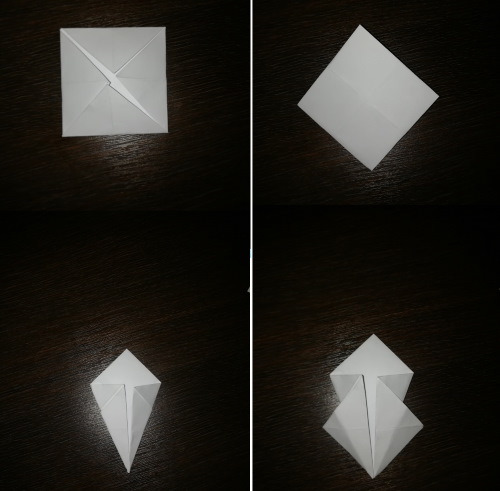
- Fold the sheet diagonally in the other direction, and then unfold it back.
- Fold the corners of the square towards the center, which is located at the intersection of the two fold lines obtained from the previous steps.
- Turn the resulting square over and position it so that one of its diagonals is vertical.
- Fold the two lower adjacent sides of the square towards the center of the square so that their edges are on the line of its vertical diagonal.
- From the back of the workpiece, turn the side parts forward and bend them towards the center of the vertical line of the workpiece.
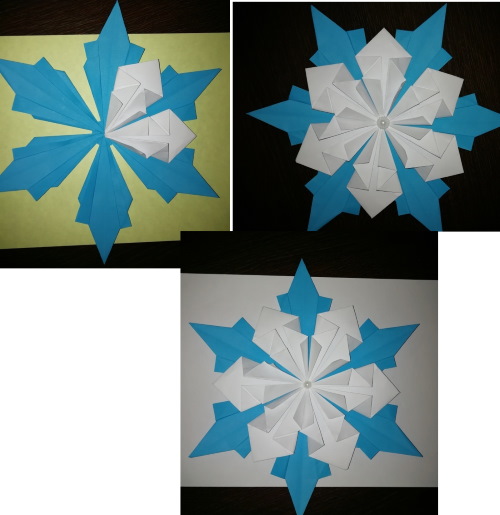
After 6 such modules are made, you can begin assembling the snowflake, for which you need to complete the following steps:
- Glue 6 blue modules to the blue circle, arranging them so that the ends of their longest parts are located in the center of the circle, and the modules themselves are evenly distributed around the circle.
- Glue 6 white modules on top of the blue ones, placing them so that the ends of their longest parts are located in the center of the snowflake, and the modules themselves are located between the blue modules.
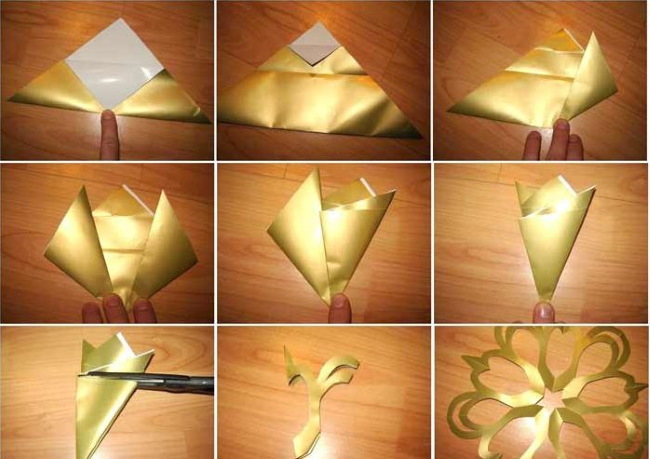
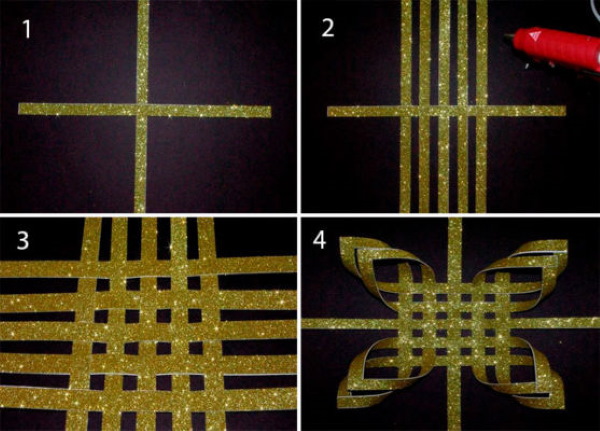
Kirigami
You can fold paper for a snowflake, the step-by-step instructions for making which are simple for a style such as kirigami, in just a few minutes. Unlike origami, the kirigami technique allows the use of scissors. A snowflake in the kirigami style also turns out to be voluminous.
To make one of these snowflakes, you will need a blue sheet of paper (the back side of the sheet should be white), scissors, a pencil and a protractor.
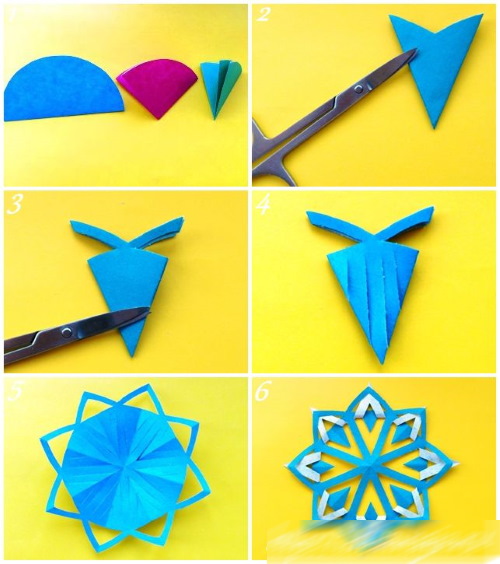
The process of making the craft consists of the following steps:
- Fold a sheet of paper diagonally, then cut off the excess paper that extends beyond the resulting isosceles triangle.
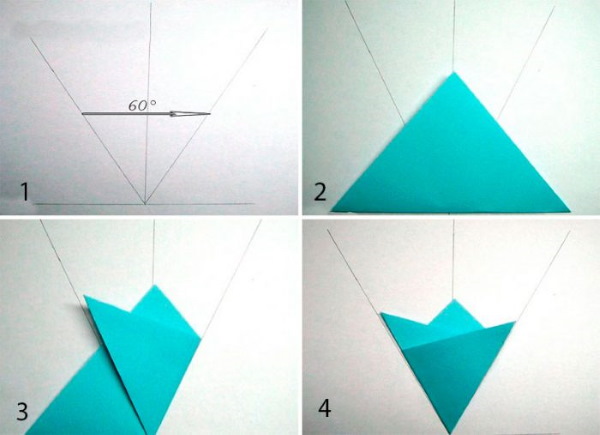
- Mark the middle of the base of the triangle (to do this, you can fold it in half, then unfold it and mark the fold line with a pencil).
- Measure an angle of 60° on both sides from the base of the triangle with a protractor and make marks with a pencil on the sides of the triangle.
- Bend the left and right sides of the triangle so that the beginning of their fold is in the center of the base, and the bottom edge of the folded part passes through the 60° marks made.
- Fold the workpiece in half (vertically).
- Cut off the part of the paper that extends beyond the outline of the triangle located on the top layer of the workpiece.
- Draw a pattern on the workpiece in the form of a vertical wide wave. At the same time, draw a small line in the middle of its upper and lower parts.
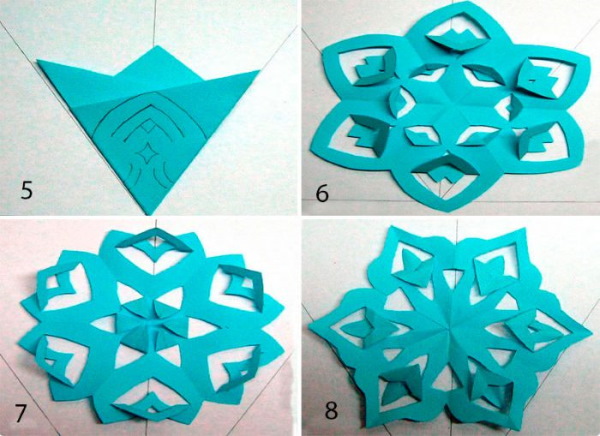
- Cut out the part of the paper that is outside the design from each edge of the blank, and then cut the center lines at the top and bottom of the design.
- Unfold the workpiece.
- Inside each edge (at its tip), bend the inner triangle towards the center of the snowflake.
- Inside each edge (in its middle part), bend the inner petal towards the tip of the edge and push it into the hole of the small triangle.
Tips and tricks
In the process of making a snowflake, you can improve its appearance if you follow some recommendations:
- in order for the snowflake to be more beautiful and consist of many different elements, it is necessary to use such patterns for the snowflake that make maximum use of the entire area of the future snowflake blank;

- If after making the snowflake it does not straighten out completely, it should be placed under a press for 1 day or smoothed out thoroughly with an iron;
- To add more color and brightness to the snowflake, you can decorate it with glitter, for which you first need to apply a thin layer of glue to the snowflake, and then sprinkle it with multi-colored glitter on top.
Anyone can fold paper for a snowflake, especially since there is a simple step-by-step instruction for any type of such craft. Snowflakes made in various styles can decorate not only the Christmas tree, but also windows, furniture and the entire room as a whole.
Video about the craft
How to fold paper for a snowflake: