Drawing lips with a pencil is difficult to do without knowing how to correctly construct the parts of the face. It is not difficult to convey the features of human facial anatomy, if you know a few rules for applying light and shadow and constructing a face. Following a few lessons, you can repeat the drawing of lips depicting different human emotions.
Necessary tools
Lips can be male, female or belong to a child, and each case has its own nuances. The location of the reference and the correct shading help to give volume to the figure and position the lips at different angles to the viewer.
You can draw lips with a pencil in a few minutes using the tools at hand:
| What you will need | For what |
| Paper | Choose paper for sketches. If you plan to color the finished sketch, then take thicker sheets for working with paints and markers. |
| The pencil is soft | Apply light shading to create light and shadow. |
| Pencil hard-soft or hard | Used to create a sketch. |
| Eraser | Remove unnecessary or unsuccessful strokes. |
| Ruler | Used as an auxiliary tool to create a reference. |
A simple option for beginners
This drawing method is suitable for beginners.
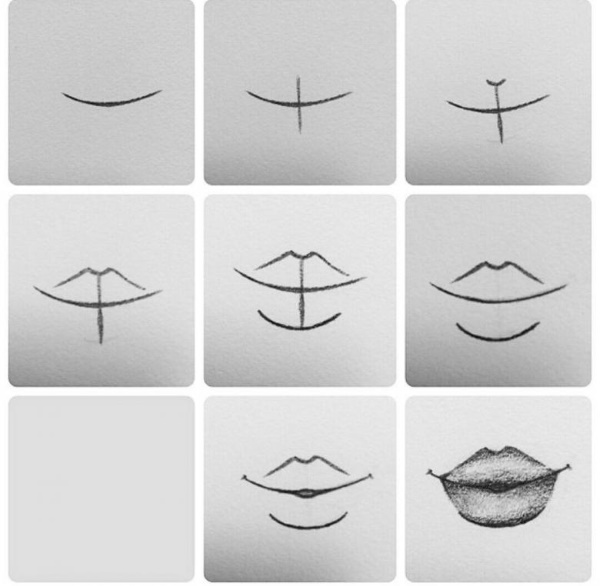
The process produces a cartoon-style image of lips:
- In the center of the sheet, draw a long arc, bent downwards. Visually find the center of the arc and mark it with a vertical line. On this auxiliary line, schematically indicate the thickness of the upper and lower lips.
- Draw the outline of the upper lip, trying to repeat the lines symmetrically to the vertical line. Make a downward bend along the center of the upper lip. Draw the outline of the lower lip with an arc without hollows. Erase the auxiliary lines.
- They give more precise curves to the upper lip, smooth out the corners. They draw the space between the lips, leaving a small hollow in the form of a circle between them.
- Connect the corners of the mouth on both sides, extending them from the common arc in the form of a smile.
- The dimple under the nose is indicated by two vertical lines.
- Using careful shading and light pressure, paint the space of the lips. Add pressure and paint the places where the shadow falls - the edges of the lips, the corners of the lips and the junctions.
Simple drawing for kids
A quick and easy way to create a symmetrical lip design, suitable for beginners or children aged 6-7 years.
The drawing is not very realistic, more suitable for a cartoon style image:
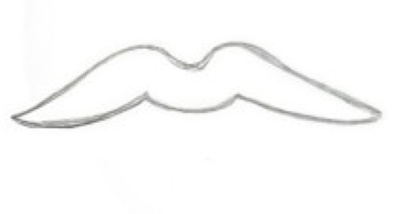
- Draw a curved line with a notch in the center, indicating the lower border of the upper lip. Repeat the curve in the center with an upward indent. This curve shows the thickness of the upper lip.

- Draw the upper contour of the lip, narrow the lip closer to the corners. Try to make the curve of the lip symmetrical and rounded.
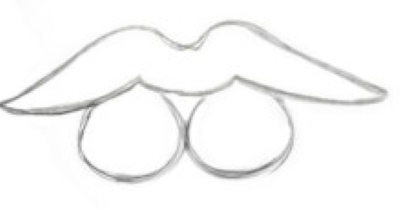
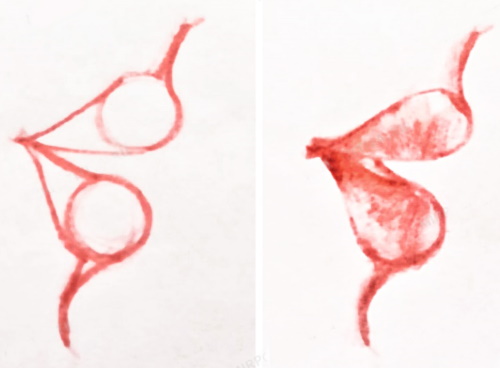
- To create volume for the lower lip, two circles are schematically placed under the drawn lip.
- Smoothly outline these shapes, creating the contour of the lower lip.
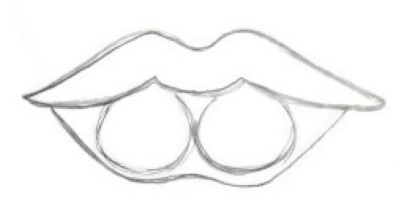
- Erase auxiliary figures and lines. Outline the general outline with a pencil or liner.
- They paint their lips in a convenient way.
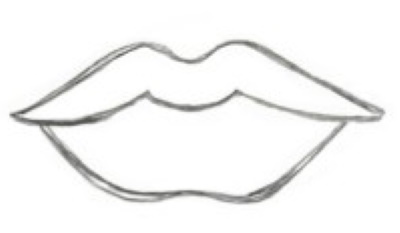
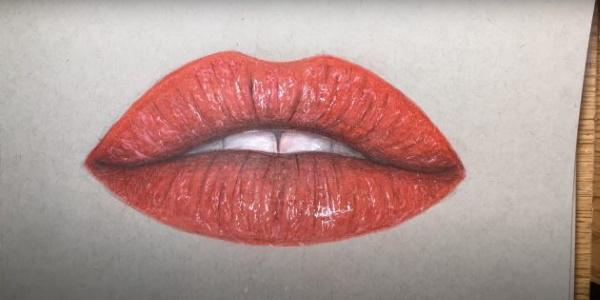
Realistic drawing of plump female lips
Lips (the pencil drawing of this part of the face may differ depending on gender) are made plumper for women.
To do this, place the sheet horizontally and start with the image of the lip line:
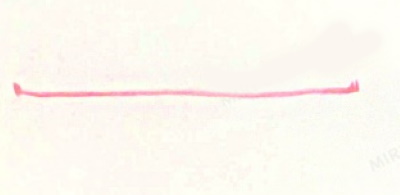
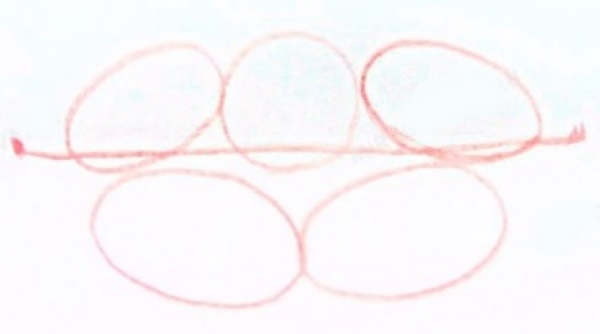
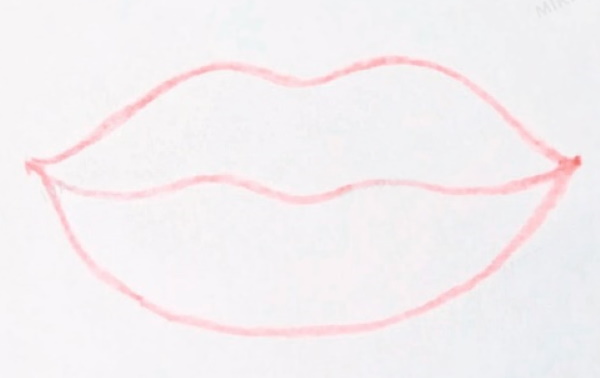
- Rounded figures begin to indicate the volumetric areas of the lips. In the center of the upper lip, a tubercle is outlined in a circle. On the sides, ovals are drawn, directed downwards. They may not be symmetrical, since facial features are often not the same. Volume is given to the lower lip by 2 ovals. A more precise line of the mouth is drawn in the center, making it curved.
- Smooth lines connect all the lines and borders, creating a general outline of the lips.
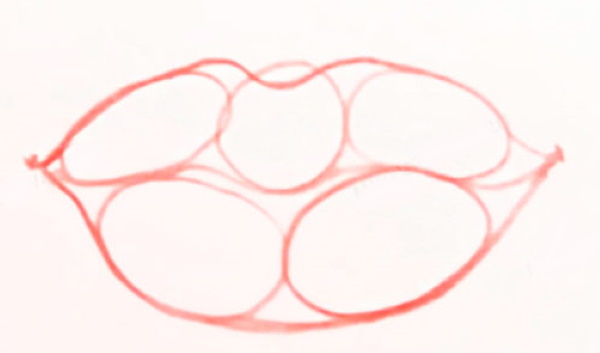
- Erase all auxiliary lines and figures with an eraser, leaving only the general outline.
- The outline is colored with colored pencils. The center is left to create a glare and volume effect. The corners of the lips and the places where the lips meet are made darker. The lower part of the lower lip is shaded with a thin dark line. The places where the light and shadow transition are shaded with light pressure to create a volumetric effect.
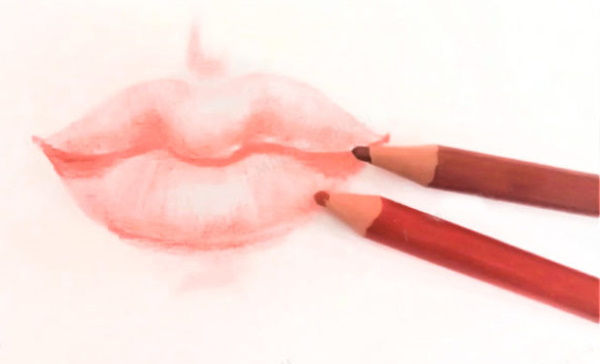
- Using a sharp, dark-colored pencil, draw the grooves on the upper and lower lips with sharp, short movements. The same color is used to add shadows on the sides of the folds.
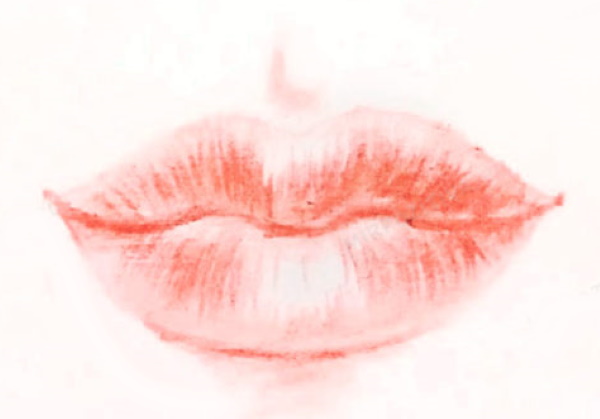
- The gap between the lips is drawn more clearly.
Drawing of male lips
Men's lips are considered less plump and voluminous than women's, so their image may differ. The mouth line usually does not have sharp bends.
Similar poorly outlined lips can also be found on girls, so decide in advance what the design will be:
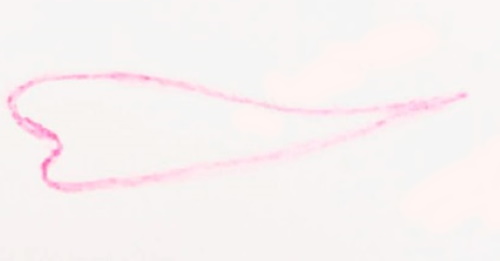
- The schematic horizontal lines indicate the thickness of the upper and lower lips and the length of the oral slit.
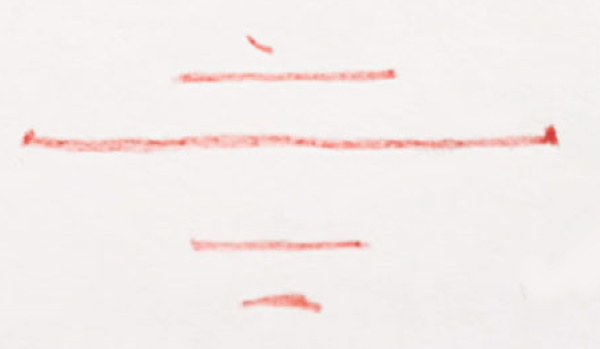
- Straight angular lines indicate the lips. Nasolabial folds and the hollow under the lower lip are indicated.

- A vertical line is drawn in the center of the lips to create symmetrical shapes. The line of the upper lip is drawn in detail, making it rounded.
- Round out the lower lip. Make the fold line on the sides of the lips, above the upper lip and below the lower lip smoother.
- The lips are filled with shading. The areas where the shadows fall are shaded more strongly.
- Using short movements, outline the grooves and folds on the lips.
Realistic drawing of parted lips
Lips (a pencil drawing of this part of the face may differ in position, emotion or direction towards the viewer) slightly open with visible teeth will look realistic if you repeat all the steps of this lesson.
How to draw:
- Using a simple pencil, draw 2 trapezoids one under the other to schematically determine the size of the lips. The upper trapezoid should be slightly larger and higher, since the teeth will also be depicted in this part.
- An arc is drawn in the center of the upper trapezoid, indicating a slightly open mouth. A small arc, curved downwards, indicates a hollow on the upper lip.
- The junction of the lips is rounded. The lower lip and the inner parts of the lips are rounded.
- They add details – they draw visible upper teeth and grooves on the lips with short vertical lines.
- The lip space is filled with shading, creating a chiaroscuro effect. The central part is not affected, creating a highlight.
- Shade the lips in different directions to evenly fill the space of the upper lip. Leave space around it to make the lips appear more voluminous.
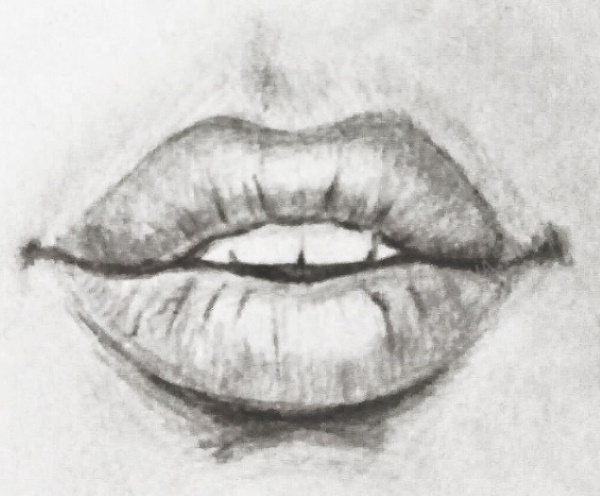
- Shade the skin around the lips with a small indentation.
Lips in a kiss
You can draw a kiss mark using pencils in several stages. This drawing is suitable for beginners, as it does not require special skills.
How to draw:
- Draw a circle with a pencil, sharpen the sides where the lips meet, and lift the corners slightly.
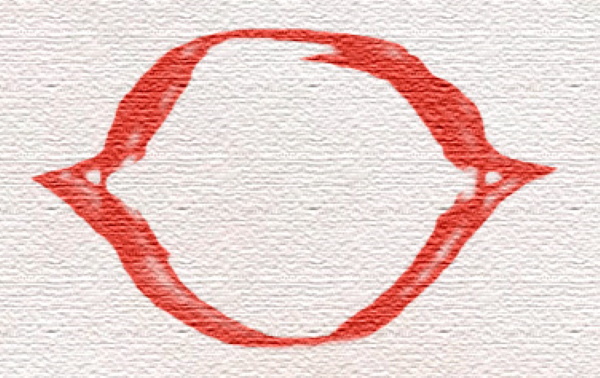
- Mark the indentation on the upper lip and erase the extra contour lines. Draw the inner contour where the lips do not meet, with a small indentation on the lower lip.
- With a red pencil, make strokes from the outline to the center. Gradually fill all the lips with this shading.
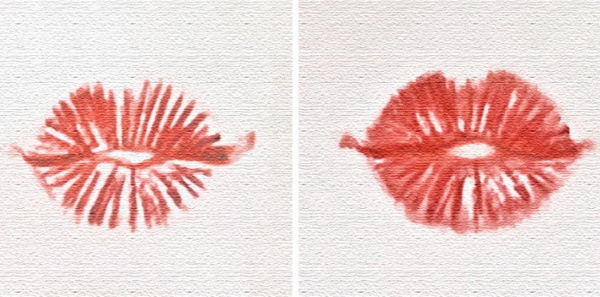
- Use a lighter pencil to fill in all the gaps with shading.
Lips in profile
Lips (a pencil drawing can be done in profile) begin to be drawn with a schematic image of the main features from the side.
How to draw:
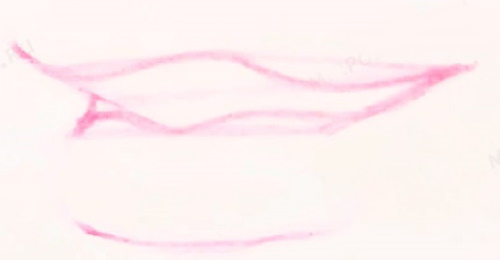
- To depict a mouth in a slightly open position from the side, draw an angle with the tip to the left. At the end of each line, mark the thickness of the lips with circles. From each circle, draw short vertical lines at an upward and downward angle.
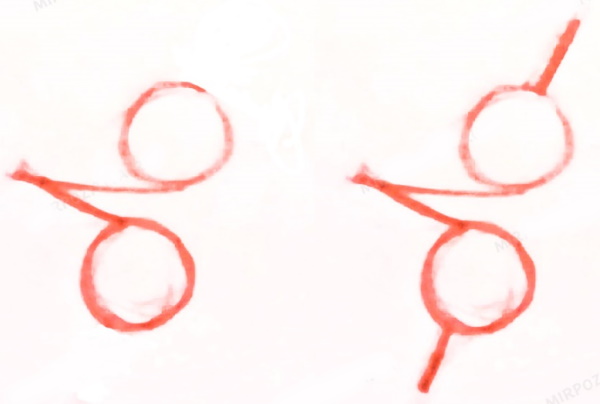
- From the edge of each circle, draw connecting lines to the corner of the mouth. Each line tapers closer to the corner of the mouth.
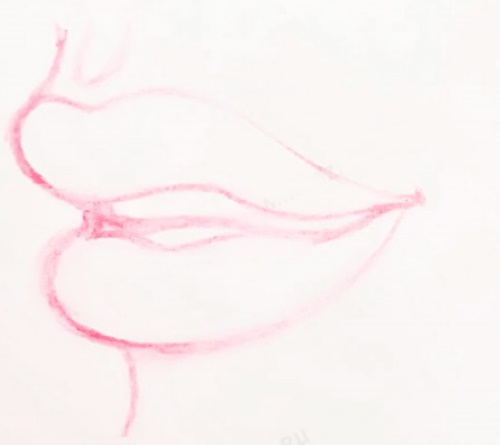
- Add volume and round out the lines leading to the nose and chin.
- The lips are painted with light shading. Dark color is added to the corner of the lips, the upper and lower lips are left light closer to the center to create a voluminous effect.
Lips in a half turn
Most often, the face in the portrait is in a half-frontal or half-turned position. To make the face look realistic, you need to pay attention to the lips. Start the drawing with the upper and lower lips. If you want the drawing to look like a smile, the corner of the lips is rounded upwards.
How to draw:
- Schematically depict the inner borders of the lips of an open mouth, as shown in the figure.
- Light horizontal strokes define the thickness of the lips. Add the curve of the upper and lower lips. Mark the place where the teeth will be visible.
- Give shape to the lips. Draw rounded, curved lines from the corner of the lips to the left edge. Make the lower lip slightly thicker than the upper. Draw a notch under the nose on the upper lip.
- Lightly shade the main dark and light areas of the lips. Accentuate the color on the corners of the lips, the lower and side parts of the lips. Color the contour more densely. Do not shade the front part of the lips and teeth.
- Continue to fill in the lips, adding more color.
- They try not to fill the space between the teeth too much and use less black color.
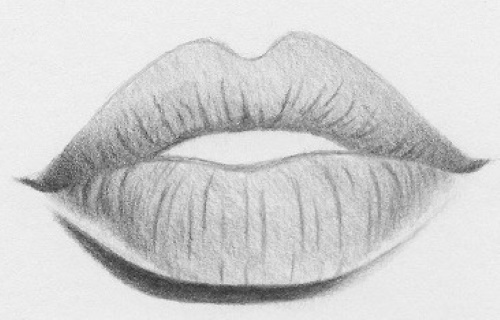
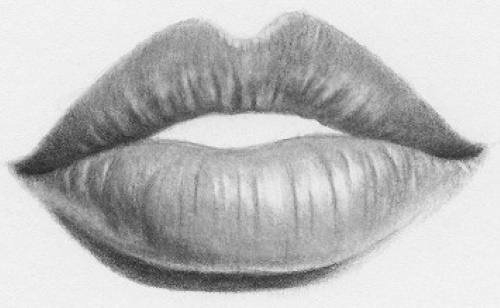
Lips with a simple pencil
A method of drawing lips in a realistic form using a simple pencil. The effect of light and shadow is applied with a pencil and all the small details are drawn, which makes the drawing look close to the original. The drawing method is suitable for those who have an average level of drawing.
How to draw:
- Start by drawing a line between the lips. In the center of the line, make 2 small identical bumps.
- Above this line, draw an arc with a small depression in the center. This creates a schematic image of the upper lip.
- Draw a downward curved line, showing the lower lip. Draw the outline of the lips and the line between them more clearly.
- The pencil is applied to the sheet so that the lead touches it. The lips are painted with light pressure. Shaded so that the color of the pencil is uniform.
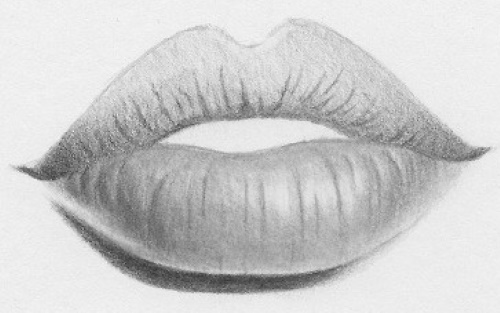
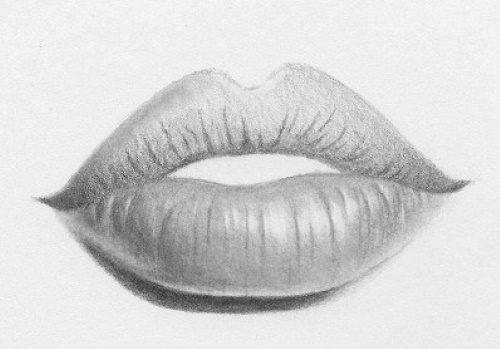
- Add vertical shading on the lower lip. Each stroke is made slightly curved towards the corner of the lip. The shading is more frequent at the edges and becomes rarer and paler closer to the center. The central part of the lower lip is lightened with an eraser.
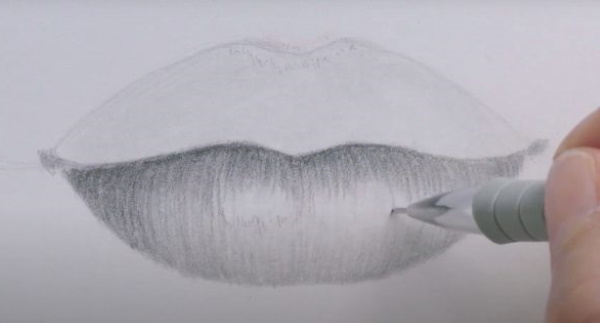
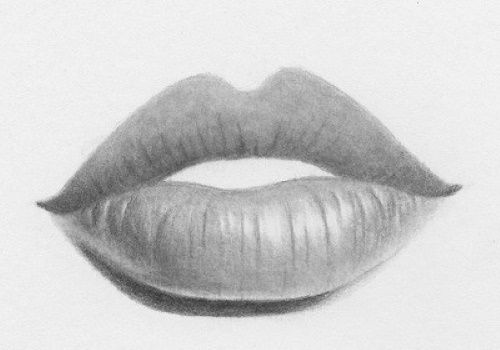
- The upper lip is shaded in a similar way. In the middle of the lower part of the upper lip, a bright line is shaded.
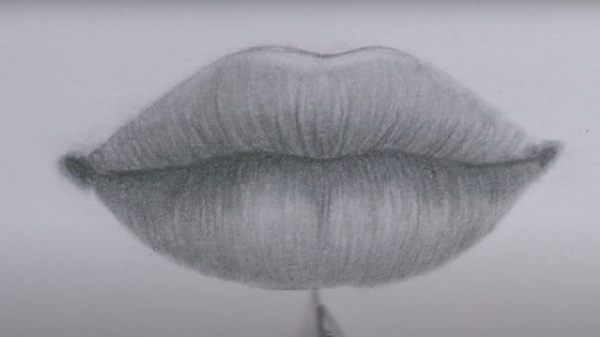
- The upper part with the notch is lightened with an eraser.
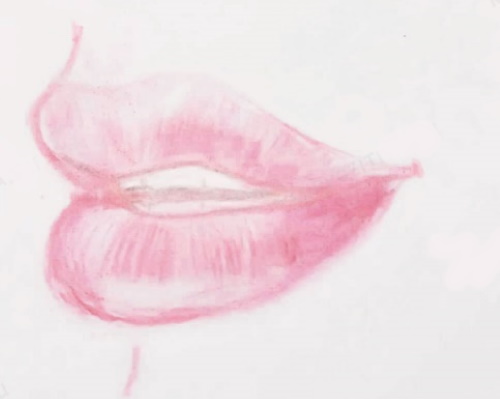
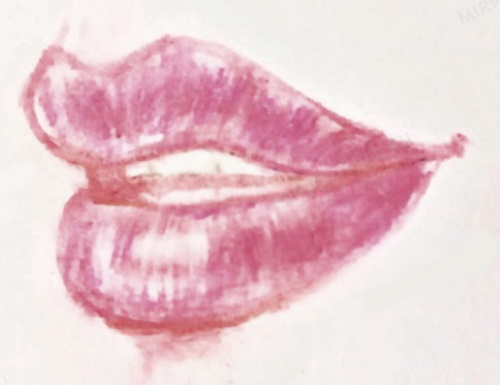
Lips with colored pencil
The lips (the pencil drawing can be immediately created in color) can be made more realistic:
- Draw an upward curved arc with a depression in the middle. Add another arc without a depression a little lower and connect the two lines. This creates a schematic image of the upper lip.

- The lower lip is shown as a downward curved arc. The upper part of the lip looks like a horizontal line with a small indentation from the upper lip. This space is filled with short vertical lines indicating the teeth.

- They outline the finished contour, erase unnecessary details and make the sketch a little paler.
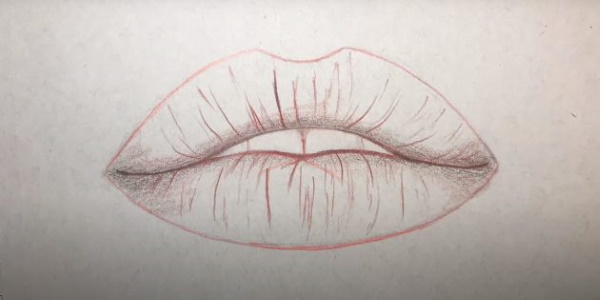
- Using a burgundy pencil, outline the contour and draw vertical stripes on the lips to create texture. The direction of the stripes is made at the angle of the lip arch.
- Using a black pencil, make light shading and blending in the lower central part and in the corners of the lips.
- The red pencil is pressed flat against the sheet of paper. In this way, the space of the lips is painted over several times to make the color more saturated.
- The teeth are painted white.
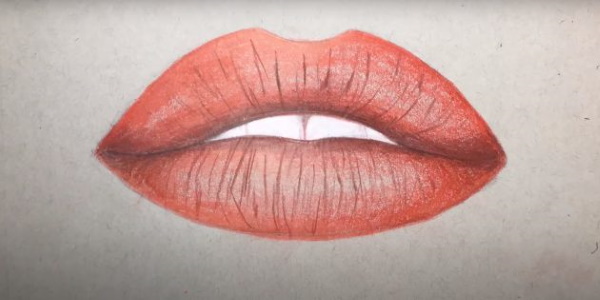
- The lips are painted red again to make the tone even. The inner contour of the lips is outlined with a black pencil.
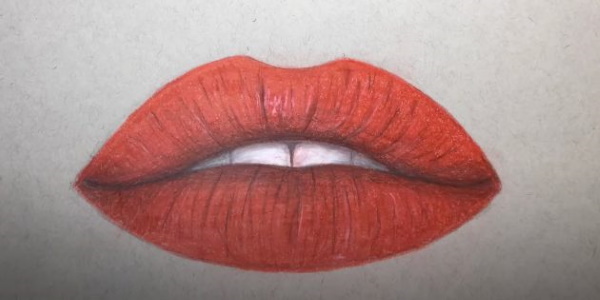
- The shadow on the teeth is shown in grey.
Using a white pen or thin marker, make multiple strokes towards the center of the lips to create a highlight effect.
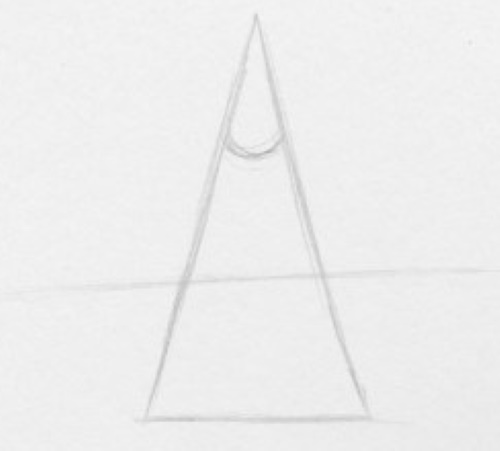
Drawing lips using a triangle
A method of creating an image of lips using a triangle-shaped base. This method is convenient because the lips can be depicted in any position - full face, in profile or in a semi-full face.
How to draw:
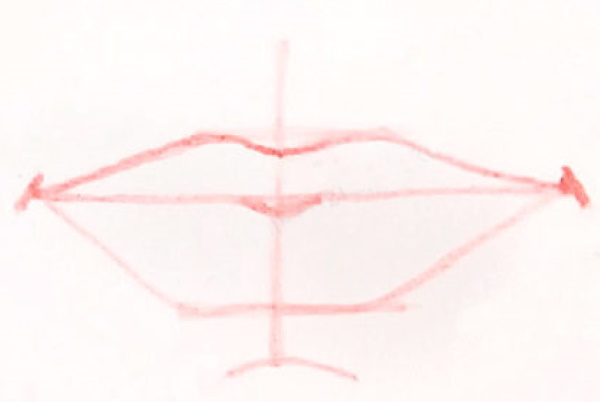
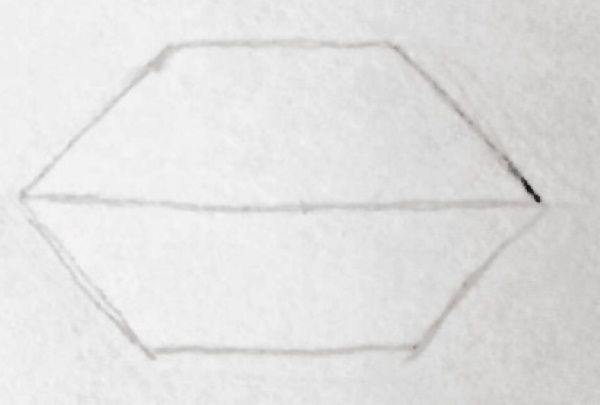
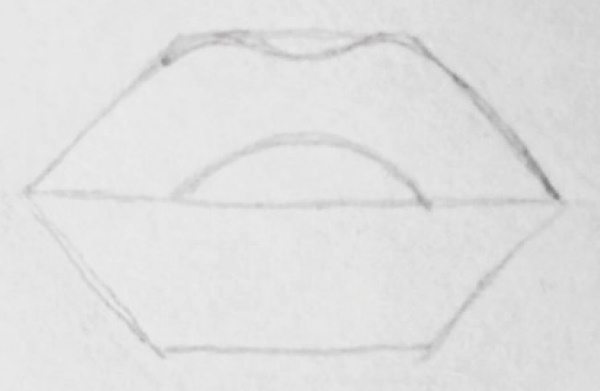
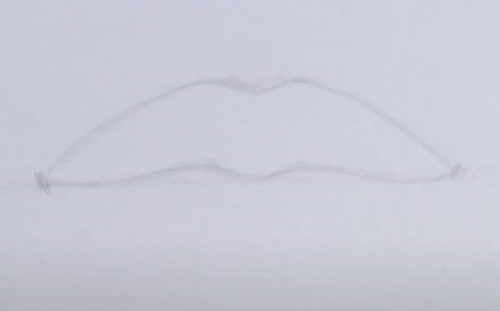
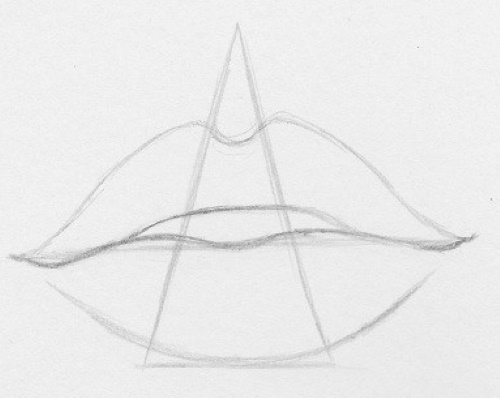
- Start with an image of an elongated triangle. The lower angles of the triangle should be equal so that the lip drawing is symmetrical. Under the upper elongated angle, draw an arc directed downwards. In the middle between this arc and the base of the triangle, draw a long horizontal line. The length of the line is equal to the width of the lips. This line can be used to adjust the thickness of the upper lip. If you want to make it narrower, then the line is raised upwards, if you want it to be plumper, then the line is drawn in the center.
- Make a schematic image of the upper lip contour. The arc in the center of the triangle is the depression on the upper lip. The end of the horizontal line is the corners of the lips. Therefore, check that the triangle passes exactly in the center of this line. Try to make the bend of the lip symmetrical. At this stage, the image of the upper lip resembles the shape of a bow for arrows.
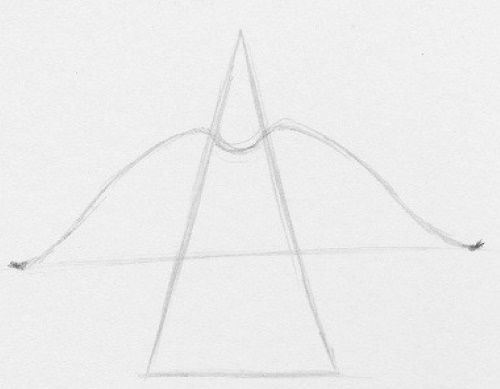
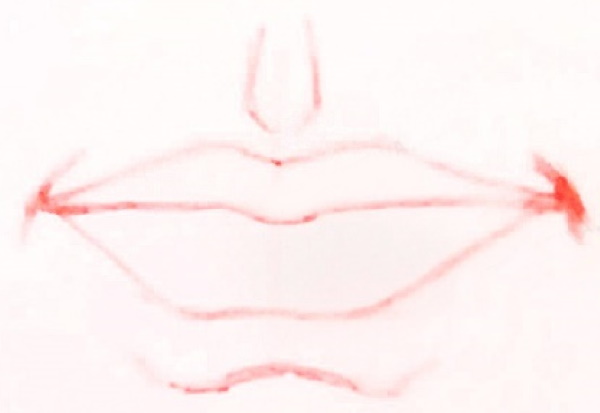
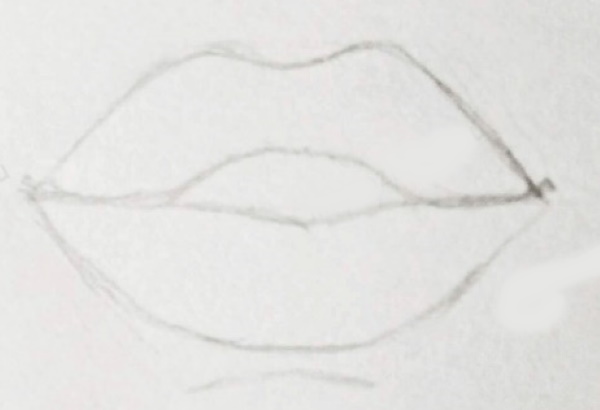
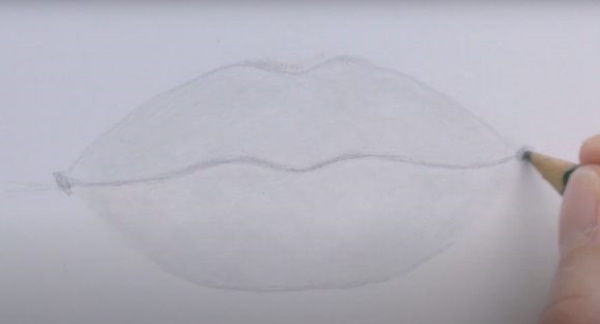
- Draw the lower lip as a downward curved line. Draw an arc from the corners of the lips and do not go below the base of the triangle. Try to make the shape of the lower lip symmetrical.
- At the level of the horizontal line, depict a slightly open mouth. Draw the upper lip as an arc directed upwards. The upper border of the lower lip is in the form of an arc curved in the center.
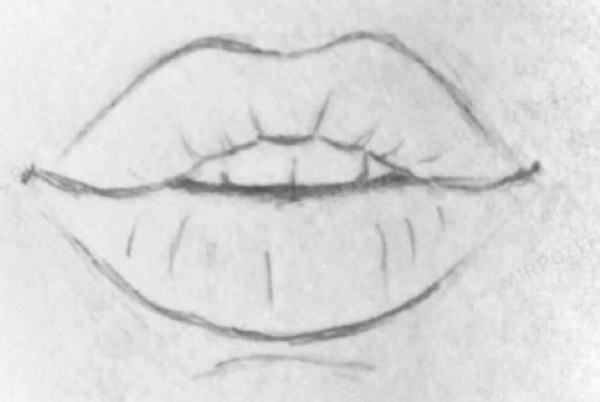
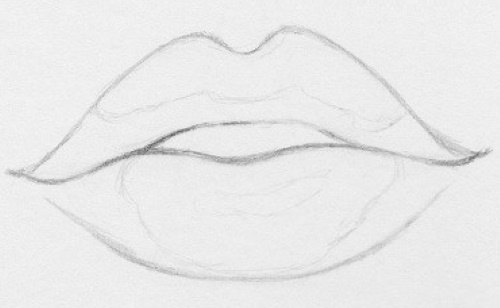
- Trace the finished outline with a pencil and erase all auxiliary lines.
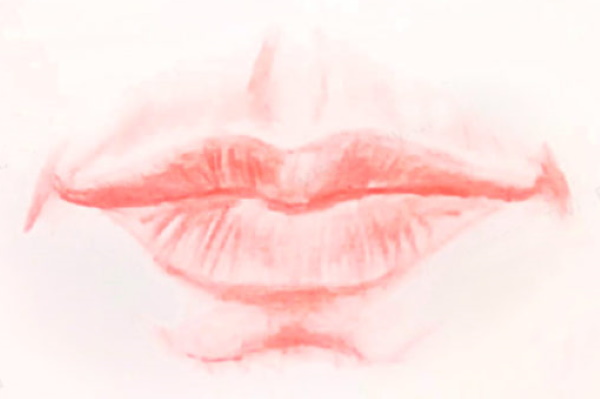
- Visually determine the light source and mark the dark and light parts in the drawing relative to it. Using lines with light pressure, determine the area where the light hits the lips the most. This part will be almost not shaded.
- Using light shading, darken the areas where the lips fall into shadow – the corners of the lips, the lower part of the lips and the space under the lower lip. If the light source is intended to fall from the other side, the position of the shadow is changed.
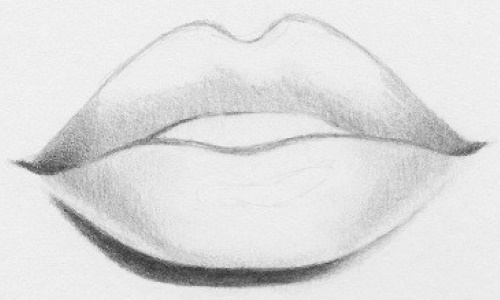
- The pencil is placed flat on the paper with the lead and the entire space of the lips is filled in, leaving the areas that have been designated as the lightest.
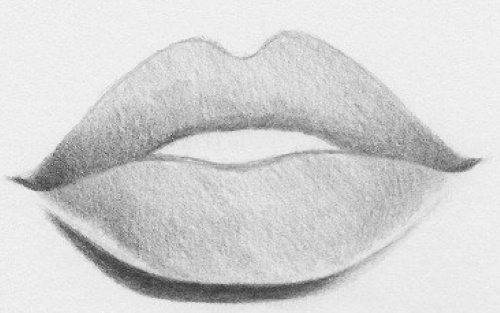
- Use a hard or hard-soft pencil to add texture to the lips. Draw vertical curved lines toward the corners of the lips. Try not to press too hard so that you can shade the finished drawing and the image looks natural.
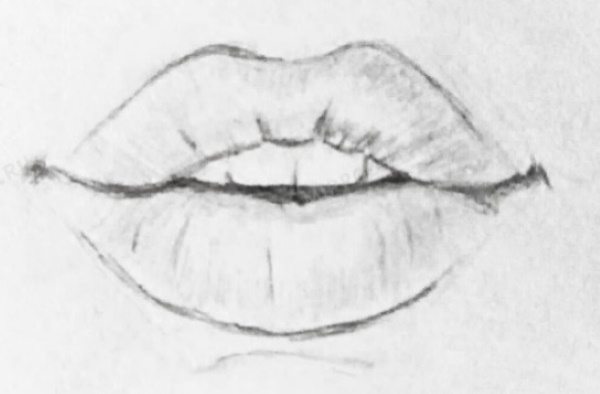
- Shade the dark part on the lower lip and try not to touch the light area. At this stage, the effect of volume of the figure appears.
- The eraser is lightly applied to the light areas of the lower lip to give the appearance of shine. The highlight should look neat, so they try to press too hard on the eraser.
- The upper lip is painted in the same way, shaded and given shine.
- Using a soft pencil, add a shadow effect to the corners of the lips, on the outer parts of the lips and above the upper lip.
- In several places, the folds are made more distinct. With an eraser, they add shine, which makes the lips appear even more voluminous.
Useful tips
You can make your lip drawing with a pencil more realistic and spend less time on the drawing process if you follow a few tips:
- The sheet is placed horizontally or vertically in advance, depending on the direction of the drawing. If, in addition to the lips, they plan to draw the entire face or figure of a person, then they make a schematic sketch of the body so that the finished image is located in the center of the face.
- They start with a schematic image of the lip line and shapes that indicate the volume of the lips. Auxiliary lines draw the direction of the main lines and contours. Lastly, small details are drawn and shaded with hatching. In order not to get confused in the process, the drawing is divided into separate components and practice with each of them.
- To make the drawing more realistic, use colored pencils in red and pink tones. In places where shadows fall, paint the drawing with darker and more saturated colors.
- Special attention is paid to the mouth line. In different people it can be straight, or curved up or down. Most often the lower lip is thicker than the upper one, but there are exceptions. In order to depict the face or its fragments more realistically, attention is paid to such details.
Video on how to draw lips with a pencil
How to draw lips with a pencil correctly: