Gift wrapping – an important component of any holiday. You don’t have to buy beautiful bags or expensive packaging materials for this. You can make a beautiful box yourself from cardboard and improvised means. You can also make decorations for it yourself to create a festive mood.
DIY Cardboard Box
A cardboard box, which you can make at home, should be adapted to the gift that will be packed in it. The larger and more unusual it is, the more difficult it is to make the packaging.
To begin with, it is recommended to learn on standard rectangular or square boxes, and only then move on to curly shapes. Decorations can also be made by hand, or bought in specialized stores for needlewomen.
Basic materials
The main material for the craft is cardboard.
You can choose any:
- new or used;
- strong or soft;
- thick or thin;
- color or standard.
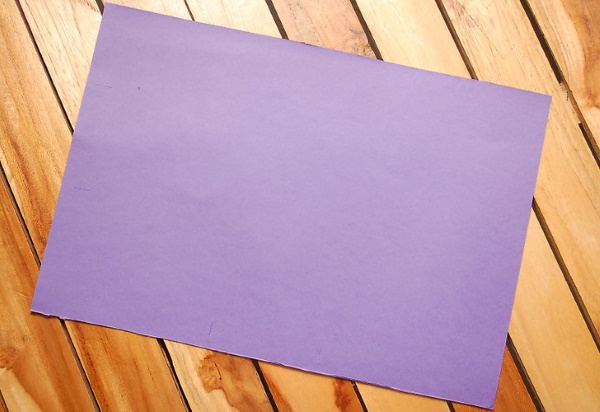
If you don't have cardboard at hand, you can use regular thick paper. To make the structure strong, use several layers or reinforce the frame with a stapler.
Tools and Fixtures
To make a box you will need not only cardboard, but also:
- a ruler and pencil to draw the shape;
- scissors to cut out the base for the future product;
- glue of any kind. It is more convenient to use a glue gun, but others will do;
- double sided tape;
- a stapler, if necessary to strengthen the structure and make it more stable.
Materials for decoration
The cardboard box itself does not look the most attractive. Therefore, it needs to be additionally decorated.
The following materials are used for this:
- wrapping paper;
- artificial flowers;
- other decorations that do not add much weight to the structure;
- beads, pearls;
- ribbons, bows.

You can use ready-made products from stores as decorations.
Patterns and diagrams for assembling boxes using glue, a stapler and without them. Master class
Most patterns are made with glue. When the cardboard is weak, a stapler is used, and the staples act as a frame. There are patterns without fasteners/adhesive elements, but they are more difficult.
Square box with removable lid
A cardboard box, which needs to be made in a classic format, is made of a fragile material. It needs to bend easily. Therefore, used cardboard will do for the classics, but without folds on the pattern.
To draw a pattern you need:
- Draw the bottom. The dimensions depend on the things that will be packed in the box. You can make a square or rectangular shape.
- Draw the walls. Sizes are selected individually.
- Mark the lines for the cut and the "ears". Subsequently, they are bent and glued in a circle so that the walls hold firmly.
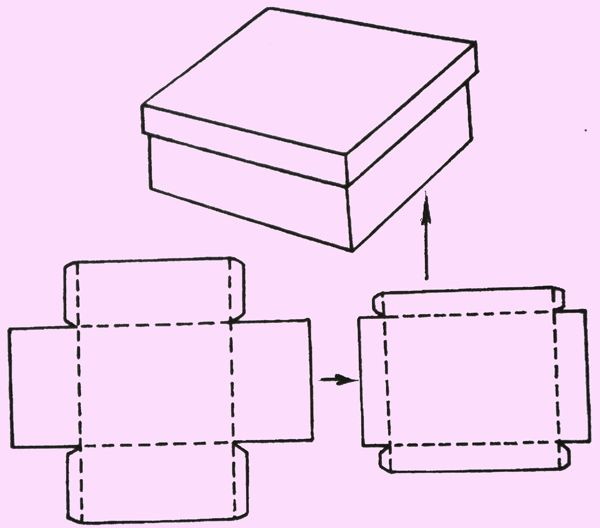
The method is used if the height of the walls is not greater than the size of the bottom. Otherwise, the pattern is more complicated, since it is divided into several different and separate elements. The lid of the box is drawn in a similar way, but the thickness of the walls is added to the dimensions of the bottom. If you slightly increase the size of the lid, no big deal, it even looks prettier.
Rectangular version with hinged lid
A solid box with a lid is even easier to make than a separate one. Any pattern can be used as a basis, depending on the gift. For example, it is better to use oblong boxes for packing watches, and wide ones for candies.
Instructions for making:
- Transfer the pattern onto cardboard or strong paper.
- The model is cut out according to shape, making small cuts at the fold points.
- The box parts are connected with glue or double-sided tape.
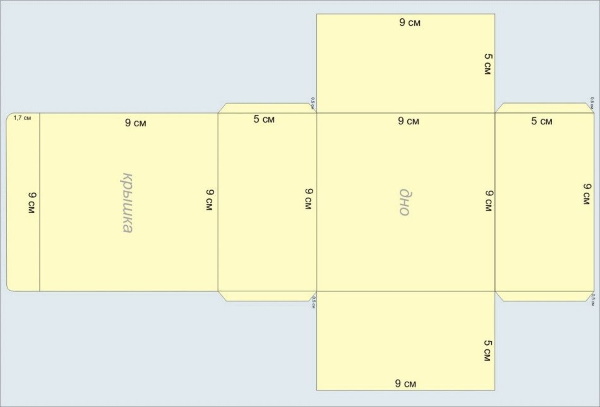
The packaging is decorated depending on the event. For children, you can add bright stickers and bows. For an adult, a strict classic box covered with old stamps looks aesthetically pleasing.
A spacious box without a lid for things
Large boxes are rarely made for gifts. But they are very useful in the household. They are used to create organizers so that essential items are at hand. They also help save useful space in the closet.
The most convenient way is to take a regular box from household appliances, shoes or other products, and decorate it according to personal preferences. If you don’t have one at hand, then use any template, but make the pattern larger.

For convenient operation in the future, it is recommended to listen to the advice:
- It is better to use thick cardboard as a base;
- Durable material should be used for cladding;
- decorations are needed, but to a minimum. If the box is going to be an organizer in the closet, decorations will not be needed at all;
- for carrying, you can make handles on an adhesive base. You can also cut handles on the sides;
- inside the box you can make partitions to distribute things according to their specific use.
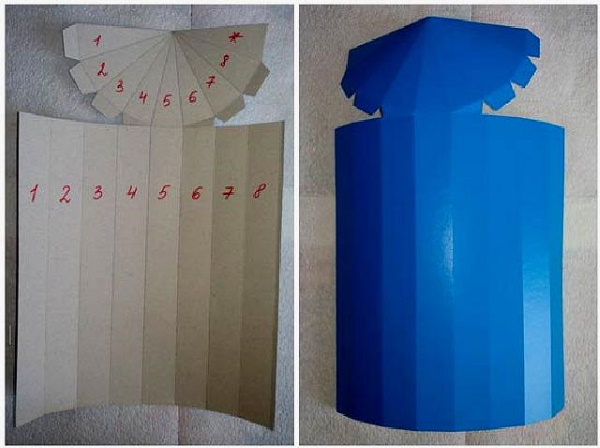
Round shape
To create you will need:
- ruler and pencil;
- glue gun;
- cardboard;
- scissors.
Instructions:
- Circles are cut out of cardboard: 2 with a diameter of 16 cm, 4 with a diameter of 15.5 cm.
- A rectangle with sides of 50.8 x 8.7 cm is cut out of cardboard.
- The rectangular shape is rounded and left in this position for some time so that it will be convenient to glue the bases later.
- The rectangular wall is secured into the lock with glue.
- The circles are glued together in pairs. It is better to apply glue over the entire surface for better adhesion.
- A circle with a diameter of 15.5 cm is pushed into the round walls. The seams are secured with glue.
- The lid is glued together from the remaining pair of circles.
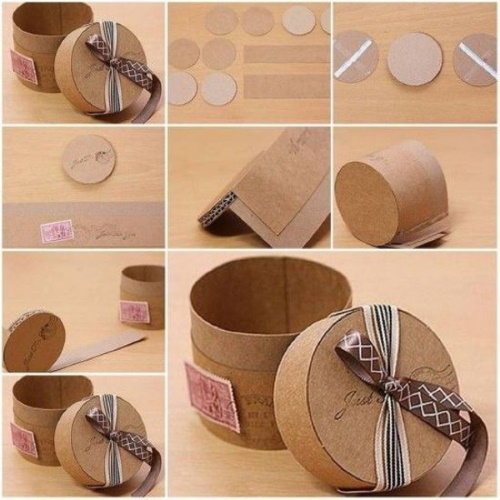
This is how you get only the blank. Subsequently, the box needs to be treated with wrapping paper or fabric. Also, various decorations are applied to the lid, homemade or ready-made.
Pyramid
To create you will need:
- cardboard;
- scissors;
- hole punch;
- disk;
- ruler and pencil;
- ribbon. You can use regular yarn or thread instead.
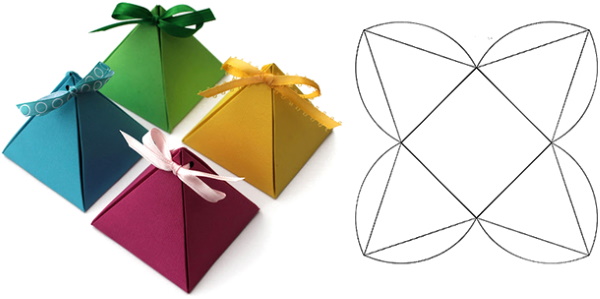
Instructions:
- Cut out a square from cardboard.
- Using a pencil, divide 4 lines into 9 identical squares.
- Marks are made in the middle of each line of the large square.
- Straight lines are drawn to the marks from adjacent squares, forming triangles.
- Rounded parts for bends are drawn along the lines of the triangles. It is more convenient to draw them by applying a disk.
- The pyramid is cut out along the drawn lines. The final shape should resemble a 4-leaf flower.
- The lines bend.
- Holes are made in the corners of the triangles using hole punches.
- Thread yarn or ribbon through the holes. When it is pulled tight, the pyramid is assembled.
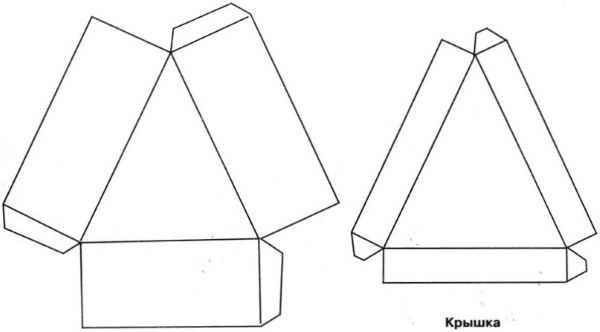
Triangle
A cardboard box, which can be made from any available materials, should be additionally covered with fabric or beautiful paper. Especially if you use the original used material.

The triangular box is made according to the pyramid principle, but with a triangular base. Otherwise, the instructions are completely similar.
Polygon
To create you will need:
- ruler and compass;
- pencil;
- cardboard;
- scissors;
- glue;
- decorations, ideally bows or ribbons.
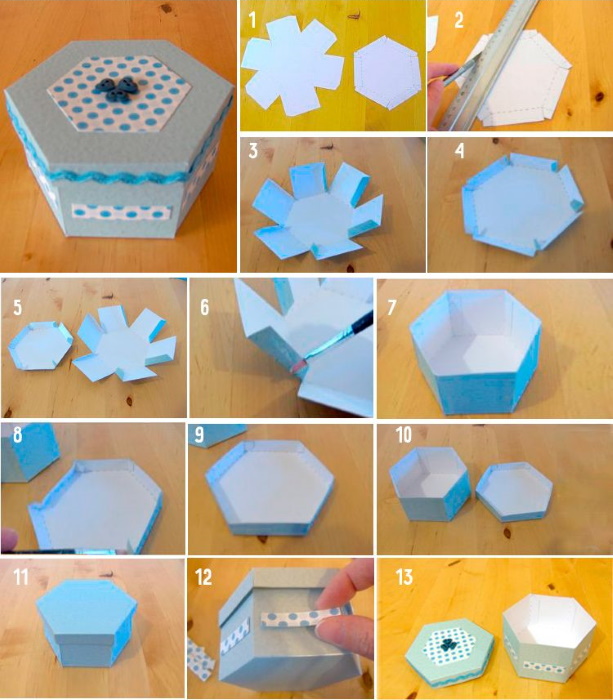
Instructions:
- Draw 2 circles, each 5 cm in diameter.
- On the circle make 6 marks, equally spaced from each other.
- On the first part, from the marks, draw external lines measuring 4 cm, on the second – 2 cm.
- The ends of the lines are connected by straight lines (a polygon is drawn).
- From each detail on the right, small details are drawn for gluing.
- The figures are cut out along the lines. The inner part of the polygon is not cut out completely for easy bending.
- The lines are held together with glue.
The small polygon is decorated with a bow or other decoration for beauty.
Cot
To create you will need:
- pencil, ruler;
- cardboard;
- disk or compass;
- scissors;
- ribbon, thread or yarn.
Instructions:
- A circle is drawn on cardboard using a compass or a disk.
- Inside the circle, draw 2 lines perpendicular to each other.
- Again use disks or compasses (do not change the step). Draw another circle on top so that the lines intersect with the upper and right junction point of the perpendiculars in the circle.
- The circle is again divided into perpendiculars.
- Inside the perpendiculars, semicircular lines are drawn with a disk or compass.
- The folds are cut a little with scissors or a knife.
- The clamshell box folds up after the gift is placed inside.
- The box is tied with a ribbon, bow or yarn.
Tea house
To create a tea house, follow the instructions:
- Cut out of cardboard: 4 pieces 20x9 cm, 3 pieces 10x10 cm, 1 piece 10x6 cm.

- Cut out 4 strips 20x3 cm. They are needed to fasten the walls. They are folded in half, and the walls are glued.
- Cut out 4 strips 9x3 cm for gluing the bottom. It should protrude slightly on all sides.
- To maintain the roof in its original position, it can be reinforced with inserts parallel to the bottom. In this case, one is already ready (part 10x6). If the material is not strong, you need to make several such inserts.
- Next, the roof is glued to the main part. To do this, 3x9 strips are cut out again.
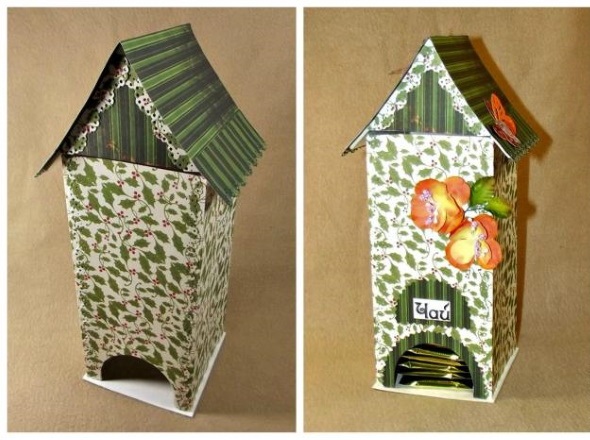
The roof can be made removable, not glued, if you plan to put a gift inside. The house needs to be decorated. It is best to use scrap paper, but fabric will also work. The pattern should be adjusted to the real house. For example, you can glue stripes to the roof, creating a tile effect.
Flat box
A flat box is also called an envelope. It is usually used to pack very small gifts, such as money or notes with confessions. Therefore, you can use thick paper instead of cardboard.
To create you will need:
- paper;
- glue;
- scissors;
- pencil;
- ribbon or other decoration.
Instructions for creating the craft:
- 4 identical circles are cut out of paper.
- The circles are folded in half.
- The halves are glued together, overlapping each other.
- The unglued halves are slightly bent to add volume.
- The gift is placed inside, closed with half circles and secured with a ribbon or other decoration.
Retractable model
To create a pull-out box, use a matchbox as a basis. You can take it apart to make a pattern. You can open the product by pulling a beautiful ribbon or hook.
The scale is selected depending on the gift that is planned to be packed in the box.
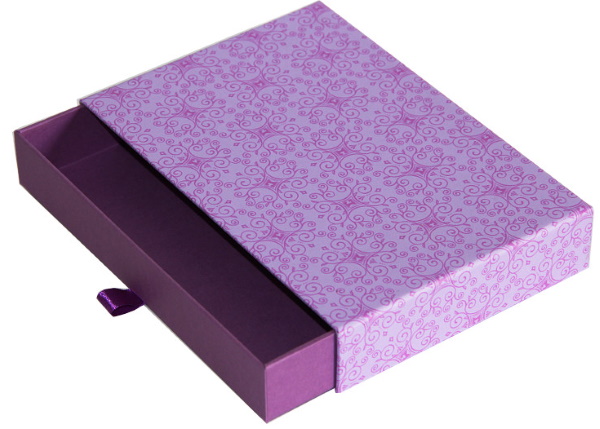
The pull-out format is convenient because the top can be decorated in any way. The design is strong and reliable, so you can use even heavy decorative elements - beads, pearls or metal.
Ideas for beautiful gift boxes
A cardboard box, which can be made for any holiday, does not necessarily have to be of a standard shape. There are patterns designed to make intricate figures. With their help, you can prepare for any holiday.
Cup
To create a box in the form of a cup, a pyramid pattern is taken as a basis. In it, the circle was divided into 6 equal parts, but here they are made more from 8 to 12.
Instructions:
- A pattern is drawn up, transferred onto cardboard and the shape is cut out.
- An additional strip of cardboard is cut out, which is equal to the diameter of the upper part of the future cup. It will be needed to secure the "petals".
- The side parts of the cup are slightly rounded, creating a shape. You can make it a semicircle or use a wavy format.
- The strip is rolled up and glued together. Then the side parts of the cup are glued to it.
- The handle can be cut out of cardboard. You can also use any other available materials – plastic, strong fabrics, straps from old wristwatches.
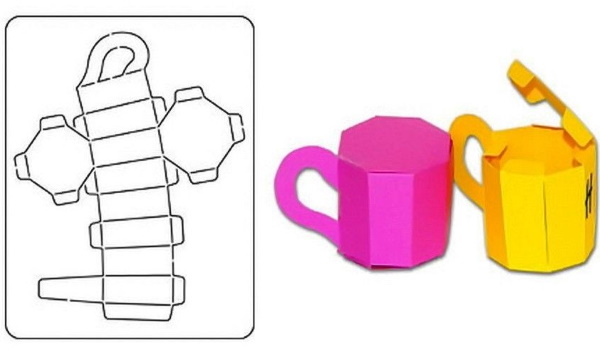
It is better to decorate the cup with paints. They additionally strengthen the entire structure. The box is suitable for light gifts, since this format will not withstand a large load. For example, you can put jewelry, invitations, certificates for the purchase or attendance of various events in it.
Christmas tree
When making a Christmas tree box, it is better to use a stationery knife rather than scissors. With its help, you will be able to trim the edges neatly, and the tree will turn out neat and symmetrical.
Instructions:
- The pattern used to create the pyramid is taken as a basis.
- Spruce branches are drawn along the edges. They can be round or pointed.
- The shape is cut out of cardboard, and the folds are cut out.
- Holes are made at the ends of the form using a hole punch, and the tape is passed through them.
- The box is tied with a ribbon after the gift is placed inside.
The top of the tree can be decorated with a star made of beads. You can also decorate the branches with LED light strips to create a festive atmosphere.
Heart
Heart-shaped boxes are made for wrapping romantic gifts.
To create you will need:
- sample;
- paper for creating a pattern (you can use any paper, either clean paper, newspaper, or sheets of paper covered with writing);
- cardboard;
- scissors;
- pencil;
- glue gun.
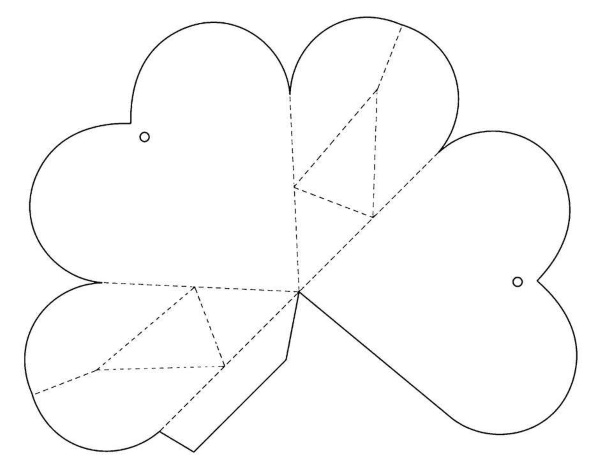
Instructions:
- The template is transferred to paper. You can do it manually, observing the proportions, or use a printer and print out a ready-made pattern from the Internet.
- The pattern is transferred to cardboard. The fold lines are slightly cut with scissors or a knife, but not completely. This way the box will not fall apart, but at the same time it will be easier to bend.
- The fold details are cut into small strips.
- The fold details are glued to the small heart. It is important to ensure that they are on the inside.
- The large heart is the lid and is glued in the same way as the previous one. But the strips on the fold should be larger, since it will need to be constantly opened, and it should be stronger.
Next, the box is covered with red paper. You can decorate it with ribbons or romantic stickers.
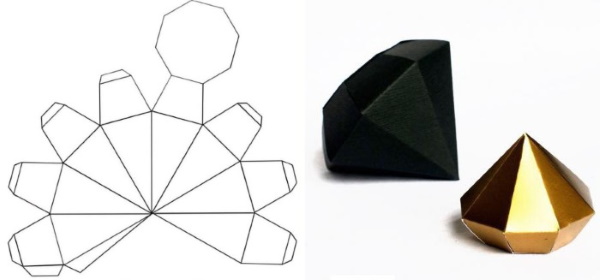
Diamond
A small box for a gift.
| Materials for creation | Instructions |
|
|
A diamond is a shape that does not require decoration. It is better to use colored cardboard for assembly or wrap it in foil for shine. Extra decorations will only spoil the packaging.
Cupcake
Cupcake-shaped boxes look appropriate if the gift is addressed to a woman: a friend, grandmother, sister. This is a simple form, in which you can pack anything.
Instructions:
- The pattern is cut out according to the template. It can be changed a little, for example, the petals can be enlarged if you want a more lush top.
- The shape is cut out of cardboard. The folds are slightly cut.
- The form is being assembled.
A cupcake-shaped box is demanding when it comes to decorations.
You will need:
- white fabric or foil to frame the box;
- decoration for the top of the cupcake, which will also cover the joints;
- fabric, paper or paint to brighten up the cupcake;
- small decorations to decorate the box.
Cake
It is almost impossible to make a box in the form of a full-fledged cake. But it is possible to make several pieces. This way you will be able to give one or several gifts at once.
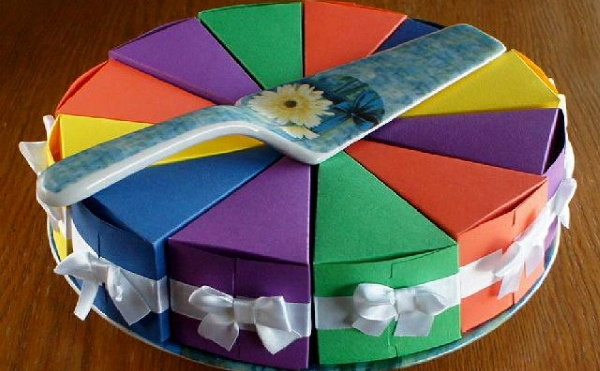
Instructions:
- The template is cut out of ordinary paper.
- The pattern is transferred to cardboard. It is better to use a soft and pliable source material to make it easier to assemble the form.
- The final shape is cut out, the fold points are slightly cut for easy bending.
- The form is glued together.
Next, you need to decorate a piece of cake. You can use different decoration methods - decoupage, quilling. You can also use markers, paints, colored or wrapping paper. The whole cake is assembled from several pieces. The top is decorated with beads, bows or prepared decorations.
How to make unusual gift boxes for children?
Usually, children are not interested in packaging. When a gift is packaged in a standard way, they, without thinking, tear the paper to quickly get to the inside. But if you use your imagination, the packaging can educate a child no less than the gift itself.
Pencil
You can make a cardboard box in the shape of a pencil according to the instructions:
- Take a white sheet of A4 cardboard.
- On the vertical edges, marks are made 3 cm from each other and from the beginning of the sheet.
- Perpendiculars are drawn from the marks.
- On the horizontal line, 18 cm is measured and the line is drawn again.
- On the horizontal line, 7 cm is measured from the previous mark and a line is drawn.
- Isosceles triangles are drawn in 7x3 cm rectangles.
- The top part of the form is cut off, 2 lines of triangles are cut out.
- The form is bent along the straight lines that were drawn first in the form.
- The pencil is assembled and glued.
Next, the box can be painted or covered with colored paper. School supplies that are planned to be presented to the child are put into such a box.
Little Frog
To make a frog-shaped box, first make the bottom part in the same way as when creating a round package. The top part is made in the shape of a frog's head.
Features of such packaging:
- the lower part is made of durable cardboard, the upper part is made of double-sided colored paper;
- the lower part is covered with green paper or painted in the appropriate color;
- make paws at the bottom and attach them with glue or double-sided tape;
- Instead of the frog's eyes or nose, you can use beads;
- It is better to make the upper part voluminous, adhering to the 3D format.
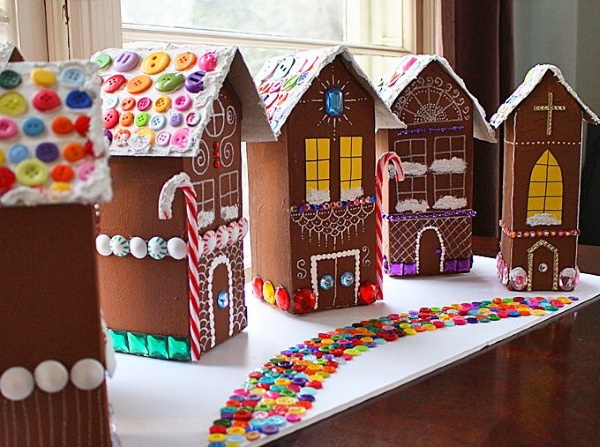
Gingerbread house
The gingerbread house is created in the same way as the tea house. Here you only need to use strong cardboard, since sweets are usually packed in it. You can also cut out windows and doors in the house. And when wrapping a gift, make sure that the candies or chocolate "look out" of the windows.
To make a beautiful cardboard box, it is recommended to first try to assemble it from ordinary paper. Then a convenient order of actions is established, changes are made to the pattern or the shape is changed. And it is better to start making it a few days before the holiday, so that there is an opportunity to practice.
Video on how to make a cardboard box
How to make a cardboard box with a lid: