The need to give a thing a finished look sometimes requires the needlewoman to use various techniques. One of them is to crochet the edge of the finished product.
Crochet Edge Binding Techniques
There are many ways to crochet a thing, from the simplest to the most complex, representing lace several dozen centimeters wide. Even classic crochets have many variations in execution, since knitters try to bring something new - to modernize basic patterns.
There are certain advantages to using knitted edging:
- fixes the shape of the product;
- prevents edges from curling;
- allows you to hide imperfections, such as seams;
- used as decoration;
- helps to update an old and boring thing.
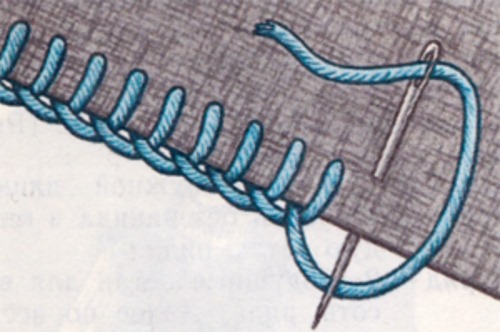
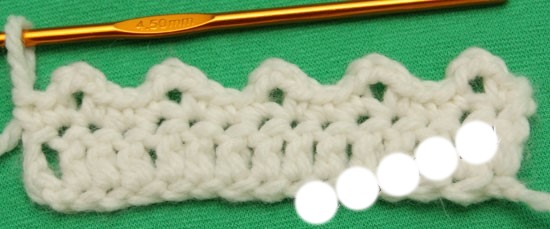
Binding the edge "Crayfish step": step-by-step instructions
This pattern is called "Crayfish Step" because the binding of the product must be done from left to right. - in the opposite direction to the usual crochet or knitting.

At the same time, such a border preserves the shape of the edge well and protects the product from deformation during wearing or washing. The pattern is made in 3 variations. The choice of knitting technique is influenced by the type of product and the way it will be used in the future.
Classic version of the pattern
After the thread is secured at the left edge, you need to perform a VP, then, lowering the hook into the next base loop, grab the thread. At this stage, there should be 2 loops crossed between each other on the hook.
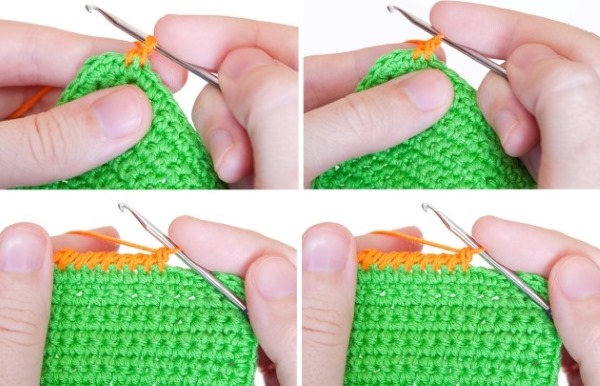
Then the working thread should be knitted through both loops. The remaining loops along the perimeter of the product are made in the same way.
Rachiy step with yarn over
This binding looks voluminous, so it is recommended to use it on knitted items made of thick winter yarn. It is necessary to make a VP, then a yarn over and pull the thread through the next base loop so that there are 3 loops on the hook. Then they should be knitted all at the same time.
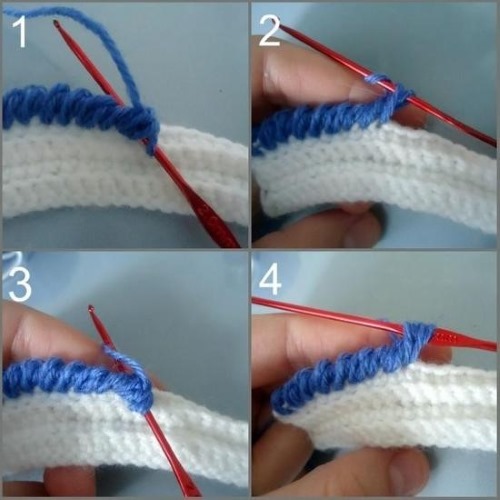
Then, in the same loop of the edge, you need to repeat the above steps 2 more times, after which close the fragment of the pattern VP. This pattern should be done as many times as required for tying the product.
Double-sided crab walk
A double-sided pattern is used when it is important that the product looks good from all sides. To do this, you need to tie a VP and make a yarn over, then lower the hook into the next loop of the bottom row.

Then, you need to grab the working thread with a hook and pull it through the loop. The 3 loops formed on the hook should be knitted together. Next, you need to knit 1 VP and continue the pattern along the entire length of the edge of the product.
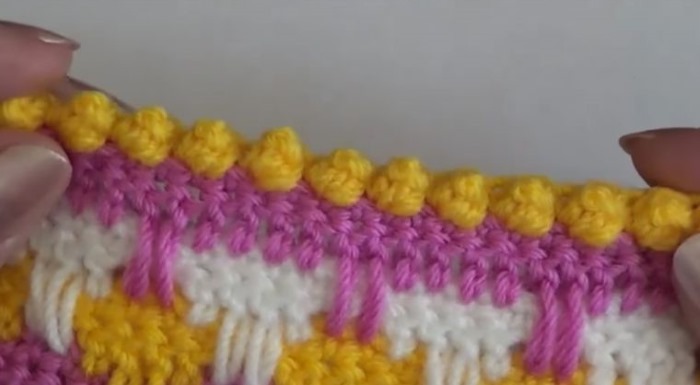
Pompom edging
How to crochet the edge of a product so that it looks original and beautiful - this can be crocheting with pompoms.
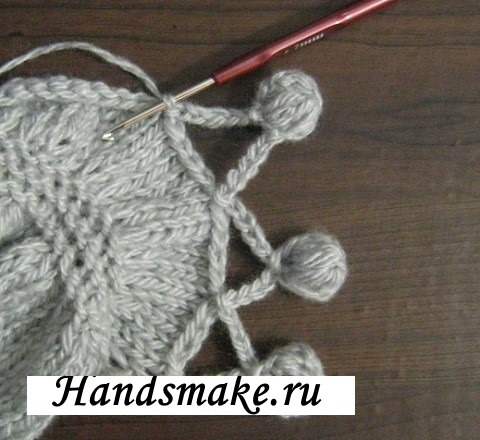
At first glance, this type of binding seems complicated, but in the work you will need to use only air loops and double crochets, which are the basics of crocheting.
Stages of work:
- Depending on the edge of the product that needs to be tied, you should decide whether to immediately proceed to the design of "pompoms" or pre-tie the edge with single crochets. Binding with columns will allow you to align and add rigidity to the edge, which is sometimes necessary for knitted products.
- If the edge of factory knitwear or other fabric is being processed, then a row of columns is necessary, as it will allow you to secure the hem and will be the basis for the future row of pom-poms.
- You should start knitting pom-poms from the corner of the product if the binding will be around the entire perimeter, or from any edge.
- Having secured the thread to the base of the product, you need to make 7 VP.
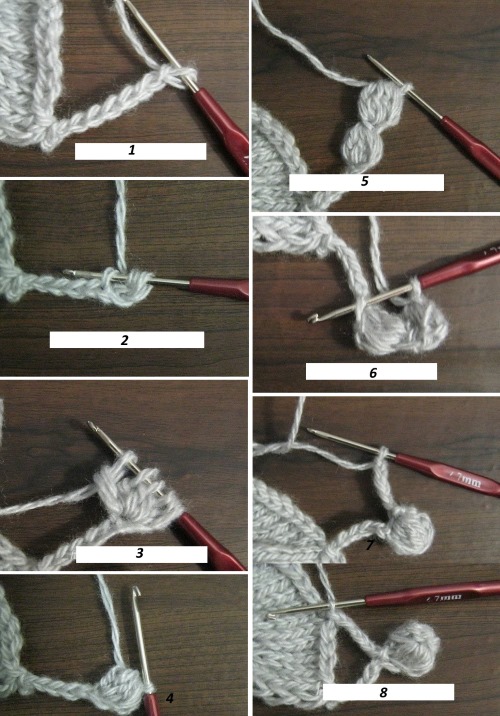
- In the 6th VP from the beginning, you need to knit 5 CH. In this case, all the columns should not be knitted to the end - you need to make a yarn over, grab the working thread through the 6th loop and pull out the loop. There should be 2 loops left on the hook. Next, you need to knit 4 more columns. The 6 loops formed on the hook should be knitted together.
- The resulting cone is half of the future pompom. To make the second half, you need to make 1 VP, into which, by analogy, you need to knit 5 CH.
- To connect both parts of the pompom, you need to put the cones together and knit them at the base of the first cone.
- Next, you need to make 5 VP and secure the chain to the base of the product.
You can experiment in your work by changing the number of VP and columns. The thinner the yarn, the more columns you will need to get an even and voluminous pompom.
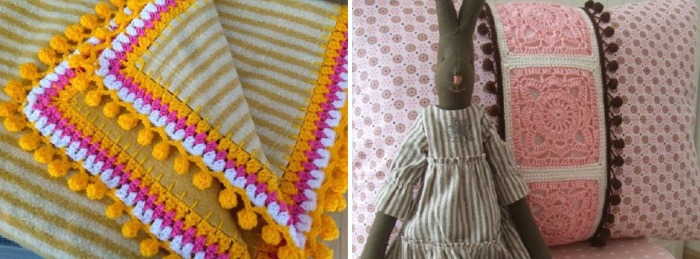
This fringe can be used to decorate blankets and capes, pillows and curtains, and to trim the edges of clothing.
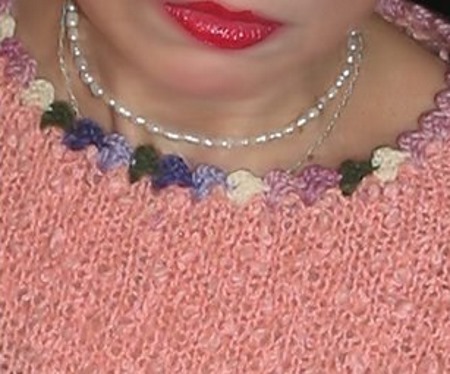
Edge binding "Beads"
How to tie a crocheted fabric or item along the edge so that it looks original and unusual - this question is quite common among knitting enthusiasts.
Imitation of beads sewn on the edge is one of the ways to decorate things. Its advantage is that in this way you can decorate not only geometrically correct shapes, but also any curves, for example on the neck or armhole.
Execution of the pattern:
- The bottom row should be made with any type of columns. The beads themselves will be made above it.
- Make 1 VP, then knit 4 SC in the 1st loop of the bottom column. Next, you need to pull the hook out of the loop and insert it behind the first (from the beginning of knitting) of the 4 SC, grabbing this loop and pulling it through the specified column. Then you need to knit 1 VP and through 1 column of the bottom row, in the next column from the beginning of knitting, make another "bead".
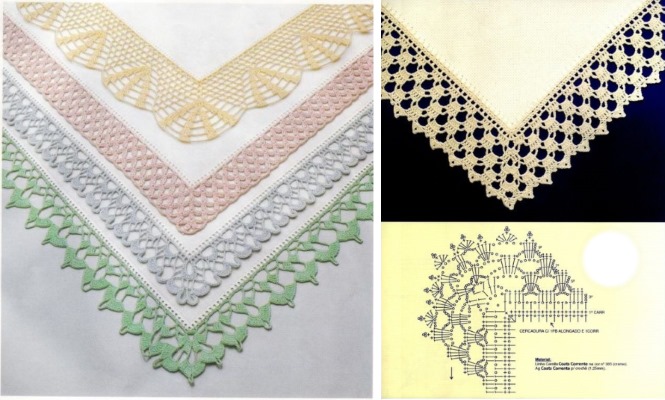
Openwork binding
Openwork edging can give a new look to any product. This type of edging will look especially impressive on items made with simple knitting. It can get “lost” on bright, colorful and openwork items.
Crown Pattern
Stages of work:
- It is necessary to tie the edge of the product with overcast stitch.
- The first row will consist entirely of dc. The row should be started with 3 ch for lifting.
- The second row is made from arches according to the following pattern: 1 VP for lifting, SC, then you need to knit an arch formed by a chain of 4 VP, through 2 columns of the bottom row you need to close the end of the arch by knitting 1 SC.
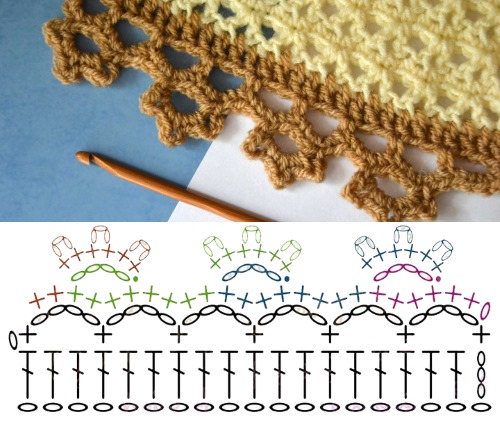
- At the beginning of the 3rd row, you need to make 1 VP for lifting and tie the first lower arch with SC. There should be 4 of them. Next, you need to make 2 SC to the middle of the second arch of the previous row. After that, you should tie a chain of 3 VP and close it with a connecting loop for the middle of the first arch.
- Thus, we have the upper arch. It needs to be tied in the form of a crown. To do this, on the 4th loop of the chain, knit 1 sc, then make a chain of 3 loops and secure it with a sc for the 3rd loop of the arch. Next, you need to make 2 more teeth: 1 sc, a chain of 3 VP, 2 sc, a chain of 3 VP. The arch in the form of a crown is ready.
Above the 2nd arch of the bottom row, you should knit 2 more sc, and on the 3rd arch - 4 columns. Next, 2 sc on the 4th arch and again make a chain of 4 loops, which will close in the middle of the 3rd arch with a connecting loop. Then you should knit in accordance with the description of the 1st crown arch.
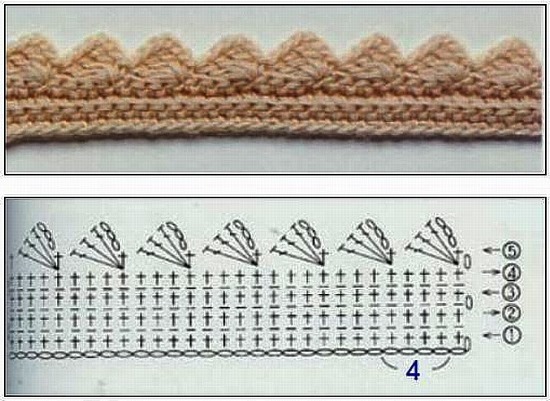
"Shell" edge
The pattern for the border of knitted products "Shells" is also called scallops. Scallops are easy and quick to make, so they are loved by both beginners in knitting and experienced craftswomen. Scallops are usually the final row in the binding. It can be preceded by a row of any columns or a more complex pattern.
It is important to correctly calculate the number of loops so that the festoon does not end up on the edge of the product, otherwise the corner will bend.
Stages of work:
- The bottom row must have an even number of loops (columns). At the beginning of the scallop row, you need to make a VP.
- Then you need to knit 5 dc through 1 loop of the bottom row into the next one.
- At the final stage of forming the festoon, skip 1 loop of the bottom row, and in the next one, knit a single crochet.

- Continue by repeating the pattern according to points 1 through 3 until the desired length. There should be a SC at the corner of the product, separating the 2 scallops.
Binding the edges of napkins
The following tips will tell you how to crochet the edge of a product if it is a thin napkin or handkerchief. To do this, you will need a needle, thin threads, a hook and a little free time.
Basic rules:
- The thinner the yarn, the more airy the lace will be. But it is necessary to ensure that the thickness of the fabric and threads match. The final product should look harmonious.
- To correctly place the pattern around the perimeter of the napkin, you should make a pattern sample. This will allow you to accurately calculate the number of required rapports.
- It is not necessary to knit a complex or wide border directly on the napkin. It can be knitted separately and then sewn to the desired product.
- Before starting work, the fabric must be washed in case it shrinks.
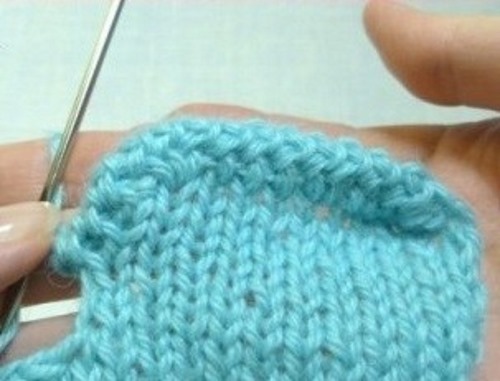
Edge treatment:
- If the fabric does not fray, then it is enough to fold the edge. When the fabric is frayed, it is advisable to process it on an overlock, or hem it by hand or on a sewing machine.
- Next, the napkin needs to be overcast with the yarn that will be used to make the lace.
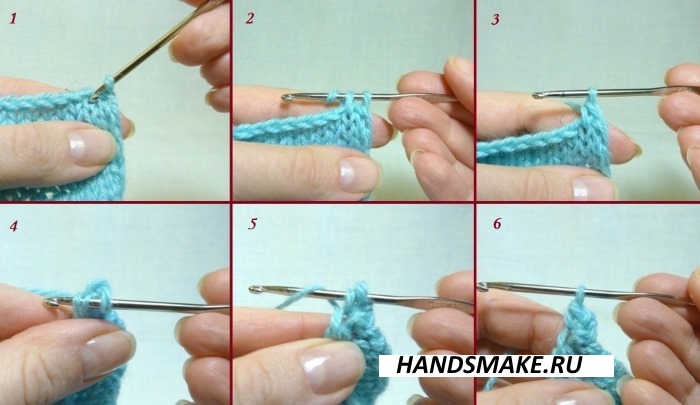
There are many options for overcasting. The simplest is overcasting over the edge.
Another method will look more professional and beautiful. To overcast the edge, as in the photo, you need to turn the fabric face to you and perform SC along the perimeter of the napkin. The distance between the bases of the columns on the fabric should be 5 cm.
During the work process, you should monitor the tension of the thread. The fabric under the post should not bend, wrinkle or twist.
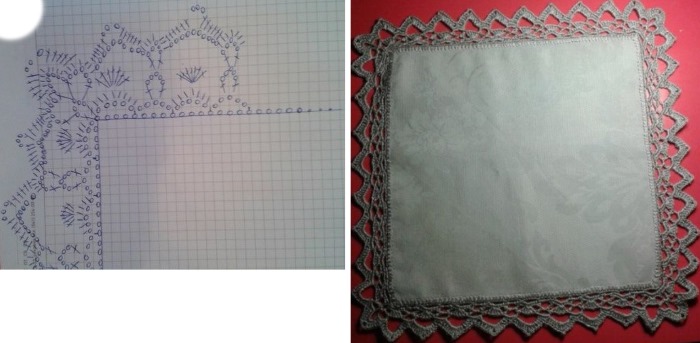
Once the napkin base is prepared, you can choose any of the existing patterns.
For square and rectangular items, patterns with corners are suitable.
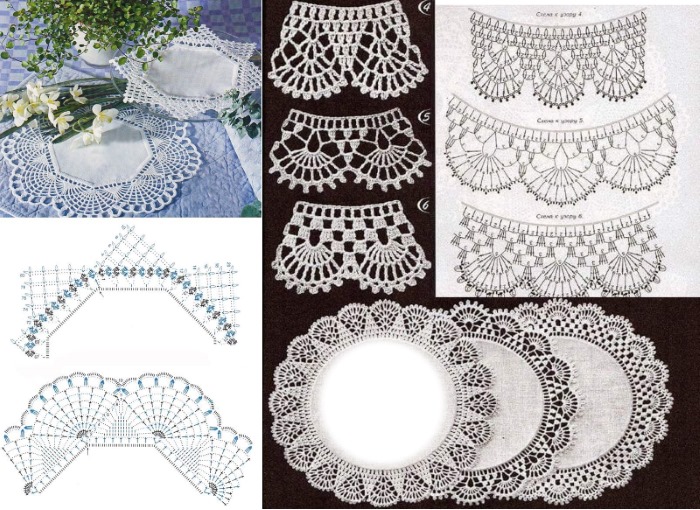
There are also many interesting patterns for round napkins.
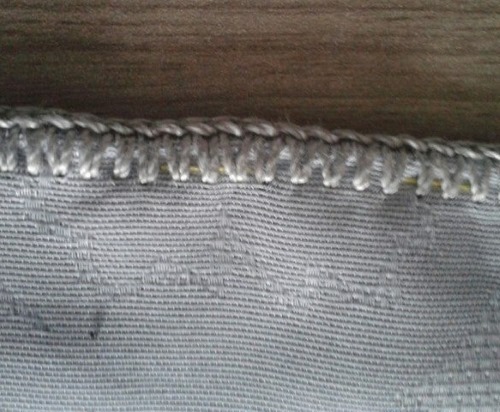
Caterpillar edge binding
The “Caterpillar” binding type allows you to create a dense edging along the edge of the product, which gives the item a finished look.
Stages of work:
- After securing the working thread at the edge of the product, the hook must be passed through the outer loop and, grabbing the working thread, pull it out. There should be 1 loop on the hook. Next, you need to pull the thread through the next loop of the fabric again. The resulting 2 loops should be knitted with a hook.
- The next loop should be done on the wrong side. To do this, you need to turn the product clockwise and, similar to the previous one, grab the loop with a hook, working from the wrong side. Next, you need to knit 2 loops at once.
- The previous points were preparatory. The main knitting should be done according to the given pattern.
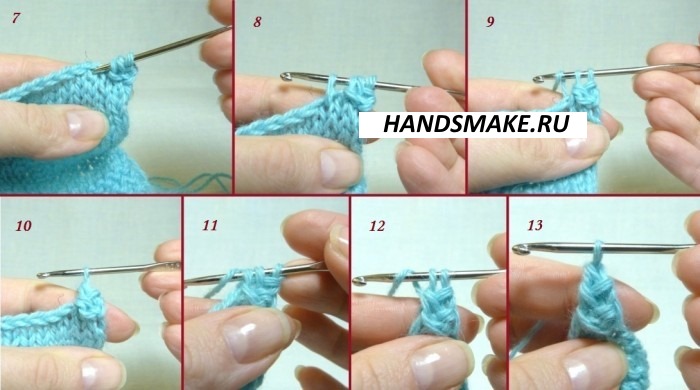
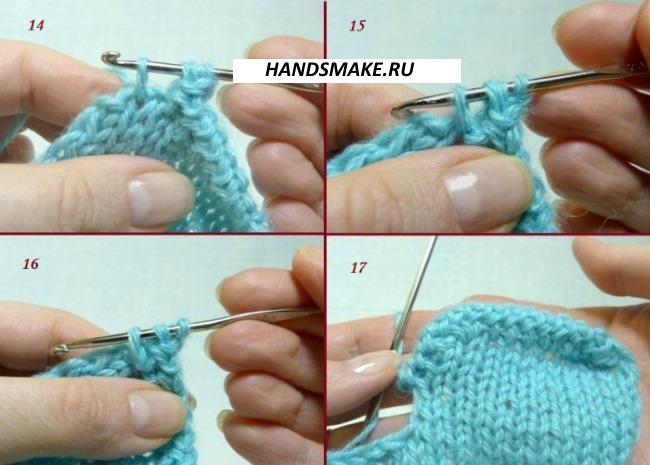
Turning the product over with the front side facing you, you need to pass the hook through 2 loops of the previous row, then insert it into the fabric and, grabbing the thread, bring it out, knitting 2 loops at the same time. If everything is done correctly, then 2 loops will remain on the hook. Then they need to be knitted at the same time. Then the actions need to be repeated, but from the inside.
The specified knitting pattern should be alternated along the entire perimeter of the workpiece. To prevent the edges where the braids are knitted to close the row from twisting or curling, when knitting the "Caterpillar" pattern, you should grab the loops not by the braid, but by the loops of the lower row.
Small border of one row
Sometimes, after the thing is knitted, it seems that something is missing - there is no sense of completion of the work. In such cases, a single-row edging will do. Such a border can be difficult to distinguish on the product or, on the contrary, act as a bright decor, as in the example below.

How to crochet the edge of a product so that the border is narrow (no more than 1.5 cm):
- You should start working with crocheting single crochet stitches.
- Next, you need to knit 3 VP, as well as 2 CH at the base of the chain.
- At this point there should be 3 loops on the hook. They should be knitted together, and then through 2 base loops, make another sc.
This pattern can have many variations, depending on the final goals and the thickness of the thread. For example, you can change the number of sc or use dc instead of single crochet.
Arched binding from air loops
Stages of making a border from arches:
- In the first loop of the bottom row, you should make a SC. If the arched row is the final one for the already knitted binding, then before the column you need to knit 1 VP for lifting.
- Then you need to make a chain of 3 VP and SC, secure them by knitting them through the 2nd loop of the base.
- In the 3rd and 4th base loops, you need to do SC.
- Then, around the entire perimeter of the product being tied, you should alternate a chain of 3 loops and 3 sc.
Even such a simple method of tying can be approached creatively. For example, make arches from long chains, then they will look more like fringe. In a knitted shawl, arches consist of a chain of 20 VP, which are secured to the base with the help of SC.
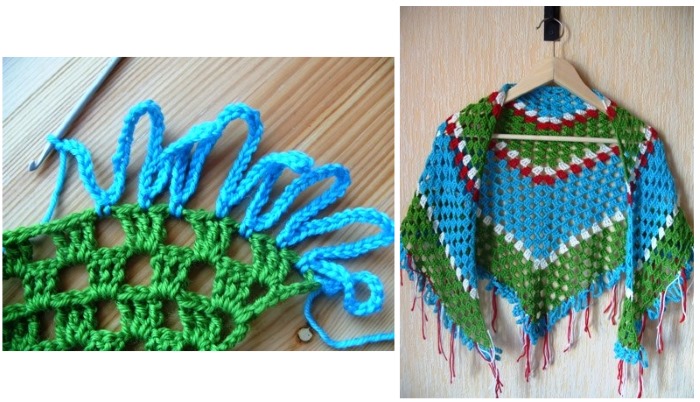
In addition, the arches of air loops can be made in several rows. In this case, the arches will be staggered. Such piping looks especially impressive on products made of thin fabrics - napkins or handkerchiefs. In this case, you need to use thin threads, for example, sewing threads in spools.
Pico
How to crochet the edge of a product using the "Pico" pattern depends only on the taste of the needlewoman, since there are several options for performing this type of crochet.
| Classic pico. Pattern diagram: make 3 sc, then a chain of 3 VP. The ring of loops should be closed in the 1st VP using a SS. Then make 3 sc again. It is permissible to change the number of columns, and also instead of sc, make with a yarn over. | 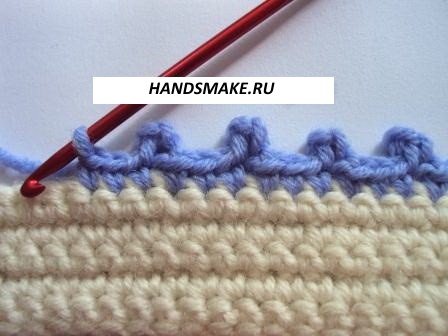 |
| Expanded picot.
With this type of pattern, the VP chain must be closed with a SS, knitted in the outermost SC chain. | 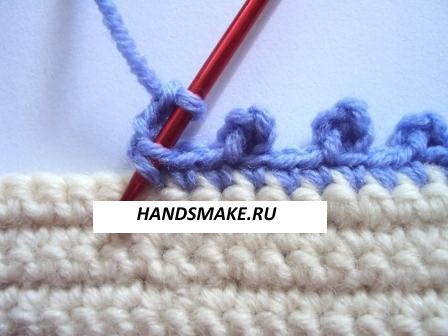 |
| Big pico.
The chain should be made of 5 VP. | 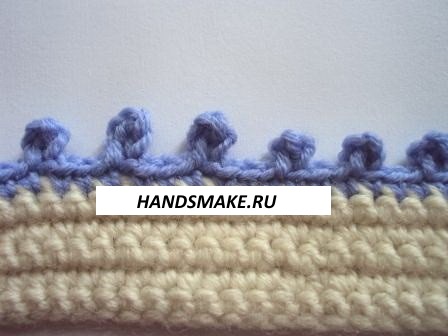 |
| Triple picot.
Having knitted 3 sc, you need to dial 3 ch and connect them into a ring with ss, made in the 1st ch, as in the “Classic picot”. Then knit another chain of 3 loops and close it in the same way. And then make a ring from VP. Next, the loop on the hook needs to be knitted with SS in the outermost to the air loops of the SC. | 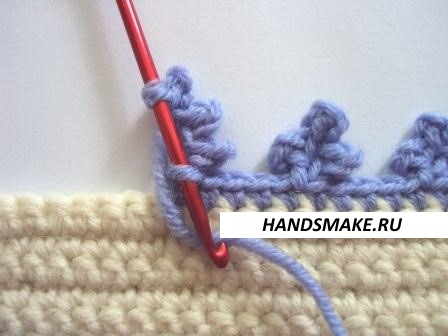 |
| Volumetric pico.
To get a voluminous circle, you should knit 3 VP, then make 2 CH in the first loop of the chain. Next, you need to make another chain of 3 loops and close the resulting picot SS in the outermost SC. | 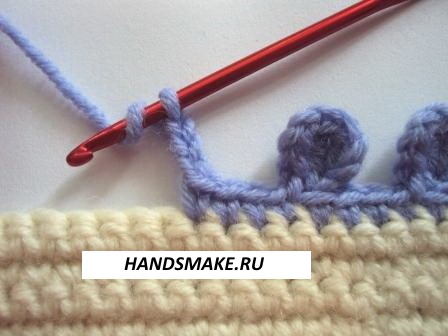 |
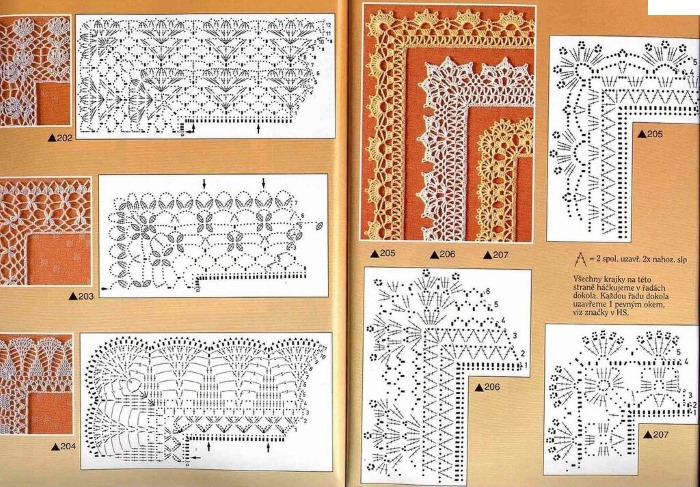
Border Pattern Ideas
How to crochet the edge of a product, with a narrow border or wide openwork lace, depends on the product that needs to be decorated, the thickness of the threads (since not every pattern is suitable for thick yarn), the taste of the needlewoman and her skills.
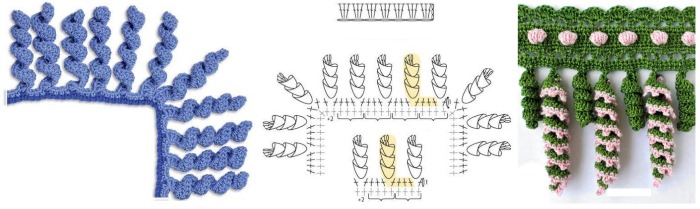
Fringe made of curls looks original. It can be used to decorate a scarf (not necessarily knitted), as well as blankets or pillows.
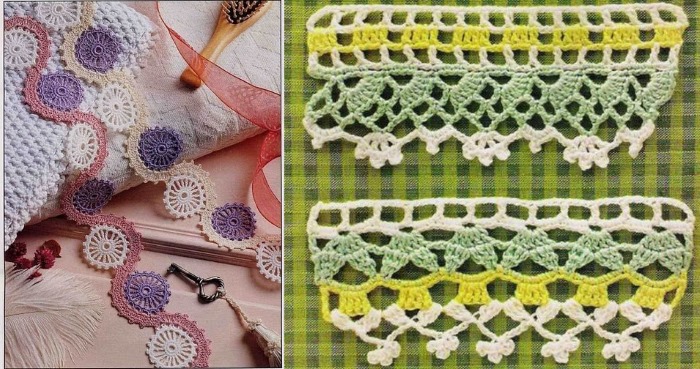
You should carefully approach the choice of threads for multi-colored piping so that the final product looks interesting and beautiful, especially if it is a decoration for clothing.

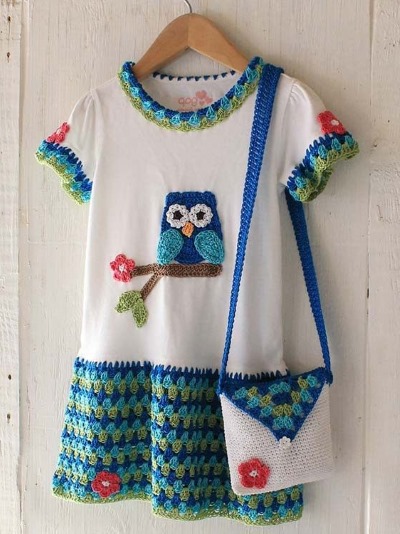
Complex patterns require skill from the needlewoman and a lot of time spent on the work. But the result is worth all the effort. Binding clothes with a pattern allows you to create a completely new image.
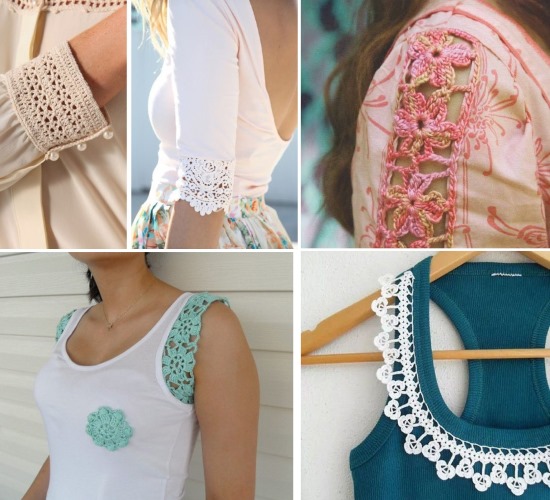
Any knitted inserts and trims for children's clothing are especially relevant. Armed with a crochet hook and approaching the issue creatively, you can lengthen clothing, disguise a hole or simply add a "zest" to a store-bought item.
The useful skill of crocheting a lace or narrow edging around the edge of a garment gives a lot of room for experimenting with clothing and variations in the appearance of home accessories.
Author: Vorobyova Nadezhda
Article formatting:Natalie Podolskaya
Video about crochet tying methods
How to crochet the edge of a product - detailed video instructions:
simply great, thank you very much….