Those who want to learn how to draw with simple pencils need to know what tools and materials can be used. You also need to look at several master classes with detailed descriptions of simple drawing ideas, and also choose pictures suitable for copying.
What you need for drawing
To draw beautiful pictures with a simple pencil, 1 tool is not enough. You need to have a set of pencils of different degrees of hardness on hand.
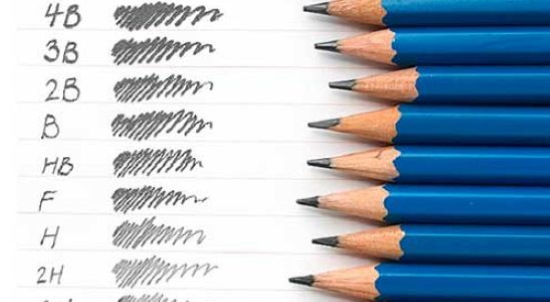
What types of pencils are there:
| Degree of hardness | Marking |
| Very hard | 4H – 9H |
| Solid | H – 3H |
| Average | F |
| Hard-soft | NV |
| Soft | B - 3B |
| Very soft | 4V – 8V, 9xxV |
The higher the number before the letter, the harder or softer the pencil.
Hard pencils leave thin, pale lines. Therefore, they are used for drawing sketches and drawing auxiliary lines. Hard-lead pencils can also be used for shading light areas of the drawing.
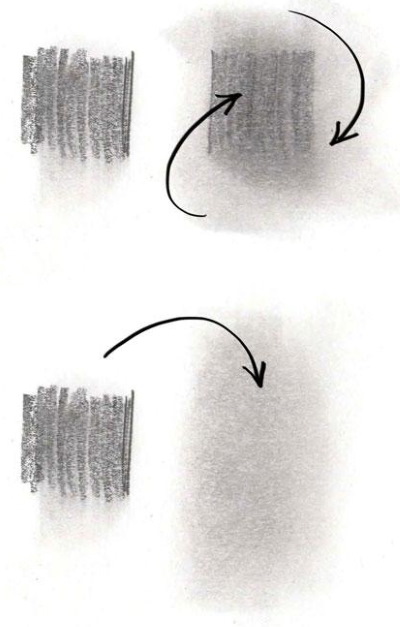
Medium and hard-soft pencils are needed for drawing small details, as well as for marking light shadows. Soft pencils are created for the final outline and hatching of the darkest parts of the picture. The density and texture of the paper affects the clarity of the strokes and the quality of shading.
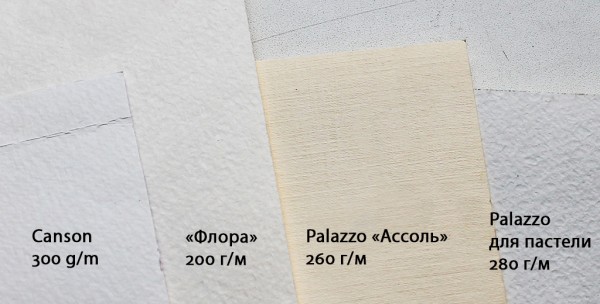
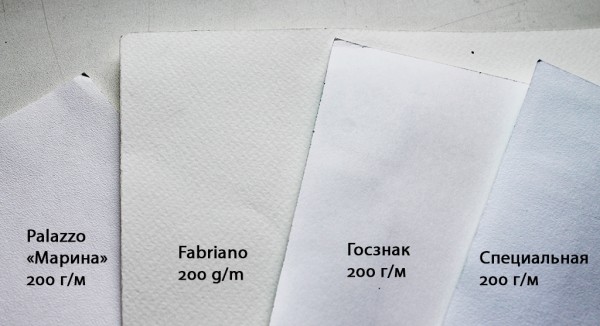
What paper can be used for drawing:
- writing paper, density 68 g/m2;
- office printer paper, density 80 g/m²;
- album sheets, density 100-120 g/m2.
Watercolor paper with a density of 200-300 g/m2 is suitable.2. Such sheets have a rough surface, it will be a little more difficult to apply and remove pencil lines than on smoother sheets. The tone of the paper is also important. There are light gray, brown and white sheets. The last option is considered the most successful, since pencil lines on them will be more clearly visible.
You also need a quality eraser to draw with simple pencils. It should not smear the graphite or damage the paper. A good option would be a rubber or vinyl eraser.
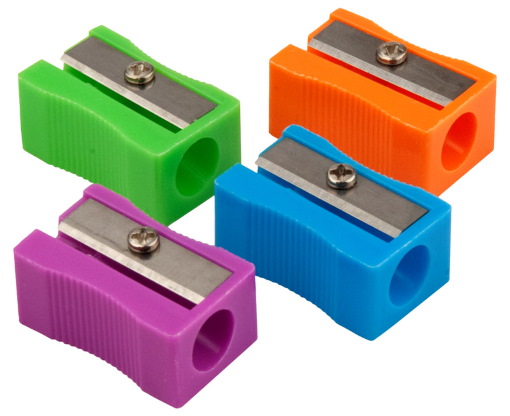
A sharpened pencil leaves behind thin and neat strokes, so a sharpener should always be at hand. Sharpeners with containers will help get rid of graphite crumbs and wood shavings on the artist's workplace. All the trash remains inside. The sharpener should be cleaned only when the container is full.
Ideas for pencil sketching should vary in theme, because it is important for a beginner artist to practice drawing living and inanimate objects, as well as try to depict a landscape, still life and a simple portrait. Further in the article, you can consider several step-by-step master classes on drawing simple pictures with a pencil.
Simple still life
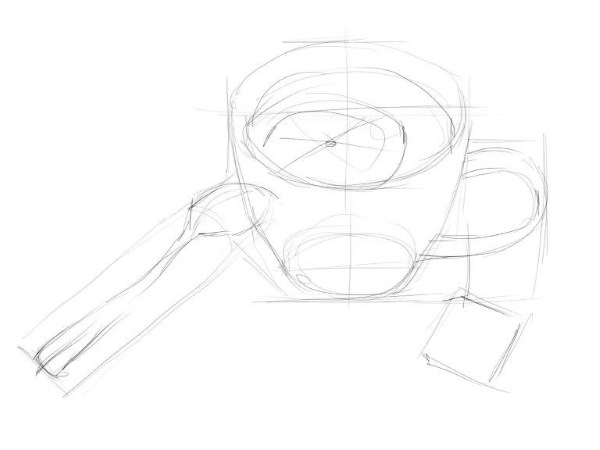
You can draw a still life with a pencil from a flat image or from life. Ideas for setting up a composition should be laconic. These can be tableware or fruits of simple shapes. This master class describes the process of drawing a mug of tea and a spoon.
 How to draw:
- Using a hard pencil, draw a line in the center of the sheet indicating the height of the mug.
- Use 2 horizontal lines to mark the width of the top and bottom.
- Use a thin line to indicate the position of the spoon and its size.
- Draw the shape of a mug.
- Finish drawing its inner part in the form of a circle. It is important to show the sides on the front wall of the dish so that it looks three-dimensional. They should be wider at the center than at the edges.
- Draw the shape of the mug handle.
- Erase the auxiliary lines.
- Inside, mark the boundary of the poured liquid with an arched line.
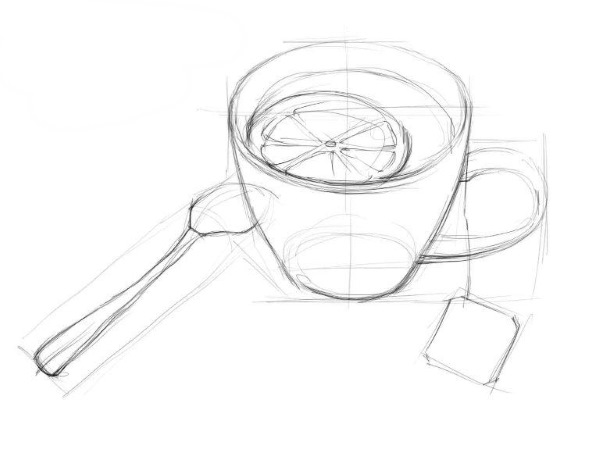
- Draw the shape of the spoon. To add volume to the drawing, you need to draw the side of the handle.
- Use the eraser to remove the auxiliary lines.
- Draw a slice of lemon inside the mug, on the side where the liquid is drawn.
- Add a thread from a tea bag, draw a label.
- Use a hard or soft pencil to outline the elements of the picture.
- Shade the front wall of the dish with vertical lines. The strokes should be applied from the bottom and top, leaving a small gap in the middle. It will imitate a glare. The strokes should be longer along the edges of the dish.
- Add a few short vertical strokes on the inside wall of the mug.
- Apply short, barely noticeable strokes on the headband, repeating its shape.
- Draw the side of the mug handle. Shade the handle, repeating its shape.
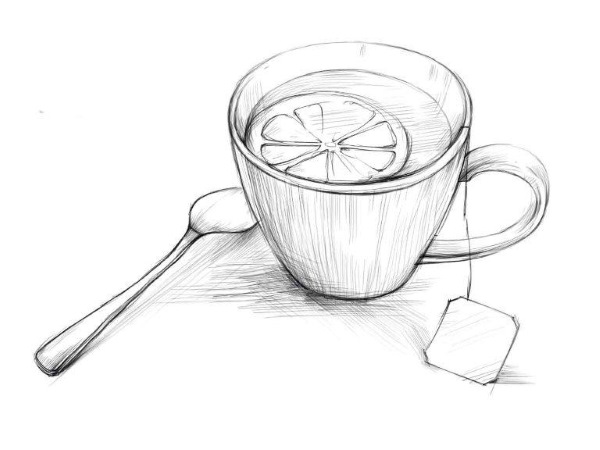
- The liquid inside the cup should be shaded with long, thin lines, applied directly over the drawn lemon. This way, the lemon wedge will look slightly sunken in the tea.
- Shade the tip of the spoon, as well as the bends on it.
- Apply a few strokes to the corners of the tea label.
- Draw a shadow under the objects.
- Use a soft pencil to outline the elements of the picture.
Use an eraser to clean the background and remove any unnecessary strokes.
Tulip
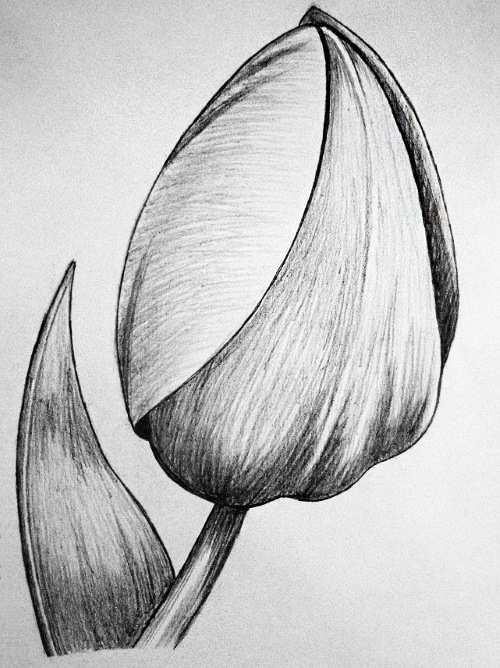
When drawing flowers, it is important to maintain the correct direction of the strokes, and also not to forget about the shadows.
How to draw a tulip:
- Place a sheet of A4 paper vertically on the table.
- On the right side of the sheet, using a hard pencil, draw an egg-shaped bud.
- Draw the stem and the pointed leaf.
- On the lower part of the bud, depict the bends of the central petal with a wavy line.
- Using smooth lines, outline the position of the left petal.
- Draw the right petal so that it slightly extends beyond the drawn outline of the bud.
- Using smooth strokes, outline the position of the central vein by drawing 2 parallel lines. The vein should repeat the rounded shape of the bud.
- Shade the left petal with lines, from the edge to the center.
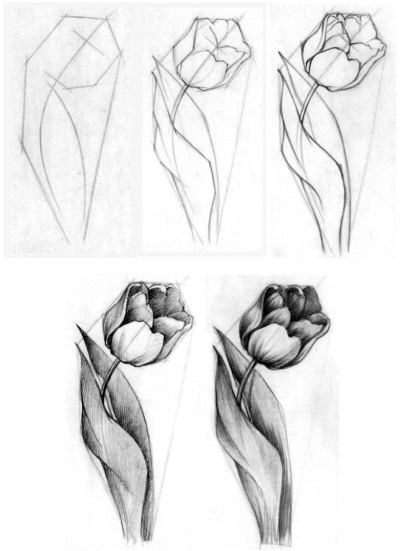
- Shade the central petal with lines that repeat its shape. Closer to the center of the bud, make the strokes a little paler, reducing the pressure on the pencil.
- Using a hard-soft pencil, shade the leaf and stem of the flower, as well as the right petal.
- Use a soft pencil to darken the right edge of the sheet, repeating the direction of the previously applied strokes. Mark the shadow at the bends.
- Darken the stem under the bud, as well as the lower part of the flower, using short strokes.
- Show the shadow under the left petal, from below.
- Darken the top of the flower, mark the shadow under the right petal.
- Apply several long and smooth strokes to the left petal, imitating veins and small folds at the top.
Trace the outline of the drawing and clean the background with an eraser.
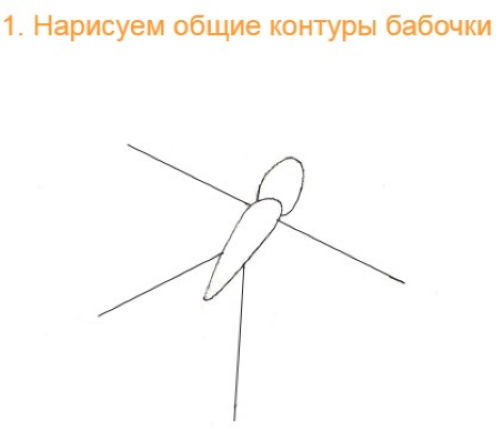
Butterfly
Pencil sketching ideas featuring insects may seem complicated for beginners. In fact, this is not the case. The secret to beautiful drawings on such a theme lies in the smooth transitions of light tones to darker ones. For this effect, artists use soft pencils with different markings.
To draw a butterfly, you will need 1 hard (H) and 3 soft pencils: B, 3B and 6B.
Procedure:
- Using a hard pencil, draw a line indicating the position and size of the butterfly's body.
- Draw the shape of the body and head.
- Draw the antennae.
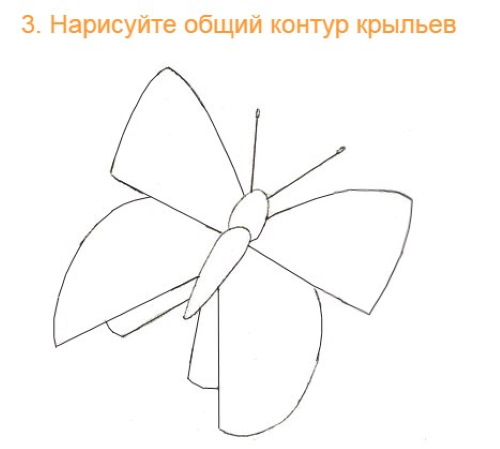
- Add lower and upper wings on 2 sides.
- Separate the head and body from each other with 2 arched lines.
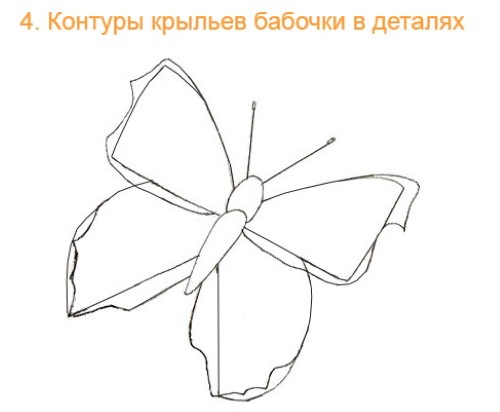
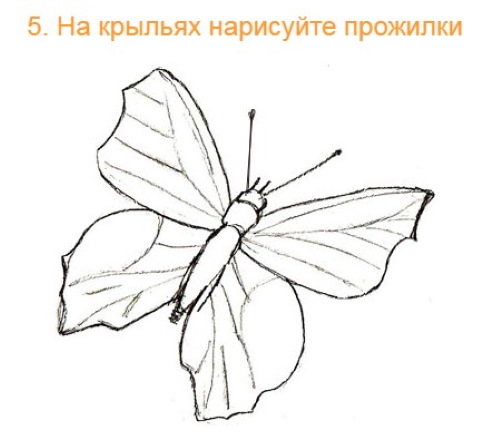
- Draw a pattern on the butterfly's wings.
- Use the eraser to erase the auxiliary lines.

- Using a soft pencil (B), fill in the butterfly wings with dense shading. Blend the lines.
- Using a softer pencil (3B), shade the body and head of the insect, without touching the arched lines.
- Darken the central parts of each wing. Blend the strokes.
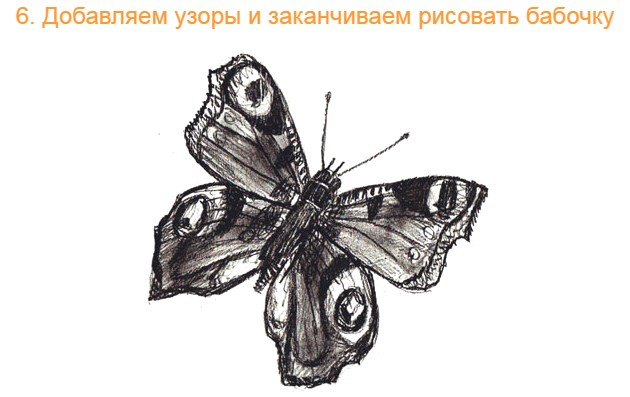
- Using the softest pencil (6B), darken the spots that form the pattern.
- Mark the shadows on the body of the insect, as well as at the base of the wings.
- Outline the drawing with a thick line.
- Draw an eye for the butterfly.
Use an eraser to lighten the right parts of the lower wings, clean up the background and remove unnecessary strokes.
Scenery
Beginning artists should look for ideas for pencil sketching, with a landscape image, among photographs or finished works of other, more experienced masters. The fact is that it is difficult to draw natural views from life. You need to learn to see the direction of the strokes and the position of the shadows.
For the first works, simple pictures with a minimum number of details are suitable.
How to draw a simple landscape:
- Place a sheet of A4 paper horizontally on the table.
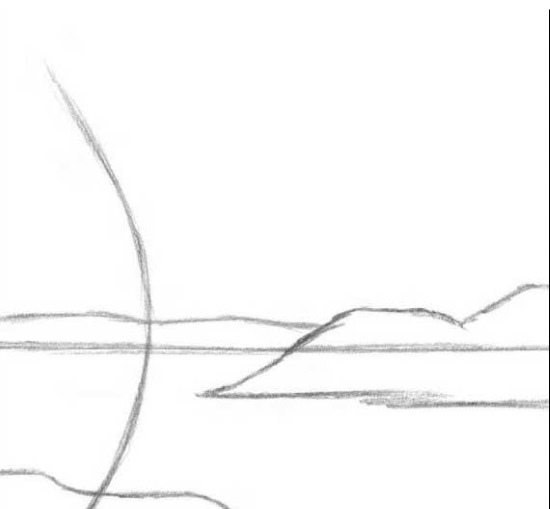
- Use a hard pencil to mark the horizon line.
- On the right side, draw 2 small hills.
- Above the horizon line, draw another horizontal line, but not a straight one, but a smooth one. It will imitate the hills in the background.
- On the left side, depict a curved tree trunk.
- Draw some branches. They should be curved. You can add some short branches for realism.
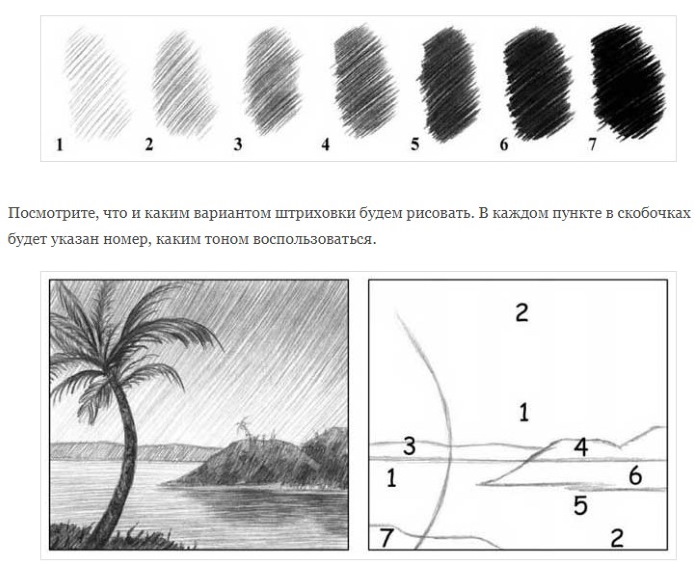

- Using a hard-soft pencil, without pressing, shade the sky with diagonal strokes.
- Fill the hills beyond the horizon with dense, slanted shading.
- Shade the large hills, pressing a little harder on the pencil. Draw a few small trees on their tops.
- Use horizontal strokes to paint the lower part of the drawing, imitating waves on the water. Under the hills, mark the shadow, pressing a little harder on the pencil.
- Use a soft pencil to draw the grass under the tree.
- Paint the trunk and draw the branches.
Use an eraser to lighten the middle of the tree trunk slightly.
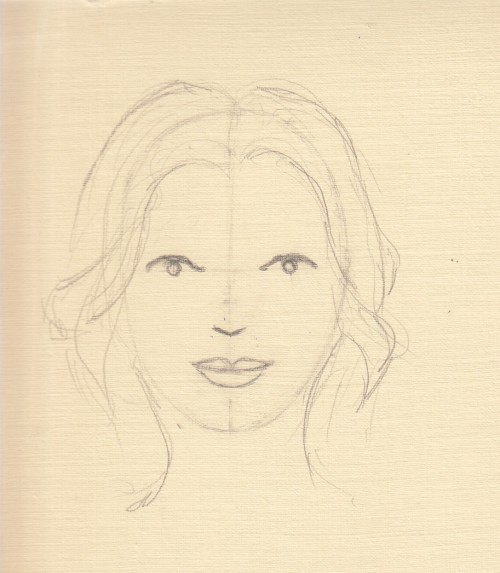
Portrait of a girl
To draw human facial features symmetrically, you need to learn how to draw auxiliary lines correctly. For copying, you can take a simple portrait, without fine detailing.
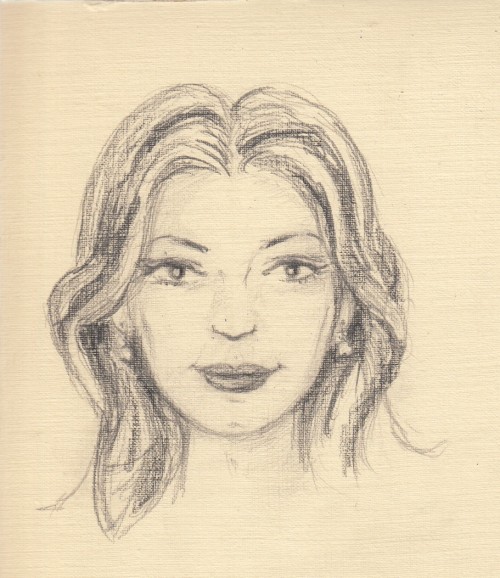
How to draw a girl's head:
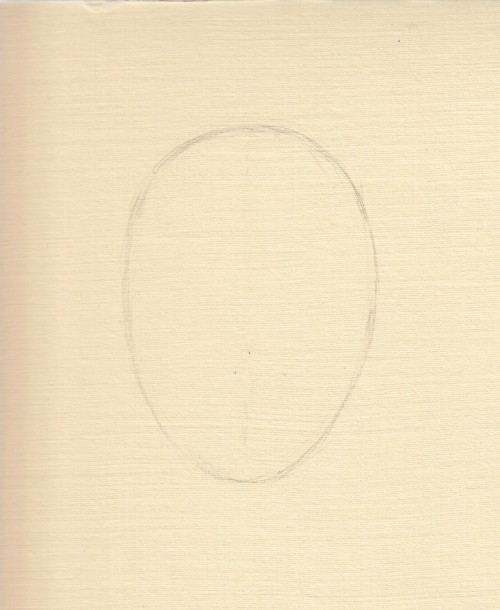
- Using a hard pencil, draw an oval in the center of the sheet.
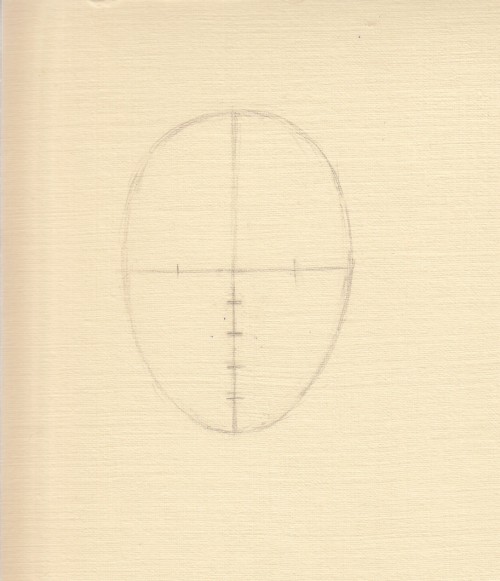
- Divide the oval into 4 parts with horizontal lines. The top line is the line of the eyebrows. The next line indicates the position of the eyes. The next lines should be shorter. They are a guide for drawing the nose and mouth.
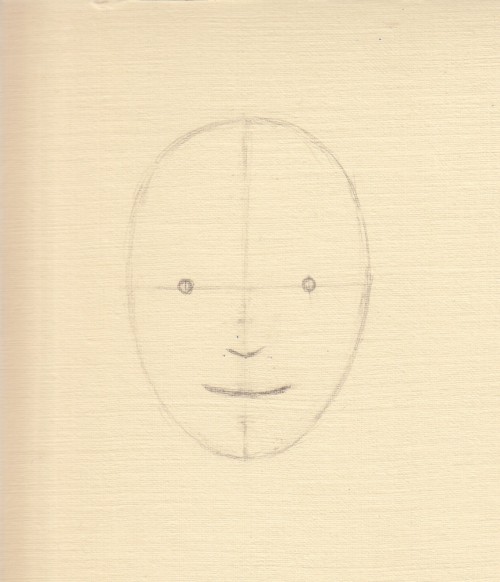
- Draw slightly curved eyebrows. The outer and inner corners of the eyebrows should be located above the auxiliary line.
- Draw almond-shaped eyes. The auxiliary line should pass through the outer and inner corners of both eyes. Draw eyelashes and pupils.
- Draw a nose in the form of a tick with a blunt end. Use small semicircular lines to show the shape of the nostrils.
- From the inner corners of the eyes, outline the hollows at the bridge of the nose.
- Draw the lips. The upper lip should be located above the auxiliary line, and the lower lip – below it.
- Draw the ears. The earlobes should be positioned at the level of the wings of the nose.
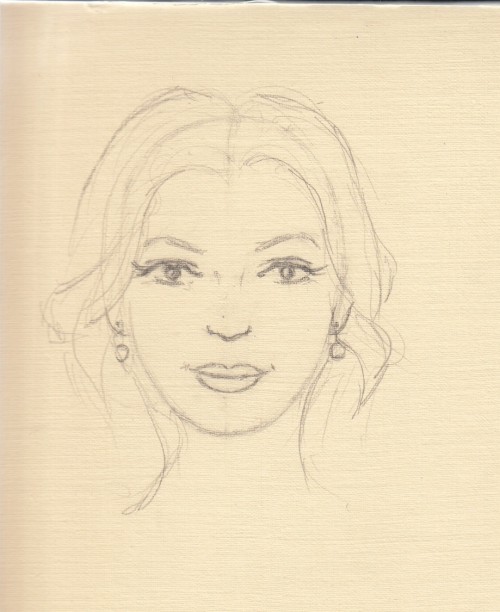
- Finish drawing the girl's neck.
- Depict the shape of the hairstyle.
- Erase the auxiliary lines on the face.
- Select several large, slightly curly strands in your hair.
- Use a hard-soft pencil to outline the girl's facial features and shade her lips.
- Darken a few strands of hair, mark the shadow underneath them.
- Add a few strokes on the neck, indicating the shadow under the chin.
- Mark the hollows on the cheeks with short strokes.
Use an eraser to clean the background and remove unnecessary lines.
A small bird on a branch
When drawing birds, it is important to show the direction of feather growth. This can be done schematically, using short and smooth strokes.
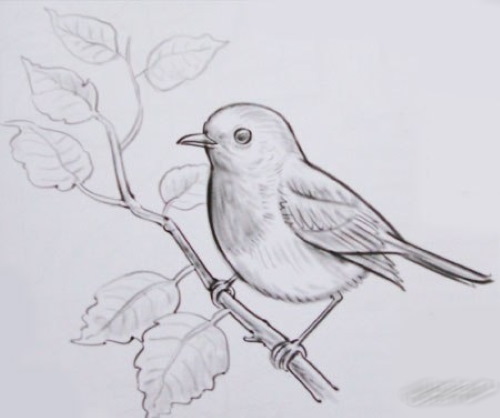
How to draw a bird on a branch:
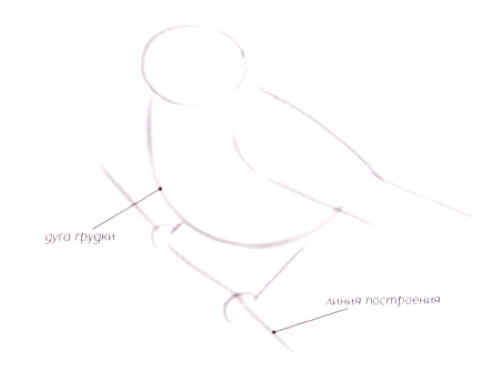
- Using a hard pencil, draw a round head.
- Draw a larger oval at the bottom.
- Connect both figures with 2 smooth lines.
- Add a tail and wing to the bird.
- Erase the boundaries between head and body.
- Draw a round eye with a pupil.
- Add a beak.
- Draw the bird's paws.
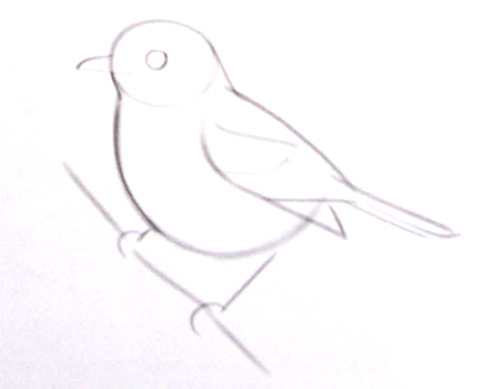
- Draw a branch with leaves under the bird.
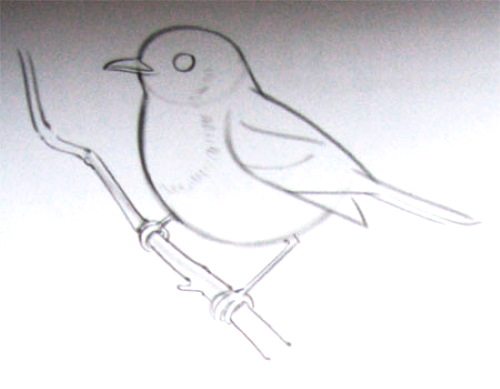
- Using a hard-soft pencil, outline large groups of feathers on the wing and tail.
- On the lower part of the body, depict protruding feathers using short strokes.
- Draw veins on the leaves and indicate shadows.
- Draw the feathers on the head and chest with smooth, short strokes. Blend the strokes.
- Shade the feathers and tail.
- Use a soft pencil to color the right side of the branch.
Outline the drawing, excluding the leaves, and highlight small details.
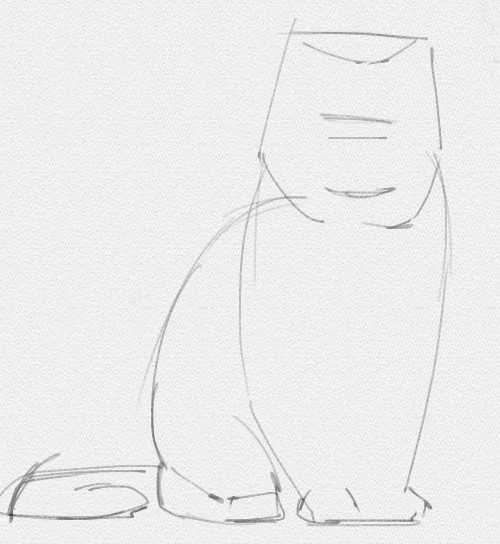
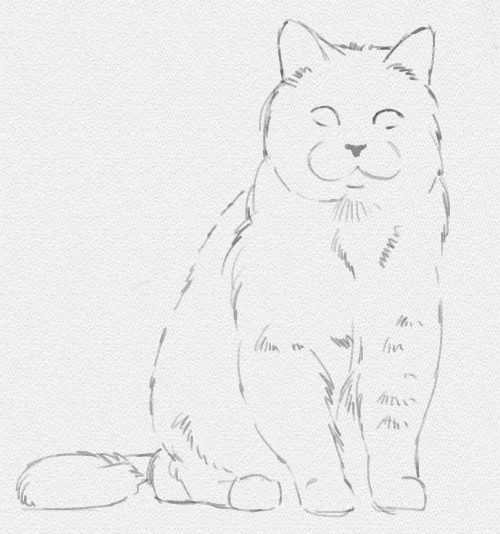
Cat
When drawing animals, you need to take into account the proportions of their bodies; in addition, it is important for beginning artists to learn how to depict fur by making strokes in a certain direction.
How to draw a sitting cat:
- Place a sheet of A4 paper vertically on the table.
- At the top, on the right side of the sheet, draw a round head using a hard pencil.
- Draw an egg-shaped figure at the bottom, placing it at an angle. The top of this figure should slightly go beyond the outline of the circle.
- Use 2 narrow ovals to indicate the position of the paws.
- Draw 2 small ovals at the bottom. These will be the animal's feet.
- Draw the tail.
- Connect the body and head with smooth lines.
- Give the paws a shape. They should be slightly tapered at the bottom.
- Draw the toes on the back and front paws.
- Erase the auxiliary lines.
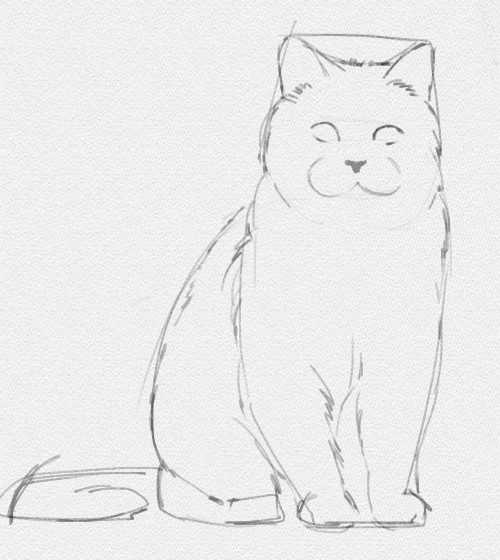
- Draw ears on the cat's head. Mark their inner parts.
- Divide the head into 3 parts with horizontal lines.
- Draw the cat's eyes in the form of 2 large circles. The auxiliary line should pass through the middle of each eye. Draw the shape of the eyelids on top.
- Draw a nose.
- Draw the shape of the mouth.
- Highlight chubby cheeks.
- Draw protruding whiskers and a pair of long hairs above the eyes.
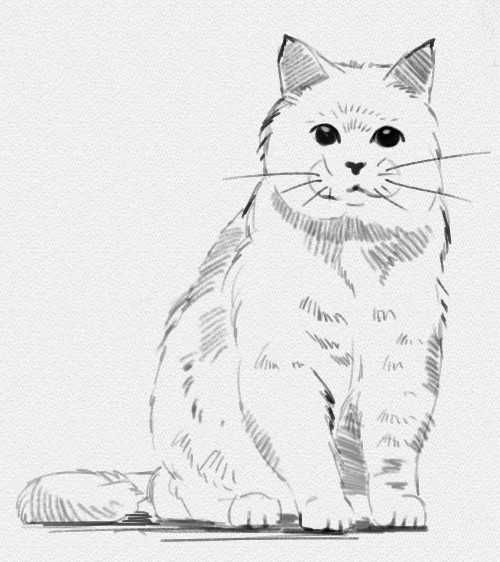
- Using a hard-soft pencil, shade the inner parts of the ears.
- Using smooth and short strokes, show the hairs sticking out along the contour of the head and body.
- Draw fur sticking up above the bridge of the nose and eyes.
- Use long strokes to mark the border of the neck and chest.
- Use short strokes to depict the fur on the limbs and darken the area of the bends.
- Use sparse lines to show the fur on the lower part of the tail.
- Draw the fur on the back.
- Show the shadow between the paws with denser shading.
- Using a soft pencil, outline the cat's eyes and color them in, leaving small round highlights.
- Draw the shape of the nose, darken the center of the mouth.
- Outline the mustache.
- Draw protruding hairs along the contours of the body, head and tail.
Draw a shadow under the cat using long horizontal strokes.
Funny monsters
Ideas for pencil sketching, with the image of cute monsters, can be called the easiest to perform, for beginner artists. When creating such drawings, there is no need to take into account the anatomical proportions and draw auxiliary lines.
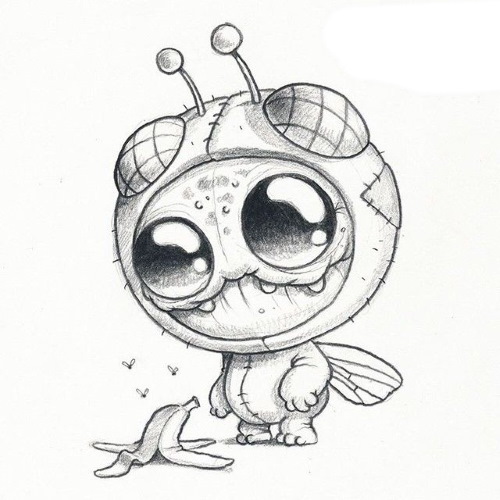
The shapes of the bodies and faces of such creatures can be anything. Everything depends on the imagination of the artist. To make the picture beautiful, you just need to think through the composition and then apply the shadows correctly.
How to draw 2 funny monsters:
- Draw the shape of the body of a large monster. Finish drawing his tail.
- Add arms and legs.
- Draw a large eye with a pupil. Draw 1 large, oval highlight and 1 small, round one.
- Draw protruding fur or combs on the monster's back.
- Finish drawing the mouth.
- Erase extra lines.
- Draw a semicircular body of a small monster nearby.
- Add paws, ears and tail. Shape the muzzle.
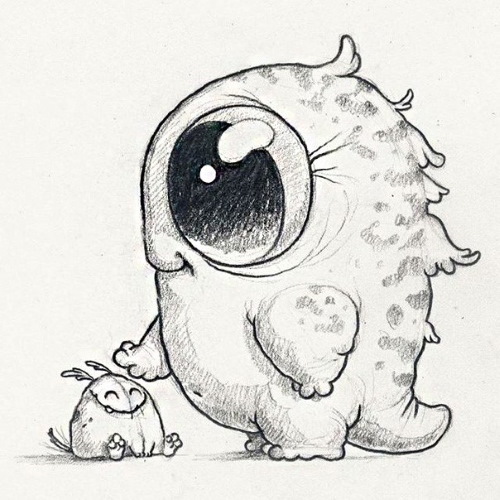
- Using a hard-soft pencil, draw chaotic spots on the back and arm of the large monster.
- Mark the shadow on both creatures on the left side. The large monster needs to have the lower part of the tail shaded, as well as the left side of the arm.
- Using a hard pencil, shade the white of the eye of the large monster.
- Use a soft pencil to color the pupil.
- Draw thin folds of skin around the eye, in the armpit area and on the bend of the tail.
- Trace the outline of the picture and draw all the small details.
Show shadow under monsters with horizontal strokes.
Tips for Beginning Artists
To make a beautiful drawing with a simple pencil, you need to follow some rules:
- You can place a clean sheet of paper under your working hand to avoid accidentally rubbing the graphite.
- The shading of the strokes is done not across, but along.
- When drawing sketches and auxiliary lines, you must not press hard on the pencil, because it will be difficult to erase these lines with an eraser.
- Dense shading should be done by tilting the pencil. This will make the strokes wider and the coloring process faster.
- The sketch should be drawn not with a straight line, but with short strokes. Forms drawn this way will look natural.
Beginner artists can use photographs of more experienced artists for copying. Such images clearly show the direction of strokes, as well as light and dark areas.
The advantage of this method of learning to draw is that the beginning artist will have to create sketches on their own, as well as determine which pencils to use for shading. In the future, these skills will help to implement their own ideas.
Video about drawing
Ideas for pencil sketching: