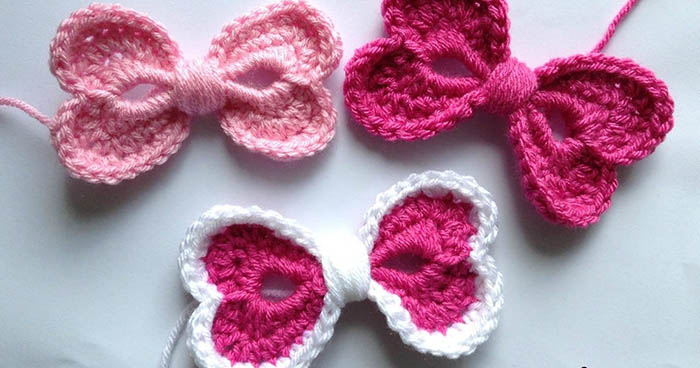
Neatly tied a bow can decorate any accessory and clothingRegarding the parameters and shape, this decorative element can be combined with various wardrobe styles.
A bow made with a crochet hook is especially popular because it does not take much time and has simple patterns with descriptions. It is also acceptable to hang the decorative item on a dress, hat, or use it to decorate knitted or plush toys.
Materials and tools
Crocheting a bow or any other item requires the preparation of materials and tools.
The main ones are:
- knitting tool;
- needle;
- measuring tape with ruler;
- scissors with a sharp blade;
- yarn.
When creating amigurumi, knitters often use several types of material:
| View | Yarn |
| Combined | A mixture of bamboo and acrylic or a combination of cotton and acrylic. |
| Natural | The threads can be made from bamboo or wool. |
| Synthetic | The material can be made from microfiber or acrylic. |
| Fantasy | It is a synthetic material that has a textured effect. In this case, the yarn can be tweed, plush. |
Depending on the type of material from which the hook was made, there are several types of the tool:
- Aluminum. It is convenient and easy to use, especially when knitting for a long time. However, this type of hook can stain your hands and light fabric. When using hard yarn, it is permissible to bend the tool.
- Wooden. It is considered environmentally friendly, light and beautiful. However, the tool will become electrified and covered with burrs, which will then catch the yarn, interfering with normal work.
- Combined. It is convenient to use in work, because the handle can be made of bamboo, plastic or wood, and the rod is made of steel. When choosing a tool, it is recommended to pay attention to the rod and the handle mount. The rod should sit firmly in the handle, without moving from side to side.
- Bone. It is the best option for working with natural wool. However, this device is fragile and expensive.
- Plastic. It is considered a convenient, lightweight and budget type that does not injure the fingers. However, the hook contributes to the electrification of the thread material. In such a situation, it is recommended to treat the tool with an antistatic agent to eliminate the drawback. Often, the device is used to create products from thick threads in the form of worsted material. In this case, the tool should not be very flexible, while the thickness should vary from 2.5 to 19 mm, and the length - about 15 cm.
- Steel. It has the smallest size than other types of hook. Suitable for working with thin and sewing threads. The length of the tool can reach about 12.5 cm, the thickness can vary from 0.75 to 3.5 mm. This type of tool is high-quality, so it is characterized by a long service life. However, the cost of the hook will be high.
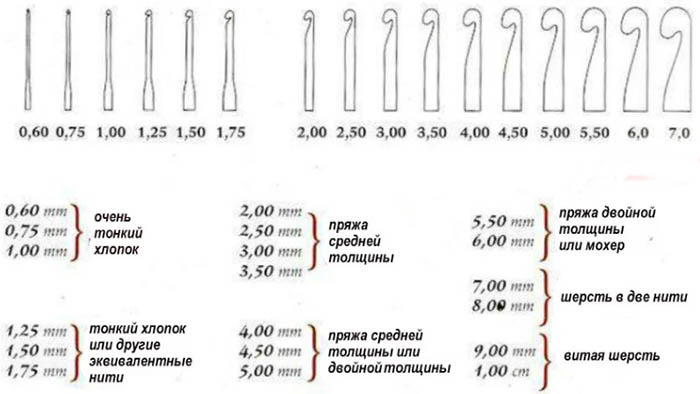
When choosing a knitting tool, it is necessary to take into account the thickness of the thread material that is used for work. Often, each needlewoman should have at least 3-4 hooks of different sizes in her set.
When creating amigurumi, a narrow tool No. 2.5 is widely used., thanks to which it is possible to design the most dense fabric so that the decoration does not show through.
If the bow is to be small, the hook should also be small and have a metal tip. When choosing a tool, you need to consider that the device should be almost 2 times thinner than the yarn.
Often, the label of the thread material indicates what size of knitting tool to take. However, it is necessary to remember that the product must be dense. If you do not have experience, it is recommended to consult with the seller.
Before you start knitting, you need to immediately determine the size and shape of the bow. At the same time, this decorative ornament has several models suitable for bags, things and toys. When changing the thickness of the thread material and tool, it is permissible to experiment with textures and parameters.
When deciding to crochet a product, you need to read the patterns correctly. Beginner knitters may not decipher the meaning of different signs, which will lead to making mistakes and refusing to continue working.
When studying the symbols, you should first familiarize yourself with the basic types of loops:
- the letter "T" means a half-column with a throw;
- if an arch is depicted, the loop should be a connecting one;
- if a vertical line is drawn, it means there should be a column without a throw;
- if the line is crossed out, it means that there should be a column with one yarn over (the number of crosses will correspond to the number of yarn overs);
- the ring corresponds to the air loop;
- The half-column in the diagram is indicated by a plus.
These symbols are considered common types of loops, on the basis of which many patterns are built. To design a bow, it is enough for beginners to know these signs. In this case, it is advisable to choose a pattern that goes with the diagram, so as not to make mistakes when creating more complex ornaments.
In the center of a knitted bow, it is acceptable to place sequins, rhinestones, a crystal, a large bead. If the decorative item is light, a delicate pearl detail will do. A knitted decoration tied in the middle and along the edges with a different shade looks original.

In this case, the material should contrast with the main shade. It is acceptable to decorate the bow with beads, which can be used to create a small scattering or used to trim the edges of the fabric.
If the bow is made with an openwork pattern, additional decorative elements should not be used, because it is permissible to overdo it. To make the decoration more voluminous, it is permissible to place a small crocheted flower in the middle of the product. If the decorative item is large, the flower can consist of several layers.
Small bow for amigurumi
It is possible to crochet a small bow from any type of yarn. The main thing is to choose the right knitting tool for the selected thread material. The decoration can become a decorative item for dolls and amigurumi.
To create the product, you need to knit in turning rows.
Step-by-step description of the work:
- In the 1st row, initially knit 3 air loops. After from the knitting tool from the 2nd loop, make 2 columns without a yarn over, an air loop and a turn. In total, you should get 2 loops.
- In the 2nd row there should be 2 increases with a chain stitch and a turn. There should be 4 loops.
- In the 3rd row, make 4 columns without yarn over, a chain stitch with a turn. There should be 4 loops.
- Row 4 consists of an increase, 2 single crochets, an increase, a chain stitch and a turn. There should be 6 stitches.
- From rows 5 to 9, knit 6 single crochet stitches, a chain stitch and a turn. There should be 6 stitches.
- In the 10th row, make a decrease, after 2 columns without yarn over, decrease again and chain stitch with a turn. You should get 4 loops.
- Row 11 consists of 4 single crochets, a chain stitch and a turn. There should be 4 stitches.
- In row 12, make 2 decreases, a chain stitch and a turn. The result should be 2 loops.
- In row 13, knit 2 single crochets with a chain stitch and a turn. You should get 2 loops.
- In row 14, make 2 increases, then knit a chain stitch and perform a turn. There should be 4 loops.
- Row 15 consists of 4 single crochets, a chain stitch and a turn. There should be 4 stitches.
- In row 16, make an increase, then knit 2 columns without a yarn over and make an increase again. Then make an air loop and make a turn. There should be 6 loops in total.
- From rows 17 to 21, make 6 single crochet stitches, a chain stitch with a turn. There should be 6 stitches.
- In row 22, make a decrease, after 2 columns without yarn over, a decrease and a chain stitch with a turn. There should be 4 loops.
- Row 23 consists of 4 single crochets and a chain stitch. Make a turn. There should be 4 stitches.
- In row 24, make 2 decreases, then a chain stitch and a turn. There should be 2 loops.
- Row 25 consists of 2 columns without yarn over.
- Cut the thread material longer. Connect the 1st and 25th rows with a needle. Wind the decorative item in the center with thread, fix it with a knot and hide the ends.
- To create the tails of the bow, knit 9 air loops. After from the knitting tool, starting from the 2nd loop, make a connecting column, 6 columns without a yarn over and again a connecting column.
- Then knit 9 air loops again. Starting from the 2nd loop, create a connecting column, after 6 columns without a yarn over and a connecting column. If desired, knit an additional connecting column in 1 loop.
- Using threads, attach the tails to the base of the bow.
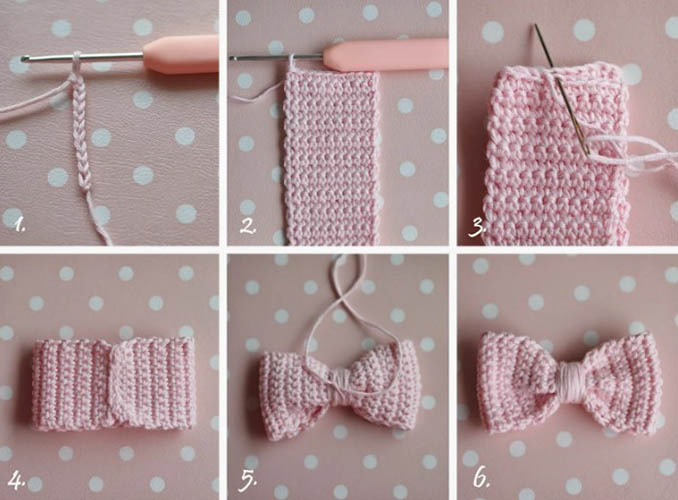
Volumetric bow
You can crochet a bow from pure cotton to create a beautiful decorative item. Thick thread material made of acrylic or wool is not suitable, because the decoration will have an unsightly appearance. The pattern will be columns without a throw.
Despite the fact that the size will not be very large, the bow turns out voluminous. At the same time, you do not need to spend a lot of threads for work. For knitting, it is permissible to use the remains of old material.
A voluminous bow is suitable for decorating children's things, a phone case, a tablet, and also a woman's bag. It is permissible to decorate the decorative item with 1 or 2 shades, one of which will be the main one, the other is required for tying. In this case, the colors should be in harmony with each other.
Step-by-step description of the work:
- Cast on 45 chain stitches.
- Using the main shade, knit 9 rows. Relative to the desired width that the bow should have, it is permissible to make more or less rows.
- To tie the edge, make 1 column in each loop, 3 columns in the corners. Do not cut the thread material.
- Join the shortened edges of the rectangular product together and knit with half columns. If all actions were performed correctly, a circle should be formed from the knitted product.
- In a similar way, make a small jumper to secure the bow in the middle and hide the main seam.
- Wrap the narrow element around the wide object and close the jumper into a circle. The result should be a bow.
If desired, the decoration can be supplemented with tails. For this purpose, you need to knit a small strip in width, which needs to be bent in the middle so that the ends look in different directions. After this detail needs to be attached to the main decoration on the back side using a hook.
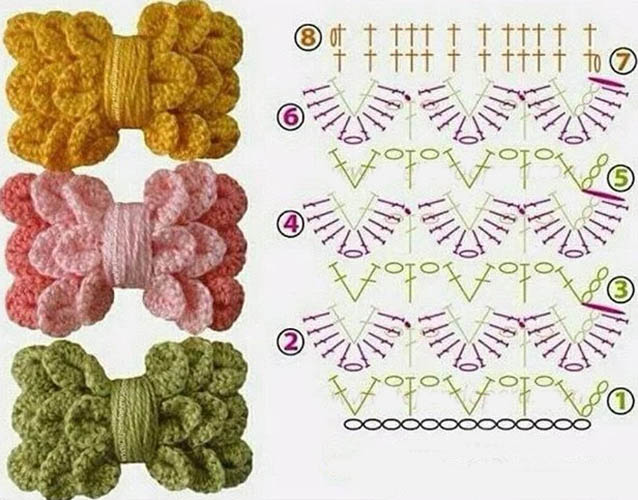
Butterfly
You can crochet a bow in the shape of an elegant butterfly. The decoration made of lush columns is in special demand. For these purposes, you need to prepare a thread material of any color and texture. The size of the knitting tool should correspond to the thickness of the yarn.
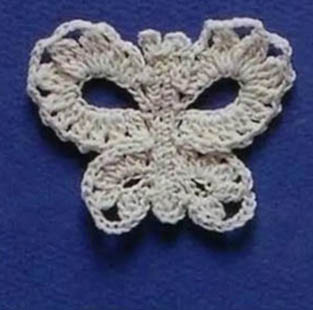
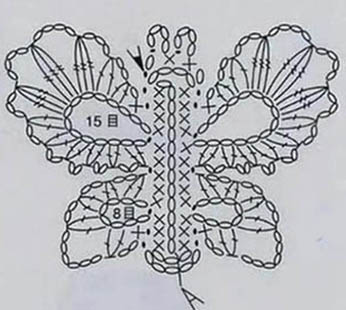
Step-by-step knitting instructions:
- Make a circle from the thread material, then knit 3 air loops.
- Cast on 2 stitches in a circle with a throw.
- Make 2 air loops and secure with a connecting post. As a result, one half of the bow should be formed.
- Perform similar actions to design the second part of the decorative item.
- Pull the connecting circle together, then you can move on to the 2nd row.
- In the first chain of air loops, knit 3 single crochets and 3 lifting loops.
- After that, make lush columns. For these purposes, knit 3 half-columns with a throw in the first arch and join them with one top. To create the second and third arches, perform similar manipulations.
- In the outermost arch, knit 3 columns without yarn overs.
- To create the second half, perform similar manipulations.
- Along the contour, make a binding of the decoration. To do this, in the first arch, create 3 columns without a yarn over. In the upper loops, which are located above the lush columns, knit 2 columns without a yarn over. In the outer arch, make 3 columns without a yarn over.
- After tightening, cut the yarn so that a 30 cm long piece remains. Wrap the remaining thread around the center of the bow.
- From the wrong side, secure the edges with a tight knot and cut off.
Bow with contrasting border
You can crochet a bow with a contrasting edging to get a bright flat decoration that can be combined with any knitted items.
To work you need to prepare:
- knitting tool of appropriate size;
- a needle for joining knitted elements;
- scissors;
- leftover thread material in 2 different shades that should contrast with each other (for example, it is acceptable to use purple and light green colors).
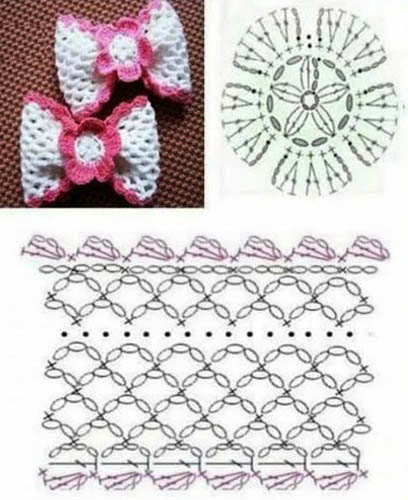
Step-by-step description of the knitting pattern:
- The chain of 16 air loops should be decorated with a light green shade. Starting from the 2nd loop, make 15 columns without yarn over.
- After that, make 1 lifting loop and turn the fabric. Knit an additional 15 columns without yarn over. Make another 8 rows in a similar way.
- Cut off the light green yarn and hide the end. Attach the purple thread material and make a tie-off with columns without throwing. As a result, a green rectangular canvas with a lilac edging should be formed.
- To make the jumper, use purple yarn to cast on 5 chain stitches and knit in single crochet stitches similar to the main piece.
- After row 8, finish knitting. On each side (at the beginning and end of knitting) keep small tails.
- Tie the middle of the decoration with a thread material to easily secure the bridge.
- Wrap the center of the product with a jumper and secure the saved tails on the back side of the decoration.
In the shape of a figure eight
A knitted bow can be made in the form of a figure eight of two colors. To do this, you need to prepare a knitting tool, as well as thread material in red and yellow shades.
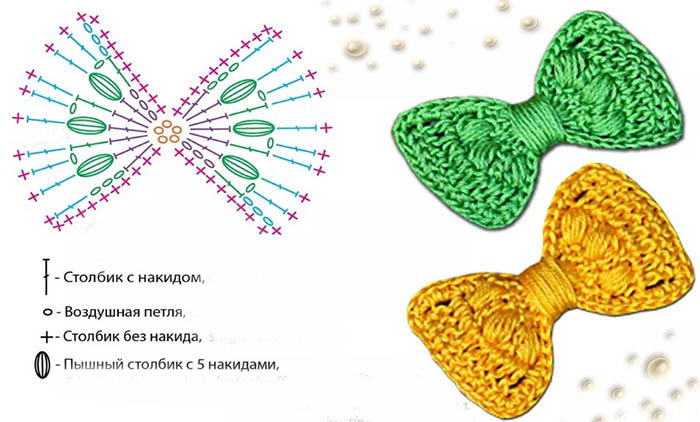
Step by step description:
- To make the base, first knit 8 loops. Close the resulting elements into a ring. The result should be half of the future decoration blank.
- To make the second half, make 8 air loops and close them into a circle. The result should be a product resembling the number 8.
- To tie the base, initially make 4 simple columns in the left circle. Then knit 8 half columns.
- To complete the left ring, knit 4 simple columns.
- To tie the second half of the accessory, make 4 simple columns. Then knit 8 half columns in a circle, finishing the tying with simple columns in the amount of 4 pieces. As a result, you should get the first row of the decoration.
- To create 2 rows over single crochets, knit 4 single crochets in succession.
- In the next 3 loops, knit 2 half-columns in each hole. Then make 2 half-columns in succession.
- To complete the binding, make 3 groups of half columns that have a common base. Additionally, knit 4 simple columns.
- Do the same with the second half of the accessory. Secure the yellow yarn and cut it off.
- Decorate the edges of the decoration with red yarn in the form of simple columns.
- When you have finished working, cut off the thread material, leaving a 30 cm long section. Use this part to rewind the decorative item in the center.
There are many options for decorating shoes, clothes or toys. A universal and popular decorative item is a bow, which can be made from a variety of materials.
At the same time, this element will always look stylish and fashionable. To create a beautiful and unusual decoration, you can use the crochet technique. As a result, such a bow can be used in various ways.
Video about knitting a bow
Master class: cute crochet bow for amigurumi toys: