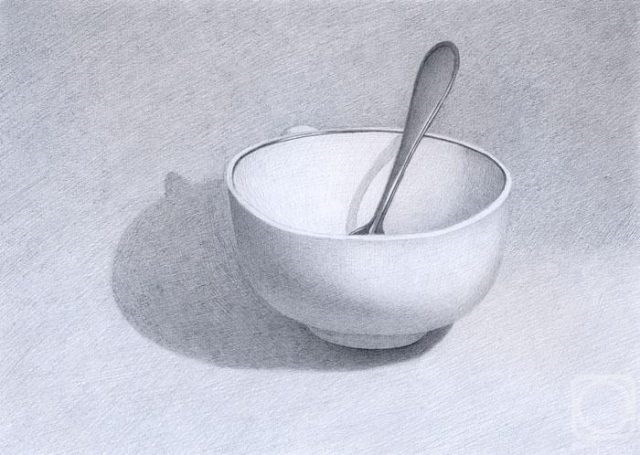
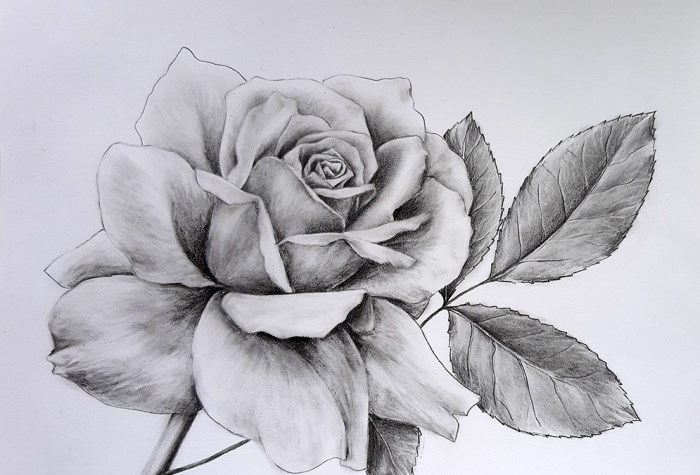
Images on a sheet of paper, made in graphic style, should be created with a simple pencil. Such drawings, which are traditionally considered easy to perform, can rather be called the most universal. They can be done by small children, very beginning artists or professionals creating real masterpieces of art.
Drawing tools
Even a beginner can do a graphic drawing with a pencil for beginners. In order for the drawing to be the most successful, it is necessary to take into account several nuances. The graphic drawing should be similar to the original and cannot look flat. The image will seem successful if you know how to correctly hold the pencil according to the rules, try to correctly perform shading and skillfully apply highlights and shadows.
Because the same drawing may have to be redrawn several times, certain skills are considered the main qualities of a good graphic artist:
- patience;
- zeal;
- perseverance.
To start learning how to draw graphic drawings with a pencil, you will need a few handy tools.
Pencil
Pencils currently have several different categories. They differ in softness, which is designated by the abbreviations "H" and "B", with the addition of numbers indicating the degree of their hardness. The higher the value of the numbers accompanying the designation "H", the harder the pencil writes. When writing and drawing lines using such a pencil, they will look pale.
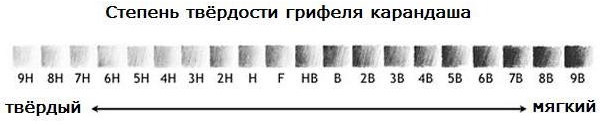
A large number accompanying the letter "B" can indicate the softness of the lead and the contrast of the saturation of the black color. For a sketch in drawing, this is the hard pencil most often used. For a drawing or a three-dimensional image, a pencil with the abbreviation "HB" is more likely to be needed. For sketches and for applying hatching to canvas, pencils 4B, 6B and 8B are preferable.
Paper
An image or graphic drawing made with a pencil is best applied to thick and smooth paper with parameters from 90 to 110 g/m2. In this case, it is easier to correct mistakes and draw small parts. The store sells specialized sheets of paper intended for graphic drawings and for drawings. If there is good quality office paper at hand, then a beginning graphic artist can use it.
Eraser
When choosing an eraser to use when drawing, it is worth giving preference to neutral-colored erasers. Colored erasers often have strong dyes and stains may remain when working with them. It is better to use a soft eraser, since hard ones are recommended for use with the hardest ones in the category or with colored pencils.
Cutter or stationery knife
When drawing with a simple pencil, you often have to sharpen its tip. It is difficult to achieve the correct shape of the tip with a regular sharpener, since when applying a graphic drawing, in addition to classic sharpening, a "spatula"-shaped rod is often used. With such sharpening, it is easier to draw lines of a certain thickness, which are useful for creating the desired color or complex uneven shading.
Drawing methods and techniques
A graphic pencil drawing for beginners can turn out more beautiful if you know how to correctly position the image relative to the size of the paper.
When drawing, the hand may cover the drawing, as a result of which only some of its fragments will be visible. For a good result, the drawing must be visible in its entirety. With a normal grip of the pencil, due to bent fingers, hatching is possible only with short lines. Also, difficulties may arise due to the fact that the hand constantly rubs against the sheet of paper and can smear the image.
Therefore, when applying a graphic sketch, it is better to use a method called "Tripod", in which you need to hold the writing tool near its middle part. If you tear the brush off the sheet, then the possibility of applying a full-fledged image at once will increase.
This will be possible due to the work of the hand as a whole (starting with the forearm and ending with the hand), which will allow you to draw a straight line of the desired length. This way of holding the pencil allows you to apply a graphic image without smudging the drawing.
If the drawing is done on an easel, the pencil holding method called "Overhand" should be used. In this case, it is fixed between the thumbs on one side and the other fingers on the other side. Depending on the shape of the sketch, the position of the fingers can change. The result of using this method is increased pressure during the stroke.
There are several techniques for applying graphic images:
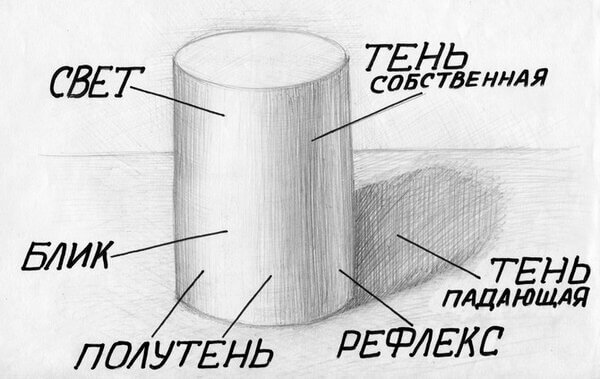
| Hatching | The use of strokes of different shapes and lengths, with the help of which the sketch is given volume and texture. Hatching can be: wavy, parallel, zigzag, chaotic and cross. |
| Shading | The peculiarity of hatching. During application, the pencil does not rise from the working surface and the stripes are applied tightly to each other. This method is used on small parts of the sketch in order to obtain an even tone. |
| Shading | Using the smearing method after frequent shading. With this method, the drawing is given the effect of photography. The image is composed without visible fragments, from which the sketch is composed. With this method, the texture and realism of the image are lost. |
| Engraving | The method is used to draw texture, it is used to depict the effect of hair and to imitate a rough surface. |
| Lightening with an eraser | This method is used to lighten a drawing or to depict a highlight on a sketch. An eraser in the form of a small ball, with the help of a light touch to the paper, makes part of the drawing a little lighter than its main part. |
Master classes
A graphic pencil drawing for beginners can be applied in a linear or volumetric way. Initially, for inexperienced artists, the drawing should consist of the minimum possible number of objects. These can be mathematical figures, living creatures or complex landscapes.
Volumetric square
- To depict a three-dimensional square, draw a horizon strip diagonally. In the lower zone of the sheet, the point with the edge should be in the middle along the left side of the sheet of paper, the top should be located at a distance of 5 to 7 cm from the right side of the upper part of the corner. The horizon line near the right edge does not need to be extended to the very border of the worksheet.
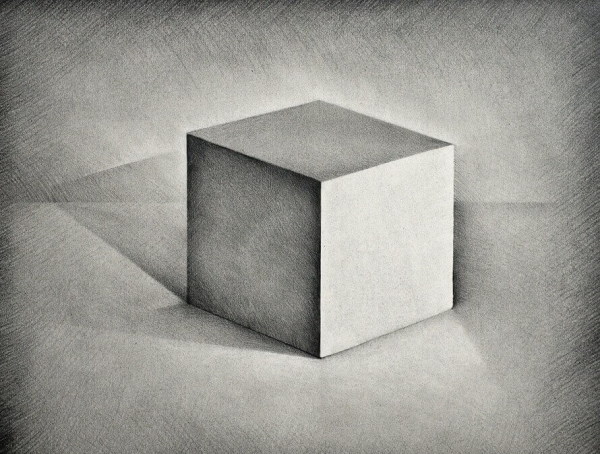
- The top of the working surface is shaded in a single color, without the use of shadows or gradients.
- At a distance of 5 cm from the horizon line, a square is drawn down so that its sides are vertical and the top and bottom are parallel to each other. They should connect the outermost strip of the horizon on the right side of the sheet.
- From the upper corners of the square, diagonals are drawn towards the upper right corner of the paper sheet. The lines are connected parallel to the upper border of the drawn figure.
- A straight parallel line is drawn from the lower right corner, where the extreme point is in the upper right corner. When connecting the edges, a three-dimensional square should be obtained.
- Color the figure and indicate the direction of light falling on the drawn object.
- Draw a falling shadow on the right side of the finished object.
Volumetric cylinder
A graphic pencil drawing for beginners in a cylindrical form can be done by applying contour lines.
- At the very beginning, draw auxiliary lines; for this purpose, draw a vertical line in the middle of the sheet.
- Draw segments at the edges, leaving 4 cm.
- At a distance of 3 cm from the intersection of the lines on the right and left sides, draw vertical lines that will be parallel to the main line.
- Rounded images are applied to the top and bottom sides, from the places where the auxiliary lines intersect with the edges of the drawn figures.
- Erase the lines that served an additional function.
- From the center of the oval figure located below, from its upper and lower sides, draw diagonals that will be located towards the central part of the right side of the paper sheet, indicating the shadow of the object. The length of the lines should not be more than ½ the length of the cylinder side.
- Connect the dots along the edges with lines in the form of a semicircle, convex towards the top.
Volumetric cup
- Draw a vertical line in the center of the working surface of the paper sheet.
- At a distance of 3 cm from the top point of the line, it is necessary to depict a horizontal strip, which will define the upper part of the sketch, intersecting with the vertical line in the middle. The size of the secondary lines should be the same.
- Measure the distance from the top of the vertical strip to its intersection with the horizontal.
- At the end point below the vertical, draw a horizontal line equal to the length of ½ of the top strip. The intersection point should be located in the middle of the horizontal line.
- Starting from the extreme points of the line, draw an oval.
- From the side points of the oval located on top, draw 2 curved lines towards the bottom. The ends should be located on the edges of the lower figure.
- Stepping back 1 cm from the bottom of the smaller oval, draw a semicircle that will be equal to the side of the closest figure.
- On the right side of the mug, draw a slightly curved semicircle, which will act as the handle of the mug.
- At a distance of 1 cm from the resulting semicircle, draw a semicircle that will repeat the curves of the existing one and act as a shadow.
- Apply shading to the inner part of the figure in accordance with the angle of incidence of light on it.
Volumetric jug
For beginning artists, correctly selected tools will help to draw a three-dimensional graphic drawing with a pencil.
- In the very center of the sheet, draw a vertical line; this will be the middle of the jug.
- On both sides of the vertical line, at the same distance, draw 2 curved lines of the same length.
- Connect the top points on the right and left sides with a semicircle curved downwards.
- Step back from the bottom oval at a distance of 1 cm and connect the semicircle with the bottom side of the jug.
- On the right side of the bottom edge, draw a shadow using hatching.
- Mark the angle of incidence of light at the top of the drawing.
Volumetric flower
- To draw a three-dimensional flower, draw a semicircle with a deep bend towards the bottom, placing it diagonally.
- A small semicircle is drawn under the lower edge of the strip, resembling the main outline of the drawing in its shape.
- A semicircle is drawn again, resembling the image of a future plant bud.
- A triangle is drawn from the central part of the larger inner semicircle. Its side edges are curved lines located in opposite directions.
- From the upper corner of this triangle, a vertical line is drawn towards the bottom of the drawing, which does not reach the lower point of the plane boundary.
- At a small distance from the top edge on the left side, draw a triangle without a base upwards. The right point of the triangle should be located 1 cm from the central part of the drawing in relation to the right extreme point in the semicircle.
- Draw a second triangle without a base, connecting it to the main figure.
- Connect the space between the corners at the top with a curved line.
- Details should be added to the drawn object, which will be depicted by additional curves, so that in the end you get a three-dimensional flower bud.
- To complete the sketch, draw a vertical line from the center of the semicircle downwards, depicting the stem of the plant.
- If desired, the image can be supplemented with thorns or leaves.
Volumetric orchid
- The curved stem of the future orchid is drawn from the center of the lower border of the paper sheet.
- From the lower part of the plant stem, draw 3 leaves elongated in an upward direction.
- The contours of these leaves are drawn and shadows are applied, which depend on the angle of incidence of the light.
- Step back 5 cm so that the center of the bud is located on the stem.
- As drawing details, use 5 triangles, of which 2 middle and 2 lower ones are identical, have no base and are connected to each other.
- In the same way, 2 more buds are drawn on top of the first one. Each subsequent bud should be smaller in size than the previous one.
- From the very edge of the curved stem, 5 small ovals are drawn, this is how unopened buds will look, which are randomly scattered on each side of the flower.
Volumetric hare
- In the middle of the paper sheet, draw 2 ovals of different sizes. They should be diagonally opposite each other, the top oval should be much smaller than the one below.
- Between the ovals, draw a small vertical line on which the hare’s mouth and nose will be located.
- From the border of the line to the right side, draw a semicircle with a downward bend, about 9 cm long.
- From the top point of the vertical line, draw a semicircle to the left, which will look like a curved line reminiscent of the shape of a head.
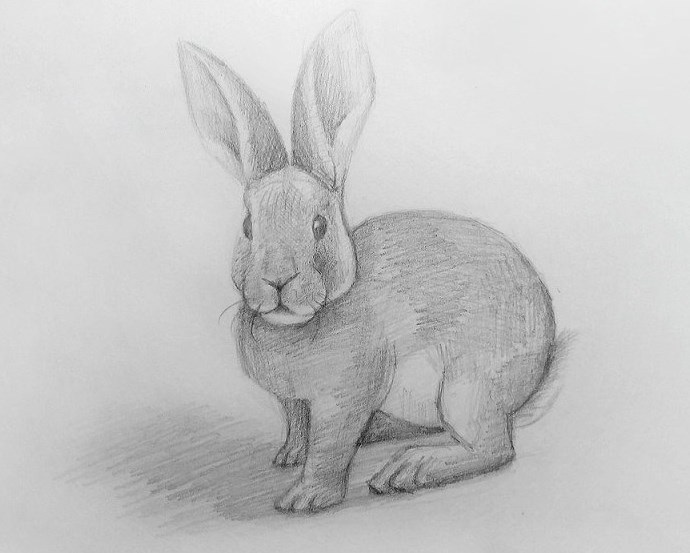
- The continuation of the semicircle should be the animal's ears pointing upwards.
- One of the hare's ears should be wider and higher than the other, depending on the distance of the image.
- Draw an eye inside the head.
- The final touch will be to add the pupil, whiskers and shading of the body to the image.
Volumetric kitten
- First, draw 2 triangles, 8 cm up from the middle of the sheet.
- Both figures should be connected by a horizontal line, the edges of which should be joined by a semicircle (which will later become the animal’s muzzle), drawing it at the bottom of the line.
- From the extreme points on the sides of the oval (the future muzzle) draw a semicircle to the bottom.
- From the right border of the drawn semicircle, step back 2 cm and draw a smooth curved line, which will later serve as the animal’s body.
- Draw the front and back legs of the animal using straight and curved lines.
- From the semicircle depicting the animal's body, draw the tail, making it slightly pointed.
Human face
- To depict a person's face, first draw auxiliary lines in the middle of a sheet of paper, which should be perpendicular to each other.
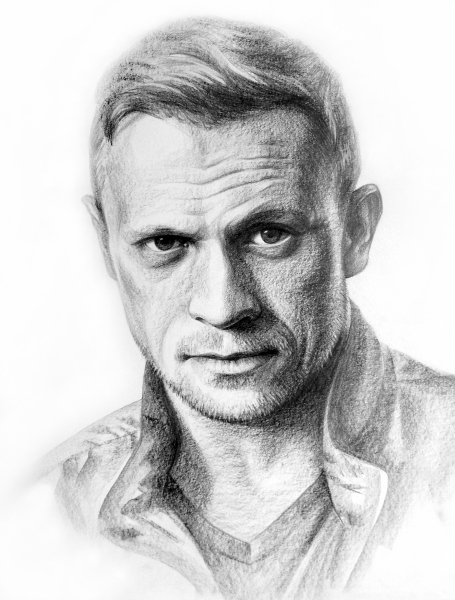
- From the lower side of the marked line, mark the level of the future eyes. From the auxiliary straight line passing near the eyes, draw 2 vertical lines, which will serve as a guide for the location of the nostrils.
- Draw an oval under the nostrils, which will later serve as the mouth.
- Draw eyebrows above the marked eye ovals, which should be located at the same level and close to the auxiliary horizontal line.
- If desired, you can add more detail to the image, draw in pupils, hair, and other characteristic features of a person’s appearance.
Drawings in the style of pencil graphics must be created taking into account the basic rules of this style of fine art. For beginners, the easiest option is to copy ready-made images, using a clear algorithm for creating such drawings.
Author: Olga Zhanskaya
Video about graphic drawings
Let's look at the simplest graphic techniques: