A pencil drawing of the Eiffel Tower will help introduce children to the symbol of France. This landmark in the center of Paris is one of the most visited architectural structures in the world. Every year, over 6 million people visit it.
The 324 m high metal structure was built at the end of the 19th century (1889) and served as the entrance arch to the World Exhibition. Today, there are observation decks and a restaurant.
Not everyone has the opportunity to see the landmark with their own eyes. To give the child a better idea of what the building looks like, you can offer him to draw the structure together or independently. The drawing can be done with a pencil using a more complex technique, drawing small details.
The scheme for depicting the tower is generally the same - they start with the silhouette itself and draw small details.
Using a pencil, create an image of the tower in different styles:
- A simple drawing is a graphic black and white image. Often supplemented with strokes and dots, creating a three-dimensional picture.
- A sketch is a schematic outline of a building that lets the viewer know what the author wanted to convey.
- Colourful image – the outline of the tower image is drawn with a thick pencil to create a thick line. Everything else is coloured with coloured pencils.
- A realistic drawing is an image that conveys the maximum amount of small details of the environment so that the viewer gets the impression that he is seeing the picture live.
- A quick drawing is a black and white image in a free style. The strokes are quick and not always even, conveying the pace and character of the author's work.
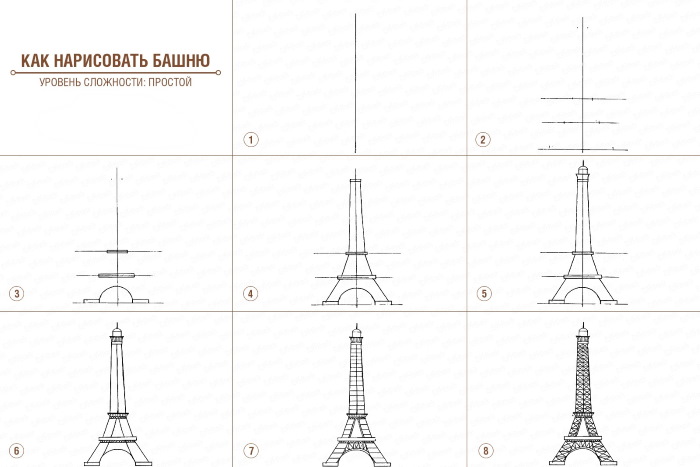
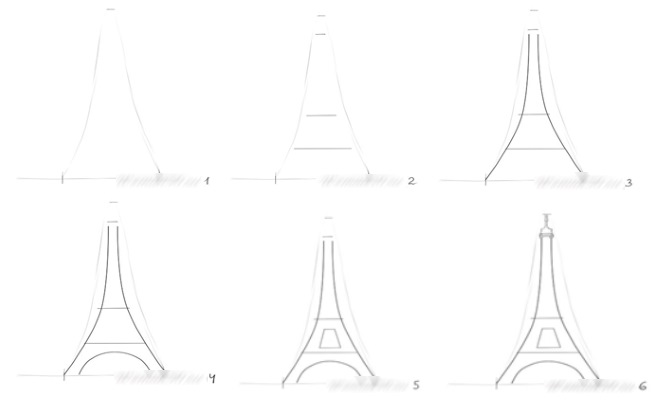
Step by step pencil drawing
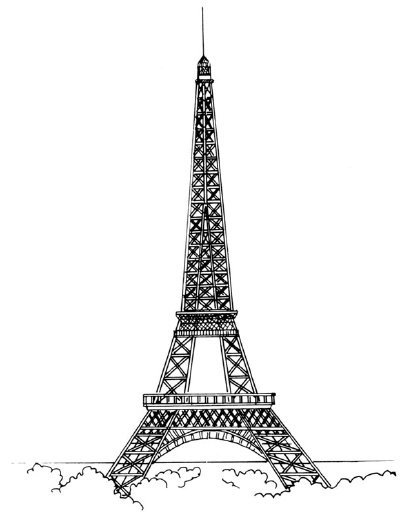
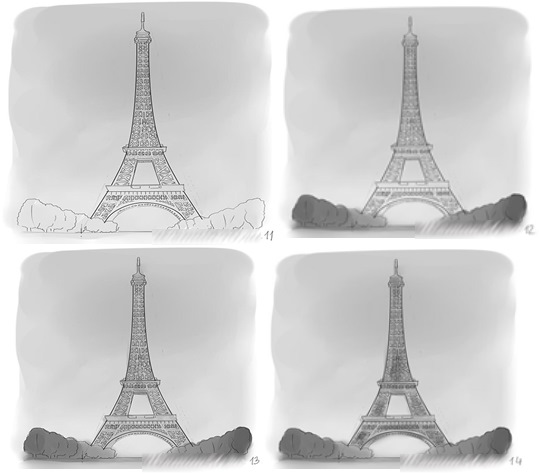
The Eiffel Tower pencil drawing is done in 8 easy steps.
The following tools are used in the process.
| What is needed | For what |
| Sheet of paper | Choose any convenient paper option. If you plan to color the finished drawing with watercolors or other paints, choose thicker paper. |
| Simple pencil | The degree of softness is chosen at your own discretion. |
| Eraser | To correct sketches, to remove unnecessary lines during the final outline of the drawing. |
| Ruler | For drawing straight lines. |
Step by step:
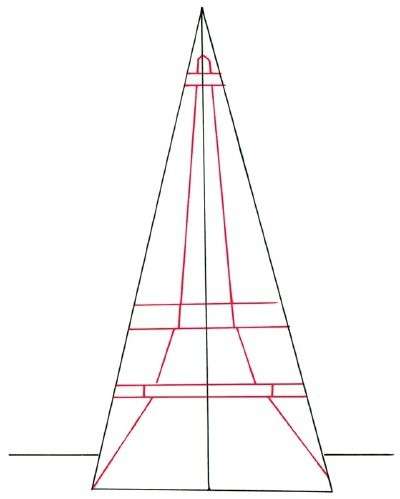
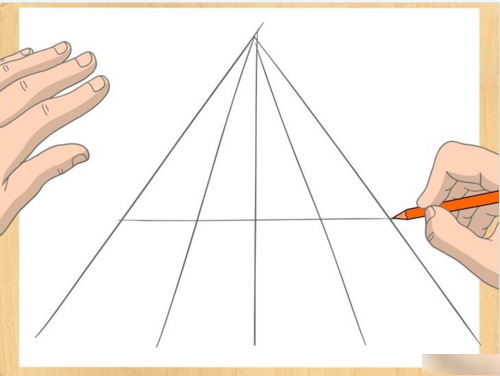
- A horizontal line is drawn with a ruler in the very center of the sheet of paper. It should be long enough, its length is equal to the height of the tower. This part is the basis of the drawing, from which the other lines are drawn.
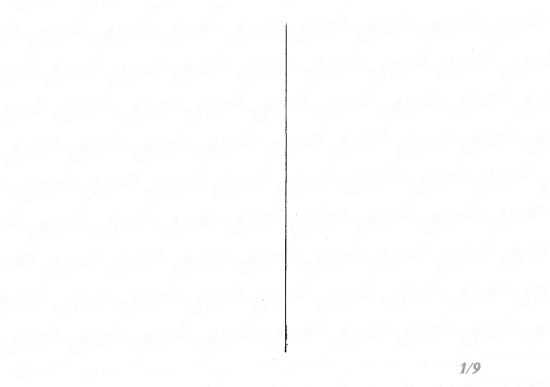
- Visually search for the center of the vertical line and draw 3 horizontal lines at the bottom of it at equal distances from each other. The lowest line intersects the central axis.
- The main elements of the tower silhouette are marked on the horizontal lines. To make the silhouette symmetrical, use a ruler and measure out equal segments on different sides of the central axis.
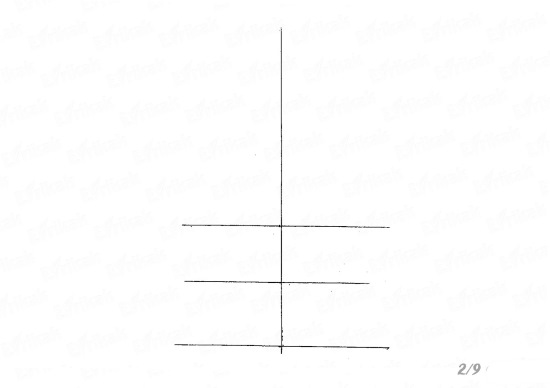
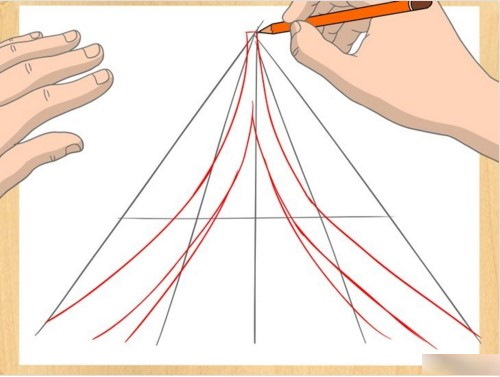
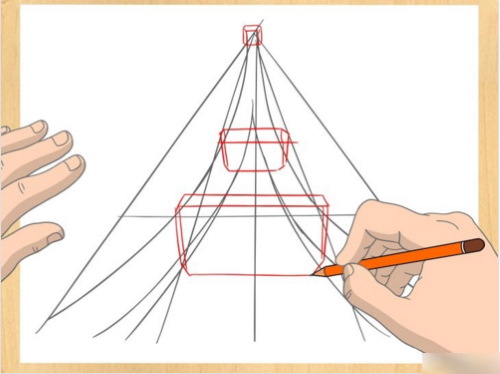
- The base of the tower is drawn with two thin rectangles. There are observation platforms on the 1st and 2nd tiers, so they are also drawn with rectangles in the drawing. The higher the tower, the narrower it becomes, so the upper platform should be smaller in size. The base of the tower is connected with a semicircle to form an arch.

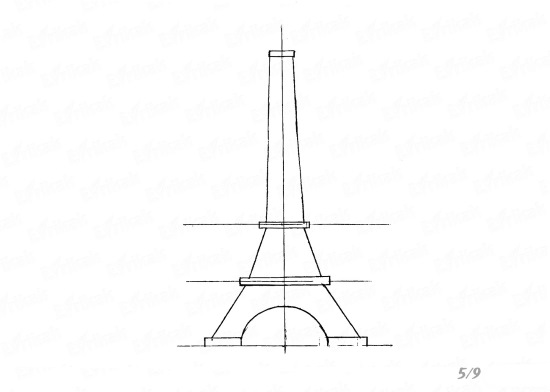

- All elements are connected by curved lines from the outside and inside. The tower narrows upwards and ends with a thin spire that comes out of the 3rd floor. At the top of this floor there is a lighthouse and a small dome, it is schematically drawn as a short rectangle.
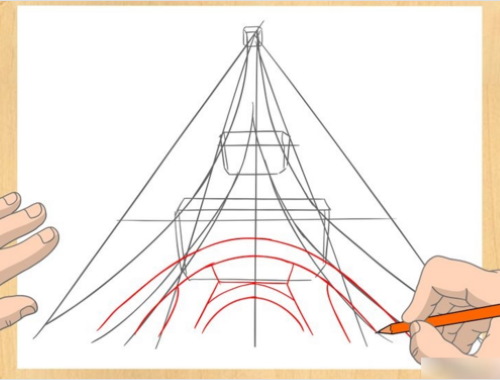
- The 3rd floor and the dome are drawn in more detail. The dome is depicted as semicircular.
- The extra lines of the central axis and horizontal marks are erased. Each floor of the tower is connected by vaults in the form of multiple arches. To depict them, cross-shaped strokes are drawn under each tier and separated by a horizontal line.
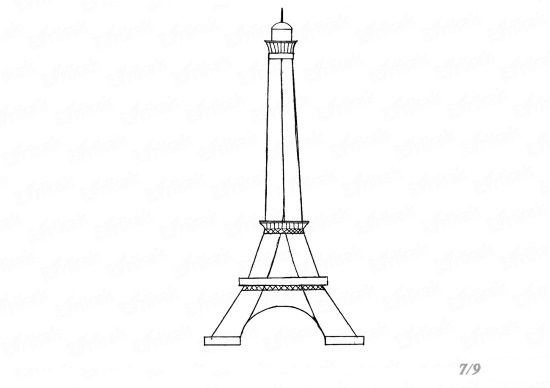
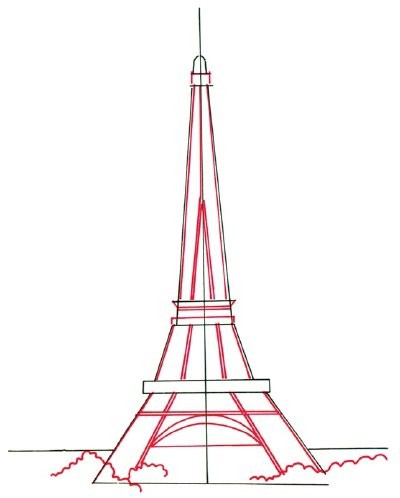
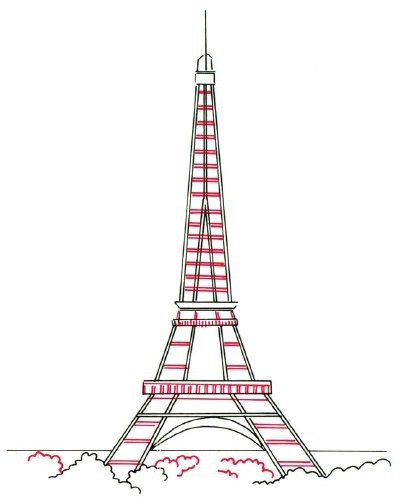
- Draw metal ceilings along the entire height of the tower. There should be 18 of them in total, just like the real tower. Each ceiling is hatched crosswise. On the lower tiers, the hatching can be curved, repeating the curve of the arch.
Step by step drawing for adults and children
The Eiffel Tower (a pencil drawing of one of the world's main attractions can be made by adults and children using a ruler to create symmetry) is completed in several stages.
Step by step:
- They draw a triangle with a sharp point and draw a straight vertical line down from it.
- Three floors are marked on the triangle, paying attention to the fact that the distance between the 1st and 2nd floors is minimal. A large distance is made between the 2nd and 3rd floors, placing the level of the 3rd floor at the very top. Each floor is marked with two horizontal lines. The floors are connected with vertical lines, they narrow towards the top.
- The parallel lines are drawn with an indentation inside once again. The base of the tower is obtained. The auxiliary figure, the triangle, is erased. At the foot, an arch is drawn as an arc, which passes under the 1st floor. A beam is drawn above the arch, and a balcony is depicted in the center as a small rectangle.
Above the third floor, a rounded dome is drawn, from which an antenna emerges. At the foot of the tower, a line of trees and bushes is drawn with frequent wavy lines.
- Along the entire height of the tower, horizontal lines are drawn, depicting crossbars. On the balconies on all floors, frequent vertical lines are drawn, depicting railings on observation platforms. New lines are added to the trees.
- Each cell is filled with cross-shaped strokes. Strokes are added to the arch and trees. All auxiliary lines are erased and the key lines of the tower are outlined with a thick pencil or liner. The image is colored with pencils or paints, or the drawing is kept in black and white.
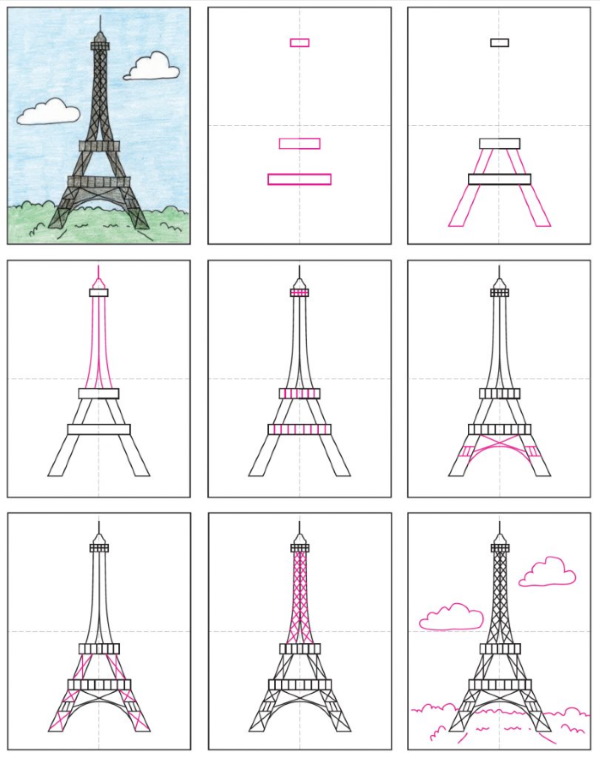
Simple step by step drawing
The Eiffel Tower (a pencil drawing of this landmark in a simple manner can be done together with preschool children or you can show them and explain the stages of the sketch) can be done in color.

To do this, you need to color it with pencils or paints, and also come up with a continuation of the illustration, adding houses, a park, people or other details to the drawing:
- Draw horizontal elongated rectangles at different distances from each other, which correspond to the floors of the tower. At the top of the top floor, draw a spire. The higher the floor, the narrower the floor and the rectangle.
- The floors are connected with each other by straight lines.
- Between the 1st and 2nd floors, the foundations are depicted with straight lines.
- They finish drawing from the 1st floor downwards with expanding lines of the base of the tower.
- These lines are connected by an arch depicted as a semicircle.
- The tower is painted with cross-shaped strokes, except for the crossbars on the floors.
Bottom view
An unusual version of the image of the landmark is a view from below, as tourists see it when approaching the tower.
Step by step:
- Draw the outline of the future tower - 2 triangles with the tip extended upwards. Place one triangle inside the other, draw an axis in the center. Visually find the middle of the axis and draw a horizontal line with a small indent downwards.
- Draw the tower with inwardly curved lines, leading them from the wide corners of the schematic triangle to its top. The lines are made wide with a blunt end at the top – marking the thickness of the tower bases. To add volume to the drawing, draw the narrow sides of the bases inside the triangle.
- Rectangles mark the floors of the tower. The 1st floor is drawn at the level of the intersection of the axes, the 2nd floor with a small indent upwards, the 2nd floor – at the very top. Each subsequent rectangle becomes smaller, relative to the sides of the tower. To add volume to the image, the sides of the floors are drawn with narrow lines.
- The columns are connected by two arcs, depicting an arch. These figures are duplicated with the back columns, but the lines and bend are made smaller, since the columns are further away.
- They draw horizontal overlap lines between floors. All the voids are shaded with cross-shaped lines and side lines are added for volume of the image.
- Erase extra lines, add missing details, and color the drawing.
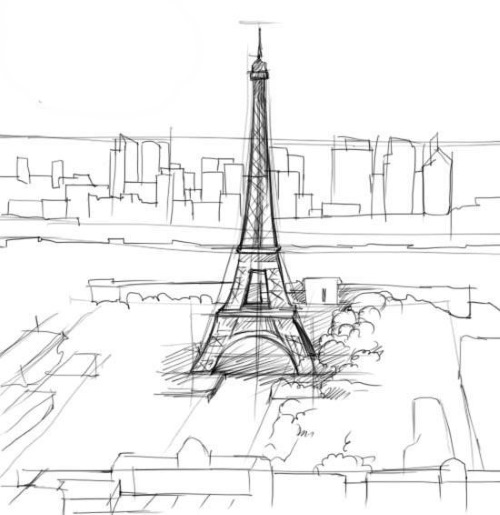
Against the backdrop of the city
The Eiffel Tower (a pencil drawing can be depicted in panoramic view) looks beautiful from a bird's eye view or a multi-story building. The tower will be visible from the side, and the drawing includes a green part of the city and other buildings.
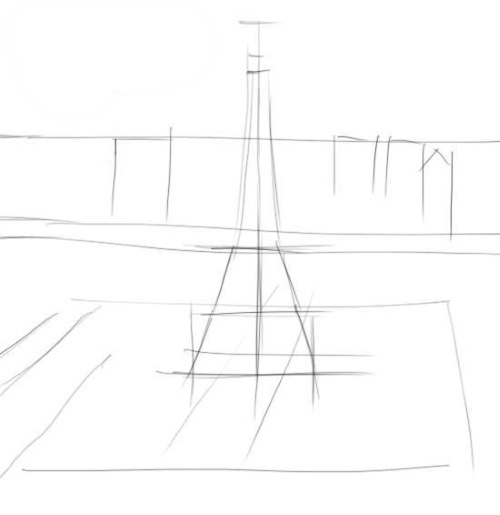

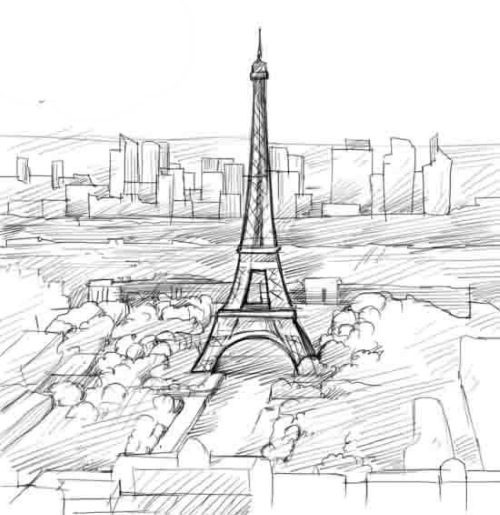
Step by step:
- The tower itself, the level of its floors and the places of its expansion are depicted with schematic lines. The horizon line, the intersections of streets, the height of the buildings in the background and foreground are marked.
- The outlines of the tower are drawn in more detail, noting the silhouette of the building, the columns, the arch and the spire. Details are added to the houses, vegetation and the outlines of the buildings in the background.
- The tower is shaded to represent the crossbars. The oblique strokes mark the place where the shadow from the tower falls and between its columns. The buildings in the background are drawn in detail. The silhouette of the vegetation next to the tower is drawn.
- The tower is drawn with thick lines so that its silhouette stands out from the overall drawing. More elements of trees and bushes are added to the image, side lines are added to the houses to create volume in the image. Shadows are drawn with oblique strokes throughout the illustration.
Drawing for children
A simple step-by-step version of the Eiffel Tower image without drawing shadows and volumetric details. In the process, a ruler is used to create precise and even lines, as well as a black liner and colored pencils for the final outline of the image.
Step by step:
- Draw 3 rectangles representing the floors of the tower.
- Connect the two lower rectangles with straight lines. These lines represent the base and the column towers.
- Connect the middle and upper rectangles with tapering w=lines, and draw a dome with a spire at the top.
- Vertical shading is added to each floor.
- Between the columns and the 1st floor, cross beams and an arch under them are drawn.
- Additional beams are drawn on the base of the tower using cross-shaped lines.
- Add structural details to the top of the tower.
- They add details such as vegetation and sky.
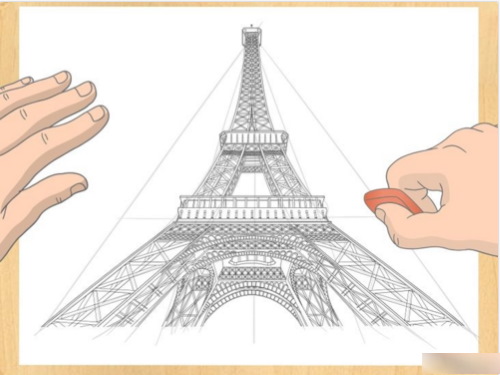
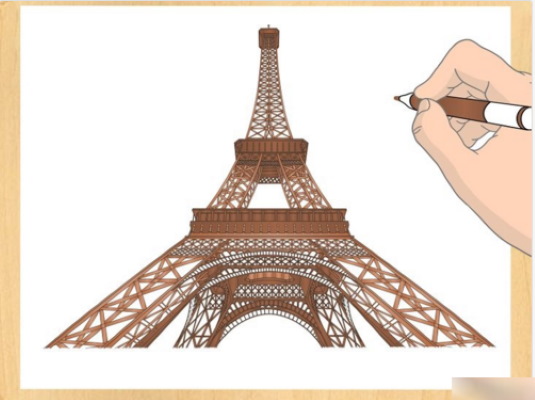
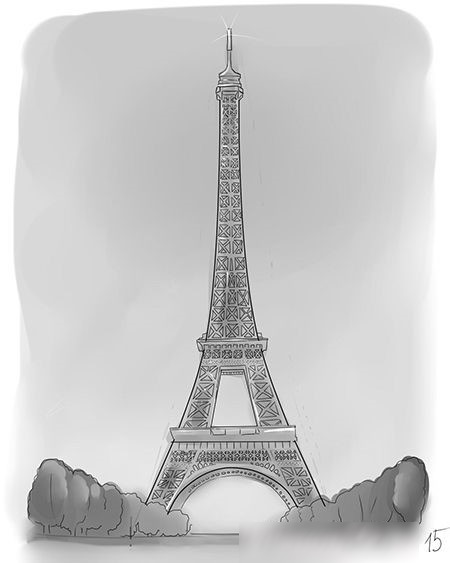
Detailed drawing
The Eiffel Tower (a pencil drawing can be made as realistic as possible by drawing details and maintaining the scale of the entire image) has basic lines that can be drawn with a liner or soft pencil to make the outlines of the structure stand out more in the entire image.
The picture can be left in black and white or colored with paints, ink, or pencils.
Step by step:
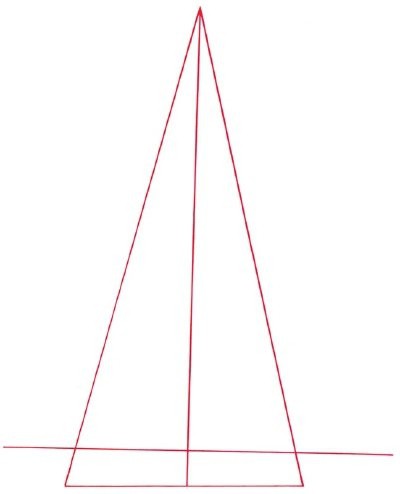
- The sheet is placed horizontally. The level of the lower boundary of the tower and its end is marked. A schematic outline of the building is drawn as a triangle.
- The schematic horizontal lines mark the level of the floors and the dome with the tower.
- All floors are connected with inwardly curved lines. The lines are narrowed towards the top. To make the tower outline symmetrical, a vertical axis is drawn and the boundaries are measured with a ruler on both sides of this axis.
- Depict an arch at the base of the tower - draw a line curved toward the center along the center of the triangle. Draw the arch with an indent from the edge of the triangle to depict the thickness of the tower columns.
- In the next tier, between the 1st and 2nd floors, draw a trapezoid, narrowing towards the top. This figure depicts the free space between floors.
- A small dome is drawn above the top tier, its width is the same as the width of the tower itself at this level. A spire-antenna is led from the tip of the dome.
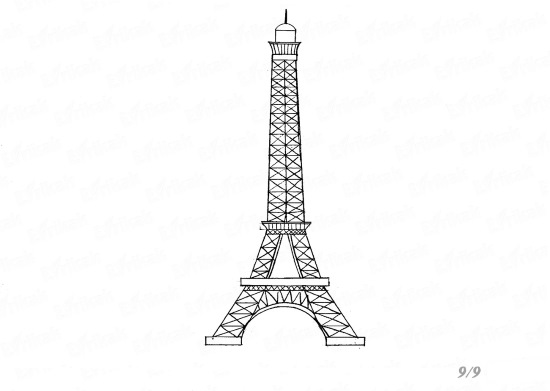
- From the top tier, they begin to draw the details of the metal structure. On the Eiffel Tower, they are crossed beams between the floors. There are 18 such floors in the tower.
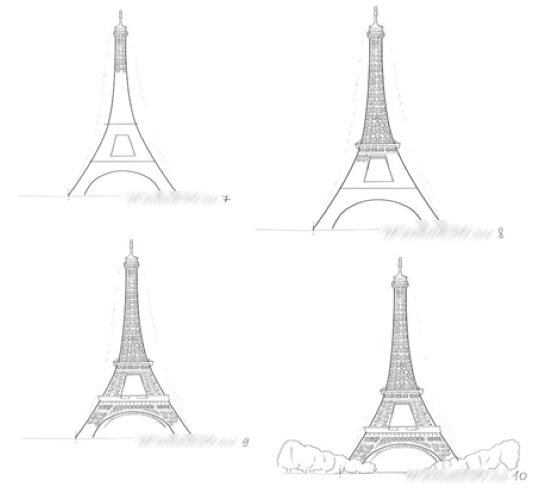
- Draw horizontal lines at the same distance and shade them crosswise. Make sure that all lines are the same size. Duplicate all lines inside, depicting the thickness of the beams.
- The entire tower image is gradually filled with the image of the ceilings. In places where the tower floors are located, observation platforms are drawn with horizontal lines. There is no shading in these places, but there is a long crossbar.
- In the columns, the hatching is changed - the size of the crossbars remains the same, its direction is changed. The beams are depicted in the direction from the center. Small hatching indentations are made, visually separating the columns and the upper part of the structure above the arch. The far part of the arch on the back side of the tower is drawn to give a volumetric effect.
- The trees planted in the direction of the tower columns are drawn with rounded strokes. The building is located in the middle of the avenue, so the trees are drawn as if on an alley. To make the drawing look realistic, the perspective is observed. The line of trees is drawn from the edges of the sheet, narrowing it towards the center, towards the tower.
- Paint or pencil the sky in the background. Choose the color at your discretion. If desired, add clouds or other elements.
- They paint over the trees and depict a shadow in a dark color in the place opposite from the light source.
- The entire structure is painted with light strokes to make the tower look realistic. Using a soft pencil or liner, key elements of the tower are outlined.
- The places on the tower where the least amount of sunlight reaches are shaded with a pencil – the side parts of the columns, the central part of the tower and the side sides of the crossbars.
- A white pencil or paint is used to depict highlights, showing the places where the sun shines the most. White creates the effect of illumination and a realistic image. The remaining fragments of the image are painted in black and white tones or natural colors.
Useful tips and recommendations
The drawing can be easier on the first try if you know a few simple life hacks:
- In the process of creating a drawing of the Eiffel Tower, a ruler helps to draw straight lines.
- If you want to create a realistic and believable drawing, first look at photographs of the tower to convey the smallest details not only of the building, but also of the objects around it.
- To give the drawing volume, narrow lines are added to all the lines of the tower and other objects in the drawing on one side to create a perspective effect.
- To create the effect of illumination, imagine a source of sunlight on one side and draw the shadows cast by objects on the opposite side using hatching.
- To maintain the symmetry of the drawing, the vertical and horizontal axis are depicted in the center of the tower with light strokes. The width of the drawing is checked on both sides of this axis using a ruler.
- If you want to paint the finished drawing, then you should prefer a thicker type of paper so that it does not bend when it comes into contact with water.
While working, try not to press too hard on the pencil, since many lines give a schematic representation of the Eiffel Tower and are not needed for the final drawing.
Video about drawing
Eiffel Tower Drawing: