The bird lives in wooded areas, but they cannot be found in Antarctica, Australia, Madagascar and New Zealand. The distinctive feature of the woodpecker is its beak, with which it gets its food. It is believed that the woodpecker can make about 20-25 blows on the bark of a tree per minute. It is quite easy to draw a bird with children - you can use special outlines or follow step-by-step instructions.
Pencil drawing
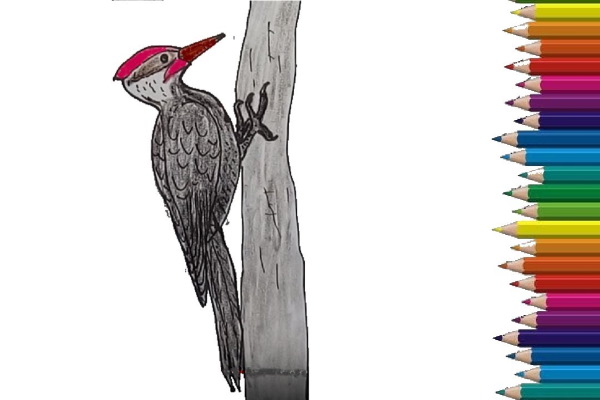
Woodpecker (a drawing for children in pencil is presented below in the text) is an interesting bird that gets its food from a tree trunk. They move along a vertical surface, helping themselves with the claws on their feet and tail. Due to the high load, the bird's tail is reduced by a tenth.
Pencils, paper and supplies
To complete the work you will need:
- simple pencil;
- ruler;
- eraser;
- sharpener;
- sheet of paper.
Since the drawing consists of oval elements (mostly), you can use lined sheets in the process. It will be much easier for a child to draw ovals on the cells than on a clean sheet.
Step by step process of execution
Stages of work execution:
| Stage | Description of the stage | Image |
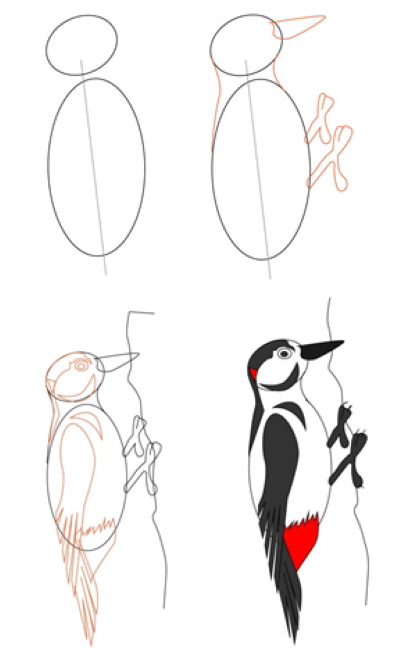
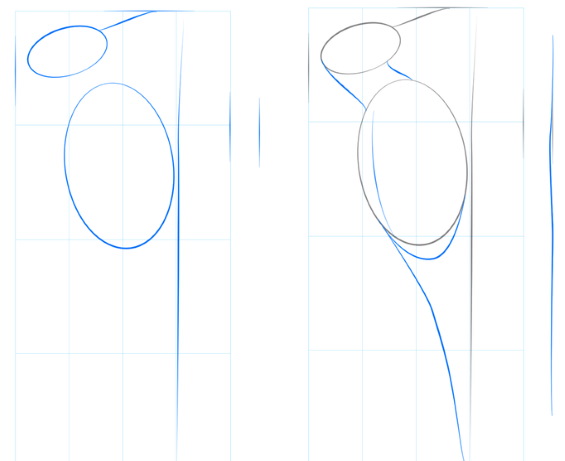
| 1 | On a clean sheet of paper, visually draw a diagonal straight line. On this line, “plant” a slightly flattened oval, which will be the body of the bird. Attach a figure resembling a seed to the top of the oval. Draw a small circle inside the drawn element, located closer to the sharp edge. | 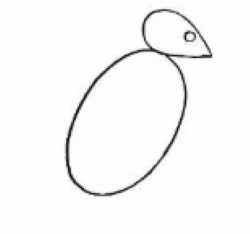 |
| 2 | Make the bird's head sharper at the top to show the "crest". Using the lower part of the eye, draw a slightly curved line - the direction of the beak.
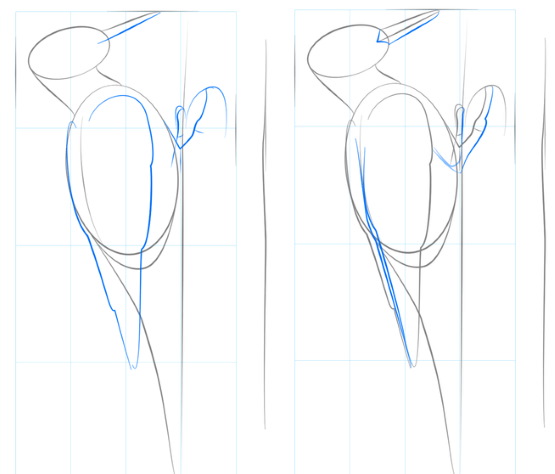
Draw a steep arc from the right side of the oval, and then connect the bird's tail to the main part of the body with a curved line. Remove unnecessary elements with an eraser. Draw the bird's wings with oblong ovals. Use lines to show the basis of the plumage. Draw a line under the woodpecker, without touching the area of the elements already drawn. Step back a small distance and draw a parallel one. |  |
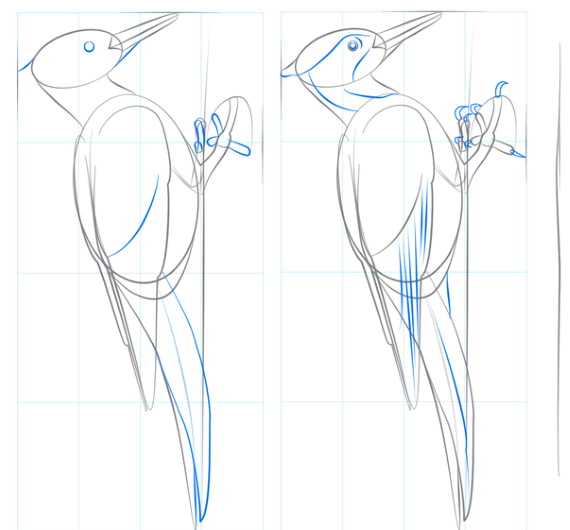
| 3 | Using arched lines, outline the bird's feet. Connect the outlines of the wings to the body, removing unnecessary elements.
Using small strokes, add more detail to the beak and also draw a pattern on the bird's head. | 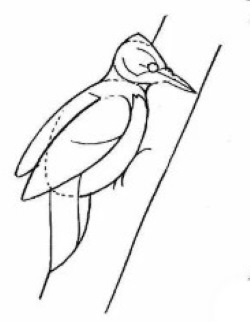 |
| 4 | Using thin lines, show the bird's feathers. Make the previously drawn elements on the woodpecker's head more voluminous. Darken the eye, leaving a small white space inside - a highlight.
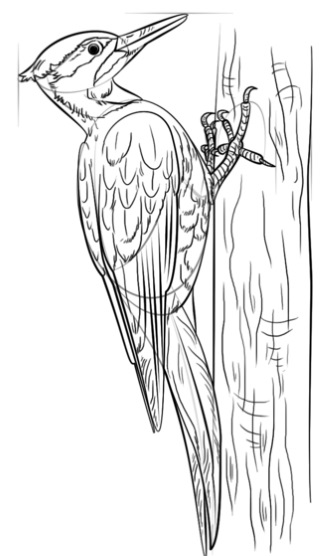
Make the bird's paws more pronounced and slightly curved. Draw a small dot on the tree trunk - a hole left by the woodpecker. | 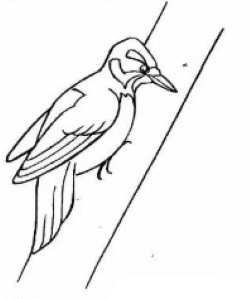 |
The finished image can be shaded. To do this, you will need to mark the shadow areas with a pencil: the space under the wings, the tree trunk under the bird. You can also slightly darken the chest and the lower part of the woodpecker's tail.
With colored pencils
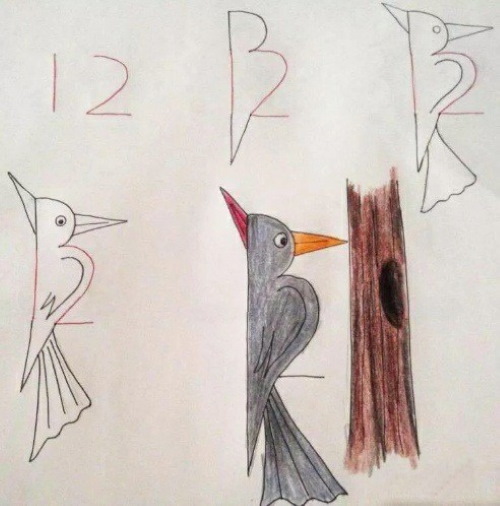
Woodpecker (a drawing for children aged 2 to 4) has a simple shape. If you look closely, you can see the number "12" in it. This option is suitable for coloring with colored pencils.
Pencils, paper and supplies
To complete the work you will need:
- set of colored pencils;
- simple pencil;
- eraser;
- sharpener.
For a more vivid effect, you can use watercolor pencils. You can also get a rich color by using colored gel pens and markers.
Step by step process of execution
While doing the work, you can use the image as a guide:
Stages:
- Draw the number "12" on a piece of paper.
- Extend the upper and lower edges of the unit. In the upper part, connect the ends of the resulting elements with a semi-oval. In the lower part - with an inclined line.
- Using isosceles triangles of different shapes, draw the crest and beak of the woodpecker. Inside the previously drawn number "2" draw half a heart. At the bottom of the drawing add a figure - as shown in the picture.
- Divide the beak into 2 parts using a horizontal line. Use slanted lines to show the feathers on the bird's tail.
- You can draw a tree trunk nearby.
- Using a yellow pencil, lightly paint the woodpecker's beak. Add red on top of the applied color to get an orange tint.
- Paint the bird's crest bright red.
- Use a black pencil to fill in the body and head of the woodpecker to get a gray shade. Actively color the pupil.
- Use a brown pencil to color the tree trunk. Use black to depict the texture of the bark.
All lines drawn with a simple pencil can be highlighted with a felt-tip pen or gel pen.
Gouache
You can draw a woodpecker with gouache. This material is suitable for children due to its water base. The paint is non-toxic and completely safe for children.
With the help of gouache you can create quite bright drawings without experiencing any difficulties with application.
Pencils, paper and supplies
To complete the work you will need:
- minimal set of colors;
- brushes;
- glass;
- thick sheet of paper;
- pencil;
- ruler.
If desired, you can use a palette and easel.
Step by step process of execution
You can draw a bird in the following way:
- Draw a slanted line on a clean sheet of paper.
- "Put" the ovals on the prepared line. The lower one should be more elongated, as it forms the body of the woodpecker. The upper oval is flattened, small in size.
- Draw a beak on the right side of the head. It looks like a triangle, the smaller side of which is zigzag.
- Using curved lines, connect the head and body as shown in the picture.
- Attach the paws to the right side of the body, on both sides of the middle. For convenience, you can draw 2 letters "X" with sides of different lengths, and then outline them with rough lines.
- Draw a tree trunk under the bird's paws. It can be of varying degrees of curvature, depending on the idea.
- Using boomerang-like elements, detail the bird's head and body.
- At the top of the head, draw an eye in the form of several ovals of different sizes.
- Along the contour of the head and neck, draw a part of the plumage that stands out against the main background.
- Attach the wings to the body. First, draw an oval, then draw trapezoid feathers.
- Also add a tail.
- Use an eraser to remove unnecessary elements from the drawing.
- Use a small brush to pick up some black paint. Wet the bristles of the brush first.
- Paint the beak, claws on the feet and the pupil of the bird.
- With the same brush, transfer a small amount of black paint to the palette. Use a handy tool to pick up some white gouache. Mix until you get a creamy consistency.
- With the resulting shade, paint the paws, wing, tail and head and neck area - as shown in the picture.
- Take red paint on a thin brush. Paint the lower part of the body, a small element on the woodpecker's head.
- When the paint dries, use a thin brush to paint the remaining elements with white paint. At the same time, align the previously applied elements to get a clearer picture.
- You can paint the wood with brown paint.
Using a thin brush, you can paint over the lines drawn with a pencil. You can also use a thin felt-tip pen or marker.
Watercolor
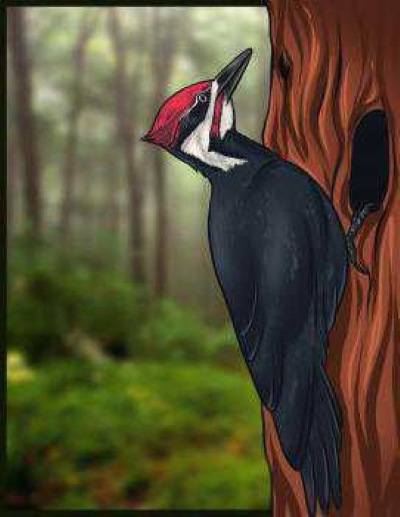
Woodpecker (a watercolor drawing for children can be seen below in the article) can be a great subject for older children. Using watercolor paints, you can create a bright drawing, observing all the rules of light and shadow.
Pencils, paper and supplies
To complete the work you will need:
- set of watercolor pencils;
- watercolor paints;
- brushes;
- simple pencil;
- thick white paper;
- easel;
- eraser.

In the process of performing the work, brushes of different thickness and density are used to create a more accurate and natural drawing.
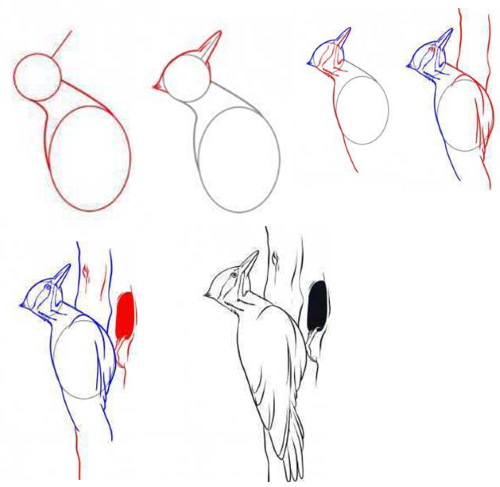
Step by step process of execution
Step-by-step process of completing the work:
- Draw an elongated oval on a sheet of paper. It is important that it “stands” straight.
- Stepping back a small distance to the left, draw a smaller circle – as shown in the picture. To perform this step, you can use a compass or any other available tool.
- The resulting circle is visually divided into 4 parts. The upper left part is also divided in half. A little above the resulting line, on the circumference, put a point. From this point, draw a small straight line.
- Using curved lines, connect the circle and oval.
- From the resulting line, draw a voluminous beak of the bird. It is not necessary to erase the middle – it can be modernized in the process of detailing.
- On the back of the head, draw a small triangle with feathers – a crest.
- Add a small arched line to the side of the oval – the future tail of the woodpecker.
- Using jagged lines, highlight the plumage of the bird's head and neck.
- At the top of the head, not far from the beak, draw the woodpecker's eye.
- Using different lines, convey the texture of the plumage and body of the bird - as shown in the picture.
- Also finish drawing the lower part of the bird's tail.
- Add the top of the tree trunk in the background. The curved lines convey the texture of the bark.
- Define the lower part of the tree. In the upper part, draw additional lines and curves, add an uneven hollow. Using a pencil, darken the hollow area.
- Draw the bird's thin legs.
- Add a small dimple in the bark to represent the beak marks.
- Connect the parts of the bird's tail and also add wavy curves - feathers.
- Use the eraser to remove all unnecessary elements from the drawing.
- On a palette, mix white paint and a drop of black paint.
- Paint the entire drawing with a dirty white shade.
- On a slightly dry drawing, using a small brush, spread black paint.
- Paint the design from the tail, using a more active color. Closer to the middle, slightly smear the paint to leave a slight highlight.
- Using a thin brush, pick up some red color and paint the area of the head next to the crest.
- The "layer" under the crest, near the eye, and the neck are painted black. The beak is also painted black.
- Paint the hollow, the hole in the bark and the paws with black paint.
- Paint the wood with a brown shade.
- Mix a little black and brown on the palette. Use the resulting shade to fill the curved areas and the area under the bird, indicating the shadow.
- Dry the drawing in a horizontal position.
- Use a black watercolor pencil to paint over the main lines previously drawn with a simple pencil.
- Color the outlines of the plumage with the same pencil, and also highlight the relief on the bird's legs.
- Using a brown pencil, duplicate the fold lines on the wood.
- Using a thin brush and a minimal amount of water, distribute the applied paint over a small area to obtain an even pattern.
You can add a background to the finished image, if desired.
Woodpecker from the cartoon
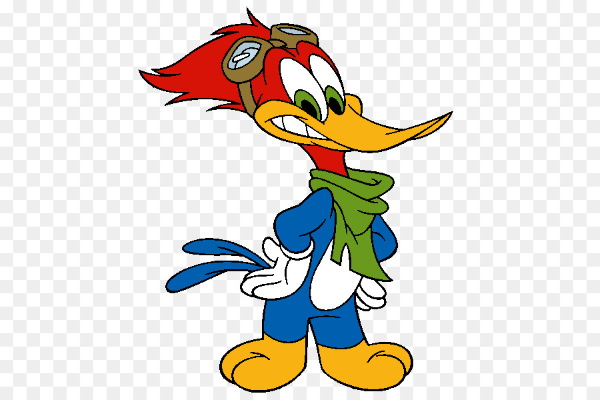
Woodpecker (a drawing for children can be funny) Woody is a character from the cartoon "Woody Woodpecker", which first appeared on screens in 1940. He belongs to the category of red-headed woodpeckers, and the characteristic feature of the character is an annoying loud laugh.
Pencils, paper and supplies
To complete the work you will need:
- compass;
- ruler;
- sheet of paper;
- simple pencil;
- paints or colored pencils.
If paint is used in the process of doing the work, then you will need a palette, brushes and a glass for water.
Step by step process of execution
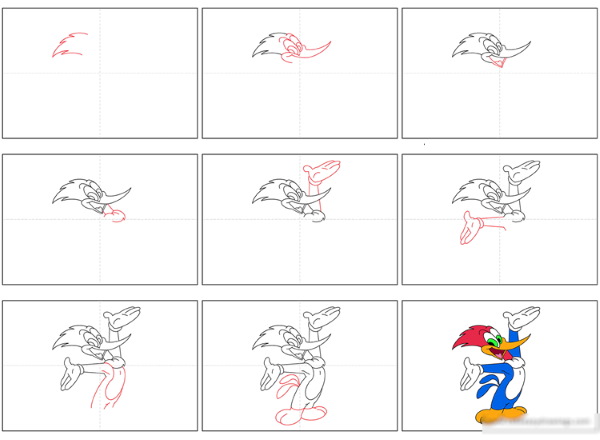
Step-by-step process of completing the work:
- Draw a small circle on a sheet of paper. It is best to place it with a slope to the right, as it is the outline of the character's head.
- Stepping back a little downwards and to the left, draw an elongated oval. The same is used to draw the body in the previous versions.
- Connect the head and body with a slanted line. Draw the same line across the area of the larger oval.
- Draw small circles at head level, as shown in the picture.
- Use segments to connect the resulting figures to the central oval.
- Use broken lines to outline the base of the character's paws.
- At the top of the head, outline a crest. It looks more like a lush hairstyle.
- Inside the outlined circle, draw an unfinished oval – Woody’s eyes.
- At the bottom, add a part of a triangle – the character’s slightly open mouth.
- Add 3 arched lines next to the marked paws. They will separate the character's fingers.
- Add volume to the previously outlined lines on the right side of the drawing.
- Draw the outlined lines of the legs smoothly.
- Draw the "bangs" and also add the brow ridges and pupils.
- Use a semi-oval to draw the character's cheeks. Use additional lines to create texture.
- Using an additional parallel line, make the right arm more voluminous.
- Correct the body, making the transition less rounded.
- Between the body and head, draw a wide "collar" - the bird's throat. It slightly resembles a heart without the top part.
- Woody Woodpecker does not have the usual bird feet. He wears gloves on his hands. His very large feet look more like a dog's than a bird's.
- To begin with, you can apply a large oval as the base of the feet, and then detail it by drawing several divisions.
- Color the pupils of the eyes with a pencil.
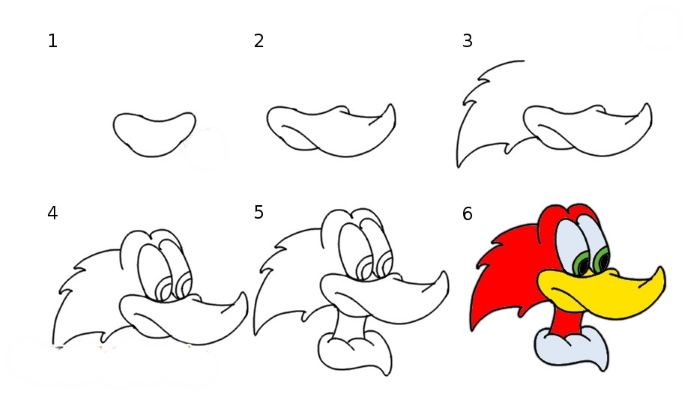
- Add the lower part of the beak and also draw the outline of the bird's tongue. Add the second cheek on the left side of the head.
- Connect the lines of the fingers, using the previously drawn circle as a guide, draw the thumb (located at a 90° angle to the others).
- Using the provided image, draw the lower body elements and also add a wavy line on the front of the body.
- Finish the bird's crest, add the finishing line on the arm, and also draw textured lines on the palms.
- Using short, arched lines, separate the collar area from the neck.

- Connect the upper arms and the torso with parallel lines.
- Draw the control lines of the bird's legs.
- Add tail as shown in the picture.
- Use an eraser to remove unnecessary elements, and use a simple pencil to highlight the drawn lines for greater clarity.
- You can paint the character according to all the canons, using any convenient material.
- Paint the character's head and neck red. You can pre-paint the eyebrows with a black marker or felt-tip pen.
- Color the character's eyes bright green.
- The beak is orange. For this, you can use a yellow and red pencil, applying them in turn.
- The collar, the central part of the "belly" and the palms can be left as is or painted white.
- Fill the tail and most of the body with blue or light blue paint.
- Paint the feet orange or yellow.
- Paint the tongue red and the area around it brown or black.
Any detailed, small lines or folds can be highlighted with a marker or felt-tip pen.
Woodpeckers play an important role in the health of trees. Due to the high costs of constant work with the beak and tail, the bird requires a large number of insects for food. By ridding trees of beetles and other living creatures, the woodpecker prevents diseases from spreading.
You can draw this bird using a step-by-step process of doing the work. It will help not only children, but also adults.
Video about drawing
Woodpecker drawing for kids:
Nice drawings!
Very!
Very!
The drawings are very beautiful!
The drawings are very beautiful!