In order not to lose needles during work, it is convenient to use a special pillow. Additionally, a needle cushion performs a decorative function, bringing a new accent to the room and complementing the design of the room. You can buy such a product in a store or make it yourself if you have minimal sewing experience.
What is needed for work
The needle case should provide safe storage of sharp tools that are intended for sewing. This is considered the main task of this item. If the needlewoman has only 2 needles, sharp objects should not be in the thread skein.
For ease of work, it is recommended to prepare a soft pillow into which you can stick not only needles, but also tailor's pins. Thanks to such a product, the risk of accidental injury to pets or family members is prevented.
A pillow suitable for storing sewing needles can be purchased in a specialized store or made by yourself.
The second option has more advantages than the first:
- sewing requires minimal consumption, while the work does not take much time and does not require special skills;
- any material that you have at home is suitable for creating a homemade product;
- It is permissible to give the product an unusual appearance in order to use it as a gift or as a decoration for a room.
There are many options for making a pin cushion.
When creating a pincushion, needlewomen can use:
| Type of material | Features of use |
| Ceramics | It is a fragile material, so it requires careful handling. The ceramic product is mainly painted in white and blue shades, complemented with ornaments and monograms. |
| Metal | Often, such material is used as a pillow stand. Steel or iron are suitable for these purposes. As a result, the product will be beautiful and stable. Items with a bronze base are especially popular, as well as items with a gold coating on a metal stand. |
| Fabric material | To create a pillow, it is permissible to use velvet, felt, satin, silk. Crepe, velour and corduroy products turn out very beautiful. Beginner needlewomen can use cotton and mixed fabric material. |
When making a needle cushion, it is also acceptable to use:
- birch bark;
- tree burl;
- tin;
- plastic;
- yarn;
- porcelain.
Before doing any work, it is necessary to prepare the workplace. When developing a template, choosing consumables, making a fabric pincushion and decorating the finished product with decorations, the lighting should be bright, and the surface should be comfortable and wide.
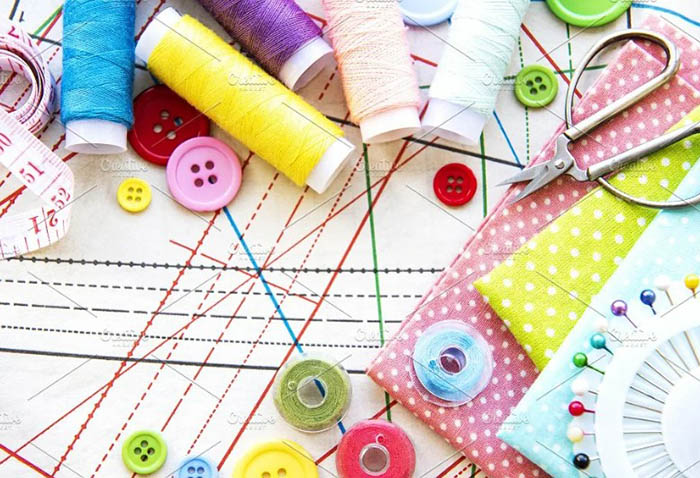
Standard set of tools and materials required for work:
- decorative stones, large beads, buttons necessary for decorating the product;
- needles with thread material;
- filling in the form of batting, holofiber, synthetic padding;
- textiles (it is permissible to use several options).
When sewing by hand, it is permitted to use several types of seams, each of which has a special purpose:
- To perform overcasting, you need a buttonhole stitch;
- The oblique stitch is required for permanent or temporary fixation, therefore it is considered stronger than the straight stitch;
- straight stitch is suitable for temporary stitching of fabric, as well as for highlighting seam allowances;
- To secure buttons, loops or buttons, a special stitch is required;
- To hem the bottom area of the piece, you will need a cross stitch (this helps to maintain the appearance of the fabric).
If the product is complex to manufacture, it is permissible to use all types of seams.
When making a pincushion yourself, it is recommended to adhere to several conditions:
- The filler must be of high qualityIf a sharp sewing object accidentally gets inside the product, the filler used must firmly hold the needle.
- The needle cushion should have a bright design to quickly find an item on a shelf in a pantry or closet.
- The pillow must have a stable base., especially if there are small children in the house.
- The cover must be tight. The outer cover should not only perform a decorative function, but also securely hold the accessories intended for sewing.
Simple pillow
The pin cushion can have a simple appearance, which is considered the best option for beginners. In this case, it is necessary to make a pattern, on the basis of which it is permissible to sew the product by hand.
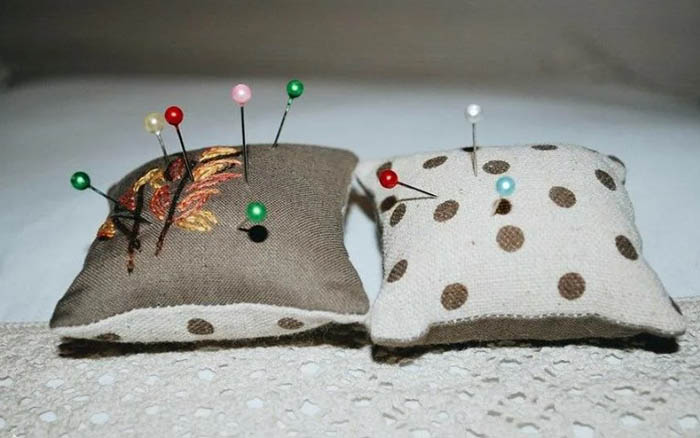
For needlewomen who do not have much experience in sewing, when creating original items, it is recommended to initially make simpler items, gradually moving on to more complex ones.
Step by step description:
- Cut out 2 rectangular or square pieces from any fabric material.
- Sew the cut out pieces together from the wrong side, leaving a small opening.
- Turn the product inside out, first making 2 notches in each corner.
- Stuff the pillow with any filling, then sew up the hole.
- If desired, the finished product can be decorated.
Square pincushion
The pin cushion can be sewn on a sewing machine. Such a product will have a strong, even stitch, therefore preventing the risk of the pin cushion breaking.
Necessary materials and tools:
- 2 pieces of fabric measuring 7x7 cm;
- a needle with a thread that matches the shade of the material;
- special filler, cotton wool or synthetic padding.
Step by step instructions:
- First, iron the fabric well to get rid of creases.
- Place 2 pieces together so that the right sides are on the inside.
- Sew 3 sides using a sewing machine.
- Turn the resulting product inside out, then fill it with cotton wool, synthetic padding or a special filler.
- When finished, sew the fourth side of the pincushion with a hidden hand stitch.
Round pincushion
If you have sewing experience, you can make a round pincushion that may look like a flower. In this case, the product can be decorated with beads to make the pillow look more beautiful.
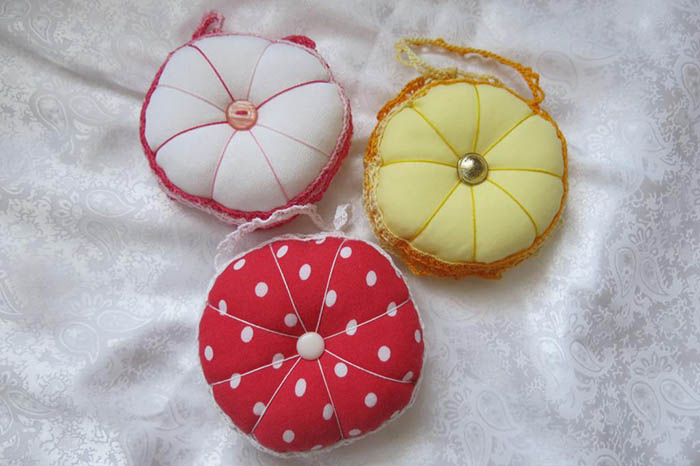
List of materials and tools:
- beads for decoration;
- pencil with glue gun;
- thread material with scissors, as well as 2 needles (one should be large, the other is needed for sewing);
- synthetic padding;
- cotton fabric.
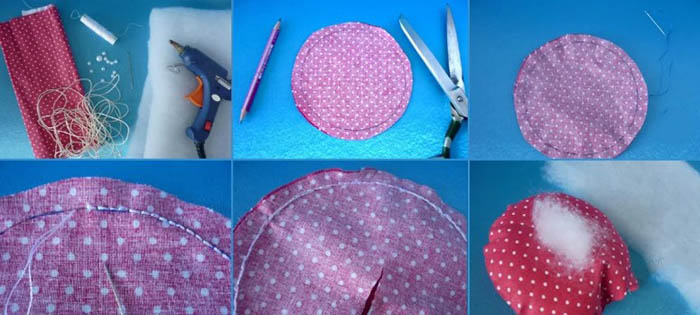
To re-stretch the pincushion to divide the product into several sectors imitating flower petals, you need to prepare a thread material, ribbon or waxed cord. In this case, the re-stretching material must be strong and not tear.
Creation algorithm:
- Fold the fabric in 2 layers so that the front side is on the inside.
- Draw a circle of the desired diameter on the fabric using a pencil. When cutting, leave allowances so that you can sew the product.
- Sew 2 pieces together with a basting stitch for ease of further sewing.
- After 2 parts, stitch with a straight stitch. The stitches should be the same and dense. If you have a sewing machine, you can stitch the workpiece on it.
- Remove the thread material used to sweep the blanks. Make a 4 cm long cut in the middle of one side of the material.
- Turn the part inside out and straighten the edges. Fill the product evenly with padding polyester. Place pieces of padding from the edge, moving towards the middle, until the pincushion is completely filled.
- Sew the cut after filling the blank. The seam may be uneven, because everything will depend on the quality of the material. However, any defects will be hidden by beads and thread material.
- Thread a long piece of thread folded in half into a large needle. Tie the ends of the thread into a knot.
- To divide the needle bed into several sectors, insert the needle into the middle of the product and bring it out on the other side. Then pass the tool from top to bottom again and tighten it tightly. 1 strip should consist of 3 circles. Then move to the opposite side.
- To do this, first close the seam with thread material, then you can move on. The main thing is that the needle always enters the same hole from below and above.
- If the thread material runs out but the required number of sectors has not been created, tighten the knot tightly to the fabric material and cut the thread. Then thread the needle again with thread material and continue working. The number of sectors will depend on personal preferences, as well as the diameter of the needle bed.
- Decorate the middle of the product, where the thread bundle is located, with 2 large beads at the top and bottom to hide the knots.
- If desired, the upper part of the pincushion can be decorated with additional beads, placing decorations on each strip, moving from the middle. In this case, the diameter of the beads should be smaller than that of the central one. Use a glue gun to fix it.
Pincushion on hand
Beginner needlewomen can create a pincushion that can be worn on the arm.
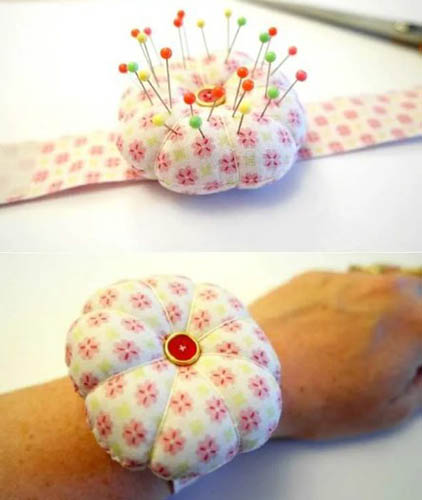
To do this, you need to prepare:
- Velcro for fixing on the hand;
- thread material that will match the fabric;
- cotton or calico fabric;
- holofiber for filling.
Method of creation:
- Cut out 2 circles from the fabric with a radius of 5 cm. Additionally, cut out a strip with a width of 10 cm and a length equal to the circumference of the arm. When measuring the length, it is recommended to increase the size by 4 cm.
- Place the pieces together with the right sides facing each other and sew them up, leaving a gap for filling. Trim the seam allowances.
- Turn the blank inside out and fill it with holofiber. Sew the remaining opening manually using a hidden stitch.
- If desired, the product can be decorated by dividing the pillow into several segments to make a flower. To do this, thread the material into the middle of the workpiece from the front side, then throw it over the edge and thread it into the middle from the back side. Pull the thread tightly. The middle of the pillow can be decorated with a small button.
- Fold the cut rectangular strip in half along its entire length. Hide the cuts inside and sew on a sewing machine.
- Fix the Velcro and the created pincushion onto the strip.
Pillow hat
A pincushion can be created in the shape of a hat. Such a product will perform not only a direct main function, but also a decorative one, decorating the interior of the room.
In this case, you need to prepare:
- satin ribbon;
- artificial flowers;
- cardboard sheet with knitted fabric material;
- thread material with scissors and glue;
- special filler in the form of synthetic padding or holofiber.
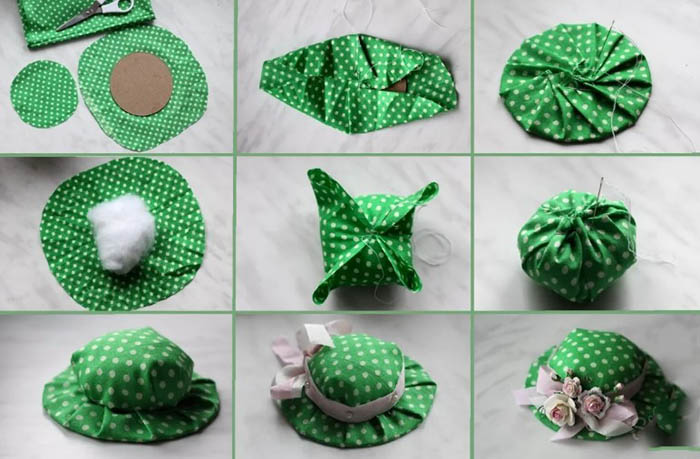
Creation option:
- Cut a circle out of a sheet of cardboard, the diameter of which should be at least 10.5 cm.
- When cutting out the fabric material, cut out 4 circles. The diameter of 2 pieces should be 22 cm, the others – 14 cm.
- Join the pieces of the large circle together, having first placed a cardboard circle between them. Stitch the workpiece on the machine, carefully draping the edges.
- Prepare smaller diameter pieces, placing the filler in the middle. Initially sew 4 edges that are opposite to each other, then sew everything together.
- Join the 2 parts of the pincushion together.
- To decorate the hat, use satin ribbon with artificial flowers. Use glue to fix it.
Pincushion for finger
Most needlewomen use a pin cushion, which has a ring shape, when sewing. This item is convenient for pinning clothing elements, as well as for removing tools. Both experienced and novice seamstresses can make such a product.
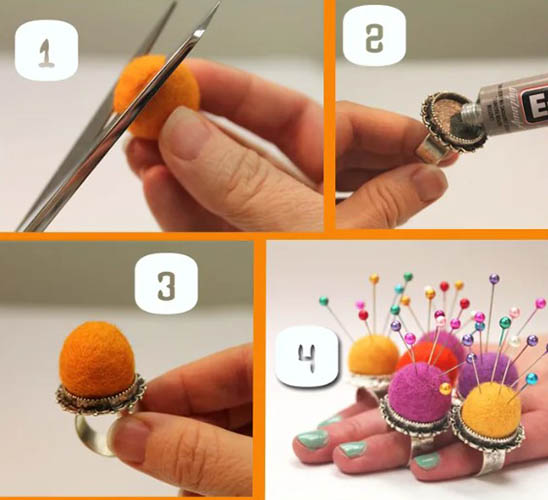
When creating a pincushion, it is recommended to give preference to natural fabric material, because it is easy to insert needles and pins into it.
Necessary tools and materials:
- pins and needles, as well as filler;
- ruler with scissors and tailor's chalk;
- a small piece of cotton or linen fabric;
- sequins or beads, as well as thin fishing line for decoration.
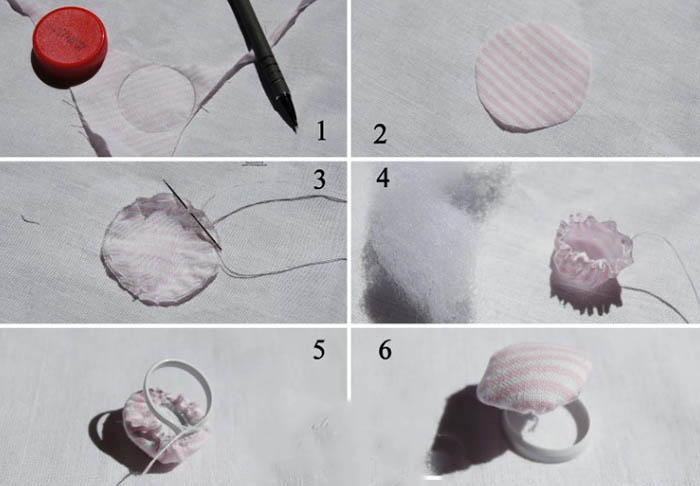
Step by step description:
- Cut a square from the fabric material, the size of which is 10x10 cm. If the material is thick, add 0.5 cm to each edge.
- Place the workpiece so that the front side is at the bottom. In the upper right corner, measure 2.5 cm down and to the left using a ruler. Fold the corner and iron.
- Fold the square piece diagonally so that the front side is inside. Sew the workpiece on a sewing machine. On the right side, the seam should go along the folded corner. In the lower area of the square, finish the seam in the center and make fastenings. Stepping back 2 mm from the line, cut off the corner.
- Turn the workpiece inside out, simultaneously straightening the corners. Stuff the product tightly with a special filler, especially near the right angle.
- Sew the open area with a hidden stitch. Allowances can be folded inward, folds ironed. Sew to the end.
- Tuck the stitched corner tightly into the gap on the opposite corner. In this case, it is recommended to use a needle. Sew the ends.
- To decorate a pillow with beads, thread the thread material into a needle, then string the beads onto the thread. Tie the end of the thread material into a knot to prevent small parts from slipping off. To secure the thread, use a fishing line that is inserted into a needle and stitched between the beads.
If the pin cushion will be decorated with embroidery, it is recommended to make this decoration before cutting out the blank.
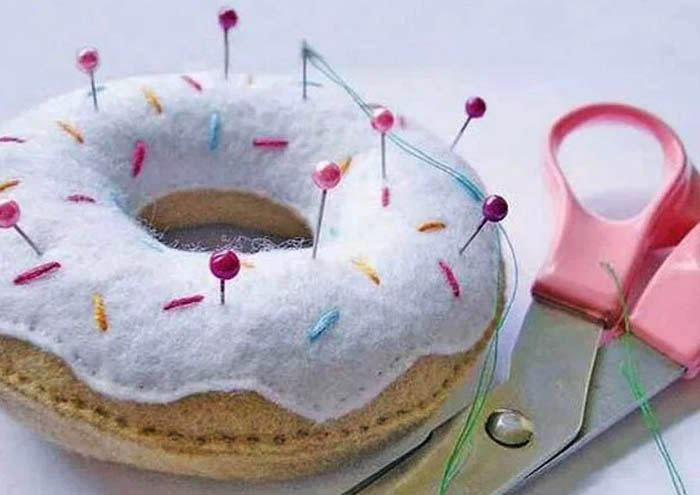
In the shape of a donut
The pin cushion can be made in the shape of a donut, because food themes are becoming popular in crafts these days.
List of tools and materials:
- tailor's pins with a needle and floss;
- filler;
- Felt material in brownish, pink and beige shades.
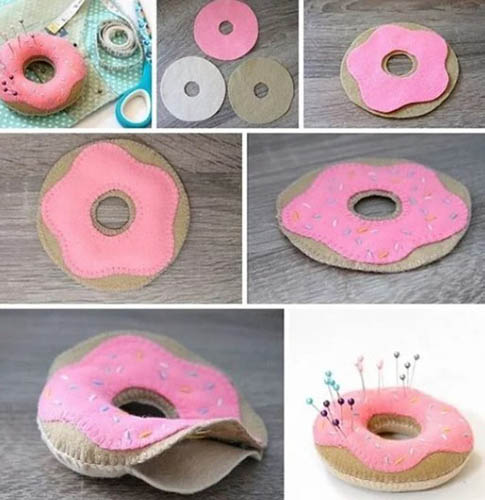
Creation option:
- Using a template made of felt fabric in different shades, cut out 3 pieces. The pink piece is needed to imitate the glaze used to cover the donut. To make this piece look more realistic, the piece should have a wavy shape.
- Place the pink piece on the brownish circle and secure with pins.
- Using a loop stitch, sew 2 elements along a wavy arbitrary contour. To do this, use a needle and pink thread material.
- Using a similar method, stitch the edges of the brown part. There should be no strong tension during the work, otherwise the felt fabric will deform.
- To create an imitation of sugar sprinkles, create several frequent but single knots of different colors.
- Using a loop stitch, join the brownish and beige blanks. Do not stitch all the way through. To stuff the pillow tightly, leave a gap of 3 cm. Then finish the stitching so that the filling does not come out.
The pincushion can have different sizes and shapes, and can perform a decorative or practical function. This pillow can be purchased in a special store or created independently, using empty containers, lids, leftover lace or fabric material.
To make such a product for needles, you can use absolutely any materials. As a result, you can get a beautiful thing.
Video about making a pincushion