Drawing decorative still lifes helps beginning artists learn how to make smooth lines, depict the shapes of objects correctly, and also see from which side the light falls and where the shadow is located. It is important for beginners to try to depict several different objects in different artistic styles to understand how to draw a still life in color and black and white.
What you need to draw still lifes
Decorative still life in different styles can be drawn using any materials. For children, it is advisable to conduct several classes where they will depict objects or fruits in drawings using paints, ink, pens and simple pencils.

This is necessary so that the child learns to draw correct shapes, apply strokes in the right direction, and also indicate shadows and highlights.
To paint with paints you need thick paper that will not deform or roll when exposed to moisture. You can buy special sheets for watercolors in specialized stores.
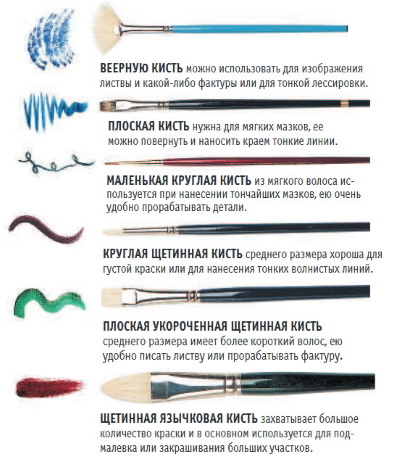
You will also need a set of brushes of different sizes and degrees of bristle stiffness. A palette is needed to mix paints. At home, it can be replaced with a ceramic saucer or glossy white cardboard.
A still life can be copied from a flat image, but in order to teach a child to perceive the shapes of objects and depict them on paper correctly, a composition is needed. All objects that will be drawn should have simple shapes. These can be balls, cylinders, cubes, cones. For drawing fruits, it is advisable to use large specimens.
Drawing from life is easier when the sheet of paper is not lying on the table, but is tilted. To place it this way, you need an easel. This is a wooden board on a stand, to which the sheet of paper is attached with drawing pins. You can buy a small table easel. It will not take up much space, and it will be convenient to use.
To draw with pencils you will need a sharpener. The lead of each pencil should always be thin to draw neat lines and strokes. An eraser is also needed to remove auxiliary lines and unnecessary strokes.
Step by step instructions on drawing a simple still life with a pencil for children
Decorative still life (in different styles you can draw simple still lifes using only pencils) can be drawn with simple pencils.
To work you need 3 tools, different in degree of hardness:
| Pencil hardness | Letter designation |
| Solid | T or H |
| Hard-soft | TM or HB |
| Soft | M or B |
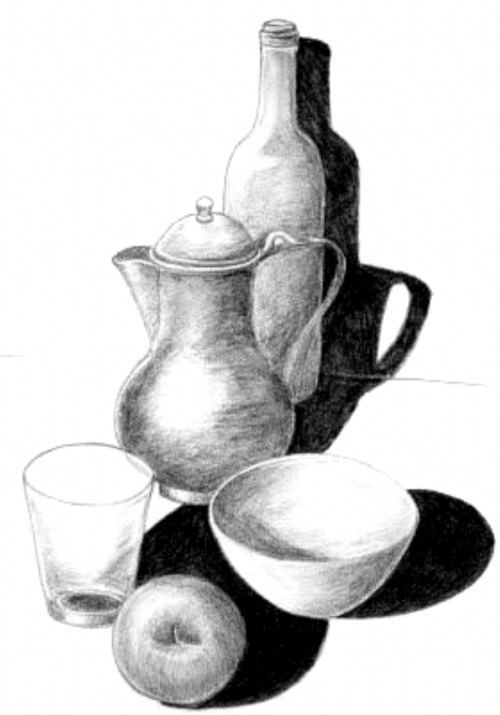
This master class describes a drawing that depicts an iron mug and a small apple.
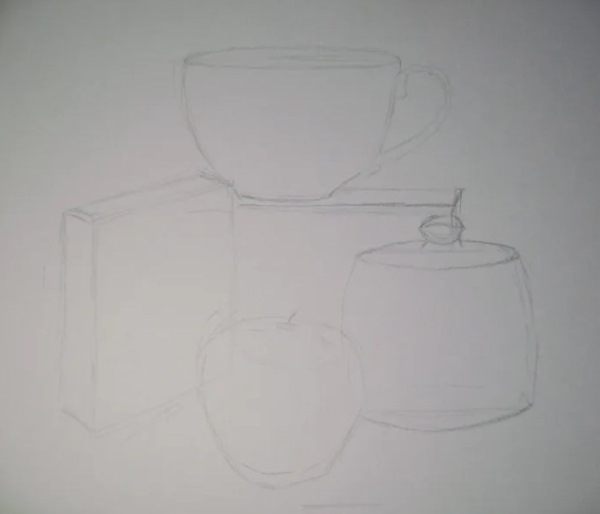
Sketch
First, you need to draw auxiliary lines to make it easier to draw the shapes of objects, and then draw the outlines of a mug with a handle and an apple. The sketch is created using a hard pencil (T or H). Do not press too hard on the tool, the lines should be barely noticeable so that they can be easily erased later.
Procedure:
- Draw a thin horizontal line across the bottom of the sheet. This will be the visual boundary of the surface on which the objects are located.
- Draw a small vertical line in the center of the sheet. It will mark the middle of the mug. It is important to consider that when a person looks at an object standing on the table, the surface line is a little further away, and not immediately under the objects.
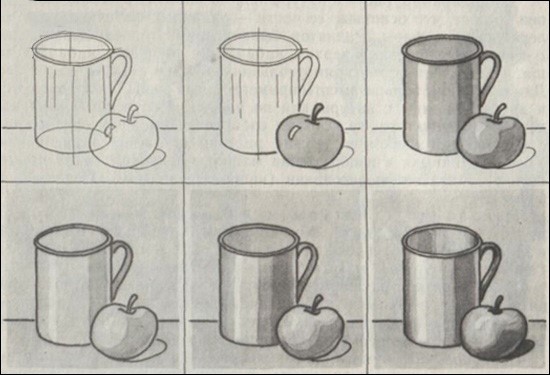
- Now you need to designate the diameter of the mug. To do this, draw a horizontal line perpendicular to the main axis of the mug. It should be located at the top.
- Draw a cylindrical shape.
- Draw the edges of the mug in the form of an oval on top, and mark the shape of the bottom with an arched line on the bottom. At other stages of drawing, this line will help to apply the shading correctly.
- Draw an apple. It should be located a little closer to the artist, which means it will be drawn below the bottom of the mug.
- Draw a handle and edges on the top of the mug.
At this stage, there is no need to erase the auxiliary lines.
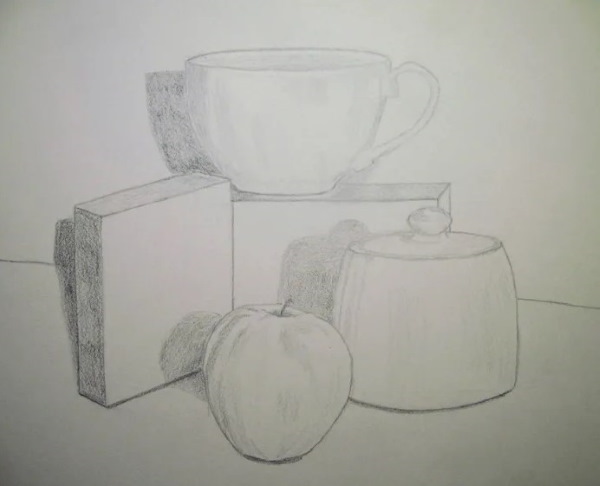
Detailing
You need to draw the details with the same pencil.
Procedure:
- Draw a tail on the apple. Draw a highlight on the left side. It should look like an inverted triangle, only its edges should be smooth, repeating the rounded shape of the fruit.
- Under the apple, mark the area where it will cast a shadow.
- Trace the outline of the mug.
- On the front part of the dish draw 3 short vertical lines parallel to each other. These lines will help to correctly indicate shadows and highlights.
Use an eraser to carefully erase the guide lines that were used to draw the shape of the mug.
Designation of shadows and highlights
For shading you will need all 3 pencils. Dull tools should be sharpened.
Procedure:
- Using a hard pencil, without pressing, shade the apple without touching the highlight.
- Blend the strokes.
- Color the inside and outside of the mug, drawing vertical lines. The shading should be done along the edges. 1 of the auxiliary stripes. The stripe remaining in the middle should be left white.
- Using a hard-soft pencil, darken the right side of the mug without pressing. Shade the handles, repeating its shape.
- Blend all strokes.
- Using horizontal lines, without pressing down on the pencil, paint the surface on which the objects stand.
- Blend the strokes.

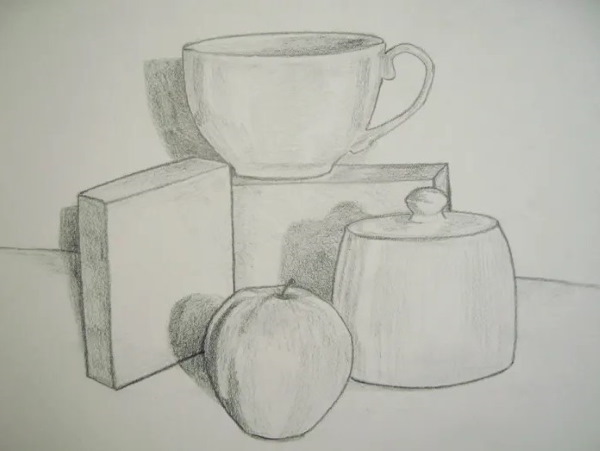
- Pressing lightly on the pencil, darken the inside of the mug, as well as its right side and handles. Shade the bottom and right parts of the apple. Blend all the lines again.
- Use a hard pencil to color the background of the drawing. Blend the lines.
- Using a soft pencil, without pressing, darken the inside of the mug on the left side.
- Shade the right side of the mug and its handle.
- Darken the bottom and right side of the apple, and also color its tail.
- Trace the outline of the drawing.
- Applying light pressure on the pencil, draw a shadow under the apple.
If the highlights were accidentally touched, they need to be lightened with an eraser.
Drawing in graphic style
A decorative still life can be done in the style of graphics. The peculiarity of this drawing technique is that shadows and light are shown not by the transition of colors, but by the directions of strokes, as well as in the form of various spots and dots. Black and white is typical for this style, but it is not forbidden to use colored lines.
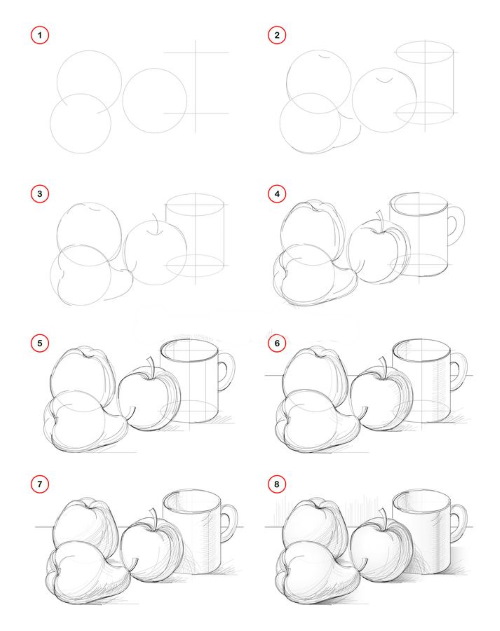
This master class describes a still life with an image of metal utensils. This will be a standing jug with a narrow neck and a rounded base, a lying jug with a wide neck and a glass on a saucer. In the background, a crumpled canvas and the edge of a wooden table will be depicted.
For work, you can use a simple pencil, a black gel pen, or black gouache mixed with artistic ink in equal proportions. You can use several materials at once, for example, gouache + ink + gel pen.
How to draw:
- Make a sketch with a simple pencil. Draw a horizontal line indicating the edge of the table.
- For each object, draw axes indicating its height and width. For the largest jug, make more marks indicating where the shape narrows and widens. These marks will make it easier to draw smooth lines.
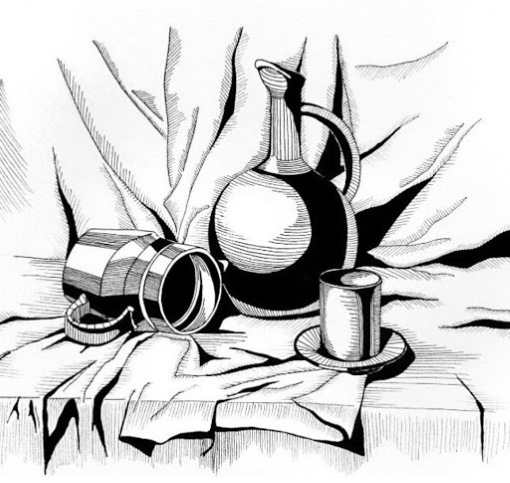
- Draw the outline of the dishes.
- Draw the inner parts and handles.
- Draw large folds of fabric on the background. They should be located in the direction from the corners to the center. The folds should look thinner toward the middle of the drawing.
- Erase all auxiliary lines with an eraser.
- Trace the outline of the drawing with a gel pen or ink mixed with gouache, using a thin brush. In the first case, the drawing will be more accurate.
- Take a medium-sized brush, pick up some black paint, paint all the shadow areas on the lying jug. The neck from the inside, the bottom part, a small area on top. Inside the neck, apply 2 small strokes along the edge to imitate dark reflections.
- By analogy, you need to paint over all the large shadow areas on the largest jug. This will be the back of its neck, the lower part of the bottom, the inside of the handle, the right side of the widest part. It is important not to paint over the last area up to the right border. There should be a narrow free space between the black spot and the outline of the drawing.
- On the rounded part of the jug, closer to the left side, there should be 1 large, round highlight left.
- The inside of the glass should be painted on the left side. A horizontal stripe should be drawn in the front. A shadow should be drawn on the saucer and its base should be painted.
- Darken large folds of fabric where they form shadows.
- Once the paint is dry, start applying strokes. They can be applied with a gel pen or black paint and a thin brush.
- Use horizontal strokes to fill the central part of the lying jug, and also depict a shadow on the folds of the fabric where the canvas lies on a horizontal surface.
- Apply horizontal strokes to the edges of the round highlight on the largest jug.
- Darken the edges of the glass, leaving a light spot on the left.
- Use vertical strokes to fill the handle of the lying jug, as well as the neck of the standing vessel.
- Darken the folds of the fabric that fill the tone by applying strokes at different angles.
Fill in other parts of the drawing with lines that repeat the shape of the elements being colored.
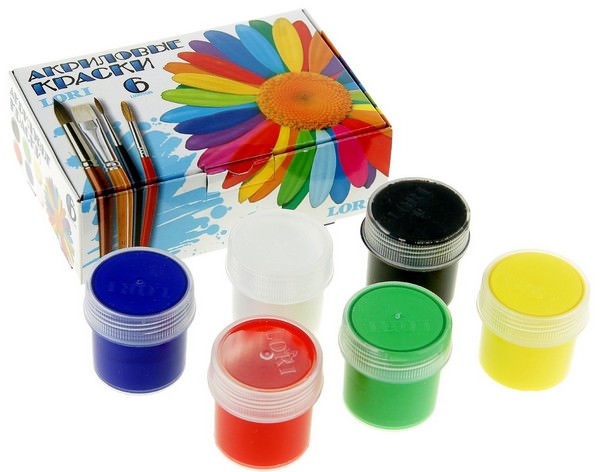
Simple acrylic painting
A decorative still life (in different styles of drawing, you can combine paints with acrylic pencils), painted with acrylic paints, will turn out bright and beautiful. This master class describes a drawing that depicts a watermelon and 1 watermelon slice.
What paints are needed for the work:
- green;
- yellow;
- black;
- red;
- white;
- brown;
- blue.
Procedure:
- Using a simple pencil, draw a horizontal line indicating the boundary of the surface on which the watermelon lies.
- Draw a large, elongated watermelon.
- Draw some twisted furniture and a leaf on its top.
- Draw a slice of watermelon nearby.
- Draw the border between the crust and the pulp in the form of an arched line.
- Inside the slice, depict several large teardrop-shaped seeds.
- On a horizontal surface, mark the area where the shadow from the watermelon falls.
- Paint the watermelon, its stem and the rind of the slice green. It is important to apply strokes, repeating the shape of the objects.
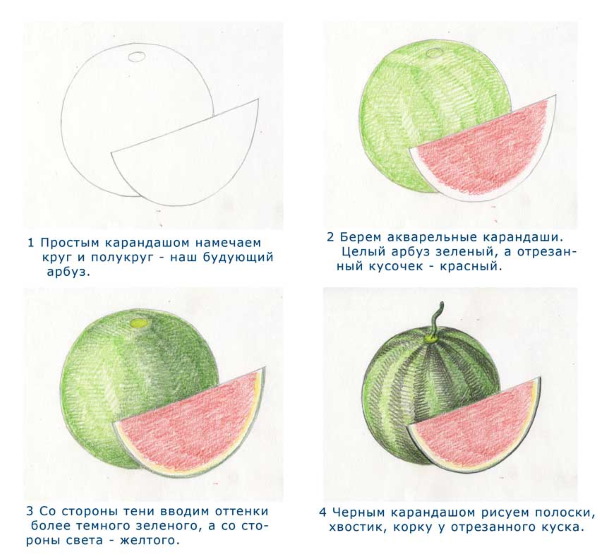
- When the paint dries, use small strokes to paint the flesh of the watermelon slice red.
- Using a dry brush with stiff bristles, paint 3 wide stripes on the large watermelon with yellow paint.
- While the paint is still wet, add 3-4 long strokes of green to the center of each strip.
- Mix green paint with a drop of black. Use the resulting shade to darken the bottom of the watermelon, as well as the bottom of the slice. Mark the shadow on the watermelon leaf.
- Mix red with white in a 3:1 ratio. Lighten the top of the watermelon slice by applying the paint with a dabbing motion.
- Paint the surface of the watermelon with brown, without touching the area where the shadow will be shown. The strokes should be short and horizontal.
- Paint the background with blue. The strokes can be applied in a chaotic manner.
- Use black paint to draw the seeds inside the watermelon slice.
- Mix brown with 2 drops of black. Mark the shadow under the watermelon by applying horizontal strokes.

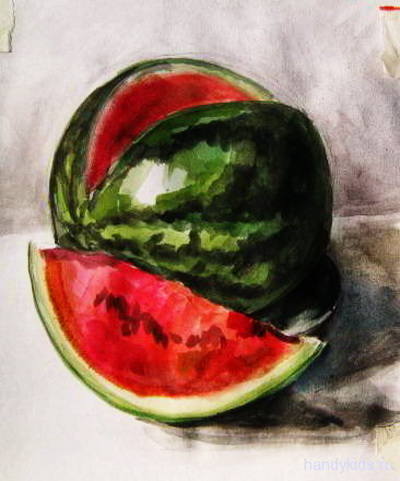
Using white paint, add a highlight to the left side of the round watermelon.
Still life with gouache
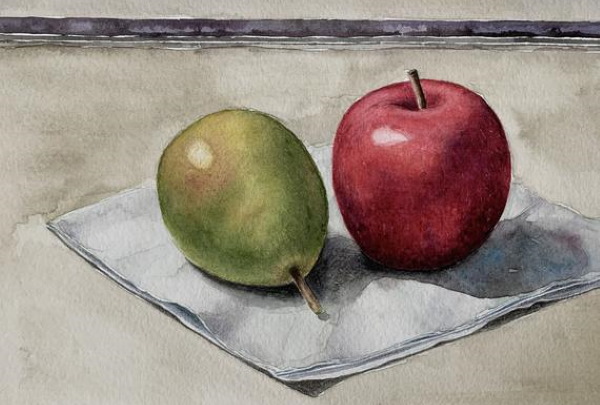
Gouache is a thick paint. Therefore, it is easier to apply it with brushes with hard bristles. This instruction describes a drawing that depicts a clay pot, an apple and a pear.
What paint colors will you need for the job:
- blue;
- black;
- brown;
- yellow;
- red;
- orange;
- green.
How to draw:
- Using a simple pencil, draw a horizontal line to indicate the boundary of the surface on which the objects are located.
- In the center of the drawing, mark the middle of the clay pot with a vertical line.
- Use 3 horizontal lines to mark the width of its bottom, middle, and the size of the neck.
- Draw a pot.
- To the left of it, depict an apple, and to the right, a pear lying on its side.
- Erase all auxiliary lines.
- Dip a wet brush in blue paint and blend the pigment into the background and under the objects.
- Pick up some blue again and make a few strokes, painting the bottom edges of all the objects.

- Paint the top of the pear, the right side of the apple and the middle of the wall of the pot with yellow paint.
- Mix brown with yellow in equal proportions. Paint the pot, leaving the yellow highlight in the middle untouched.
- Paint the left side of the apple red.
- Using orange paint, make 2-3 strokes on the yellow part of the apple, closer to the edge.
- Paint the top of the pear green, as well as its lower part. Without washing off the paint, lightly moisten the brush with water and make 3-4 strokes on the yellow part of the pear.
- Use brown to mark the shadows on the pot and also darken its inner part on the left side. Draw a tail for the apple.
- Use orange paint to make a few strokes on the wall of the pot, on the side where the apple is located.
- Mix green paint with a drop of blue. Use the resulting shade to darken the bottom of the pear and draw its tail.
Dilute black paint with water and apply a few strokes under the objects to imitate shadow.
Drawing with watercolor pencils
The lead of watercolor pencils is much softer than that of ordinary pencils. Due to this feature, these pencils are easy to shade. The color transitions are smooth. This master class describes a drawing that depicts an apple and a pear.
What colors of pencils are needed for work:
- grey;
- green;
- orange;
- red;
- yellow;
- ochre color;
- brown;
- black;
- white.
How to draw:
- Using a simple pencil, draw a horizontal line down the center of the sheet.
- Draw an apple and a pear to the left of it.
- Draw tails and large highlights on the fruits. The highlight on the apple will be located slightly higher than on the pear.
- Mark the area where the shadow from the fruit will fall.
- Erase all extra lines.
- Using a grey pencil, draw horizontal strokes to paint over the surface on which the fruit lies. There is no need to paint over the area indicating the location of the shadow.
- Color the right corner of the background with the same pencil, applying diagonal strokes.
- Shade the left corner of the background in green.
- Blend all strokes.
- Paint the apple orange, without pressing on the pencil. The strokes should be applied in a circle. The highlights should remain white.
- Using a yellow pencil, without pressing, paint over the pear, without touching the highlights.
- Blend all lines.
- Paint the tails of the fruit brown.
- Using a red pencil, carefully shade the bottom of the apple and highlight the blush on its right side. Blend the lines.
- Using an ochre pencil, highlight the shadows on the bottom of the pear and also mark the spots on the right side.
- Use a black pencil to highlight the shadow under the fruit.
Use a white pencil to shade the highlights. Rub the strokes so that the white color slightly covers the other shades within the highlight.
Black and white ink drawing
A decorative still life (in different styles of drawing, ink is mixed with gouache so that the paint lays down on the paper more densely) can be drawn in black and white, using only artistic ink. This master class describes a drawing that depicts a jug, a plate with potatoes, a bunch of onions and 1 mushroom.
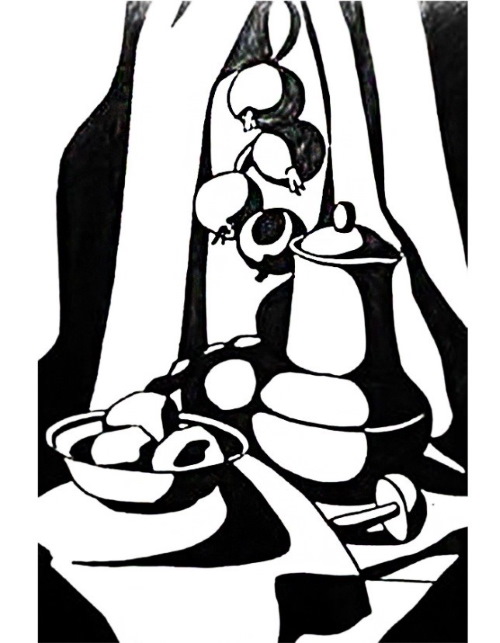
How to draw:
- Draw a horizontal line with a simple pencil.
- Draw all the objects in the following order: a plate with potatoes on the left, a jug in the middle, a bunch of onions above it, and a mushroom on the right.
- Add large folds of fabric to the background.
- There are no half-shadows in this drawing. The dark areas are completely filled with black. In order not to lose the boundaries of the objects, the drawing should be outlined using ink and a black brush.
- The light will fall on the objects from the left side. This means that the right side of the drawing will be dark.
- Paint over the folds of the fabric where they create shadows.
- Next, you should darken the right side of the jug, its lid on the right side. The protruding lines should be left white. They make the outlines of objects clearer. On a white background, these lines should be continued, finishing with black.
- Paint half of the mushroom cap and the lower part of its stem.
- Darken half of each onion.
- Draw a shadow on the potato and on the plate.
It is important to draw the boundaries of light and shadow smoothly and semicircularly. Straight lines will spoil the drawing and deprive it of visual volume.
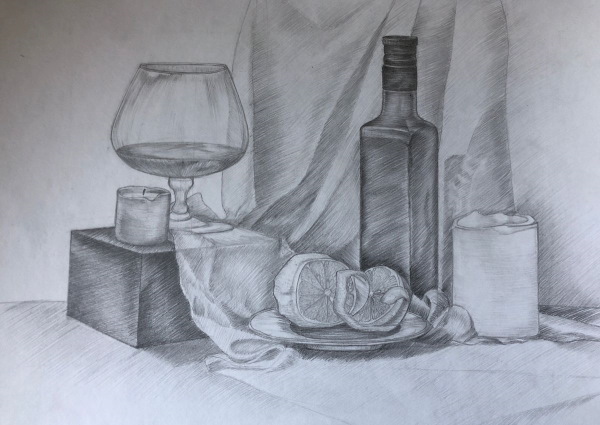
Examples of images for copying, tips for beginners
Tips for aspiring artists:
- The ink sketch should be barely noticeable. You can't press on the pencil, otherwise the dents from the graphite will be very noticeable even after coloring.
- Before applying the final touches, in the style of graphics, you need to think about their placement. Incorrectly applied lines will distort the picture.
- Pencil strokes should be shaded lengthwise, not across.
- It is important to remember that gouache becomes lighter after drying. Therefore, before applying any shade to a drawing, it should be tested on an unnecessary piece of paper. Apply several strokes and dry them, then compare whether the result matches the expectation.
Decorative still lifes can be drawn in black and white or in color, using different styles and tools. The main thing is to learn how to draw the shapes of objects correctly, as well as correctly determine the cardinal directions and shadows. For copying, you can use the images presented in the article.
Author: Frolova Ekaterina
Video about drawing
Decorative still life in different styles: