A seat pad for a chair can transform even an antique that resembles the very stool that stood at your grandmother's dacha. Diversity crochet patterns allows you to choose a unique pattern to decorate your interior. And a large selection of colors allows you to knit an unusual pattern for the seat, decorate it with a side and add pompoms.
By choosing the yarn and hook size, you can create home decorations that will instantly transform your boring interior style.
Choosing a hook and yarn
A crochet chair seat can be knitted from any yarn. Intense colors of threads with different parameters will do.
For the seats, you can use yarn that is extra soft so that it is comfortable to sit on for a long time.

Decorative pillows can be knitted from any thread, the main thing is to select the correct hook size.
- You should not buy yarn with a high wool content, as the cape will be constantly washed. The only exceptions are those products that are designed to insulate the surface of the chair.
- The width of the cape should be medium, no wider than the surface of the stool.
- The yarn should also not be too thick even for an insulated cover - 120-240 m per 100 g is enough.
- If the threads will be of different colors, it is important to choose yarn of the same width so as not to change hooks and not distort the future pattern.
- The Iris brand is considered one of the best. High-quality yarn easily withstands multiple washings, the wool does not shrink.
- For square and round threads, hooks starting from No. 3 and above are suitable. A hook less than 3 mm in diameter will not work even for thin threads.
- The quality of the threads directly affects the durability of the product. It is better to choose at least 3 threads in the yarn composition.
The hook should be chosen according to the yarn. An incorrectly selected tool will make the product loose, with a large number of gaps. The thin place should be 2 times smaller than the width of the thread.
To select the correct yarn thickness, you need to do one of two things:
- The thread of the selected yarn should be placed in the “hole” of the hook so that it lies freely in it. It is permissible to slightly stretch the wool yarn to eliminate the error due to the fluffiness of the fibers.
- When the thread fits completely into the “hole”, it means that the hook is selected correctly and the size is suitable for this yarn.
- When the thread completely falls into the groove, it means that the hook is selected incorrectly - you need to choose a No. with a smaller groove size.
- When the yarn fills the groove and sticks out so that you can't see the hook head, it means the yarn is too thick. You won't be able to knit and the stitches will slip off. You need to choose a larger tool.
Another way to choose a hook:
- You need to know the size of the yarn diameter if it consists of 1-2-3 threads.
- The hook's diameter should be 2 times larger than the thread's diameter.
- If the fabric needs to be knitted in an openwork manner, then you should choose a thick tool for a thinner diameter thread.
- A fabric with a dense pattern can be knitted if a hook for the same yarn is selected.
- In other cases, the canvas is uniform.
For detailed selection of the hook, you can use the diagram:
| Hook number | Yarn type |
| 0.5-1.0 mm | Thin cotton threads |
| 1.25-1.75 mm | Cotton threads or other yarn of appropriate thread thickness |
| 2.0-3.5 mm | Average thread thickness |
| 4.0-5.0 mm | Medium thickness double thread yarn |
| 5.5-6.0 mm | Fluffy double yarn |
| 7.0-8.0 mm | Tapestry wool or voluminous double-thread yarn |
| 9.0-10.0 mm | Twisted thick yarn with several threads |
A crochet chair seat of any size and with suitable yarn can be knitted in the shape of a square or circle. Additionally, you can use pompons, fringe, designer patterns. Depending on the selected type and shape, you can combine patterns, color schemes, creating new designs and knitting styles for the same interior elements.
Knitting calculation
To calculate the yarn consumption for a specific product, you need to know its exact length by rapport, as well as the thickness in diameter of all yarn threads. There are various online calculators, but they are not suitable for accurate calculations due to the lack of fabric sizes.
Below is a calculation table to help you select the optimal combination of thread thickness, knitting density, product type and material consumption for a specific fabric size.
| Number of loops | Received length (cm) | Quantity m/ 100 g |
| 8 | 10 | 40-60 |
| 12 | 10 | 70-90 |
| 14 | 10 | 90-120 |
| 16 | 10 | 120-180 |
| 18 | 10 | 190-220 |
| 20 | 10 | 230-300 |
| 22 | 10 | 280-320 |
| 24 | 10 | 310-350 |
| 28 | 10 | 380-450 |
| 32 | 10 | 450-520 |
If you can't use the calculator because you don't have the sizes, you'll have to knit a sample from the yarn you'll be using in your work. You'll have to buy 1 skein to experiment.
Method one
You need to create a pattern for the future product and calculate the yarn consumption:
- You need to take graph paper and attach it to the pattern.
- The length of the product can be determined by the squares.
- All obtained data must be multiplied by the number of chair covers.
- The resulting value for squares must be multiplied by the length of the yarn in the finished sample, the length of which corresponds to the length of the future chair cover.
This method is convenient because you can immediately see how a thread or several threads will look in the finished work.
Method two
Unlike the first method, this one will require a bit of mathematical calculations.
- The knitting sample should have the following rapport dimensions: 10*10 cm.
- Next, you need to determine the area of the sample. At 10*10 cm, its parameters are 0.01 m2.
- Then you need to weigh the sample on jewelry scales. If you don't have them, you need to find out the weight of a specific cut. This number needs to be divided by the weight of the whole skein and the length of the threads, then multiplying the numbers with the length of the thread in the cut.
- Next, you need to multiply the area of the finished product by the weight of the knitted sample, so that you can then multiply this number by its area.
This method is more time-consuming, but provides more accurate calculations.
The third way
This method requires knowledge of the yarn number and size.
- Knowing the thickness and number of threads in one yarn, you can find out the length of the yarn in the whole skein.
- It is necessary to divide the first number on the label by the second number, as a result you can get the value of yarn consumption or its consumption. If the skein indicates 50/5, then you get 10.
- When you specify 20/4 you get 5. This number indicates the number of meters needed to obtain one gram of the product.
- If the length of the whole skein of yarn corresponds to 100 g of weight, then with 20/4 data you will need 500 g of yarn.
These calculations are relative, since manufacturers cannot know the knitting style, the exact parameters of the patterns. It is recommended to add 10% to the yarn consumption after calculations due to the error.
A crochet chair seat can have different shapes and sizes. There are ready-made rapports, according to which you can create a pattern for the future product, or change it to suit your taste.
Depending on the color and desired size, there are standard square covers, solid covers and round seats:
| One-piece case | It will take more time, given the specifics of taking measurements and calculating yarn consumption. |
| Round seat | The easiest option for knitting a cover for a stool or chair. Round covers can be knitted in a few hours due to the lack of need to knit the corners. |
| Square seat | More difficult to make, but more choice for design. In total, there are more than 10 different styles of knitting covers for square seat shapes. |
| Border | It can be present in both square and round covers. It is convenient because thanks to it the seat does not slide off especially from a smooth slippery surface. |
The creation of any covers consists of several basic stages. The complexity and duration of the work depends on the knitting principle and the multi-layered colors.
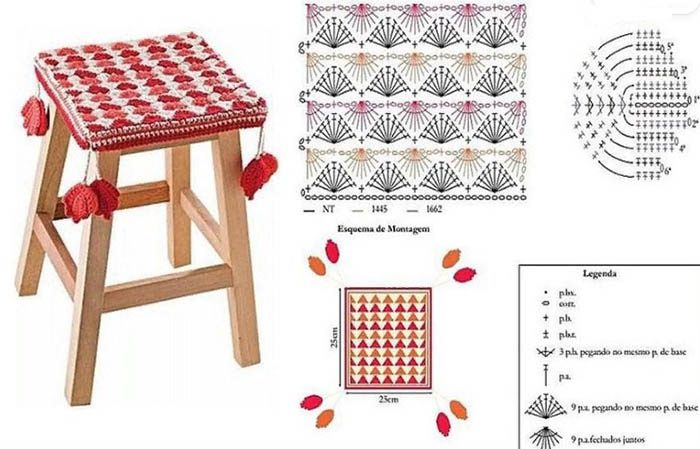
Square Chair Cover
Square seat mats have become even more popular as new yarns have emerged to create unusual patterns. Chinese and Japanese style knitting techniques have also become available. This allows you to decorate your interior in a specific style.
To knit square covers you will need:
- yarn of different colors, 50 g of each shade;
- hook No. 3;
- scissors;
- threads and a needle.
In the process of knitting the seat cushion, you need to alternately change the colors of the threads so that the pattern is even and beautiful.
- First, you need to dial 6 VP and connect the chain into a ring by knitting one BN loop.
- After knitting the connecting loop, you need to dial in the next row as many VP as is required to knit the length of the product. Also, the row needs to be closed with a lifting loop.
- Next, you need to knit 8 sc, closing the entire row with 1 VP.
- Next row also knit 8 sc and close 1 VP + make 1 loop for lifting.
- Then you need to change the thread and knit 5 VP: 3 loops for lifting and 2 VP to create an arch.
- In subsequent rows, every 3rd column should be knitted with double loops. Finish with connecting loops. The hook should be inserted into the connecting loop, after which 1 VP should be knitted in the 3rd loop of the row. The thread should be pulled out and knitted 2 loops in the next color.
- Then you need to dial 3 VP. Then using 2 columns with 1 yarn over, knit an arch for the next color. In the same row, you need to make 1 VP and 3 columns for an arch of two loops, knitted together simply VPBN.
- Between the double columns in the next row you need to knit 1 VPBN.
- Next, you can take a new color of thread, knit 3 VP + 2 double crochets on the arch from the previous row.
- In the same row, you should knit 3 VP and 3 columns, and then repeat the pattern rapport to the end of the product. In each row, you need to knit 3 columns, 3 VP and 3 more columns. This is how the pattern is repeated, and the color of the threads can be changed.
- Next, you need to knit the built-in columns according to the previous pattern, but with a new thread color. On each side of the rapport, you get 3 columns.
- Up to row 14 the pattern repeats, however there will be more columns with each row.
- Then in the last row you should knit 11 loops and columns on each side.
- Row 15 will only have built-in double crochet stitches.
- Up to the 18th row, you need to knit according to the pattern with repeating double crochets and 3 additional loops.
- In rows 19-21, you need to reduce the rows by skipping one arch on each side. In the corners, you need to knit a SC pattern.
The seat for the chair can be crocheted with hook No. 4-5, so that the pattern is less dense. The thread consumption is reduced to 200 g per square cover. You can combine colors and patterns so that the back side turns out the same as indicated in the pattern. Using a thread and a needle, you can secure the colored yarn. The finished product should be washed and dried, then steamed.
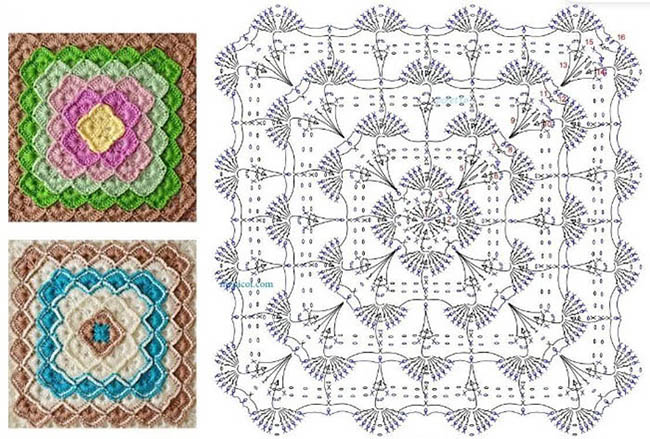
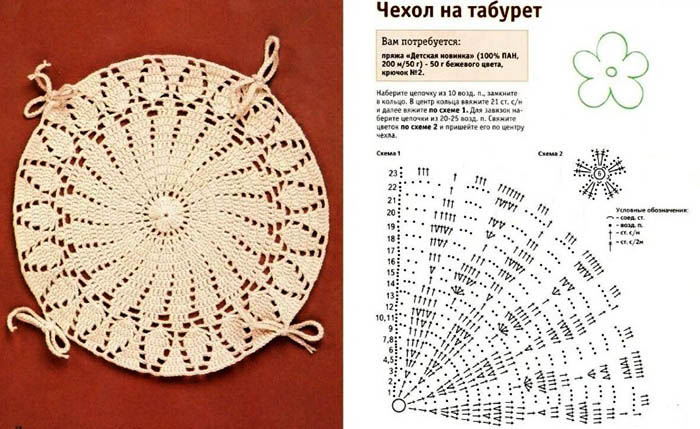
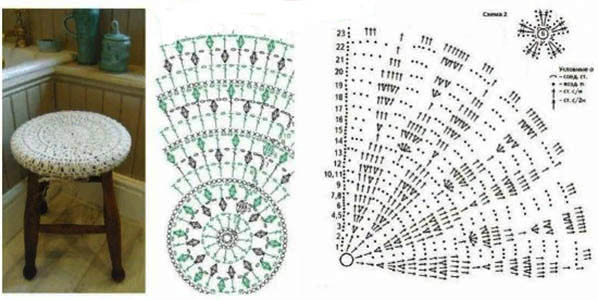
Round seat
Round covers for chairs and stools are much easier to knit due to the simplicity of the shape.
The basic principles are as follows:
- The main length of the chain of air loops is equal to the circumference of the inner circle.
- To raise the whole, 2 VP and 7-8 single crochet stitches are collected to knit the ring.
- Additional knitting of loops for lifting is performed above each column.
- Blind loops can be knitted between the columns or leave arches of 2-3 VP.
- Several half-columns are usually added to the arches, 5-7 loops are knitted and yarn overs are added to stretch the loops.

This pattern is considered basic for all rapports that can be found in master classes. You can use multi-colored threads, change the levels of joining colors, replace columns with purl ones, so that the pattern turns out as in the pattern. In this case, you can change colored threads every 2-3 rows to save yarn consumption.
To create a round cover, you will need 15 shades of yarn, 1-2 skeins each, and 3 skeins of neutral yarn for the base. If the consumption is too large, you can reduce the number of colors by knitting not one, but two rows of loops in each color.
You can also use hook No. 3 to make the fabric denser.
- First, you need to knit the base. The smaller the ring, the more double crochets you will need to knit to increase the circumference. You should start with the 1st row and knit a ring of SC + 2 VP. You can count it as 1 CCH and 11 CCH, where the connecting loop goes into the second VP. The ring is tightened.
- Next you need to knit a row through the back half loops.
- In the 2nd main row, you need to knit for the back half loops of the subsequent columns SC and 2 VP + 1 DC. Then knit 2 DC for the half loops at the back on each column, and then knit a sl st through the second VP. There will be 24 DC in total.
- In the 3rd row, for each half loop of the back column, you need to knit a sc and 2 VP + 1 dc. The last one needs to be knitted for the next loop 1 dc, and in the next loop make 2 dc. Repeat this 11 times, then knit a sl st through the second VP. You will get 36 dc.
- In the same way, you need to continue knitting the circle, adding 12 SC in each row. You should knit until the desired size of the seat. You can replace SC + 2 VP with 3 VP, but then there will be no space between the first SC and the last sl sts.
- Next, you need to knit the petals according to the rapport. To do this, you need to knit the sliding loops for the front half loops with a separate thread.
- Then you should tie a sc, add 5 air loops and tie a sc in the same VP as the first sc. You will get an arch, to which you need to add 1 VP.
- Then from the last VP you need to knit a single crochet, 5 VP, single crochet, stepping back 2 loops.
- Repeat the previous step two more times.
- The row should be finished with a slip stitch, adding 1 VP to the 1st sc. There is no need to cut the thread. You will get 4 arches with slip stitches.
- Then you need to tie the arches: dial a sc into the arch, knit 2 VP, add 1 dc, then 4 dc + 2 VP, finish with 5 dc. You will get one petal, which needs to be secured with a sc for the jumper from the previous arch (1st VP).
- Just like in the previous step, you need to tie 5 dc, 2 ch and add 5 dc into the arch, but close the sc through the jumper from the slip stitch.
- The next row is knitted as the first, in p. 11, but the distance between the arches should be increased by +1 loop. The next row is knitted as in p. 12, but 3 VP are pulled into the jumper.
- To secure the petals, you need to knit a single crochet through the jumper and simultaneously knit with the middle loop from the previous 3 skipped between the arches.
- The remaining rows should be knitted as the 3rd in item 11.
A crochet chair seat in this color can decorate a kitchen or a hall. If desired, it is permissible to knit more rows in one color to save yarn. You can also add a border to the cover or knit a separate elastic band for better fixation with the chair. If you need to select a detailed knitting pattern with a clamp, the master class is presented in the next section.
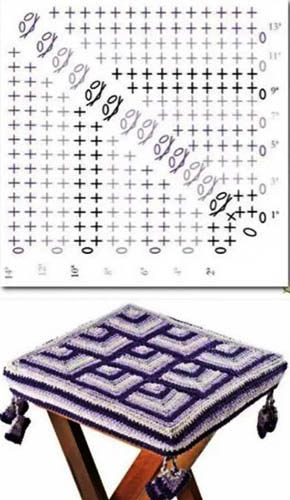
Seat cushion with border
The cover for a chair or stool with sides should be denser than a seat without fasteners. For work you will need a hook No. 4 and one-color yarn. If the amigurumi technique is familiar, you can borrow from it the process of creating the beginning for the future cover.
If not, then it is worth starting from the first loops:
- It is necessary to knit 1 loop, and from it knit all 6 columns BN. The blank allows you to create a dense fabric.
- Then you need to knit a loop for lifting and knit a single crochet with additions.
- To make an addition, you need to knit two loops from one loop. This will give you 12 VP.
- There should be as many rows as needed according to the pattern to create the cover.
- Add 6 sc to each row.
- Slip stitches can be knitted with elastic thread.
- The border or edge should be 1 cm larger than the pattern so that the pattern repeat fits into the size when stretched.
- As the seat expands, you can try the product on the chair.
Additionally, you can decorate the canvas with various decorations knitted from the same yarn threads.
With pompoms
To make the seat look more interesting, you can add several options of knitted decor:
- Tassels with lace - you can run a thread along the edge, which will be used to attach future tassels. After folding the yarn in half, you need to determine the center, tie it. The free edge should be trimmed and cut.
- Pompoms are suitable for decorating a living room or a child's room. They are made in the same way as tassels, only with a shorter pile. For more voluminous pompoms, you can take acrylic thread and three times more layers of yarn.
- Embroidery has always given finished products an unusual look. You can embroider patterns or ornaments on top of any seat cushion. This will make the cover look even more interesting.
- Beads are also used for decoration. Together with them, leggings put on chair legs look unusual.
- And bows made of ribbons or fabric will complement elegant decorations created with your own hands.
A chair seat can decorate any interior thanks to the possibility of choosing a huge number of yarn colors. Crocheted items and decorative elements easily transform the appearance of a room, update the interior style and breathe freshness into old furniture. Depending on the chosen pattern, density and tools, you can create unusual chair covers.
Video about knitting