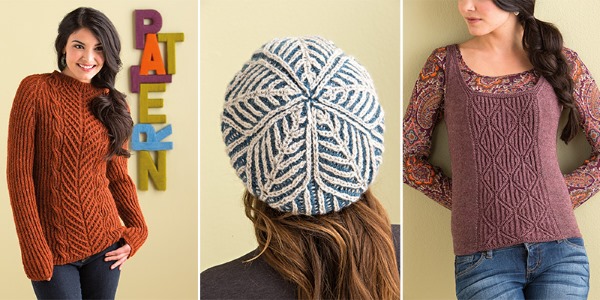
Brioche, or brioche knitting, looks very impressive: bright multi-colored stripes in various combinations. At the same time, technically, such knitting is performed quite simply. This is just a new twist on the English (patent) elastic band.
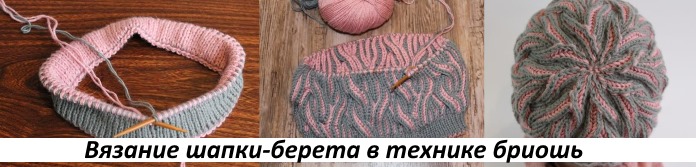
Brioche direction: what is it, knitting characteristics
The fabric in this technique is double-layered, reminiscent of arches going into perspective, an accordion, or fish scales. The specifics of the technique suggest that some places are doubled, thanks to the dropped threads. The result is a very warm, flexible, voluminous fabric. It is suitable for almost any yarn products.
It should only be taken into account that the thickness will be 2 times greater than usual. The fabric stretches perfectly, that is, it is better to use it for small or tight-fitting things. In this technique, it is permissible to make a small bag on a frame, but it is difficult to make a blanket, because it will not hold its shape.
It is best to make warm and demi-season items: socks, leggings, shoe parts (for example, knitted ugg boots), scarves, hats, berets, turtlenecks, pullovers, fitted skirts and dresses, cardigans, mittens, gloves.
Presumably, this technique appeared in the Middle East. There is no single version about the origin of the name either. Perhaps the word comes from the French slang "error". But, most likely, this name was inspired by a French bun consisting of two parts, one of which is placed on top of the other.
How to learn to knit using brioche technique, what you will need for this
Brioche is a knitting technique that can be challenging for beginners, but is mastered quickly. The process is made easier by alternating colors, adding excitement. To get the hang of it and make your first item (preferably a small one, such as a scarf), it is enough to first knit 1-2 samples measuring 10x10 cm.
Tips for choosing knitting needles and yarn
Theoretically, any yarn is suitable for brioche. However, since the fabric is voluminous and warm, “winter yarn” is usually chosen: wool, wool with acrylic, wool with various additives (polyamide, silk, nylon).
High-quality acrylic will also do. This type of yarn perfectly accepts any dyes, retains a bright and pure color, which is especially important for multi-color options where high contrast is desired.
Any fluffy yarn (mohair, angora) will not work. And it is better to avoid alpaca if it is very fluffy, which will deprive the texture of expressiveness and clarity, plus the strain on the eyes will increase. It is preferable to choose smooth threads, with superwash processing (laster wool), with a strong or medium twist - they will give a relief, clear, beautiful pattern.
Patent elastic consumes much more yarn than regular elastic, braids, or stockinette stitch. It is better to take yarn with a double reserve. Or to calculate the expenses in advance using a sample.
The knitting needles are selected according to the thickness of the yarn. Most often, knitting needles #3 or #4 are used in brioche to create demi-season and winter hats and scarves. It is advisable to knit the fabric quite tightly. Loose fabric will not hold the lines of the pattern. If in doubt between two numbers, you should give preference to the smaller one.
Step-by-step description of knitting techniques for beginners
The brioche base is a patent elastic band.
It looks the same on the front and back side, elastic, clear. It differs from the usual one by its increased splendor and relief. There are two techniques for its execution.
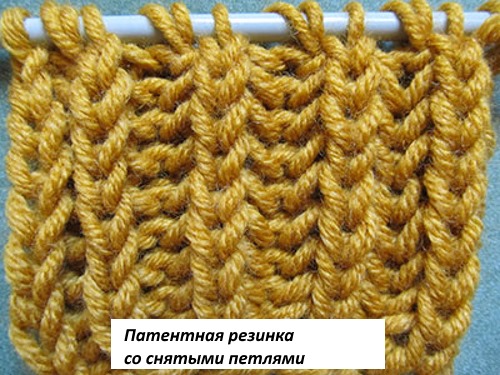
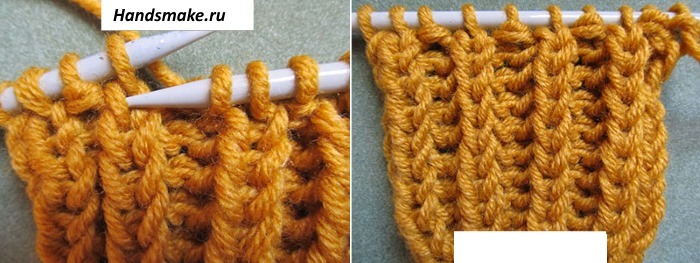
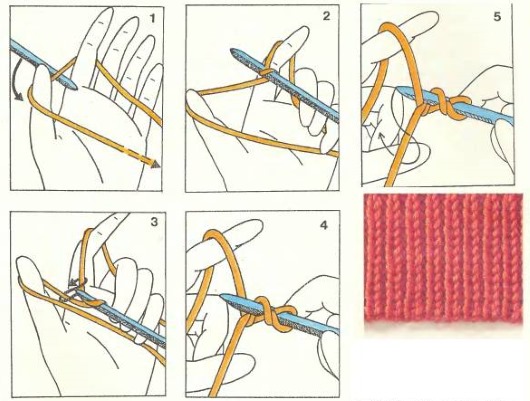
Method 1: Patent elastic with loops removed
This type of elastic is also called English. Sometimes some beginners believe that these are different techniques, but they are absolutely the same, both in execution and in the result. When performing, purl stitches are not used at all, only facial ones, so the pattern is knitted quite quickly.
Sequence of execution:
- The number of stitches for the pattern should be odd. In some sources you can find a recommendation to cast on an even number. The odd number is correct, in order to maintain symmetry.
- In the first (front row) knit: 1 edge stitch (it is simply removed, as is always done), *1 front stitch, 1 removed (thrown onto another knitting needle) loop with a yarn over (without any twists!). The sequence from * is repeated, 1 edge stitch as a purl stitch. There must be a front stitch before the final edge stitch so that the edges of the fabric look the same.
How to make a yarn over? The working thread is simply thrown over the knitting needle in the direction convenient for it, no twisting is required.
- In the second (purl): remove the edge to the right side, then *1 thrown over with a yarn over, 1 front (in this case, the yarn over from the row below is captured, i.e., two threads at the same time). Alternate from *.
The second and third repeat the required number of times. Important: the loop with a yarn over is always knitted as a front loop, in the next row it is simply removed and the thread is immediately thrown over.
It is easy to notice that each loop, without exception, ultimately comes from two threads knitted together. But the distribution of the threads is different than if they were simply taken double. This nuance gives the pattern such expressiveness and density.
What might be difficult:
| Beginners are often confused by the fact that the pattern is difficult to see at the beginning. | Indeed, pronounced vertical lines will be noticeable only after completing 5-6 rows. |
| There is no need to mix classic and “granny” stitches. | Beginners often confuse these types of loops, because there is no fundamental difference between them. It is about which way the loops are turned - either to the right or to the left, respectively, the right wall can lie either in front or behind the knitting needle. The grip with the working knitting needle is made either by the front wall (classic) or by the back wall (granny's method). It is important that only one method is used in one product. |
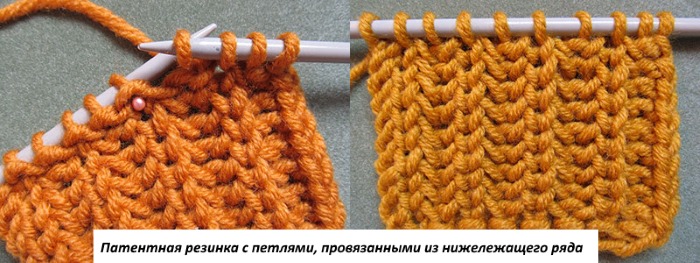
Method 2: Patent elastic with loops knitted from the row below
It is sometimes also called a fluffy elastic band.
It is performed as follows:
- The number of loops for the pattern is odd.
- 1 row: knit with a standard 1x1 elastic band.
- 2nd row: the same, but when performing the front tool, you need to insert it one level lower, into the stitch from which the loop of the current row comes out. Thanks to this technique, the front of the current row simply lies on top of the underlying one, giving it volume, and the thread on the tool turns out to be double. Repeat the alternation of purl and these specific front ones.
The result will be the same as the first method. To make sure, you can try both methods on one sample.
Circular knitting
Circular knitting needles are used for this. It is important that the work does not twist during the process. Otherwise, the techniques are the same. Perform a set edge, close it into a ring in the first row.
One of the possible options is described step by step below (list number – row). Legend: front – L, slipped with yarn over – SN, purl, knitted from loop with yarn over – I, front, knitted from loop with yarn over – LP.

To begin, cast on a number of loops in 1 color that is a multiple of two + 1 loop (it is needed to close the ring, after which it is removed):
- First color: L, CH.
- Second color: CH, I.
- First color: LP, SN.
Alternate between points 2 and 3.
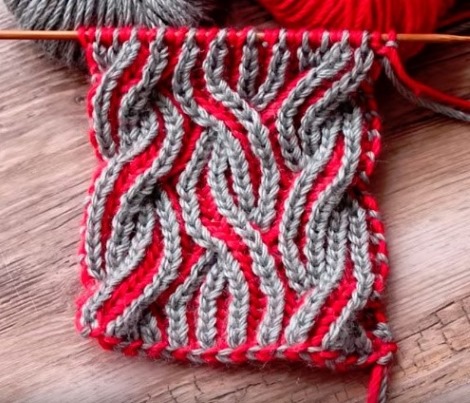
Wavy English elastic
For those who know how to knit "braids" on a regular stockinette stitch, such an elastic band will not be difficult. The essence of all "braid" patterns is the transfer of loops to an additional knitting needle. The directions and combinations of transfers can be very different. Working with the right knitting needle, the process continues sequentially with both knitting needles: with the left and the additional one.
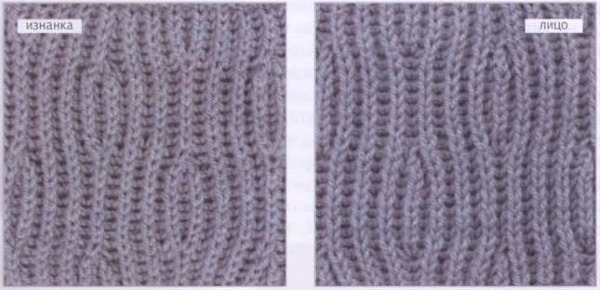
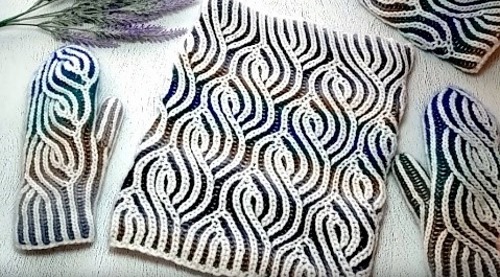
Sometimes, wavy brioche elastic is used to refer to patterns made not with braids, but using a different principle: using decreases and increases. This option produces a smoother fabric, and the waves are not three-dimensional, but two-dimensional - bright stripes on a contrasting background. Decreases and increases are discussed using the example of a scarf below.
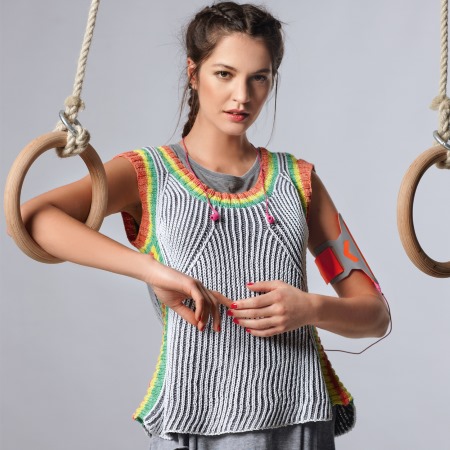
Two-color patent elastic (English elastic)
Often used to create things in a sporty style. There are several ways to make a two-color elastic band. The first is with an offset of the product on the knitting needles (you will need tools without a limiter) and making 2 rows in one direction - in this case, the fabric will be the same from the front and back. This technique is explained in detail below, in the instructions for the scarf.
This method is described for those who have knitting needles with a limiter, and the fabric needs to be turned over at each step. And although the front side will also have colored relief sides, on the back they will not have a mirror image.
The number of loops must be a multiple of three. Plus 2 edge loops. Cast on loops with the first color thread. The technique described below assumes that almost everything is done with purl stitches, the thread is passed not in front of the slipped stitch, but behind it.
Sequence (item = row):
- Auxiliary. Remove the edge stitch (hereinafter referred to as KRP). 1 front stitch (LP), make a yarn over (Y), remove the loop, the thread lies behind it (SN). Repeat LP, H, SNP the required number of times. At the end, knit the KRP "granny's purl". In the future, all KRPs at the end of the row should be done exactly like this.
- Remove the KRP. *Make a y-loop. Place the yarn over loop on the right knitting needle (RKN). Purl (P)*. Repeat from * to *, i.e.: y-loop, PKN, P. At the end, before the RKN, attach a thread of a different color. RKN - with two threads at once.
- Bring the thread of the first color to the front of the product. The working thread will be the thread of the second color, take it back. Remove the KRP to the right knitting needle. *Make H, SNP. A loop with two yarns (this is the PPN from the previous row) - like LP*. Repeat from * to *, that is, the sequence is as follows: H, SNP, LP. The entire row is made with the thread of the second color.
- The fourth row is also done with a thread of the second color. Remove KRP. IP, N, PPN.
- Color change. The process is continued again with the first color thread, this thread is pulled back. The edge thread is removed. LP from a stitch with 2 yarns, H, SNP. The sequence LP, H, SNP must be repeated the number of times.
Then everything is repeated from the 2nd row (skip the auxiliary one). Perform the actions described in points 2-5.
A simplified step-by-step diagram looks like this:
- LP, N, SNP – 1st color.
- H, PPN, IP – 1st color, securing the other at the end.
- H, SNP, LP – 2nd color.
- IP, N, PPN – 2nd color, color change.
- LP, N, SNP – 1st color.
To close the edge of such a pattern, make the second row of the pattern with the thread of the first color. Turn the work over and start closing. Remove the edge stitch, knit the front stitch, throw the edge stitch over the front stitch. Next comes a stitch with two yarns, they need to be knitted with one front stitch and throw the previous one over it.
Stages of knitting products with knitting needles using brioche technique
Brioche is a knitting pattern that is very difficult to unravel. Reworking even a small piece will require a lot of effort.
Be sure to knit samples and carefully calculate in order to avoid mistakes when making a large product.
The sequence of work execution is standard:
- Selecting a model.
- Creating a pattern sample using selected threads and tools.
- Measuring the sample.
- It is necessary to carry out WTO (wet-heat treatment). The sample must be subjected to all the actions that await the finished item in the future: washing, rinsing, drying. Some experts recommend testing the sample for all possible deformations, simulating the process of wearing: crumple, stretch, twist.
- After the WTO, measurements are taken again. It is assessed whether the yarn shrinks or stretches. Brioche patterns tend to stretch a lot after washing.
- Then, taking this data into account, the calculation of the finished product is performed.
- The actual execution and assembly. If the snood or hat is made in a circle, assembly is not required.
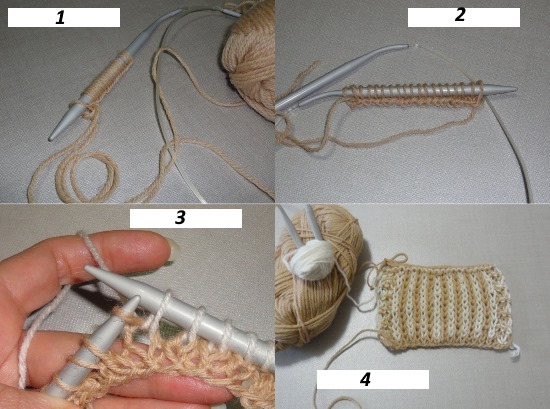
Casting on and closing loops
The typesetting edge must be made in such a way that it does not end up being pulled together later.
The following methods will work:
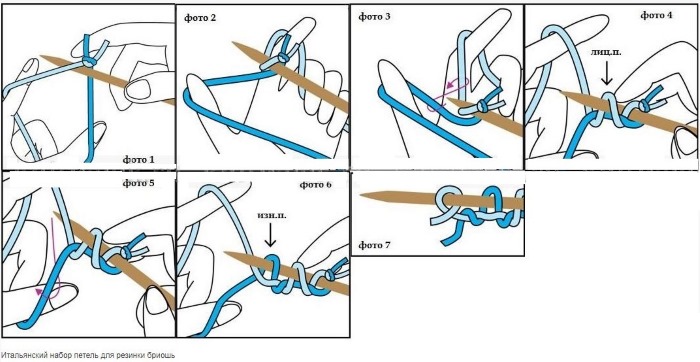
- Italian set with elastic edge. It imitates the typesetting edge of industrial products, stretches well, and looks great with volumetric patterns.
- A set of loops with a thickened edge. Fold the thread in half, then cast on in the standard (traditional) way. Remove one needle, then cast on as usual.
To close the English elastic band you should do the following:
- Remove the edge.
- The next knit stitch is knitted as a knit stitch, but only very loosely.
- Place the first (edge) stitch over the front (2nd) stitch.
- 3rd - purl, throw the 2nd over it.
- Repeat until the end.
Scarf in brioche technique
Brioche is a knitting technique that is ideal for making scarves and snoods. The products are warm, flexible, and spectacular, and fit perfectly into a sporty or casual style. Using this scarf as an example, we will examine the classic two-color brioche elastic and the principle of brioche decreases and increases.
The scarf in the photo is 98 cm long and 18 cm wide. The yarn is blended (wool/acrylic), 200 m long in 100 g. You will need 1 skein of yarn for the scarf.
Step-by-step execution of the beginning of the model (symbols: P – loop, LP – front, K – edge):
- Cast on 39 stitches in orange.
- The first row is a classic English rib. Remove K, then remove P with yarn over, knit. Repeat removed P with yarn over and LP. The penultimate P is removed, and K is knitted as LP – behind the back wall.
- If you continue with the classic English elastic, you would have to turn the work over and then knit all the stitches with a yarn over as LP, and the LP of the previous row would have to be removed with a yarn over.
But to make a brioche cloth, you need to do something different. The cloth should not be turned over, but shifted to start from the same end as the first row. In this way, two rows will be knitted in the same direction and both threads will be at the end.
- Having moved the scarf, the second row is made with black thread. The orange K is removed, then the removed P together with the yarn over is knitted with a purl P with black thread. Remove the LP with the yarn over (LP from the previous row is orange, the yarn over is black, with a new thread).
The process is repeated to the end, alternating purl stitches knitted from the slipped stitches with a yarn over of the previous row and slipped LP with a yarn over. At the end of the row, simply slip K.
- Now the product is turned over and started from the other end. Knit in orange. It is very easy to determine in the process which color will be working at the moment - it is enough to evaluate the P that are on the knitting needle.
If there are more black ones, then you need to take orange yarn. K is removed. Then LP is removed together with the working thread. Purl is done. Alternate them to the end of the row. At the end of K, knit.
- Move the work again and start from the same end. The work is in black yarn. Remove K. The first double P is like LP, the next (purl) is removed with a yarn over. K is simply removed.
- Turn the product over and repeat the 4 previous rows. Orange and black in one direction, then in the other direction also orange and black.
This will create a colored double elastic band. If desired (if you want to highlight the ends of the scarf more), make a few more rows with the same elastic band. After that, you can start making a wavy pattern. It is always done on the side where the orange stripes go.
The sequence of actions further (list number = row number from this point):
- Remove the edge stitch, *remove the purl stitch with the working thread (hereinafter referred to as WS), knit the front stitch (hereinafter referred to as K)*. Repeat between the * until there are 4 tracks of orange K on the right side. Now a decrease is performed. Before it – 1 WS.
- Next, you need to get one loop from the two tracks, they are knitted together so that the second of them looks to the right. This is done like this: the loop with the working thread is removed, the next purl - like L, it is pulled through the removed one. Return the one loop obtained from the two to the left side, and throw the next one over it.
- Thus, one track is obtained from two tracks. It is moved to the right working side. Now an increase is made to compensate for the decrease. The next purl loop is as IR. Three loops are made from L (L, yarn over, L).
- So again the original number of loops. First one was knitted from three, then three were obtained from one. Knit one track with a regular two-color elastic band.
- In the next row, make an increase, and in the next two, make a decrease, but with a leftward tilt (done in mirror image). To the end of the row, make a double colored elastic band, as at the beginning. The edge is done as a front one behind the back wall.
- Move the scarf to the beginning of the row. Now work with black yarn. Start with a regular two-color brioche fabric, alternating IR and L. Where there was a decrease, remove the front loop + yarn over (LPN). Next, one purl. And where there was an increase of 3 loops: LPN, purl, LPN. Repeat in mirror image, to the end of the row.
- Then the work is turned over and a row is made in orange with a regular English two-color elastic band, as at the beginning of the scarf. The edge is L.
- The scarf is returned to the other end and knitted again with a standard pattern, edge - L. Then rows 3 and 4 do not change and are done the same throughout the entire product.
These increases and decreases are the principle on which the entire pattern is built.
Then it is performed according to the following pattern (D – knit the tracks as usual, Y – decrease, P – increase):
- 3 times D, U to the right, P, 3 times D, P, U to the left, D – to the end.
- As point 2.
- As point 3.
- As point 4.
- 2 times D, U to the right, P, 5 times D, P, U to the left, D – to the end.
- As point 2.
- As point 3.
- As point 4.
- 1 time D, U to the right, P, 3 times D, U to the right, P, 1 time D, P, U to the left, D – to the end.
- As point 2.
- As point 3.
- As point 4.
- U to the right, P, 3 times D, U to the right, P, 3 times D, P, U to the left, D – to the end.
- All three increases are based on the principle of point 2.
- As point 3.
- As point 4.
- 5 times D, U to the right, P, 4 times D, P, U to the left, D – to the end.
- As point 2.
- As point 3.
- As point 4.
- 4 times D, U to the right, P, 1 time D, P, U to the left, 3 times D, P, U to the left, D – to the end (there will be only one).
- As point 2.
- As point 3.
- As point 4.
- 3 times D, U to the right, P, 3 times D, P, U to the left, 3 times D, P, U to the left (last).
- As point 2.
- As point 3.
- As point 4.
- 2 times D, U to the right, P, 5 times D, P, U to the left, D – to the end.
- As point 2.
- As point 3.
- As point 4.
- As row 13. Continue in the same way.
When the scarf reaches the desired length, knit several rows with an elastic band without increases or decreases, then the last row with the first color, after that, close the loops.
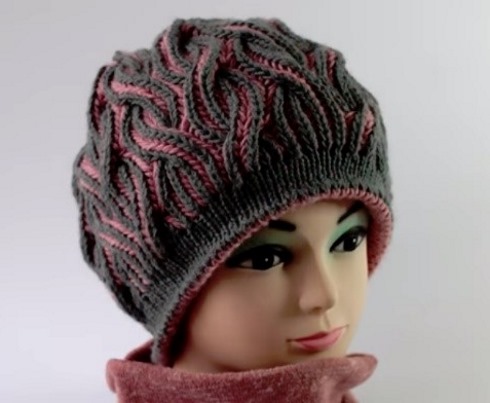
Brioche hat
This is the author's model by Katerina Mushin. It is convenient to use it as an example to understand brioche braids. The size of the beret is 56-58 cm (head circumference). The yarn thickness is 175 m/50 g, knitting needles are 3.5 and 4 mm circular. One skein is enough (50 g of each color of yarn). The hat has no seam.
Cast on 80 stitches + 1 extra stitch using the classic method of double stranding onto a 3.5 mm knitting needle. This is an auxiliary thread and will be removed later.
The first row is made with yarn of the first (gray) color in the following sequence: 1 front, 1 yarn over. Thus, the number of loops in the work will be 2 times more. The 81st loop is also knitted as a front loop. The first loop on the left side is transferred to the right, the 81st is removed through it, the first loop is returned back to the left side. This will beautifully connect the initial row into a ring.
The next one is the second (pink) color. Remove the front loop, holding the working thread behind the work, from the yarn over - the back one. Repeat to the end.
Then take the grey yarn, knit all the front loops, remove the back loops (thread in front of the product). The next row is pink. Remove the grey front loops (thread behind the fabric), knit the pink ones as back loops. Then repeat these two rows.
This way, you will get a double piece of fabric on the knitting needles. This will be the beret band. Perform 9 rows of each color. Now you can remove the auxiliary cast-on edge, it consists of two threads, both of which need to be unraveled. The edge of the beret will be neat and even.
Now, having changed the tool number, you can move on to brioche braids. Before this, decrease every 9th and 10th loop - this is done during the preparation row in gray (1 front, remove loop with yarn over). The decrease is done by double decreasing (remove one loop, knit the next two, throw the removed loop over the resulting one).
Next, braids - according to the principle of performing individual parts of the fabric with an additional knitting needle. As soon as the hat reaches 2/3 of the height, gradual decreases are performed, the remaining loops are pulled into a ring, the hat is assembled.
Two-color knitting of a scarf with English rib
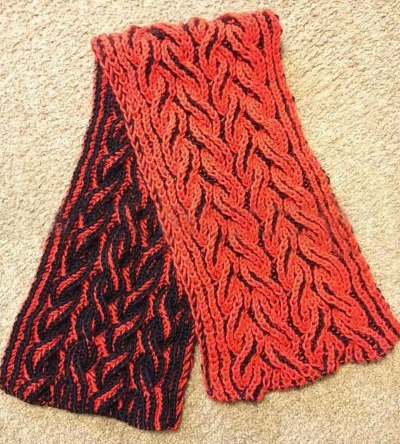
Brioche is a knitting technique that usually involves using two colors. This beautifully emphasizes the voluminous texture of the fabric. Below in the photo are classic braids that are made by throwing loops onto an additional knitting needle. Half of 1 braid - 4 loops. Rapport in height - 20 rows.
An important nuance is that you should carefully monitor the edge loops to create a beautiful edge. If there are no mistakes, that is, the final edge in each row is done the same way (either granny's purl or front behind the back wall), then the edge will be even and clear.
Please note: This scarf has a special edge - two-color.
Snood using brioche technique
The set requires 300 g of white yarn and 200 g of dark yarn. Yarn length is 240 m/100 g. The pattern is decreases and increases of loops, as in the scarf described above, but in a different combination. The number of rapports is 6, but you can take more if you need a wider product.
The brioche technique does not cause any difficulties in the future. This knitting with needles only seems complicated at first glance. The first stage of training is the English elastic. Then the same, but in a two-color version.
After mastering it, you can take on wavy patterns, which can be based either on the principle of "braids" or decreases and increases of loops. Then, inexhaustible creative possibilities open up before the craftswoman, because you can come up with your own alternations of waves or take a variety of braid or aran patterns for inspiration.
Article formatting:Natalie Podolskaya
Video about knitting brioche
Brioche knitting - in this video:
Very interesting article. Everything is accessible and understandable. Thank you. I would like to buy a book with diagrams and descriptions. I want to knit a cardigan, but I can’t find a description anywhere on how to knit a raglan using the brioche technique.
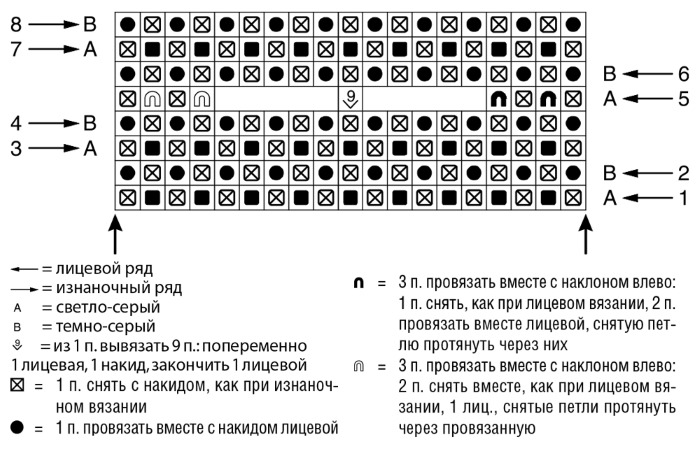
The article is not bad, but there is an error in the diagram. It would be nice to check it before publishing (or reprinting).
Thank you for the detailed article. Everything was explained clearly)))
Thank you
Natalia, thank you very much, everything is clear and accessible. Good luck to you.
Thank you very much for the article, I have long wanted to learn, I will definitely try