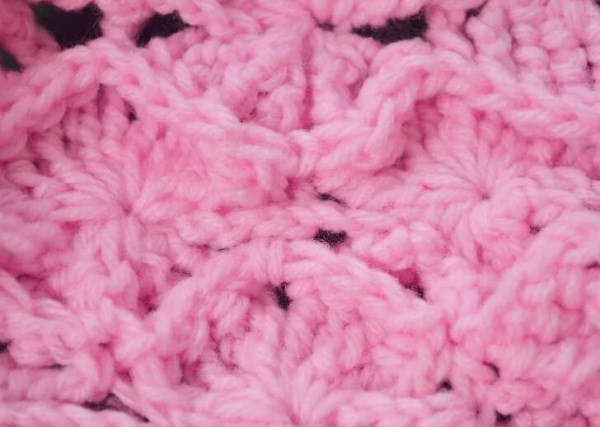
Bavarian knitting – multi-colored patterns, crocheted in an interesting technique, based on a “waffle” structure. Using descriptions and patterns, you can learn to knit bright, original interior items.
What is special about the Bavarian crochet technique?
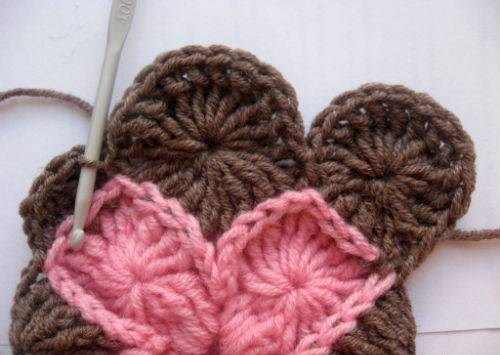
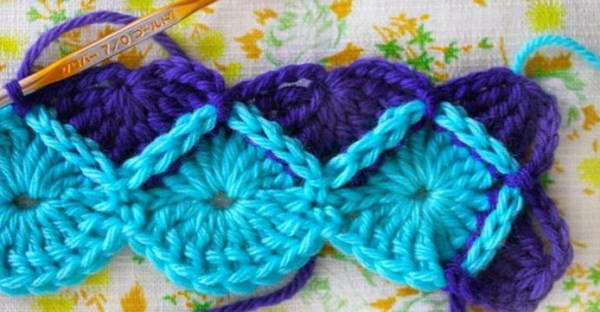
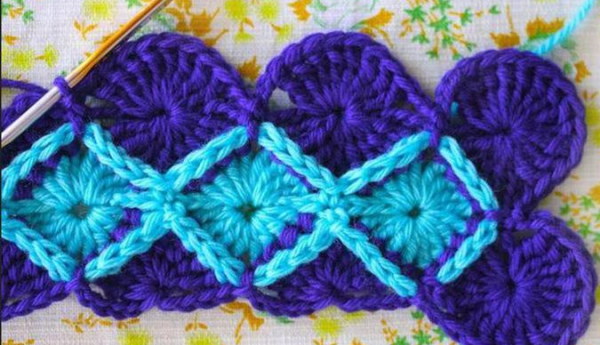
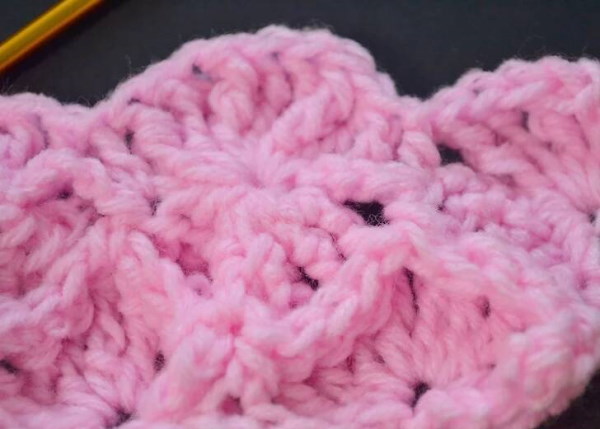
Volumetric "braids" are formed on the canvas, since relief columns are used in the work. A similar technique creates multi-colored stitches on the "petals". They are considered the main highlight of the ornament.
A smooth transition from one shade to another is created by alternating yarns of different colors. But the boundaries are not very clear. Traditionally, such a pattern, like the "granny square", is knitted in a circle.
Any size of fabric can be easily created by adding circles. This method is called "Bavarian style". This technology can also be used when knitting in rows.
The diagrams demonstrate these points in different ways:
- In the drawings where there are square motifs, all symbols are indicated by simple double crochets.
- The rectangular elements are more detailed. The relief columns with two yarns are clearly visible here.
What can be knitted using the technique
A wide variety of items are knitted using this technique, for example:
- blankets;
- pillowcases;
- napkins;
- bedspreads;
- pillows;
- stool covers;
- bags;
- tops;
- vests;
- skirts and many other things.
Conventional symbols in diagrams
Conventional symbols in descriptions:
| STSN | Double crochet |
| VP | Air loop |
| STBN | Single crochet |
| PP | Lifting loop |
| SST | Connecting post |
| NSTSN | Unfinished double crochet |
| PVP | Air lifting loops |
| NST | Unfinished column |
| P | Loop |
| ST | Column |
| VPS | Air loop descent |
| DSTSN | Double crochet stitch |
| IRSTSN | Purl relief column with yarn over |
| PSTSN | Half double crochet |
Master classes on knitting in the Bavarian technique
Bavarian crochet (patterns and descriptions will help you make unique items with your own hands) will be interesting for experienced and novice craftswomen. In this technique, you can create various items of clothing and household items.
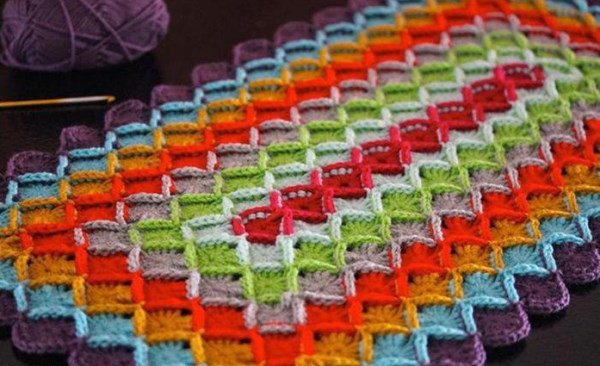
Plaid
https://www.youtube.com/watch?v=5gQKT3bGnUE
This is a very simple way to knit a blanket. It looks most interesting if you use yarn of different colors.
Algorithm of actions:
- Knit 6 VP.
- They are locked in a circle.
1st row:
- Knit 3 P, 4 HSTCH.
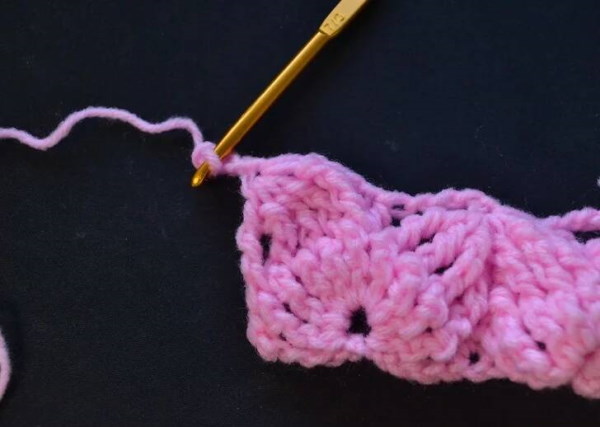
- They are knitted together.
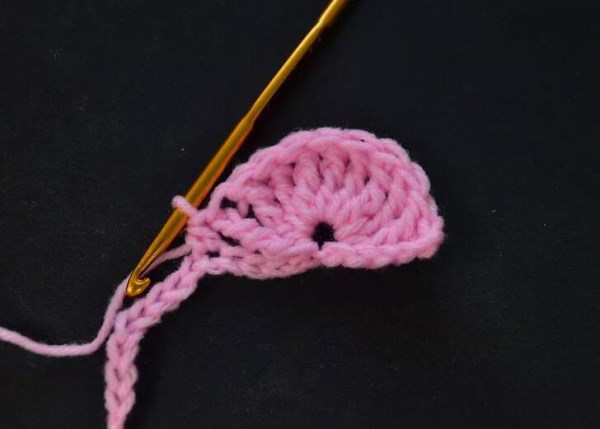
- Again, knit 3 VP and 1 CST into a chain of air loops.

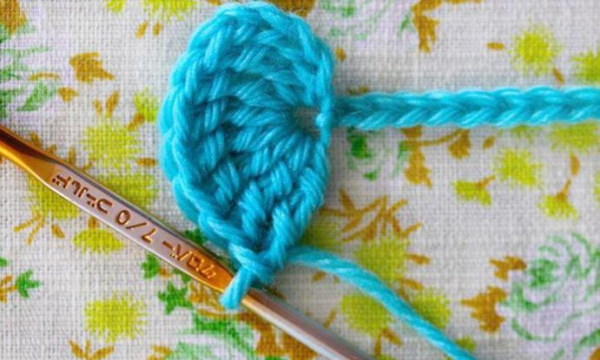
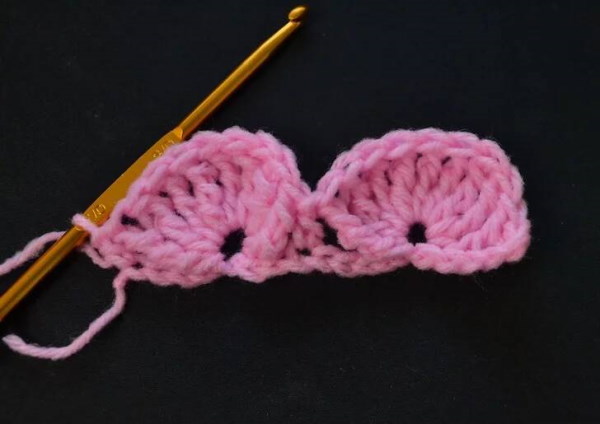
- The result is a detail that resembles a “petal”.
- Another 3 such elements are knitted in a similar way.
2nd row:
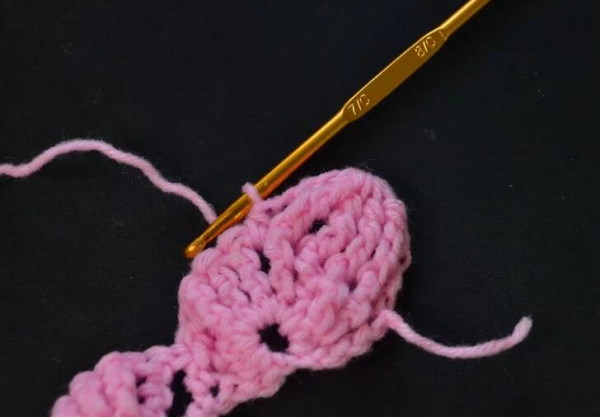
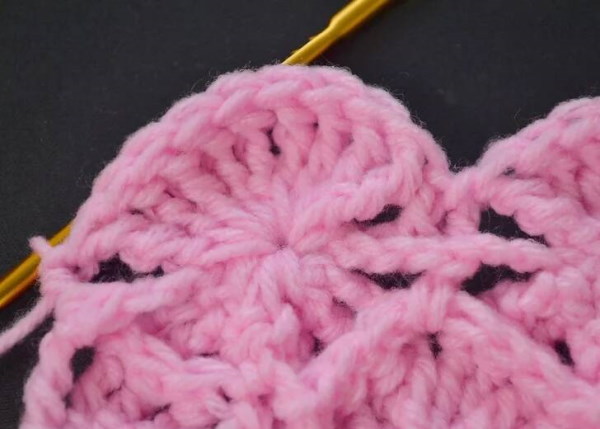
- Knit 1 lifting st, 12 SC into the middle of the “petal”.
- 1 CST is knitted into the connecting column of the previous row.
- Knit 4 "petals".
3rd row:
- Take threads of a different shade.
- Skip 4 “petal” stitches and start knitting from the 5th.
- First 3 PP, then 4 ST, knitted together.
- Again knit 3 P and 1 SST into the center of the last unfinished column.
- Then again 3 PP.
- 8 dc crocheted together, 3 ss and 1 dc crocheted into the base of the last stitch, which is considered unfinished.
- Then come 3 PP, 4 HST, knitted together, 3P plus 1 SST.
- They are knitted into the center of the column just made.
- The actions are repeated until the row is finished.
 4th row:
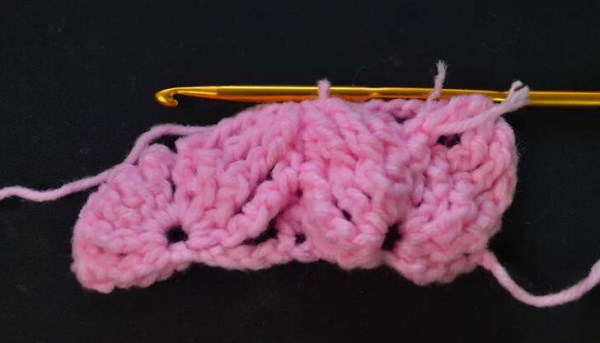
- 1 PP, 12 STCH, connected with one base loop, in the middle of the “petal”.
- Then the SST is knitted into the same column of the previous row.
- 12 STCH are knitted into the center of 8 HSTCH of the bottom row and then knitting continues in the same way.
- Having finished the row, the thread is changed again, and then knitting continues in the same way.
- 12 STCH are knitted into the center of 8 HSTCH of the bottom row and then knitting continues in the same way.
- Having finished the row, the thread is changed again, and then knitting continues in the same way.
Note:
In the 3rd row, all STCH are knitted as IRSTCH.
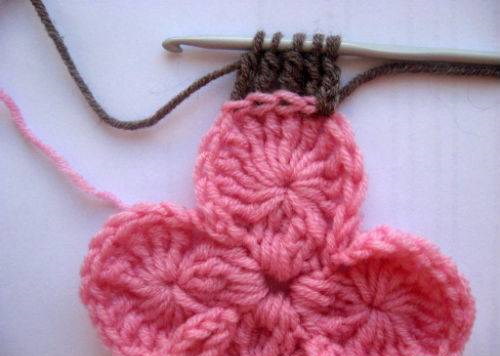
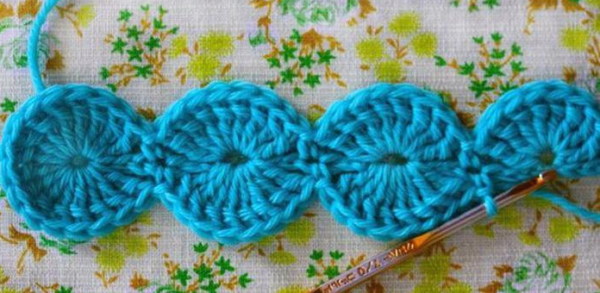
Shawl
Bavarian knitting allows you to create a "waffle" unusual texture of the fabric. A beautiful shawl can be crocheted using the diagram and description of this technique.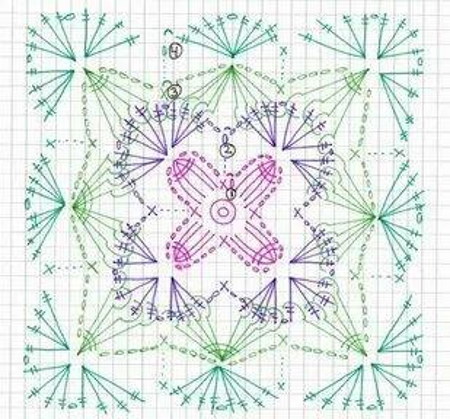
Procedure:
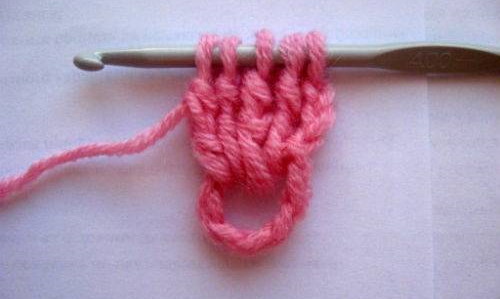
- Work begins with knitting a chain of 6 VP.
- After this, they are closed into a ring and 4 PVP are knitted.
- From them, 4 double columns are knitted without knitting to the end.
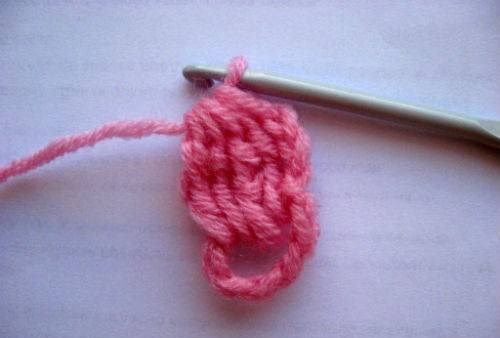
- Now connect all the columns with one loop. The result is a neat petal.
- A chain with 6 VP is attached to its base.
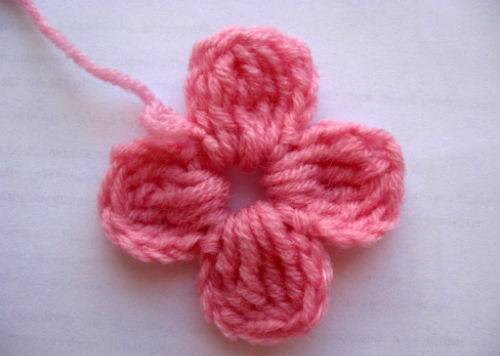
- They are again collected into a ring, and then 4 P are thrown on.
- From them, 4 double columns are knitted to obtain another petal.
- This is done 2 more times to form a flower.
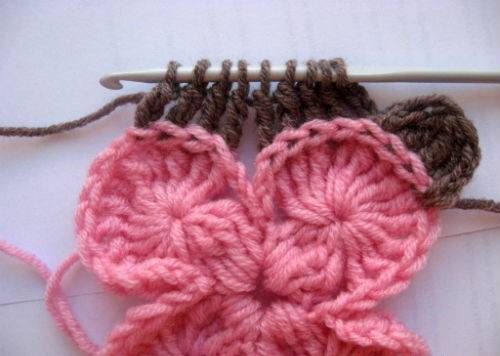
- Then each “petal” is tied with 12 STCH.
- In the lower group they are knitted into a connecting loop.
- Between the “petals” the group is finished with a half-column.
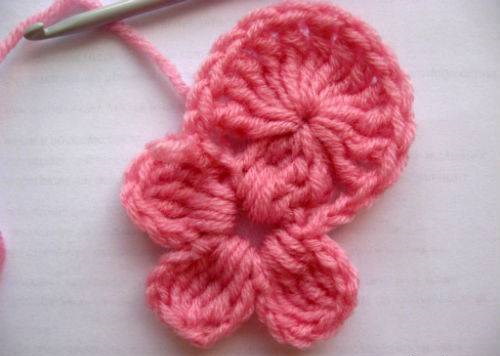
- Then a thread of a different color is tied to the beginning of the top four.
- Next, repeat the cycle as at the very beginning - dial 4 VP and knit the same number of double columns.
- Then they are pulled together into 1 loop.
- Between the tops of the flower, knit according to the pattern - 4 VP and 9 DSTSN. They are also connected with a loop.
- Now the tops of the fabric are knitted as at the beginning - 12 SC are knitted into the central lower loop.
- Then continue knitting in the same way until the fabric reaches the desired size.
The accessory will turn out textured and bright if you use yarn of a different shade on each new circle.
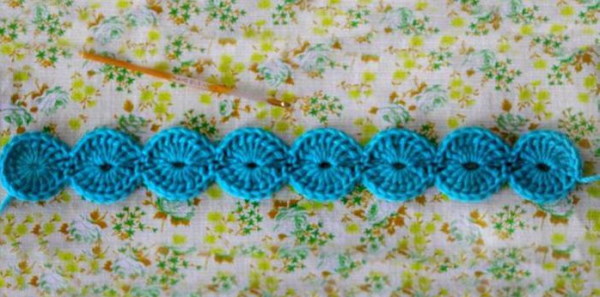
Napkin
Bavarian crochet (patterns and descriptions for all products are almost the same) is used to create original napkins, runners, and rugs.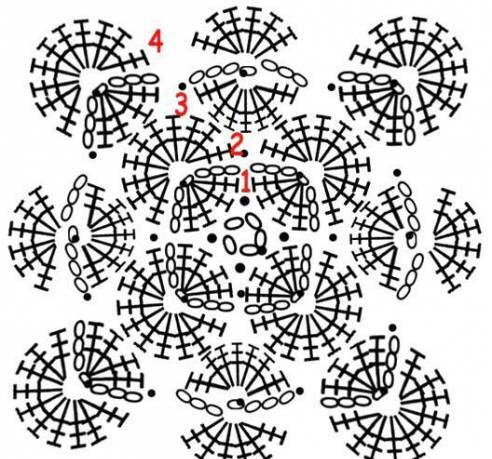
Technique of execution:
- Knit 6 VP.
- Then they are connected into a ring.
- Knit 4 PVP.
- From them, 4 double columns are knitted, but not knitted to the end.
- All the columns are connected into one loop. A small "petal" is obtained.
- A chain consisting of 6 VP is attached to its “leg”.
- The loops are closed into a ring again.
- Then cast on 4 sts.
- From these, 4 double columns are knitted to create another “petal”.
- This action is repeated 2 more times to knit a flower.
- Then all the “petals” of the flower are tied one by one with 12 STCH.
- At the bottom they are knitted into a connecting loop.
- The knitted element placed between the petals is finished with half-columns.
- Next, a thread of a different color is tied to the beginning of the top four.
- The actions are repeated again as at the beginning of knitting.
- Cast on 4 VP and knit the same number of double columns.
- Then they are pulled together into one loop.
- 4 VP and 9 DSTSN are knitted between the tops of the knitted flower.
- They will also be connected with a loop.
- Now, just like at the very beginning, knit the upper parts of the fabric. In the lower loop, located in the center - 12 columns.
- On both sides, knit 8 columns into the central loop.
- Continue knitting the napkin using the same technique until the desired size is reached.
Rectangular blanket-bedspread
Bavarian crochet (patterns and descriptions are not complicated) allows you to create beautiful accessories for your home.
Execution algorithm:
- A long chain is knitted from 40 VP.
- 8 STCH are knitted into the last loop.
- Then a simple column is knitted into the 4th loop from the edge of the chain.
- Next, the same semicircles are knitted to the end.
- Along the other side of the chain, crescents are also knitted to form circles.
- This is the 1st row.
- The knitted circles are divided into 4 parts.
- Each section contains 4 ST.
- Then attach a thread of a different color.
- Then, in one of the gaps of the piece, knit 3 PVP and 4 STCH, without knitting to the end.
- There should be 5 sts left on the hook.
- Then these loops are tied into one.
- Knit 3 VPS and tie them with a half-column to the circle - such petals are made on the sides.
- Between the circles, not 4 unfinished columns are knitted, but 7.
- They are also tied with one loop.
- All circles are tied in this way.

- Now 12 STCH are knitted on the outer “petals” into the central loop.
- 8 STCH are knitted on the remaining “petals”.
- So knitting continues until the end of the row.

- The following rows are knitted with threads of a different tone.
- The method and number of loops remain the same.
The result is a voluminous rectangular blanket.
Chair cover
Using the "Bavarian knitting" technique, you can create a chair cover.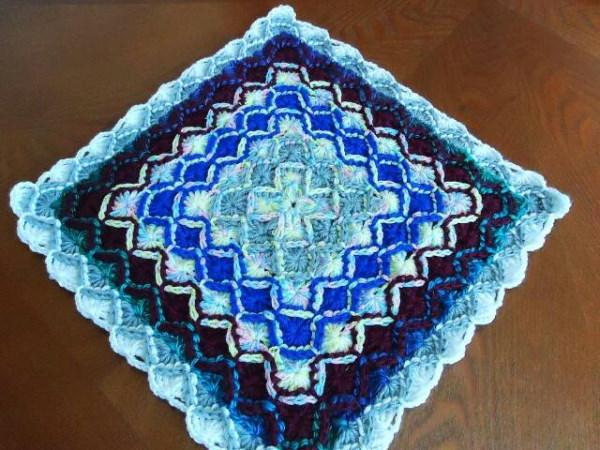
Execution technology:
1st row:
- First, cast on 8 VP.
- They make a ring out of them.
- From it, 4 VP are knitted and the same number of columns with 2 yarns, with a common top.
- Then knit 4 more VP, tying them to the ring.
- The result was a detail resembling a “petal”.
- Three more such elements are created in the same way.
2nd row:
- 12 STS2N and one base are knitted into a common top of the “petal”.
- That is, they make an element in the form of a “fan”.
- Having knitted these columns, they are connected into a ring.
- Knit 3 more of these pieces.
3rd row:
- Then 12 knitted columns are divided into 3 parts.
- Makes 4 CT each.
- Then 4 VP are collected between the 4th and 5th columns.
- For the same fan, knit 4 purl relief columns with 2 yarns and 1 top.
- Then make 4 VP again.
- They are attached between 4 and 5 ST.
- The result is a corner element.
- Now knit the edge.
- Again, 4 VP are knitted, but now 8 IRSTS2N and with one top.
- That is, they cover 4 STs on 2 sides.
- Then knit 4 VP again.
- This chain is attached between 4 and 5 SC.
- Next, knit 3 more corner pieces and the same number of pieces along the edges, alternating them with each other.
4th row:
- Again, knitting "fan" elements
- Again, 12 СТС2Н are knitted, having a common base. They are attached according to the same principle described above.
- And between the corner elements, along the edges, knit 8 СТС2Н.
- Next, knit a row with ИРСТС2Н.
- Then knit a “fan” row.
- Thus, continuing to alternate rows, knit the fabric of the cape of the desired size.
Rug "Bavarian knit"
Bavarian crochet (the patterns and descriptions of various products are almost identical, so they are all made using the same technique) allows you to create beautiful items for the interior.
Work order:
- Knit a long chain of 40 VP.
- In the last loop knit 8 SCCH.
- Then knit 1 simple column in the 4th loop from the edge in the chain. You get a "half-moon".
- The same semicircles are knitted until the end of the chain.
- On the reverse side, exactly the same “half-moons” are made.
- This is how circles are created.
- These round elements are divided into 4 parts.
- Each sector contains 4 ST.
- A thread of a different tone is tied to one of the four gaps.
- Knit 3 PVP and 4 STCH, without finishing them.
- As a result, 5 P are collected on the hook.
- They are connected with one loop.
- Knit 3 VPS and tie with a half-column to a round piece.
- These "petals" are made on the sides.
- Between the circles, knit 7 HSTCH, not 4.
- They are also pulled together with one loop.
- All circles are tied in this way.
- Now, on the outer “petals”, 12 SCCH are knitted into the central loop.
- On the remaining “petals” knit 8 sts.
- Continue knitting like this until the end of the row.
- The next rows are knitted with yarn of a new color.
- The method and number of loops are the same.
Chair cushion in "Bavarian technology"
Using a similar knitting method, you can make an unusual and effective cushion for a chair.
Procedure:
1st row:
- In a ring of 5 VP, 4 groups are knitted.
- These groups consist of 4 air loops and the same number of untied columns with 2 yarns.
- This means that when knitting stitches, the last loop is not knitted.
- Then, all the “unfinished” loops are knitted from the hook at the same time.
- There should be 5 of them.
- In the initial ring, knit 4 VP with a connecting post.
- And the four initial groups are the knitting angles.
2nd row:
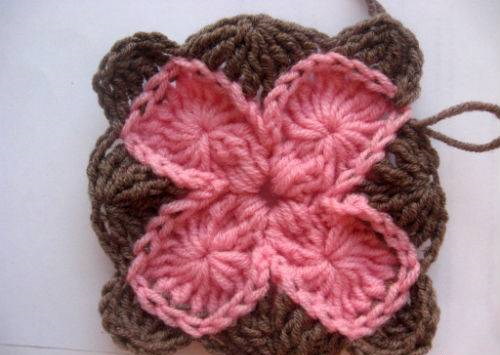
- Using a thread of the same shade, knit 12 CTC2H into the middle of each element.
- The result is a "butterfly" or a flower with four "petals". They will be the center of the knitting and at the same time its corners.
3rd row:
- The next two rows are knitted with a thread of a different color.
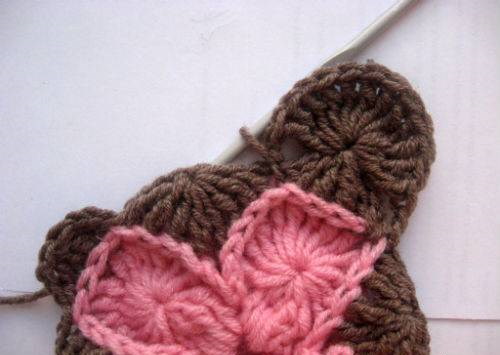
- The knitting is given the appearance of a rectangle, that is, the corners (depressions) are filled.
- On one of the elements, 8 ST are counted.
- Between 8 and 9 sts, attach a new thread.
- Knit 4 VP and the same number of untied double crochets.
- The thread is pulled through the back of the knitting, capturing the column of the previous row.
- It turns out to be a “rib”, 4 НСТС2Н.
- They are knitted into 4 SC of the next fragment of the previous row.
- The result is a rectangle with 8 new elements in a contrasting shade.
4th row:
- Here we repeat the knitting technique of the 2nd row.
- However, this only applies to the 4 corner elements.
- Knit 12 sts. The rest have 8 sts.
- The second part of the pillow is knitted using the same principle.
- They are then sewn together and filled with suitable material.
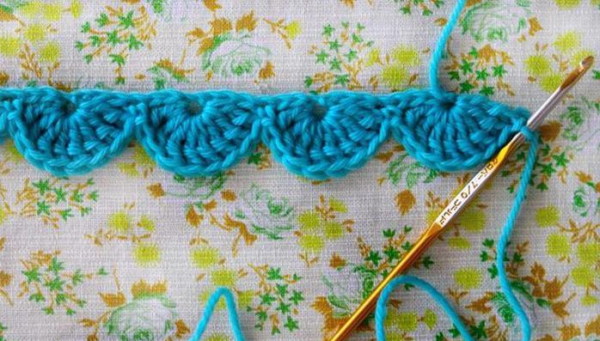
Baby blanket
Using the Bavarian knitting technique, it is easy to knit a beautiful and warm baby blanket.
Sequence of actions:
- First, knit a chain of air loops in a quantity that is a multiple of 10.

- That is, there can be 20, 30, 40 or more air loops.
- The length of the chain is determined based on the final size of the product.
- At the end of the initial chain, knit 2 more VP.
- They serve as a step up to the next row.
- A half double crochet is knitted at the beginning of a new row, into the second lifting loop from the hook.
- The loop on the hook is not taken into account when they are counted.
- Now knit the first “shell” of the initial row.
- Skip 4 P.
- Knit 9 CTC2H into the 5th loop of the chain.
- Then 4 loops are skipped again.
- Next, knit 1 half double crochet into the next loop of the chain.
- “Shells” continue to be knitted until the end of the row.
- The previous step is repeated along the entire length of the chain until you reach the end of the row.
- The first row is complete. Here you can take threads of a different color, if you wish.
The next row begins with double crochet stitches, worked from the front.
- Knit 3 VP.
- Then knit 1 СТС2Н for each of the next 4 columns. The hook is inserted from the front.
- The last loop of each column is left on the hook.
- When the last stitch is knitted, the thread is caught with a hook.
- It is pulled through all the loops on the hook.
- Make 4 VP.
- Knit 1 HDC into the next column of the previous row.
- The entire row is knitted with groups of double crochet stitches.
- It is also used to knit air loops and half double crochets.
- Stop 5 stitches before the end of the row.
For each group:
- Knit 4 VP.
- Knit 1 CTC2H for each of the next 4 columns, inserting the hook from the front.
- The final loop of each column is also left on the hook.
- Knit 1 PSTN and another 4 STS2N, securing them behind the next 4 ST.
- The last loop of each column is left on the hook.
- When the last column is knitted, the thread is caught.
- Then it is pulled through all the loops located on the hook.
- The result is a “shell” made from 9 connected columns.
- Knit 4 VP again.
- Knit 1 PSTN also for the next column. The hook is inserted from the front as always.
- Part of the group is knitted at the end of the row.
- First, make 4 VP, and then knit 1 CTC2H for the last 5 columns of the row.
- The last loop of each column also remains on the hook.
- When the last stitch is completed, the captured thread is pulled through all the loops on the hook.
- The row is complete. Knit 4 VP and turn the product over.
In the 3rd row, knit groups of double crochets and half double crochets.
- Knit 4 PSTS2N into the top of the 1st group.
- Then knit 1 HDC into the next half double crochet of the previously knitted row.
- The entire row is knitted with connecting “shells”.
- They stop only before the last group.
For each such “shell”:
- Knit 9 CTC2H into the center of the next group.
- Knit 1 HDC into the next half double crochet.
- Knit 5 СТС2Н into the top of the final group of the row. At the end, change the threads if necessary. Immediately make 1 VP, and turn the knitting over.
The 4th row is knitted in groups of nine columns.
- Knit 1 SC into the first loop.
- Then knit groups of 9 sts until the end of the row.
For each such group:
- Again knit 4 VP.
- Knit a “shell” of 9 CST over the next 9 columns.
- Knit according to the same pattern as the groups of columns of the 2nd row.
- Again, dial 4 VP.
- Knit 1 PSTCH into the next loop.
- At the end of the row, make another VP.
- The work is turned over.
In the 5th row the “shells” are connected.
- At the beginning of the row, knit 1 HDC into the first half double crochet of the previous row.
- Until the end of the row, knit in groups of double crochets and half double crochets.
For each connecting "shell":
- Knit 9 CTC2H into the center of the first group.
- Knit 1 HDC into the next half double crochet of the previous row.
- Continue knitting until the end of the row.
The cycle is repeated the required number of times until the product reaches the desired width.
- If the color of the threads is changed, this is done at the end of every 4th row.
- When knitting is finished, the thread is cut.
- The remaining end is pulled through the loop on the hook to secure it.
The patterns and descriptions of Bavarian crochet are not difficult. Having carefully studied them, you can easily knit an interesting and original interior item.
Video about Bavarian knitting
Bavarian crochet: