The art of knitting originated in ancient times and has gained extraordinary popularity in the modern world. Knitting was practiced in all countries of the world, and in each country this type of handicraft acquired its own national characteristics. Openwork patterns, interweaving of symmetrical braids, cords and diamonds were knitted according to patterns and had a certain meaning, playing the role of amulets.
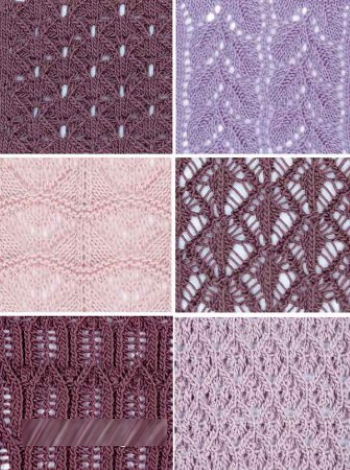
Simple openwork patterns
Openwork patterns are formed by alternating knitted loops and regular yarn overs, which create holes., giving the canvas airiness, lightness and beauty.
Simple in execution technique, openwork patterns are within the power of even novice craftswomen. Among the great variety of patterns, you should choose the most suitable for the model, analyze the scheme, knit a sample with the yarn and knitting needles that will be used in the work, and then boldly get down to business.
Openwork patterns are often found in the manufacture of scarves, shawls, baktus, stoles, snoods, as well as pullovers, cardigans, sweaters, jackets and vests. In the world of children's clothing, openwork models never go out of fashion. Almost no knitted item for a baby is complete without an openwork insert or trim.
Openwork cones
Openwork knitting with knitting needles (the pattern is considered in several variations) of cones looks great on the front or back surface, combined with cables, arans, diamonds, stripes, braids.
Simple cones
The classic bobble is knitted from 5 loops in 6 rows:
- On the front side of the fabric, 5 sts are knitted from 1 st according to the pattern: 1 l. st, Ɵ, 1 l. st, Ɵ, 1 l. st.* Then knit the same loops from the back side.
- On the wrong side, the 5 sts you just knitted should be knitted purlwise, then turn the product to the front side.
- In the front row, knit 5 sts and turn the fabric over.
- In the purl row, knit all the stitches, then turn the fabric to the front side.
- Knit 2 sts together purlwise and turn the fabric over to the other side for the last time.
- Remove 1 st onto the right knitting needle without knitting it, then knit 2 sts together purlwise. The removed unknitted loop should be thrown over the knitted loop.
In the description, *л. п. – front loop, Ɵ – yarn over.
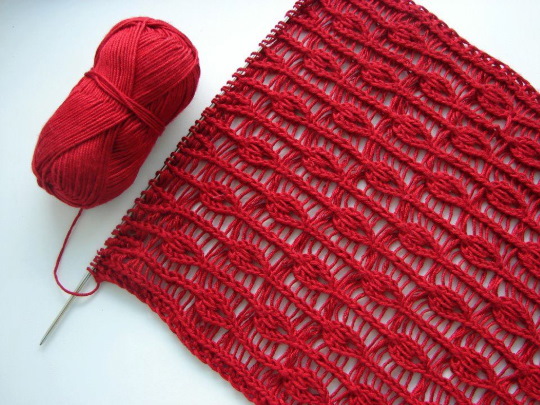
Cones from elongated loops
The cones from the elongated loops look beautiful and original. These simple elements can decorate any knitted product. If you arrange the cones from the elongated loops in a checkerboard pattern on the main pattern - the front surface - then an attractive pattern is formed.
Knitting pattern:
- To knit the base of the bobble on the front side, insert the right knitting needle into the front st. 1 row below, passing the needle from the front side to the back side. Next, pick up the thread from the ball and pull the loop towards you to the height of the loops that are on the working knitting needle.
- Then you should make a yarn over away from you.
- After this, you need to insert the right knitting needle through the front st 2 rows below, pick up the thread from the ball and pull it to the front side to the height of the loops on the right knitting needle.
- Then you should again make a yarn over away from you.
- Next, you need to repeat the steps described in points 3 and 4, pulling the free loop out of the loops on the 3rd and 4th rows below.
- The final loop is pulled out from the loop 5 rows below.
- All pulled out loops and yarn overs should be moved to the left knitting needle.
- The hook must be inserted into all the pulled out loops and removed from the left knitting needle onto the hook.
- Next, you need to insert the hook into 1 loop on the left knitting needle, grab the thread from the ball, make a loop from the pulled out and all the loops of the cone.
At the final stage, you should release the left knitting needle from the loop, and transfer the newly formed loop on the hook to the right knitting needle.
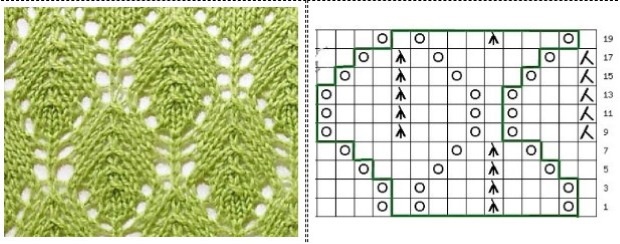
Wavy Grapevine Pattern
Openwork knitting (the wavy pattern diagram is presented below) is often used as an original design element and is perfectly combined with the stockinette stitch in dresses, skirts, jackets and vests. The pattern is simple in execution technique, but at the same time attractive and original.
There should be an even number of loops on the knitting needles:
- In the 1st row, knit 3 times (2 sts knit together), * 6 times (1 st, Ɵ), 6 times (2 sts knit together). Thus, knit from * to the last 6 loops on the left knitting needle, 3 times (2 sts knit together).
- In the 2nd row, knit all purl stitches.
- In the 3rd row, knit all stitches.
- In the 4th row, knit all purl stitches.
In the description, *л. п. – front loop, Ɵ – yarn over. The pattern should be knitted by repeating rows 1–4 to the desired height.
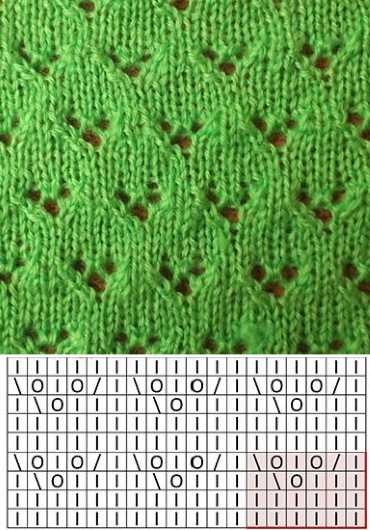
Lace Pattern
The lace pattern will decorate any classic cut item, making it unique, romantic and very feminine.
This pattern forms a vertical path, so it should be place between any 2 motives:
- 1st row: 5 l. p., 2 times (Ɵ, d. p-d. p-l. p*, 2 l. p.), 3 l. p.
- The 2nd row and all even rows should be knitted with LP.
- 3rd row: 3 l. p., 2 p. together l. p., Ɵ, 1 l. p., 2 times (Ɵ, dn. p.-dn. p.-l. p., 2 l. p.), 2 l. p.
- 5th row: 2 l. p., 2 p. together l. p., Ɵ, 3 l. p., 2 times (Ɵ, dn. p.-dn. p.-l. p., 2 l. p.), 1 l. p.
- 7th row: 1 l. p., 2 p. together l. p., Ɵ, 2 l. p., 2 p. together l. p., Ɵ, 1 l. p., 2 times (Ɵ, dn. p.-dn. p.-l. p., 2 l. p.).
- 9th row: 2 p. together k. p., Ɵ, 2 l. p., 2 p. together l. p., Ɵ, 3 l. n., Ɵ, n. n.-sn. p.-l. p, 2 l. n., Ɵ, n. n.-sn. p.-l. p., 1 l. p.
- 11th row: 2 times (2 l p, Ɵ, dp-dp-l p), Ɵ, 3 sts together behind the back loops, Ɵ, 2 l p, 2 sts together l p, Ɵ, 1 l p.
- 13th row: 3 l p, Ɵ, dc-dc-l p, 2 l p, Ɵ, 3 p together behind the back loops, Ɵ, 2 l p, 2 p together l p, Ɵ, 2 l p.
- 15th row: 2 l. p., 2 times (2 l. p., Ɵ, dc.-dn. p.-l. p.), 1 l. p., 2 p. together l. p., Ɵ, 3 l. p.
- Row 16: knit all sts.
Legend: knit stitch – front loop, Ɵ – yarn over, sl st-sl st-l st – 1 slipped stitch, 1 slipped stitch, 1 k n (slip 1 stitch onto the right needle as k n, slip 1 stitch onto the right needle as k n, return 2 slipped stitches to the left needle, then knit them together k n through the back loops).
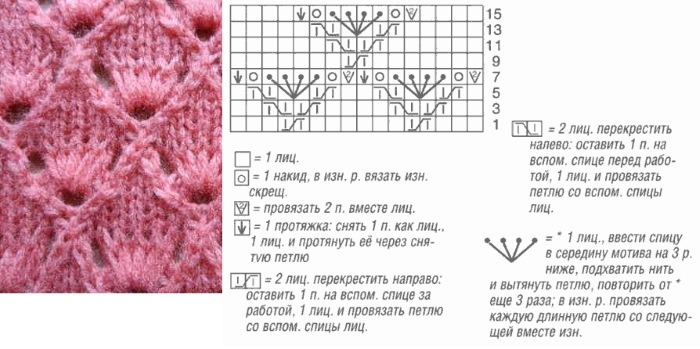
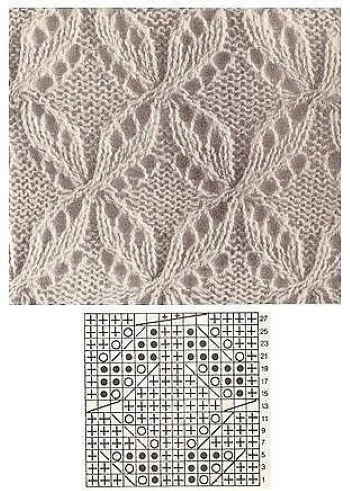
Leaves Pattern
The Leaves pattern looks spectacular as a design element, and if you knit it as a separate piece and place it on the waist of a dress or an elongated sweater as a belt, this element will draw attention to the waist, emphasizing the tight silhouette of the product. On both knitting needles, you need to cast on a number of loops multiple of 4 + 1 st for asymmetry + 2 edge loops. The pattern is staggered.
Knitting pattern:
- Row 1 (wrong side): kr. p. *1 i. p., 3 l. p., repeat from * to the last 2 sts, 1 i. p., kr. p.
- 2 rows (front side): kr. p., *1 l. p., 3 i. p., repeat l * to the last 2 sts, 1 l. p., kr. p.
- Row 3: knit in the same way as Row 1.
- 4 row: knit in the same way as the 2nd row.
- Row 5: knit in the same way as Row 1.
- Row 6: kr. p., forming a leaf: *pull a loop from the loop 5 rows below by a length equal to all the loops and place it on the right needle, then pull a loop from the loop 4 rows below and place it on the right needle.
Next, pull the loop out of the loop 3 rows below and place it on the right knitting needle, then pull the loop out of the loop 2 rows below and place it on the right knitting needle, pull the loop out of the loop 1 row below and place it on the right knitting needle, place the thread from the ball in front of the fabric and knit 1 st.
Next, the 1st loop obtained from the yarn over from the 5th bottom row must be thrown over all the raised loops and lowered, then the 2nd loop from the yarn over from the 4th bottom row must be thrown over all the raised loops and lowered, the 3rd loop from the yarn over from the 3rd bottom row must be thrown over the raised loops and lowered.
2nd loop from yarn over from 2nd bottom row, throw over raised loops and lower, 1st loop from yarn over from 1st bottom row, throw over raised loops and lower from right knitting needle, 3 ip. Repeat from *, kr. p.
- 7th row: kr. p., * 2 l. p., 1 i. p., 1 l. p., repeat from * to the last 2 sts, 1 l. p., kr. p.
- 8th row: kr. p., *2 i. p., 1 k. p., 1 i. p., repeat to the last 2 sts, 1 i. p., kr. p.
- Row 9: Knit as Row 7.
- Row 10: Knit as Row 8.
- Row 11: knit as Row 7.
- Row 12: kr. p., *2 i. p., form a leaf (see Row 6). Repeat from * to the last 2 loops, i. p., kr. p.
The pattern must be repeated from the 1st to the 12th row to the required height of the fabric.
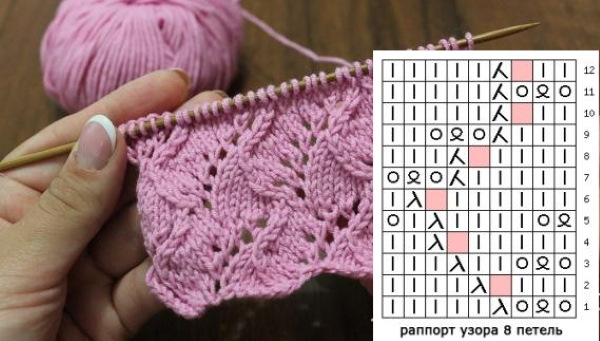
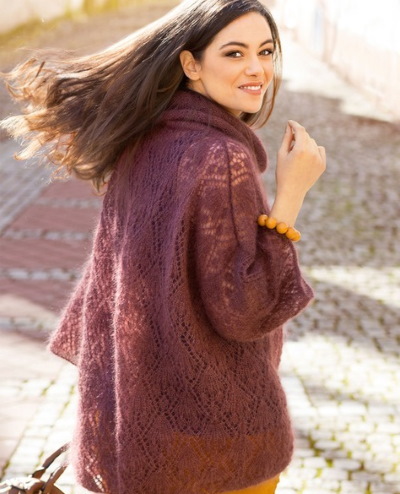
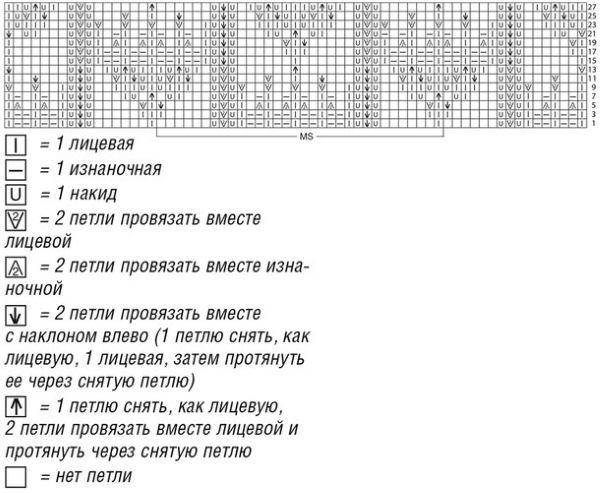
Women's pullover
Openwork knitting (pattern diagram is presented below) looks embossed in a mohair pullover with a voluminous collar.
| Patterns | Description (technique of execution) |
| Elastic band 1x1 | Knit alternating 1 l. p. and 1 i. p. |
| Stockinette stitch | Front side – l. p., back side – i. p. |
| Openwork | In the first 2 rows, the loops should be knitted purlwise and facewise. Row 3: * Knit 3 sts from 3 loops (pick up 3 sts with the right knitting needle behind the far loops and knit them as 1 front st, at the same time do not lower the loop from the knitting needle. Then you should make a yarn over on the second knitting needle and knit 3 sts from 3 sts again, only then drop them from the knitting needle), 1 l. p.* Repeat from * to *. Row 4: On the wrong side, knit the loops with the front surface. According to the pattern, alternate the 3rd and 4th rows, knitting loops in a geometric sequence as desired. |
Back
To form the bottom, you should cast on the number of loops that you got according to your individual calculations, as well as the pre-knitted sample, and start knitting from the bottom up 5 cm with a 1x1 elastic band. Then you need to continue knitting with openwork according to the description to the beginning line of the armholes according to the pattern.
To form the lower edge of the armhole, it is necessary to close 5 sts symmetrically. In the final phase of the formation of the armhole, it is necessary to knit with a straight fabric to the desired height according to the pattern. To knit the neckline, it is necessary to close 12 sts in the middle and from this moment both parts of the piece are knitted separately 10 rows.
When forming a smooth line, close 1 st from the inside. In the final phase, close all free loops. The 2nd part of the neck should be knitted symmetrically.
Shelf
Knitting the front part of the sweater is no different from knitting the back. The only difference is the depth of the neck.
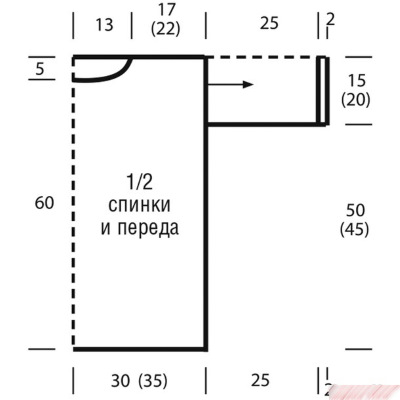
With a deep neckline, you should knit the neckline 14 rows earlier than you start knitting it on the back.
Sleeves
Before you start knitting the sleeve, you should sew the front and back along the shoulder seam. Next, you need to form loops of the edge of the neck along the armholes and knit them with an openwork pattern. From the bottom row of the sleeve, you should make decreases every 3 rows by 1 loop.
Having knitted the sleeve to the required height (it is recommended to check the sleeve pattern), you need to continue knitting with a 1x1 elastic band for approximately 8 cm, then close the remaining loops in a convenient way.
Assembly
To assemble the sweater, you need to make seams on both sides and sew the sleeves along the edge loops.
To knit the collar, you need to pull the loops from the edge loops of the neckline onto the hosiery needles and knit 20 cm with a 1x1 elastic band. To complete the row, you should close all the loops on the needle in a convenient way.
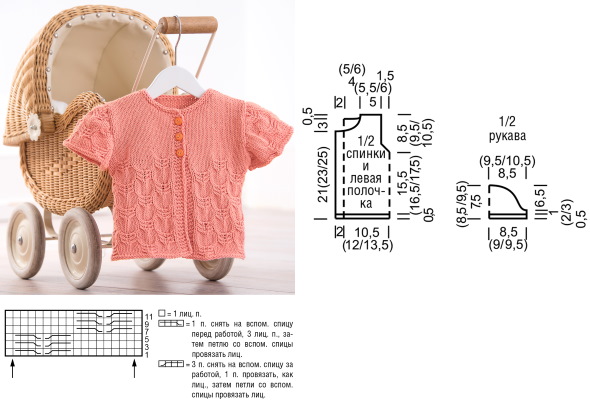
Openwork jacket for a 2 year old girl
Openwork knitting with knitting needles (the pattern of the model is described in the table) allows you to create an airy model for a 2-year-old girl. Thanks to the simple patterns, the jacket is knitted without much difficulty.
Fabric density: 21 sts x 28 rows = 10 x 10 cm. Circular knitting needles No. 4, 250 g natural soft yarn, 4 buttons.
Bubbles Pattern:
- 1 row: *1 l. p., 1 i. p.* According to the pattern, repeat from *-*.
- 2nd row: i. p. over l. p., l. p. over i. p.
- Repeat the 2nd row in a checkerboard pattern.
Pattern A1. The pattern repeat is 8 sts:
| Drawing diagram | Rows | |||||||
| Ɵ | Ʃ2 | Ɵ | Ʃ2 | Ɵ | Ʃ2 | Ɵ | Ʃ2 | 25 |
| R | V | R | V | R | V | R | V | 24 |
| V | R | V | R | V | R | V | R | 23 |
| R | R | R | R | R | R | R | R | 22 |
| R | R | R | R | R | R | R | R | 21 |
| R | R | R | R | R | R | R | R | 20 |
| R | R | R | Ɵ | W | Ɵ | R | R | 19 |
| V | R | R | R | R | R | R | R | 18 |
| V | R | R | Ɵ | W | Ɵ | R | R | 17 |
| V | R | R | R | R | R | R | R | 16 |
| V | R | Ɵ | S | R | R | Ɵ | R | 15 |
| V | R | R | R | R | R | R | R | 14 |
| V | Ɵ | R | R | W | R | R | Ɵ | 13 |
| V | R | R | R | R | R | R | R | 12 |
| V | R | R | Ɵ | W | Ɵ | R | R | 11 |
| V | R | R | R | R | R | R | R | 10 |
| V | R | Ɵ | R | W | R | Ɵ | R | 9 |
| V | R | R | R | R | R | R | R | 8 |
| V | Ɵ | R | R | W | R | R | Ɵ | 7 |
| V | R | R | R | R | R | R | R | 6 |
| V | R | R | Ɵ | W | Ɵ | R | R | 5 |
| V | R | R | R | R | R | R | R | 4 |
| V | R | Ɵ | R | W | R | Ɵ | R | 3 |
| V | R | R | R | R | R | R | R | 2 |
| V | Ɵ | R | R | W | R | R | Ɵ | 1 |
Pattern A2. The pattern repeat is 4 sts:
| Drawing diagram | Rows | |||
| R | R | R | R | 18 |
| Ɵ | Ʃ2 | Ɵ | Ʃ2 | 17 |
| R | V | R | V | 16 |
| V | R | V | R | 15 |
| R | R | R | R | 14 |
| R | R | R | R | 13 |
| R | R | R | R | 12 |
| R | V | R | V | 11 |
| V | R | V | R | 10 |
| R | V | R | V | 9 |
| V | R | V | R | 8 |
| R | V | R | V | 7 |
| V | R | V | R | 6 |
| R | V | R | V | 5 |
| V | V | V | V | 4 |
| R | R | R | R | 3 |
| V | V | V | V | 2 |
| R | R | R | R | 1 |
Symbols:
- R – front loop in the front row, purl loop – in the back row
- V – purl loop in the front row, front loop – in the back row
- Ɵ – yarn over
- Ʃ2 – 2 sts knitted together
- W – remove 1 st without knitting, 2 sts together knit stitch, throw the removed stitch over the knitted stitch.
Description of the execution technique
The back and both fronts of the garment are knitted with a common fabric at stage 1. Cast on 169 sts and knit the first 2 rows with garter stitch. It is necessary to take into account that the initial row is considered the 1st front row.
The 3rd row should be done as follows: 4 sts of the Bubbles pattern, 1 purl st, 160 sts of the openwork pattern A1, 4 sts of the Bubbles pattern. It is necessary to continue knitting loops according to the pattern A1 taking into account the strips until the height of the product is 21 cm.
Then you need to knit like this: 38 sts according to diagram A1, close 4 sts for the armhole line, 72 sts according to diagram A1, close 4 sts for the armhole, 38 sts according to diagram A1. From now on, 3 parts are knitted separately. It is recommended to place the loops of 3 parts on additional knitting needles.
Right shelf
There are 38 loops on the knitting needle. The armhole is formed as follows: it is necessary to decrease 2 times x 2 sts, and 1 st x 2, x 3, x 4, x 5 times. There are 29 sts left on the knitting needle.
At this stage, at a height of 23 cm from the initial row, from the left edge of the shelf, you should decrease the loops in every 2nd row by 1 st x 13 times. After this action, 16 loops remain to form the shoulder line. At the final stage, at a height of 35 cm from the initial row, you should close the loops remaining on the knitting needle.
Left shelf
For the left shelf, the same actions are performed in mirror symmetry.
Back
Transfer 72 sts from the additional needle to the right knitting needle. Finish the armholes on both sides of the garment in the same way as in the front. At the end, 54 sts remain. To finish the sprout at a distance of 30 cm from the initial row, close exactly 20 in the middle, then decrease 1 st x 1 time.
Next, the 2 halves need to be finished separately. There are 16 sts left on the needles for the shoulder seam. At a distance of 35 cm from the original row, you need to close all the loops in one go.
Sleeves
There are 38 sts on the needle and they should be knitted according to pattern A2. Having knitted 4 cm, you need to form an expansion using increases: 1 st on both sides of the sleeve in every 4th row (11 times). There are 60 sts on the needle.
Having knitted 23 cm from the initial row, you should knit the sleeve cap symmetrically in the following way: decrease 3 sts x 2 times, 2 sts x 1, x 1, x 1, x 2 times, 1 st x 3, x 5, x 4, x 3 times, 2 sts x 1, x 1, x 2, x 2 times and 3 sts x 1 time. The sleeve length should be 30 cm. In the final phase, you need to close the free loops of the cap in one go.
Assembly
It is necessary to sew all the details of the product and sew buttons on the left shelf strip.
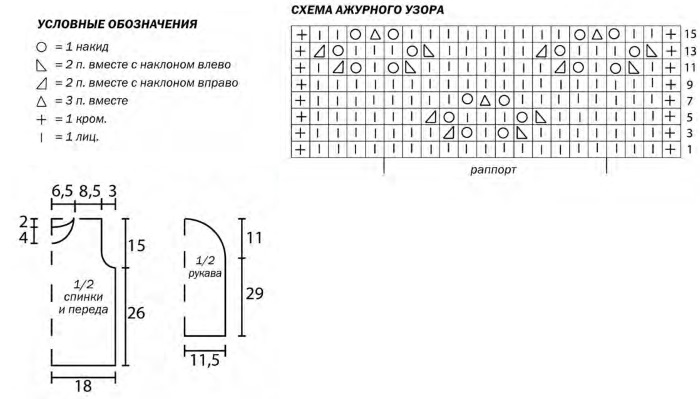
Fashionable openwork pullover for girls
A fashionable pullover knitted according to the pattern for a young fashionista, where all the details are knitted with an openwork pattern, is made in a romantic style and looks great with classic-cut trousers or jeans, and a fluffy airy skirt can complement the stylish look.
Size 116/122
Material: any hypoallergenic yarn 50 g/110 m; approximate consumption 300 g. Tool: knitting needles No. 4.5.
| Patterns | Technique of execution | |
| Rows (odd) | Sequence of loops | |
| Openwork 1 Knitting density: 22 sts x 27 rows = 10 x 10 cm | 1
3 5 7 9 11 13 15 | 3 l.p., Ω
Oh, and Զ, 3 lbs. 3 i. p., 3 l. p. Ω, 3 l. p. Յ, Ω 3 lbs., Զ 3 l. p., 3 i. p. |
| Openwork 2
Knitting density: 24 sts x 29 rows = 10 x 10 cm | 1 - 11
13 15 17 19 -29 31 33 35 | 3 l. p., 3 i. p.
3 l.p., Ω Oh, and Զ, 3 lbs. 3 i. p., 3 l. p. Ω, 3 l. p. Յ, Ω 3 lbs., Զ |
Legend:
- l. p. – front loop;
- i. p. – purl loop;
- Ω – knit 3 loops together: slip 2 sts as if knitwise, knit 1 st and pull the slipped loops through it;
- Յ – from 1 st located 1 row below, knit 3 sts: 1 l st, 1 i st, 1 l st, knit all 3 loops in the next purl row.
- Զ – from 1 st located 1 row below, knit 3 sts: 1 l. st, 1 i. st, 1 l. st, knit all 3 sts in the next purl row.
The diagram shows only the front rows, on the back side of the product the loops are knitted according to the pattern. The face of the sweater is formed in the reverse back rows.
Back
Cast on 86 sts on knitting needles, then knit with pattern 1. Form the lower armhole line 21 cm from the initial row by closing 3 sts on 2 sides, in each 2nd row 2 times x 2 sts, 2 times x 1 st, and in the 4th row 1 time x 1 st. As a result, 66 sts remain in the work.

For the sprout, after 16 cm from the initial row of armhole formation, the middle 26 sts should be closed and 2 fragments of the detail should be knitted separately. When shaping a smooth neckline, it is necessary to close 5 sts evenly from the middle in every 2nd row. Simultaneously with the 2nd decrease, on the other side of the detail, close 7 sts and 8 sts in the next row. Finish the 2nd side of the back of the sweater in mirror symmetry.
Shelf
The front of the sweater is formed in the same way as the back, but with a deep neckline. After 10 cm from the formation of the 1st line of armholes, 16 sts are closed, then both sides of the piece are knitted separately.
The formation of a smoother rounding is facilitated by closing the loops in every 2nd row 10 sts. A shoulder line is formed on the open side of the shelf, which should be closed at the height of the back. The 2nd part of the shelf should be finished in a similar way.
Sleeves
Cast on 50 sts on the knitting needles, then knit according to pattern 2. When forming an even bevel, add 1 st on both sides in the 15th row from the initial row, then 4 times x 1 st in each 16th row. 60 sts are formed on the working knitting needle.
The loops formed as a result of the increases must be included in the pattern according to pattern 2. From the initial row of the sleeve, after 32 cm, it is necessary to close 3 sts on both sides for the armhole, then in every 2nd row 21 sts. In the final row, it is necessary to close the free 12 sts in one go. During the assembly process, all the parts must be sewn with invisible seams.
For beginners and experienced needlewomen, openwork items knitted with knitting needles using simple, clear patterns and precise descriptions can become a source of pride and creative inspiration.
Video about openwork knitting
Openwork knitting - patterns: