Application in kindergarten from autumn leaves is part of the educational program. It is necessarily included in the work planning. Natural material provides great opportunities for the development of creative abilities in children.
Preparing leaves for work
To create an autumn applique, tree leaves are prepared in advance. Fallen leaves or those still on the branches are suitable for this.
Rules for preparing leaves for applications:
- The surface of the plates must be free of rot and damage.
- Take leaves with straight petioles, not twisted.
- Choose fresh leaves, not old ones.
- The leaves you like are cut from the tree using a knife or scissors.
After collection, the leaves are dried immediately. This procedure cannot be postponed.
Drying methods
| Name of methods | Description |
| Natural | This method is suitable for harvesting leaves used to create volumetric compositions and garlands. Choose a dark, non-damp place for drying. Cover the surface with clean paper (parchment). Lay the leaves on it in 1 layer. Leave them like this for 2-3 days until completely dry. After the procedure, the leaves will change shape and color: they will curl up and become dark. |
| In the book | This method is the most common. For drying, you will need a hardcover book and napkins (perforated paper). The leaves are laid out between the pages. For reliability, each of them is wrapped in a napkin. It will absorb excess moisture released from the plates during drying. The leaves are laid out without overlapping. |
| Plant Drying Press | This is a professional method of drying plants. Thanks to it, it is possible to preserve the texture, shape and color of the leaves. The press design most often consists of 2 plates (wood or plastic). They are connected to each other with special wing nuts. They are used to control the pressure on the natural material. If desired, such a press can be made independently or a ready-made design can be purchased. |
Application for children any autumn leaves can be used. Therefore, when preparing, it is worth collecting as much natural material as possible. You do not need to limit yourself to one type of leaves. It is advisable to collect maple, birch, willow.
Owl
The Owl applique is unique in its versatility. Its complexity can be varied. The simplest version of the craft is suitable for children aged 3, but older children are entrusted with work that requires greater responsibility.
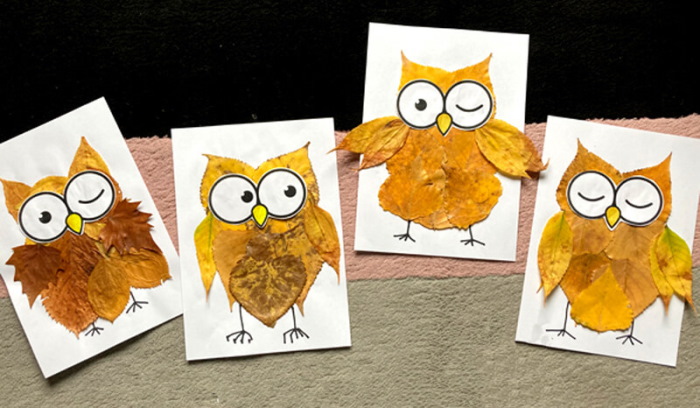
Option I, easy
Materials:
- Glue.
- White sheet for the base of the applique and the eyes of the owl.
- Elm or alder leaves 3 pcs., willow (rowan) 2 pcs., hornbeam 2 pcs.
- Scissors.
- A piece of red paper for the beak.
- Ruler.
- Pencil.
- Black paper for the owl's pupils.
Sequence of actions:
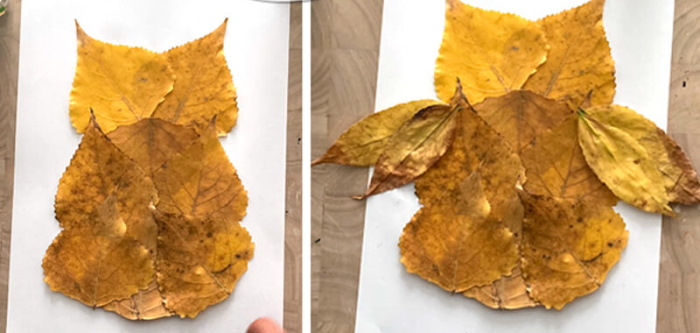
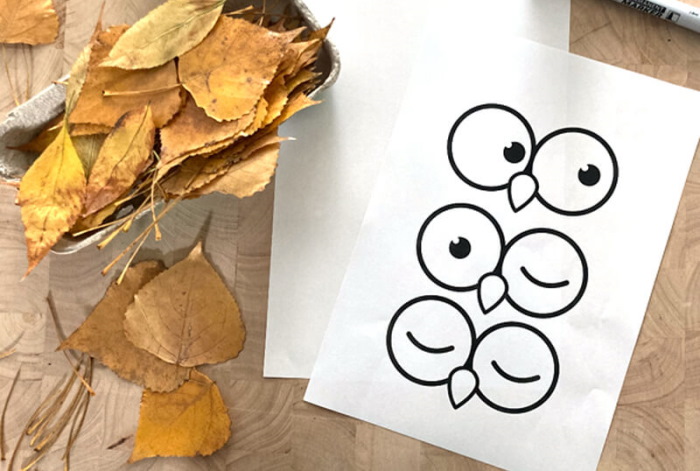
- In the middle of the sheet, glue an elm or alder leaf with the pointed end down – this will be the owl’s body.
- Glue alder or elm leaves to the upper part of the body. The sharp tips of the plates face upwards. You should get characteristic ears.
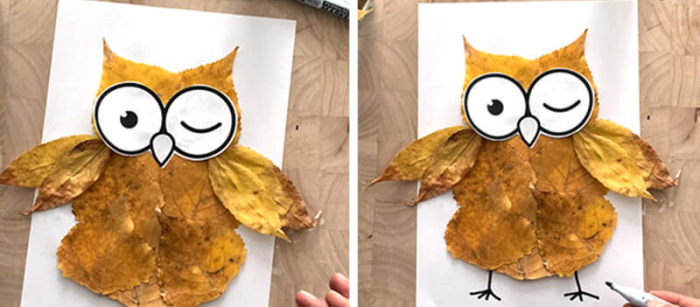
Autumn Leaves Applique. Owl - The pupils are cut out of black paper and the base for them is cut out of white paper.
- Connect both parts together and glue them to the upper part of the body.
- On red paper draw a small triangle - this will be the beak.
- Cut out the beak and glue it onto the owl's head.
- Hornbeam leaves are glued to both sides of the body – these will be the wings.
- Glue willow or rowan leaves to the lower part of the body – these will be the owl’s legs.
Autumn Leaves Applique. Owl
The shape of the leaves can be changed using scissors.
Option II, complex
Materials:
- A large number of willow or rowan leaves. They will be used to make the bird's plumage.
- A large dry leaf from any tree for the body + 2 medium-sized ones for the ears.
- Colored paper for eyes.
- Glue.
- Red paper.
- Ruler.
- Scissors.
- Sheet for the base of the applique.
- Pencil.
Sequence of actions:
- On the applique base, draw the outline of an owl with its wings spread. You can use a template if you can't do it yourself.
- A large sheet of paper is glued into the middle of the drawing, which will be the bird’s body.
- Glue 2 medium-sized sheets of paper above the body – these will be the owl’s ears.
- Eyes are cut out of white and black paper and glued onto the owl’s head, between the ears and the body.
- They work with willow or rowan leaves. They are glued overlapping the wings to create the illusion of plumage.
- Make legs from 2 willow leaves and glue them to the lower part of the body.
- Draw a triangle on red paper – this will be the beak.
- Cut out the beak and glue it onto the owl's head.
If desired, you can decorate the background for the owl. To do this, darken the whiteness with a regular pencil.
Forest
The applique "Forest" from autumn leaves can be made in different ways. The availability of materials, the creative abilities of children and their age are taken into account.
Complex work requires well-developed motor skills. Simpler options are entrusted to 3-year-olds.
Option I
Materials:
- Small meadow hay.
- Yellow leaves (with petioles) of birch.
- Fern or any other grass similar to it.
- A sheet of yellow paper for the base of the applique.
- Glue.
- Scissors.
Sequence of actions:
- Yellow paper will act as a background. If you don't have one, you can take a regular album sheet and paint it. Use pencils. Felt-tip pens or wax crayons won't work.
- The bottom of the paper is generously coated with glue. The coverage area is the entire length of the sheet, the width is 5-7 cm.
- Place hay on the glue and press it down so that it sticks. It is worth using a small fraction to get an imitation of grass.
- Work with fern leaves. Whole pieces are not needed. Branches are cut, resembling fir trees in shape.
- Glue pieces of fern on top of the hay.
- Birch leaves are glued above the fern with the stems facing down.
You will get a multi-level composition imitating an autumn coniferous-deciduous forest. If there is no hay in the area, you can buy it at a pet store. It is sold there as food for rodents.
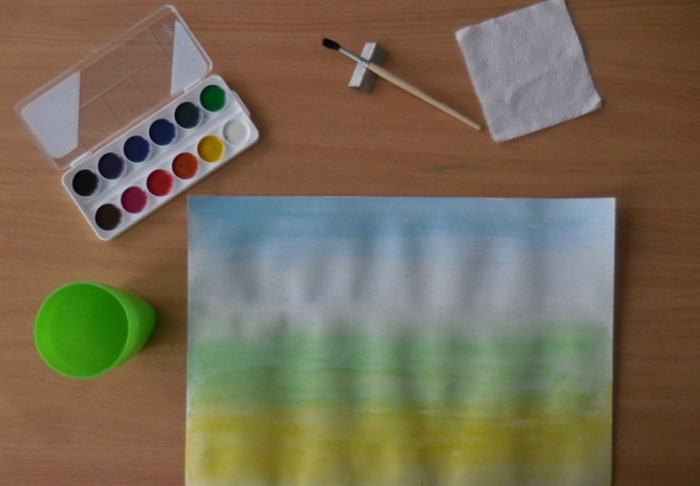
River in the autumn forest
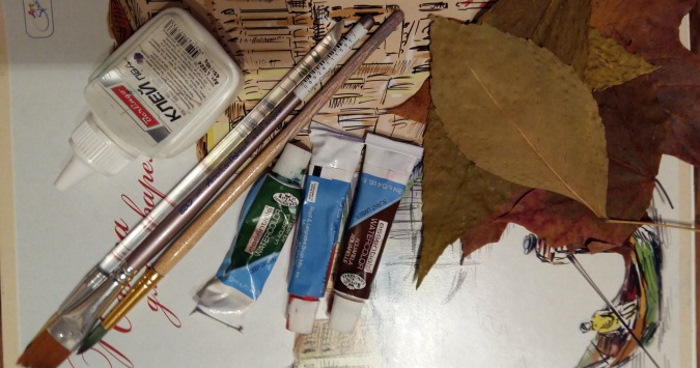
Materials:
- Paints of blue and light blue colors.
- Autumn leaves of different sizes and colors - the larger the palette, the more realistic the forest will be.
- Brush.
- A glass of water.
- A4 sheet.
- Glue.
Sequence of actions:
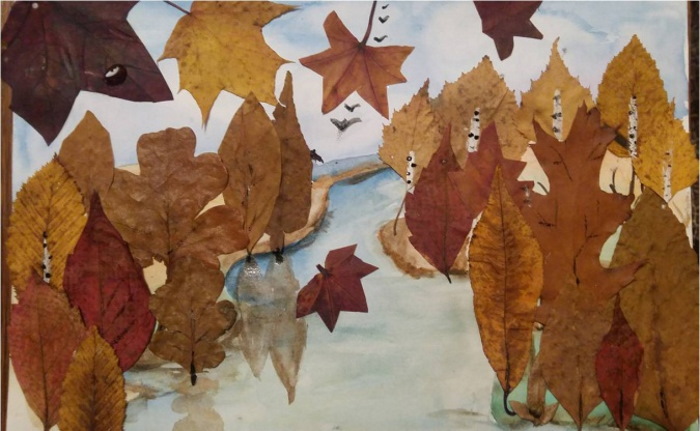
- A strip of arbitrary shape is drawn diagonally across the entire sheet – this is the outline of the river.
- Paint the stripe blue. Add blue strokes for greater expressiveness.
- Leave to dry for a while.
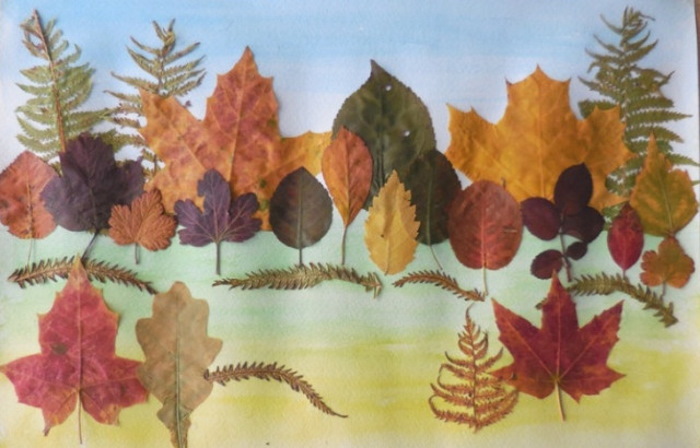
- The leaves are glued overlapping each other on the top of the paper, above the river. The petioles are facing downwards.
- Fill the lower space with leaves.
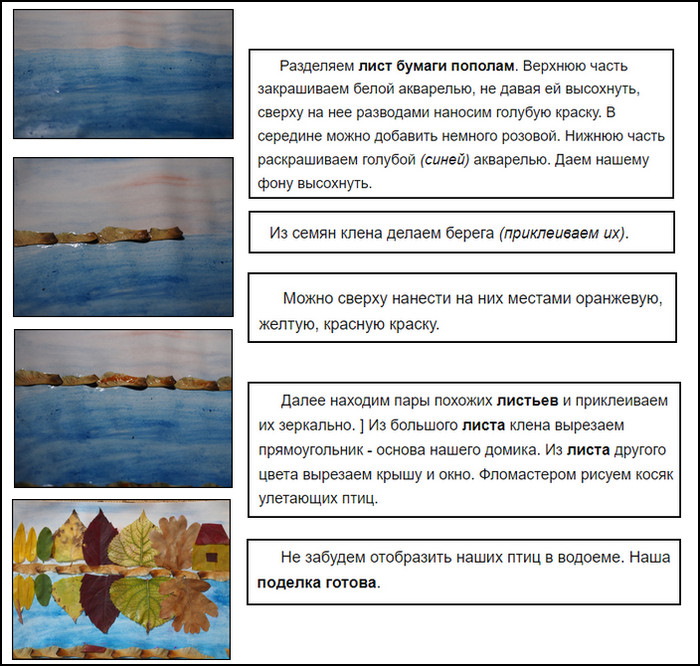
At the top, don't forget to leave a small stripe imitating the sky. If desired, it can be painted blue.
Option III
Materials:
- Gouache: white, brown, dark green, red.
- Thin branches.
- Leaves are small in size (birch or even smaller, for example).
- Brush.
- The glue is hot and simple.
- A glass of water.
- A4 sheet.
Sequence of actions:
- The sheet is placed horizontally in front of you.
- Visually divide it into 2 equal parts.
- The top part of the sheet is painted with white gouache.
- The lower part is painted with brown gouache and allowed to dry a little.
- On the still wet, brown layer, make strokes of red, yellow, dark green. The result should be an imitation of autumn soil covered with a pile of fallen leaves.
- Allow the paint to dry completely.
- Thin branches are glued to the sheet. They should imitate trees. Therefore, you need to make a trunk, branches. The trees should go into the white background. An important point is that the branches are attached to the sheet with hot glue.
- Birch leaves or any other small plates are glued onto the branches of the resulting trees.
- Between the leaves, draw berries in red. You can do this on 1-2 trees.
In the white sky, using black gouache and a brush with fine bristles, you can draw the outlines of birds flying south. It's easy to do - just sketch a pattern in the form of uneven check marks.
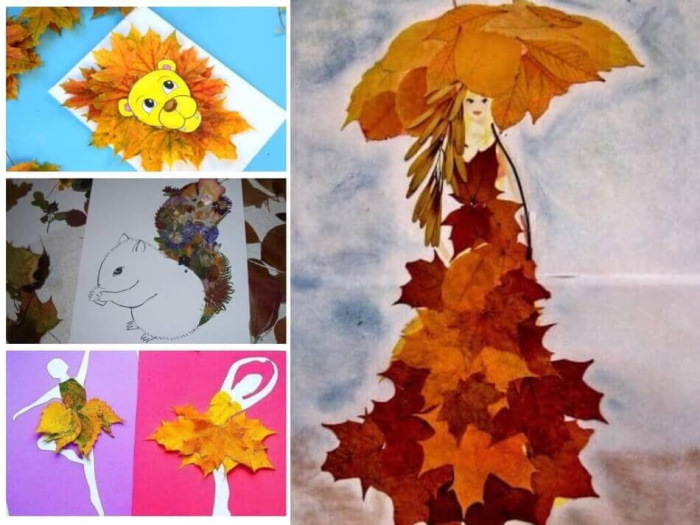
Umbrella
The autumn leaf applique "Umbrella" will not cause difficulties in creation even for 3-year-old children. This is one of the simplest works available to children.
The easy way
To create the applique you will need the following materials:
- A sheet of paper for the base of the applique.
- Glue.
- Autumn leaves.
- Pencil.
- Paint of any color to decorate the umbrella handle.
- Brush.
- A glass of water.
Sequence of actions:
- Draw the outline of an open umbrella on a sheet of paper.
- The handle is painted with paint of any color.
- The umbrella dome is generously coated with glue.
- The leaves are placed on the glue, overlapping each other.
All that remains is to give the glue time to dry.
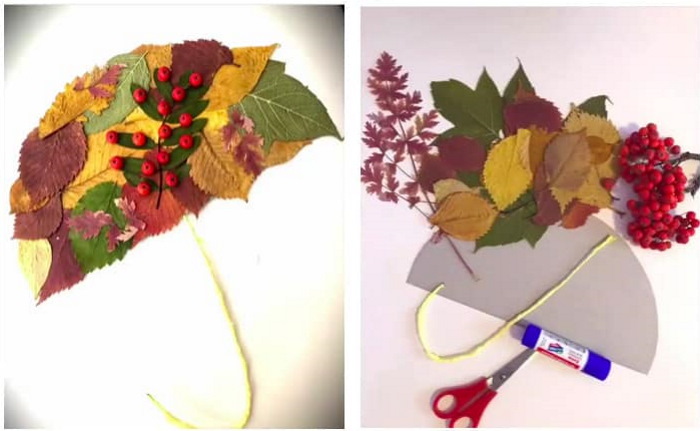
A more complex version of the applique "Umbrella"
Materials:
- Colored paper for creating an umbrella. It is advisable to choose brown for the handle and any other tone for the dome.
- Autumn leaves.
- Glue.
- Scissors.
- Paper base for crafts.
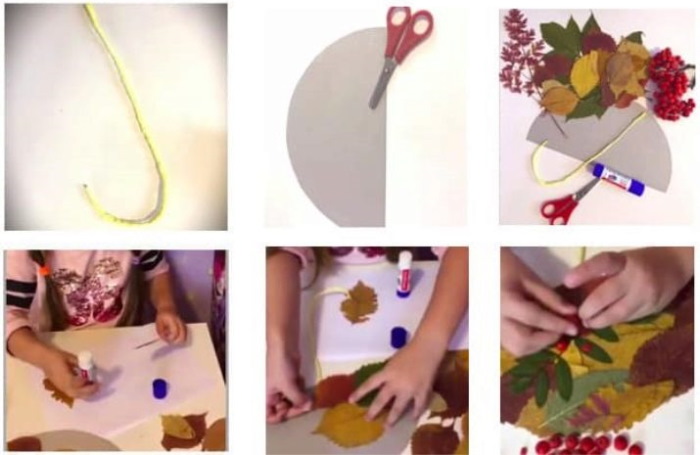
Sequence of actions:
- A square is cut out of colored paper – the future dome of the umbrella.
- Fold the square like an accordion.
- One end of the folded square is fixed by gluing each layer of paper.
- Let it dry so that the paper does not fall apart.
- Unfold the folded square into a fan shape.
- Cut out the umbrella handle from brown paper.
- The fan is glued with the pointed end down. The result should be an inverted, half-open umbrella.
- A handle is glued to the umbrella.
- A triangle is cut out from the same material as the handle – the sharp tip of the umbrella.
- Glue the triangle to the bottom of the umbrella, hiding the glued base.
- The leaves are glued as if they were lying in an umbrella.
If desired, the umbrella can be decorated: stick white or other colored circles on it. Then you will get a polka-dot product. Also, for greater aesthetics, a rowan branch is added to the pile of leaves: artificial or homemade.
Autumn Ballerina
This applique looks aesthetically pleasing and delicate. Any child can create it. However, an adult's help will still be needed.
Materials:
- Sheet for the background of the applique.
- Glue.
- Silhouette of a ballerina without a tutu.
- Autumn leaves.
The silhouette of the ballerina is printed out and cut out. If this is not possible, then it is drawn directly on a sheet of paper using a template. People with artistic skills can do this themselves.
Sequence of actions:
- A silhouette of a ballerina is glued onto the sheet (the base of the applique).
- The pack is decorated using leaves, securing each plate with glue.
- Leave to dry.
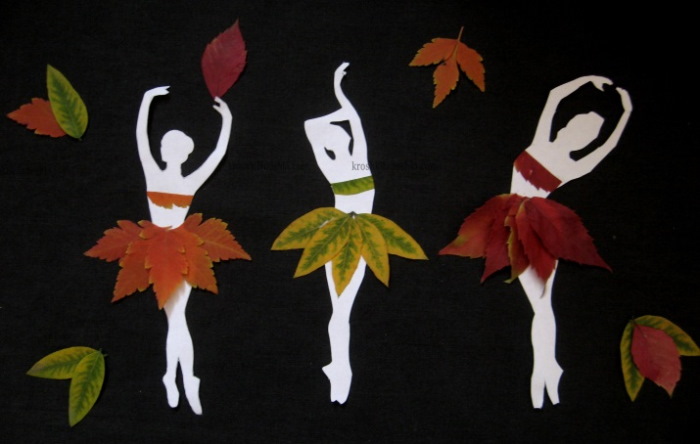
For expressiveness, it is worth taking a colored base for the applique.
Autumn vase
Materials:
- Colored pencils.
- A4 sheet.
- Glue.
- Autumn leaves with petioles.
Sequence of actions:
- Place an A4 sheet of paper vertically in front of you.
- Draw a vase at the bottom of the sheet and color it. There are no strict restrictions - choose the color and patterns to your own taste.
- Autumn leaves are glued to the neck of a vase, imitating a bouquet.
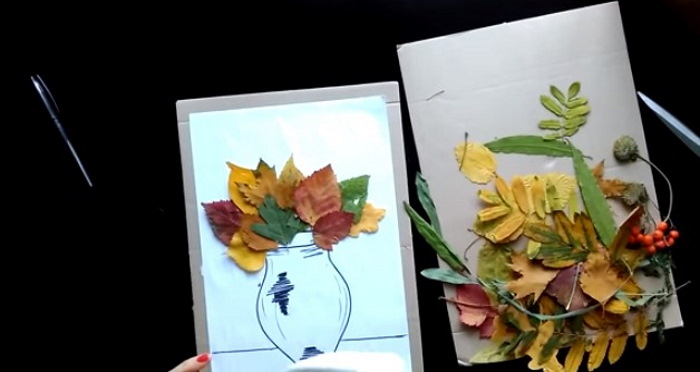
If desired, decorate the bouquet with rowan twigs cut out of paper.
Hedgehog
The autumn leaf applique "Hedgehog" will appeal to children, as the result will be a funny animal figure. The help of an adult is minimal. Most of the work is done by children.
Materials:
- Colored pencils.
- Glue.
- Autumn leaves of different shapes and sizes. There must be plates with sharp tips (maple, for example).
- Scissors.
- The basis for the applique is an A4 sheet of paper; you can use colored paper.
- Dried flowers.
Sequence of actions:
- Place the sheet in a horizontal position.
- They draw a silhouette of a hedgehog on it.
- Take leaves with sharp tips. If they are maple, then divide them into several parts with scissors.
- The upper part of the silhouette is covered with leaves – this will be the outer layer, imitating thorns.
- Continue gluing different sheets of paper overlapping each other.
- Glue 2-3 dried flowers on top of the leaves.
- They design the hedgehog’s body: they color it with pencils, draw a beady nose and dots for eyes.
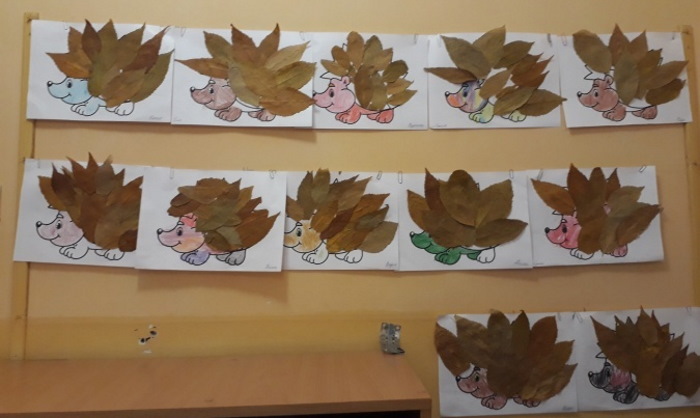
If desired, you can glue a red apple cut out of colored paper onto the hedgehog’s spines.
Autumn butterfly
Materials:
- Pencil for drawing contours.
- Autumn leaves of different sizes + 1 elongated shape for the body.
- Glue.
- Sheet for the base of the applique.
Sequence of actions:
- A plate of natural material of an elongated shape is glued to the sheet, the basis of the applique. This will be the butterfly's body. If there is no suitable option, it is cut out of a whole sheet.
- Draw the outlines of the butterfly's wings based on the size of the body.
- Using glue, overlap the leaves onto the wings.
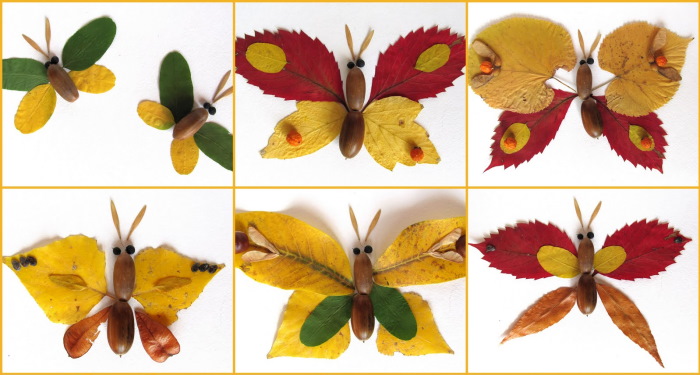
Using a pencil, draw the antennae on the upper part of the butterfly's body.
Goldfish
Materials:
- Autumn leaves are yellow or red.
- Scissors.
- Glue.
- Base for applique.
- Pencil.
Sequence of actions:
- Draw the outline of a fish on a piece of paper with a pencil.
- The fish's body is filled with leaves. They are glued on, imitating the position of the scales - the sharp tips of the plates are directed from the head to the tail.
- Glue 1-2 leaves to the upper and lower parts of the body. This will imitate fins.
- Leaves are glued on to imitate the tail of a fish.
- The head of the fish is made from 2-3 leaves.
- A heart is cut out from a single piece of plate.
- Glue the heart onto the protruding part of the head. This will be the fish's mouth.
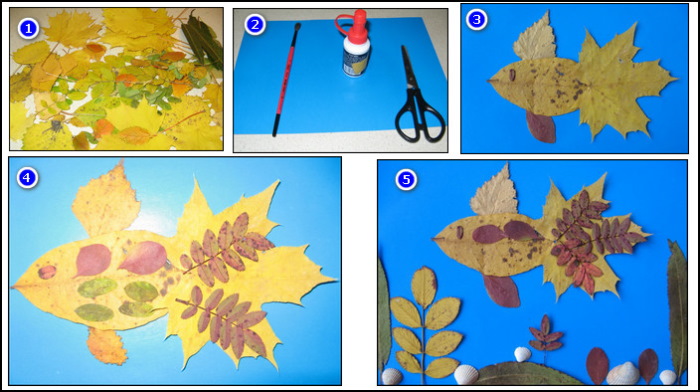
The eye can be cut out of dark paper and glued to the head.
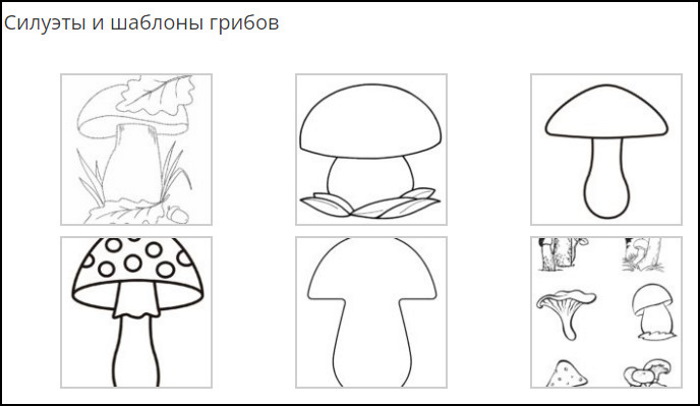
Fungus
Materials:
- Colored pencils.
- Glue.
- Autumn leaves of different shapes and colors.
- Paper base for applique.
Sequence of actions:
- In the middle of the sheet, draw the stem of the mushroom.
- On the mushroom stem, draw eyes, a nose and a mouth with pencils.
- Take a wide, oval-shaped leaf.
- They glue it onto the stem of the mushroom – this will be its cap.
- A birch leaf is glued to the hat.
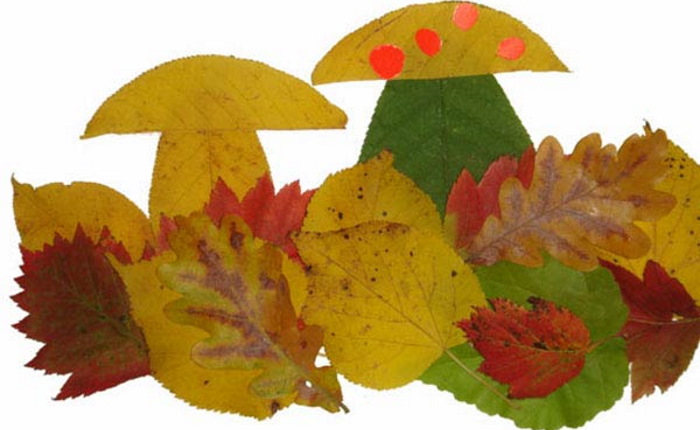
All that remains is to glue various plant plates at the base of the mushroom. This will create an imitation of the ground, strewn with fallen leaves.
Autumn birch
This craft is suitable for children aged 2-3 years. It is made with minimal effort. Even children with poorly developed motor skills will be able to create a beautiful applique.
Materials:
- White sheet of paper.
- Glue.
- Birch leaves.
Sequence of actions:
- An adult draws a birch tree trunk with many bare branches on a piece of paper.
- The child randomly glues birch leaves onto the branches.
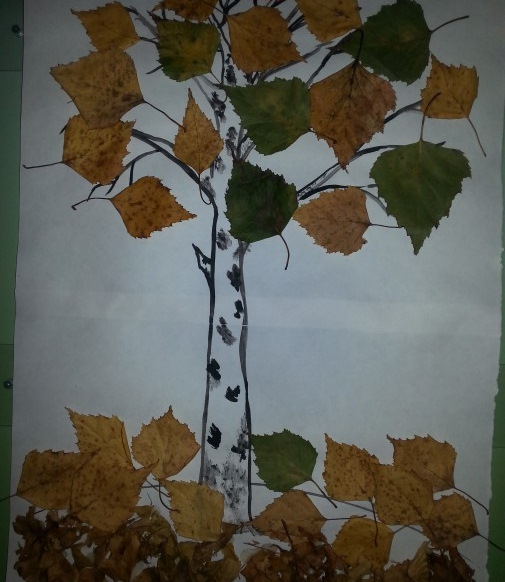
You can stick some leaves at the base of the tree.
Birds on the branches
The autumn leaf applique "Birds on branches" is a complete composition. It is suitable for middle and senior groups. It will be difficult for younger children to make it.
Materials:
- A4 sheet.
- Autumn leaves of hornbeam and ash or similar in shape.
- Colored paper: black and white for the eyes, red for the beak.
- The branches are thin.
- Hot glue and regular glue.
If there are no suitable branches, they are replaced with painted ones. For this, prepare brown gouache, a brush, and a glass of water.
Sequence of actions:
- On a sheet of paper, twigs are fixed with hot glue, imitating one large one. Another option is to draw.
- 2-3 hornbeam leaves are glued to the branches in a random order in a vertical position.
- Oval, elongated leaves are glued to the hornbeam plates. These will be the wings.
- Circles (the base of the eyes) are cut out of white paper, and ovals (the pupils) are cut out of black paper.
- Connect both elements for the eyes and glue them to the upper part of the body.
- Cut a triangle out of red paper – a beak. Glue it under the eyes.

If desired, you can cut out rowan berries from red paper and hang them randomly on the branches.
Maple Leaf Peacock
The simplest application for children aged 2-3 years.
The only materials you will need are:
- 1 maple leaf.
- Glue.
- A sheet of paper for the base of the applique.
- A sheet of a shape suitable for decorating the body.
- Marker black and red.
Sequence of actions:
- In the center of the paper base, glue a maple leaf with its sharp tips up. The fluffier it is, the more beautiful the peacock will be.
- The body of a peacock is glued to the center of the maple leaf.
- With a black marker, make dots on the upper part of the body - these will be the eyes. With red, draw a triangle, the peacock's beak.
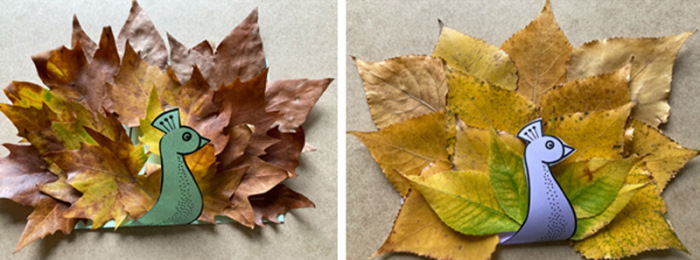
All that remains is to draw the peacock's legs-sticks.
Sunflower
Materials:
- Autumn leaves are yellow in color, shaped like sunflower petals.
- Hot glue (can be replaced with black plasticine) and simple glue.
- Markers in bright and dark green.
- Sunflower seeds.
- Base for applique.
- An ordinary pencil.
- Circle template. It will be used to make a silhouette of the sunflower core. The diameter depends on the size of the craft, the number of flowers on 1 sheet.
Sequence of actions:
- In the middle of the sheet, draw a circle template with a pencil.
- Fill the space of the circle with sunflower seeds, securing them with black plasticine or hot glue.
- Glue on sunflower petals using autumn leaves of a suitable shape and color.
- Using a light green felt-tip pen, draw the stem and leaves. Use a dark green tone to design the veins.
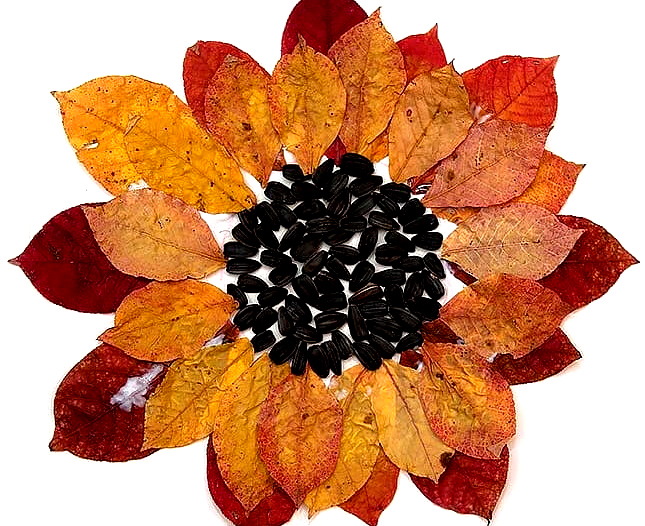
You can make a composition called “Field with Sunflowers”.
Autumn portrait
Materials:
- Glue.
- A4 paper.
- Autumn leaves of different colors and sizes.
- Pencil for drawing.
- Dried flowers.
When working with children, instead of drawing a face, it is better to print its template on paper. Choose an option with female features. If the child draws well, then trust him to draw the face.
Sequence of actions:
- Draw a woman's face in the center of the sheet (or use a template).
- They glue leaves, framing the face with them.
- They decorate their hair with leaves and dried flowers.

Rowan twigs can be used for decoration.
Squirrel
Materials:
- Drawing of a squirrel in profile.
- Glue.
- Autumn leaves.
- Base for applique.
- Colored pencils.
You can print out a sheet with a silhouette of a squirrel or let the children draw it themselves. The children's age is taken into account.
Sequence of actions:
- Place the A4 sheet vertically. If you are using a ready-made drawing, proceed directly to step #3.
- They draw a silhouette of a squirrel on it.
- The leaves are glued overlapping each other onto the squirrel's tail.

The rest of the animal is colored with pencils. Using this method, you can make an applique "Snail". To do this, draw a mollusk figure on paper. Its shell is made from leaves.
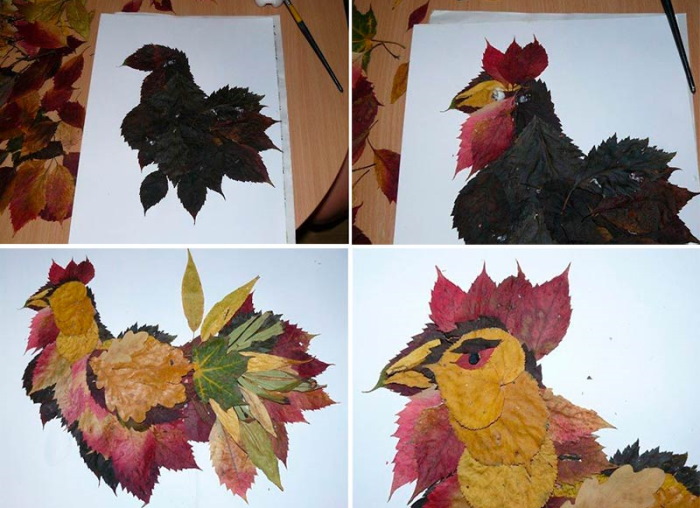
Cockerel
Materials:
- Leaves of willow, maple and other trees.
- Glue.
- Scissors.
- Paper base for applique.
- Pencil.
- Colored paper for decorating the eyes and beak.
Sequence of actions:
- The outline of a rooster is drawn on paper.
- They select a leaf suitable for decorating the head.
- Glue a sheet in the shape of a head onto the drawing of a rooster.
- Take a maple leaf and cut it to form a comb and earring under the beak.
- Glue one half horizontally above the head – this will be the comb. The remaining part is attached vertically under the beak.
- Choose a long sheet and stick it on the cockerel's neck.
- The bird's body is formed from leaves of suitable size.
- The tail is made from willow leaves. To do this, they are glued overlapping each other. The result should be an arched tail.
- Wings are made from willow leaves, heating them on top of the body.
- Eyes and a beak are cut out of paper and glued onto the cockerel's head.
- The legs are finished drawing with pencils.
Application in kindergarten from autumn leaves is a good means for developing motor skills, attention, and creative abilities.
You can create such crafts at home. This will not reduce the pedagogical value of the applique.
Video on how to make appliques from autumn leaves
Some new interesting ideas for autumn appliques.
Thank you very much for the useful publication. I will definitely use it when working with children.