Paper applique can be subject (spring bouquet, colored umbrellas) or decorative (pattern for a towel, tie for dad). For children, such activities are of great importance. Preschoolers master different techniques and methods of creating crafts. This develops creative abilities, attention and thinking.
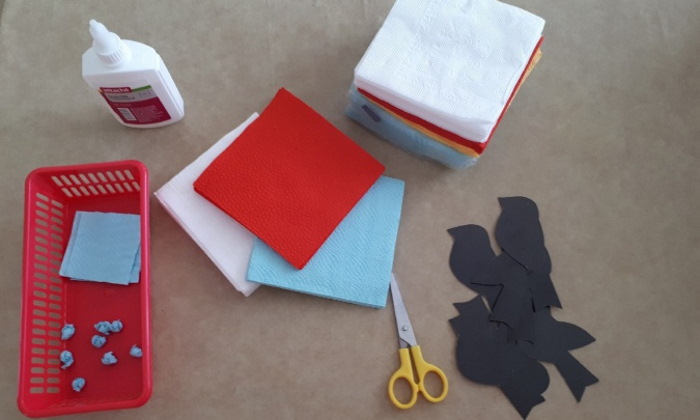
Necessary tools and materials
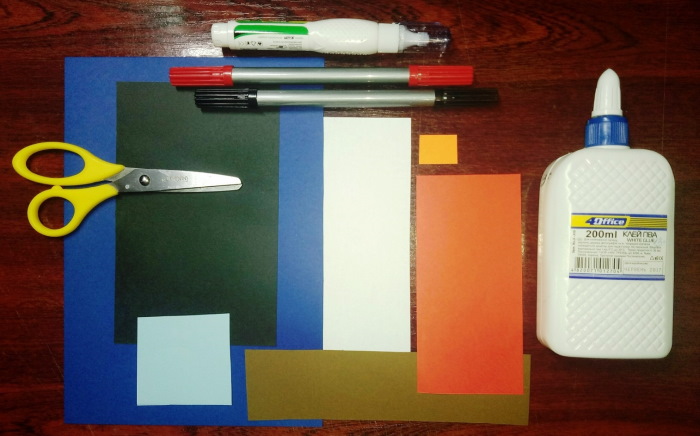
Creating an applique requires a certain set of tools.
The following materials are prepared in advance:
| Name | Description |
| Box for scraps of materials | It is worth teaching a child to treat paper and other materials with care from childhood. When creating an applique, scraps are formed. Do not throw them away. Put the remains of the materials in a box. They may still be useful in the future. |
| Plastic plates or any other container for ready-made forms | The table is kept in order. Therefore, the applique forms are not thrown away, but rather placed in a specially designated container. |
| Paper or cloth napkins | Useful for wiping hands or the table. |
| Glue jar | It is convenient to work with liquid glue if you pour the required amount into a jar. |
| Glue brush | A special brush with hard bristles. It is convenient to use it to spread glue on the form. |
| Glue stand | The brush with glue is not always in your hands. To avoid staining the table and clothes, it is placed on a stand when necessary. |
| Scissors with rounded ends | Blunt ends make the object safe. Children work with scissors under the supervision of an adult. The adult controls the children and ensures that the tool is used correctly. |
| Paper | Thick paper is used for the background. If you take thin paper, it will start to curl from the glue, and this will spoil the appearance of the applique. The best option is cardboard or semi-cardboard. The shapes are cut out of colored paper. They are used with a matte or glossy surface. |
| Natural materials | Leaves, dried flowers, grass, moss, twigs are used. Some of them are harvested in autumn and summer. Special presses or a book (standard method) are used to dry the leaves. They are used as additional material. |
| Film or board | The applique form is placed on a film or board, and only then is it coated with glue. This will protect the table from dirt. You can use a whole piece of film, covering the table completely with it. |
Paper applique for children does not include complex materials. Due to this, to create it you will need basic things sold in a stationery store. In autumn and summer you can prepare natural material.
Preparing the workplace
Children in the older group (age 5-6) are given colored paper blanks for applique. The children cut them out along the drawn lines or using templates. Sometimes they prepare the forms themselves.
Preparing the workplace consists of the following steps:
- Remove all unnecessary items from the work surface. Leave the materials used to create the applique.
- An easel is placed near the table (if there is none, then it is hung on the board). Examples of finished works or other necessary hints are placed on it.
- Items for creating an applique are neatly laid out on the table. The materials from which something is to be cut are placed closer to the child. The glue is moved to the background. When it is time to assemble the applique, it is placed closer.
- Place a garbage container on the table. This can be a small deep plastic bowl. Throw small remains of materials unsuitable for use into it.
A good level of lighting is maintained at the workplace. If there is not enough light, a lamp is installed.
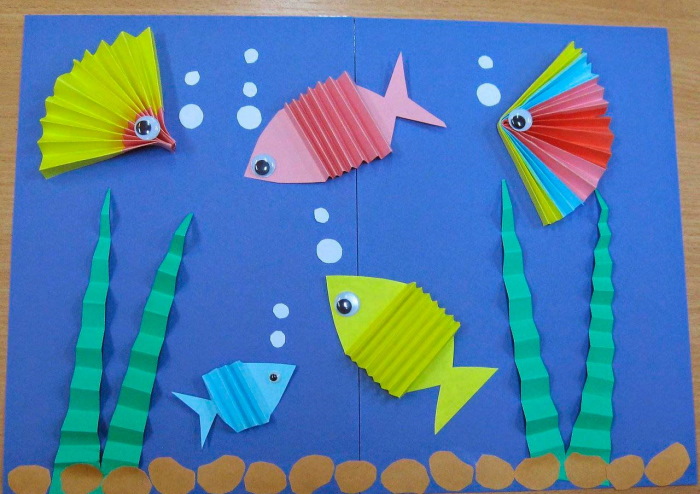
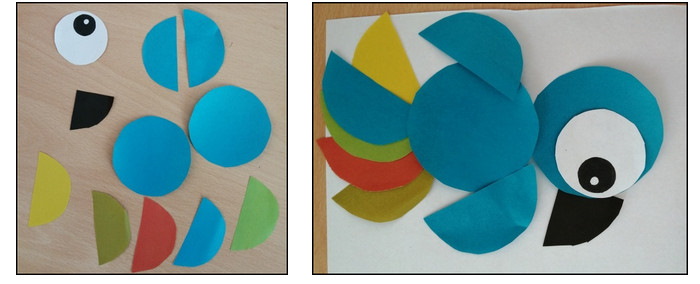
Fish
Materials:
- Colored paper: yellow, green, red.
- Ruler.
- Pencil.
- Scissors.
- Glue.
- Small shells.
- A bead or seed to decorate the fish's eye.
- Blue cardboard for the base of the applique.
- Glue brush.
Sequence of actions:
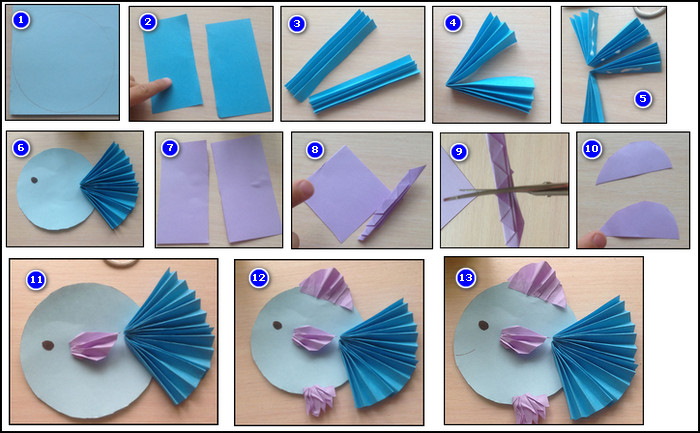
- On colored paper, draw 2 squares: a large one on yellow paper and a small one on red paper.
- Each square is folded diagonally.
- Cut each square diagonally. The result should be triangles.
- Each yellow triangle has its sharp corner removed by rounding one side. Trim with scissors.
- Starting from the base, fold each triangle like an accordion.
- Glue yellow cut triangles into the middle of the blue cardboard, placing their even sides next to each other. This will be the body of the fish.
- Red triangles are glued to the back of the fish’s body, connecting them together – this will be the tail.
- Glue the eye onto the fish's body. Use a grain or other suitable material.
- Shells are glued to the bottom of the blue cardboard.
- From green cardboard, cut out curved lines with sharp tips - these will be algae.
- They stick on seaweed.
If there are no shells, they are replaced with paper analogues. This master class can be slightly modified and create an applique "Fish in an aquarium". To do this, a sheet of blue cardboard is given a rounded shape.
Octopus
Paper applique for children "Octopus" is suitable for reinforcing the topic of sea creatures. Along the way, you can read a poem or riddles to the children. This will make the process of creating the applique exciting.
Materials:
- Colored paper pink or red + green, brown.
- Scissors.
- Glue.
- Brush for glue and paints.
- Pencil.
- Rice is round in shape.
- Colored paints.
- Thick blue cardboard.
- A glass of water.
Sequence of actions:
- On pink or red paper, draw an oval and a small circle. This will be the body and head of the octopus. Cut out the shapes.
- On red or pink paper, draw curved, long lines.
- Cut around the lines, keeping the curvature. The resulting segments will be the tentacles.
- The white rice is painted over with any color suitable for decorating the octopus's eyes.
- Circles and ovals of any shape and size are cut out of brown paper. These will be pebbles.
- Strips (seaweed) are cut out of green paper.
- The octopus's body is glued onto blue cardboard. The oval is placed horizontally.
- A circle is glued above the body, near its middle.
- Eyes made from rice are glued onto the circle.
- Use a fine-bristled brush to draw a smile on the octopus. You can also do this with a pencil.
- Pebbles are glued to the bottom of the cardboard, alternating them with green stripes.

Let the appliques dry a little. Then, using bright red paint, put bold dots on the octopus's tentacles - this will imitate suction cups.
Snowman
Materials:
- Cotton pads – 3 pcs.
- Scissors.
- Glue.
- Cotton wool.
- Colored paper: red, brown, blue, black.
- Red felt-tip pen.
- Glue brush.
- Blue cardboard for the base.
- Silver glitter.
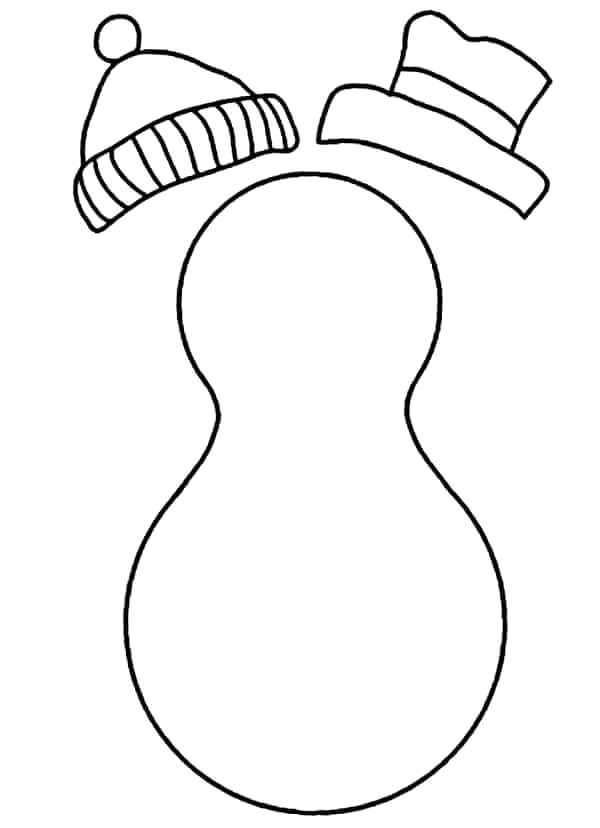
Sequence of actions:
- Take cotton pads. Leave one untouched, and process the other two. You should get 3 circles: large, medium, small. At this stage, work with scissors, cutting off the excess.
- Place a sheet of blue cardboard vertically.
- A large cotton pad is glued to the bottom of the cardboard – this is the base of the snowman.
- A medium-sized circle is glued to the edge of a large circle.
- Glue a small circle to the edge of the middle one. You should get a snowman figure.
- An elongated triangle is cut out of red paper – the snowman’s nose.
- Cut out 2 eyes from blue paper and pupils from black paper.
- Glue the black pupils into the center of the blue circles.
- They glue the eyes onto the snowman's head.
- They glue the nose onto the snowman's face.
- Use a red marker to draw a smile on the snowman's face.
- From the remaining cotton pads, cut out 2 circles – the snowman’s handles.
- Glue the handles onto the middle circle of the snowman's body.
- From brown paper cut out a strip (broom handle) + triangle (lint).
- The brown triangle is cut to give it a shaggy appearance, imitating the bristles of a broom.
- They glue the broom onto the snowman’s hand: first the stick, and then the triangle.
- From the remains of red or blue paper, cut out 3 circles - snowman buttons. Glue them onto cotton pads.
- The bottom of the cardboard is coated with glue.
- Pieces of cotton wool are glued onto it.
- Pieces of cotton wool are glued randomly all over the background - this will imitate snowfall.
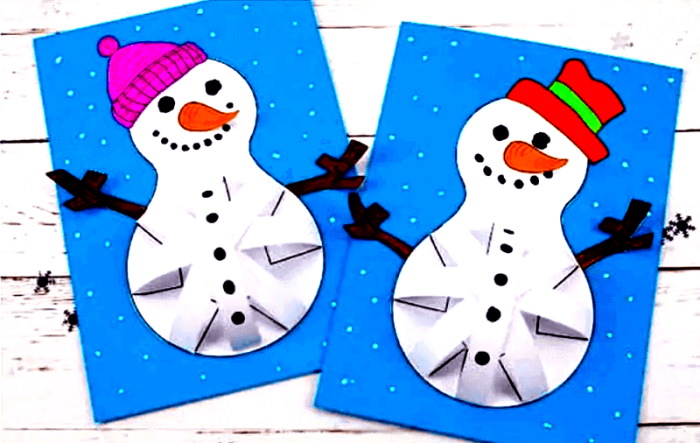
Once all the elements are glued, they are sprinkled with silver glitter to imitate the snowy glow. Cotton pads can be replaced with paper forms.
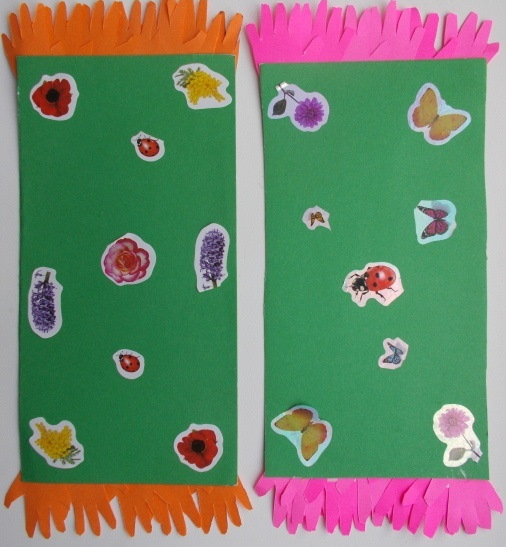
Let's decorate a towel
Paper applique for children "Decorate a towel" involves developing creative abilities. Children are given the opportunity to fantasize and create a pattern themselves. Children are shown examples of towels in advance to form an idea of existing ornaments.
Materials:
- Thick cardboard for the base.
- A piece of white fabric 20x10 cm.
- Textile adhesive.
- Glue brush.
- Scissors.
- Colored paper.
An adult uses a needle to pre-process the edges of pieces of white fabric. He uses the tip to pull out threads on them, imitating terry.
Sequence of actions:
- A piece of white fabric is glued onto thick cardboard.
- Using scissors, cut out diamonds, circles, triangles, squares, and stripes from pieces of fabric of different colors. The shape and size of the figures are arbitrary.
- The cut out shapes are glued onto white fabric.
Children create the pattern themselves. If there is no fabric, it is replaced with paper.
Volumetric applique "Mimosa branch"
Materials:
- Dry leaves for mimosa.
- Soft yellow napkins.
- Glue.
- The branch is wooden, thin.
- Paints (gouache) green.
- Base for applique.
- A glass of water.
- Brush for glue and paints.
Sequence of actions.
- The branch is painted green.
- Leave the branch to dry.
- Small pieces are torn from a yellow napkin and crumpled into polka dots.
- A twig is glued to the base of the applique.
- Dry leaves are glued to the branch.
- Apply glue around the branch.
- Peas from a yellow napkin are attached to a layer of glue.
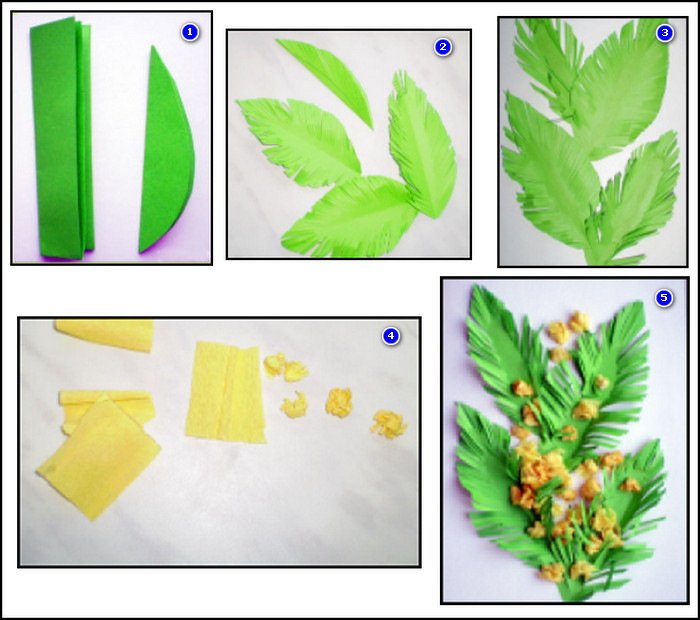
If desired, you can make a bow out of colored paper and stick it onto the branch. This applique will suit the 8th of March holiday. The wooden branch can be replaced with a paper one.
Parrot
Materials:
- Parrot body parts templates.
- Colored paper: red, blue, yellow, green, white, black.
- Green pencil (can be replaced with dry pastel).
- Dry fern leaves.
- Glue.
- Scissors.
- Glue brush.
The parrot templates should consist of the following parts:
- beak;
- body;
- wing.
If there is no suitable template, then proceed as follows:
- Choose any image of a parrot in profile that you like.
- They print it out.
- They are cut out like a mosaic into the required parts.
You can redraw the parrot. It will be difficult for children to do such work, so adults do it. The children are trusted to transfer the finished template onto paper.
Sequence of actions:
- Take a template of the parrot's body.
- Place it on a sheet of red paper and trace its outline.
- Cut out the shape of a parrot's body from red paper.
- Apply the wing template to the green paper and repeat the algorithm of actions performed with the body shape. In the same way, cut out the bird's beak from white and black material (the upper part from light, the lower part from dark).
- Cut out a circle from white paper – the base of the eye.
- The shape of the pupil is cut out of blue paper.
- The pupil is glued into the core of the white base of the eye.
- Bird feathers are cut out of yellow and blue paper.
- The shape of the paws is cut out of orange paper.
- The base of the applique is tinted with a green pencil.
- The parrot's body is glued to the middle of the sheet.
- A wing is glued to the middle of the body.
- An eye is glued onto the head.
- The beak is attached to the head using glue: first the upper part (white), and then the lower part (dark).
- Glue the orange paw to the lower part of the body.
- Feather blanks are glued onto the wing.
- Fern leaves are glued around the entire perimeter of the sheet.
Thanks to the plant design, you will get an applique of a parrot sitting in a tropical area.
Volumetric applique "Swan"
Paper applique for children "Swan" is made from simple materials. However, the result is an expressive composition. You can make not 1, but 2 birds. Their number depends on the level of training of the child and his capabilities.
Materials:
- White, blue, red paper.
- Scissors.
- The base of the applique is a pink sheet of cardboard.
- Glue.
- Black marker.
Sequence of actions:
- Cut out a strip of white paper in the shape of a question mark – this will be the head and neck of the swan.
- Using scissors, cut out a large number of teardrop shapes from white and blue paper.
- The lower part of the base is glued with blue shapes in an overlapping manner to simulate waves.
- In the middle of the sheet, just above the waves, glue the shape of the neck.
- The body is designed in the same way as the waves: by gluing white shapes in an overlapping pattern.
- A triangle is cut out of red paper – the beak.
- The beak shape is glued to the part of the neck where the head is located.
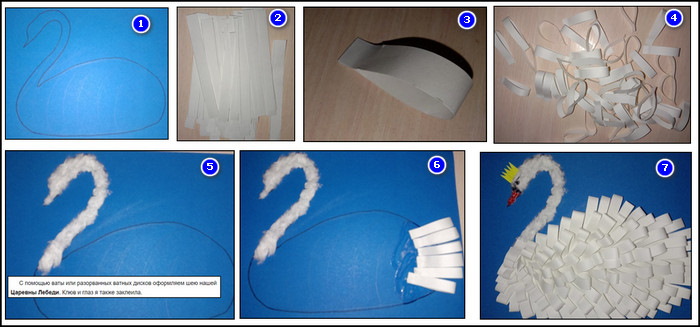
Using a black marker, place a dot on the swan's head - this will be the eye.
Clearing with snowdrops
Materials:
- The basis for the applique is a sheet of blue cardboard.
- Cotton wool.
- Brown paper, white, green.
- Scissors.
- Glue.
- Pencil.
Sequence of actions:
- A clearing of any shape is drawn on brown paper.
- They cut it out.
- On green paper, draw the stems of snowdrops. The shape is hook-shaped.
- They cut them out.
- Flowers - snowdrops - are drawn on white paper.
- They cut out flowers from paper.
- In the middle of the cardboard, 5 cm from the bottom edge, glue a clearing made of brown paper.
- Snowdrop stems are glued onto the brown meadow.
- Flowers are glued to the stems.
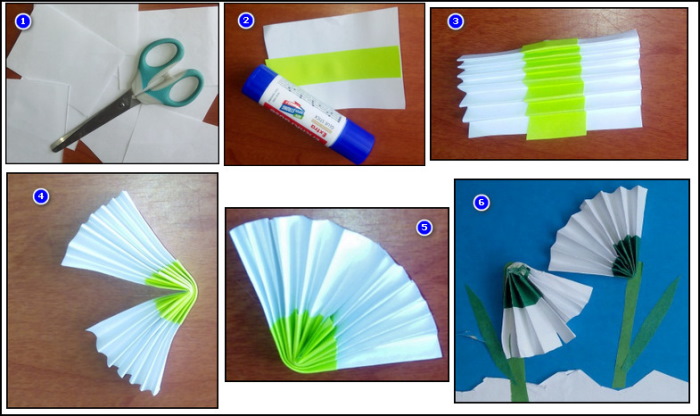
The lower part of the applique is sealed with cotton wool. It imitates the remains of snow cover.
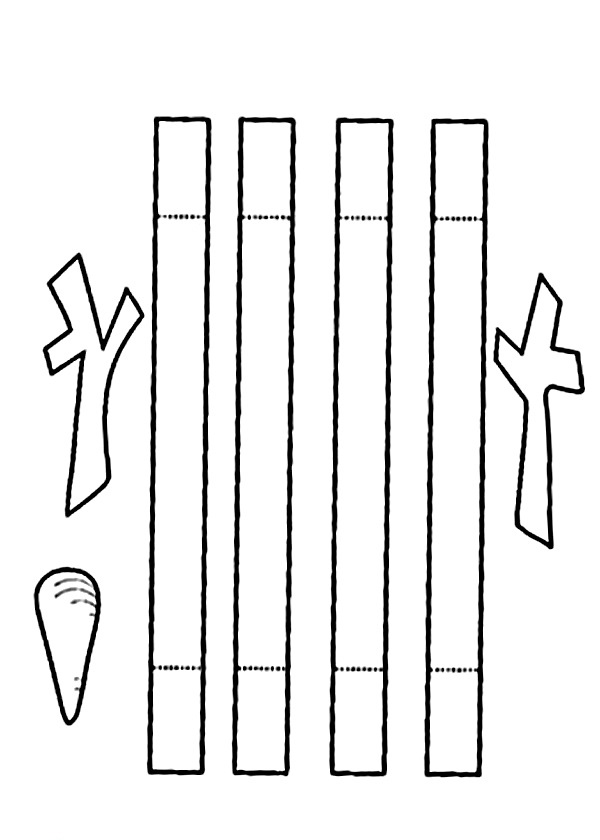
City in the snow
Materials:
- The base for the applique is a blue sheet of cardboard.
- Colored paper.
- Cotton pads.
- Scissors.
- Pencils.
- Ruler.
- Glue.
- The paint is white.
- Brush for glue and paper.
- A glass of water.
Sequence of actions:
- Rectangles of different lengths are drawn on colored paper using a ruler – this is the basis of future houses. Their number depends on the size of the craft. If you use an A4 sheet, you will have to draw 5-6 rectangles, each 5-7 cm wide. Use different colors so that the city turns out colorful.
- Cut out rectangles.
- Take cotton pads.
- Fold each in half and cut into 2 pieces. One for each house. This will be the roof.
- Windows (round, square) and rectangular doors are cut out of colored paper.
- Strips of colored paper are cut out to form tubes.
- Rectangular bases of houses are glued vertically in random order.
- Glue one half of a cotton pad to the top of the houses.
- Glue one strip onto each cotton pad to imitate pipes.
- They stick windows and doors on houses.
- The brush is dipped in white paint and snowflakes are drawn on a blue sheet of cardboard.
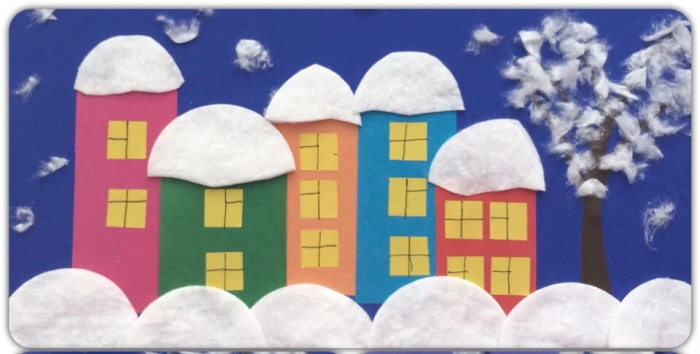
Leave the applique to dry.
Dragonfly on a chamomile
Materials:
- Maple earrings.
- Pencil.
- Green, yellow, white paper.
- The base for the applique is a sheet of soft blue cardboard.
- Glue.
- Scissors.
Sequence of actions:
- An oblong strip with rounded ends is cut out of green paper – the body of the dragonfly.
- A round base for the daisy is cut out of yellow paper.
- Chamomile petals are cut out of white paper.
- The yellow center of the flower is glued to the bottom of the applique base.
- Glue on the petals.
- The shape of the dragonfly's body is glued onto the yellow circle.
- Maple earrings are glued to it - 2 on each side.
- Use a pencil to draw the dragonfly's eyes and legs.

You can use any other background. For example, depict a dragonfly in flight over a pond. To do this, the lower part of the white sheet is tinted blue. Yellow water lilies are glued onto it.
Spring is red
The paper applique "Spring is Red" for children is suitable for work in March, when winter has retreated. Children can be asked to use their imagination and come up with the entourage of the craft themselves. For example, they can additionally glue butterflies.
Materials:
- Green sheet of paper.
- Wool thread: green and yellow.
- Colored paper: red or yellow.
- Pencils.
- Scissors.
- Glue.
- The sheet for the base of the applique is white.
Sequence of actions:
- A green sheet of paper is folded like an accordion.
- Above the middle it is tied with a green woolen thread.
- Unfold the sheet. A fan should emerge, divided into two parts: a small upper part and a lush lower part.
- Handles for the female figure are cut out of green paper.
- A bow is cut out of green paper.
- The white sheet is tinted light green.
- Glue the accordion into the middle of the sheet, with the fluffy side facing down.
- The neck and face are drawn above the top of the accordion.
- Glue on a woolen thread to imitate a braid.
- A hat for the girl is cut out of green paper.
- Glue the cap on top of the head.
- A yellow bow is glued to the end of the braid.
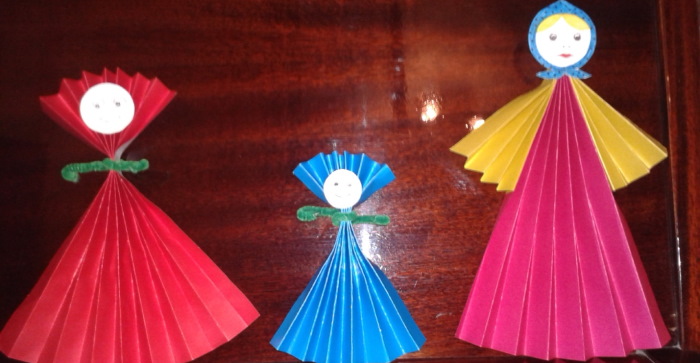
Draw the legs under the lower part of the accordion. If desired, decorate the dress. To do this, you will have to additionally cut out various circles or flowers.
Birds on a branch
Materials:
- Green paper, white, black, orange, red, brown.
- Scissors.
- Dye.
- Glue brush.
- Glue.
- The basis for the applique is any colored cardboard.
Sequence of actions:
- Cut out 2 identical circles from red and brown paper. These will be the bodies of the birds.
- Cut out another circle from any paper.
- Cut it into 2 parts. Each of the halves will be a wing.
- From green paper, cut out 2 wide strips (approximately 7 cm thick) 15 cm long.
- The ends of the stripes are rounded.
- Strips are cut around the entire perimeter, imitating terry.
- Cut out 2 circles from white paper – the basis for the eyes.
- The shape of the pupils is cut out of black paper.
- The pupils are glued onto the white base of the eyes.
- Cut out 2 beaks from orange paper.
- Bird tails are cut out of brown and red paper. Any shape.
- Start assembling. Green stripes in the shape of the letter "V" located horizontally (˂) are glued to the middle of the sheet.
- A solid red circle is glued to the sharp corner. Opposite it, a shape of a different shade is attached to a stick below. These will be the bodies of the birds.
- Glue the wings onto the birds' bodies, rounded side down.
- An eye and a beak are glued to the upper part of the body.
- The tails are glued to the lower part of the body, under the wing.
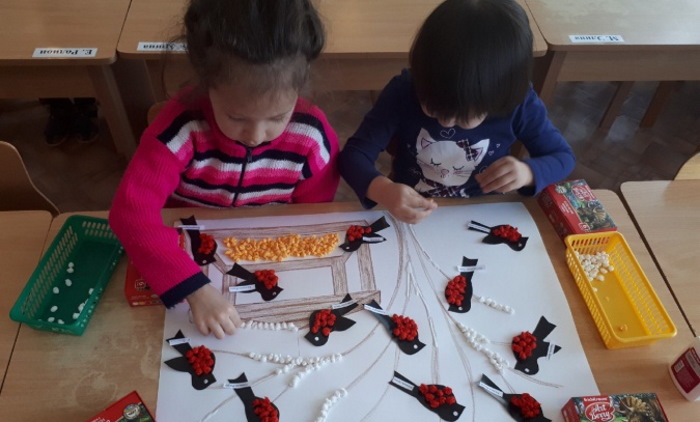
The birds are designed as if they are looking at each other.
Paper applique for children looks much more attractive if it is supplemented with details from other materials. This is simply necessary for children in the older group, since they need to learn how to work with different textures. The level of development of children aged 5-6 years already allows them to perform complex appliques.
Video on how to make paper applique
Simple children's crafts from colored paper for children 2, 3, 4, 5 and 6 years old. This is a great educational activity for kindergarten and an idea for joint creativity at home.