English Elastic band is a universal knitting pattern. Unlike regular elastic bands, it is also used on the main fabric of the product, suitable for knitting warm sweaters and cardigans, hats and scarves. The elasticity of the fabric, its density and volume of the pattern make such things warm and at the same time aesthetic. With all this, the pattern of English elastic is quite simple, there are various variations for both beginners and experienced craftsmen.
Classic English elastic knitting
The classic version of English elastic is knitted using a very simple pattern. This pattern will be easy for both beginner knitters and experienced craftswomen to create complex warm items.
Those who are just beginning to study such a hand-made art as knitting should understand the basic loops in more detail. For a classic English elastic, you will need only 3 of them, including the loops of the first row.
How to cast on stitches on a knitting needle:
- The required amount of thread is unwound from the ball, with the free end away from you, it is placed on the palm of the left hand.
- The thread is clamped between the middle, ring and little fingers.
- Next, the working thread is wrapped from the bottom up around the index finger and thumb and connected to the other end.
- It should look like this: on the index finger there is a thread coming from the ball, and on the thumb there is a thread with a free end wound.
- The knitting needle is inserted into the loop on the thumb from the bottom up, from the outside.
- The needle picks up the thread from the index finger and inserts it into the loop.
- Next, both knitting needles are inserted into the loop on the thumb, grabbing the working thread from the index finger.
 In this way, the required number of loops is cast on the needles. There are other ways to cast on, but this is the simplest and most understandable for beginners. You can cast on loops on 2 needles so that the loops do not tighten.
To set aside the required amount of thread from the ball, you can wind a spiral on the knitting needle - one turn will be approximately equal to one loop, measure the resulting segment and calculate the number of loops for the desired length. To this value, you need to add 15-20 cm so that the thread is comfortable to hold.
How to knit a classic front loop with knitting needles:
- The needle with the cast-on stitches is placed in the left hand, the free needle is in the right.
- The working thread is placed on the index finger in the direction away from you.
- The first loop is the edge loop, it is removed onto the knitting needle.
- The working needle is inserted into the next stitch from left to right.
- The working thread is picked up from the bottom with the index finger and pulled through the loop.
- The working loop is removed from the left knitting needle.
When the loops on the left needle run out and completely pass to the right, the needles change places and turn over. Knitting continues in the same way.
How to knit a purl crossed stitch:
- The knitting needles are positioned in exactly the same way - with the loops collected in the left hand, free in the right.
- The edge loop is removed to the right knitting needle.
- The working thread is brought forward, in front of the left knitting needle.
- The free needle is inserted into the outer loop from right to left.
- The working thread is wrapped around the right thread clockwise (from bottom to top).
- The right needle picks up the working thread and brings it out into the loop.
- The loop is removed from the left knitting needle.
This type of loop is also called "granny" loop. The classic English rib pattern is made using the two described loops, front and back.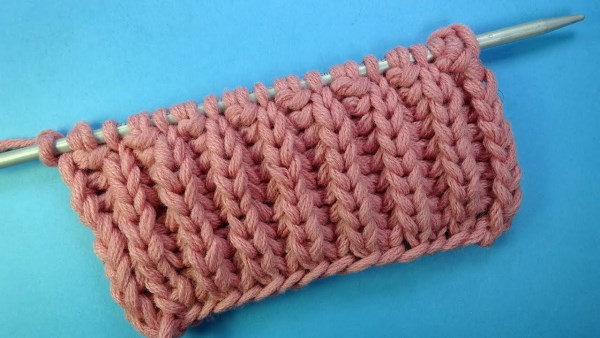
To create an English elastic band with knitting needles, you will need a minimum of tools and materials:
- yarn;
- knitting needles of the appropriate size;
- scissors;
- knitting pattern.
It is worth noting that you will need more yarn for such a knitted fabric than for other classic patterns. This is due to the splendor and volume of the pattern, its density. Depending on how dense or "loose" you want the fabric to be, you will need more or less yarn.
English elastic is knitted with knitting needles as follows:
- An even number of loops (including edge loops) are cast on the knitting needle.
- The needles are placed as usual - the needle with loops is in the left hand, the right needle is the working needle.
- The first loop is removed to the right knitting needle without knitting, it will be the edge loop.
- The next loop is knitted with a classic front loop.
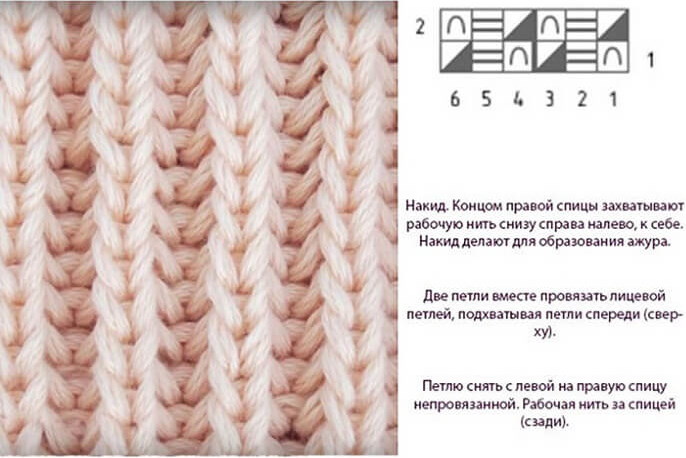
- Next, yarn over the working thread onto the right knitting needle (from above, so that the thread goes away from you).
- The next loop is removed to the right knitting needle from right to left.
- Next comes the classic front loop again.
- Next, yarn over and remove the stitches without knitting onto the right knitting needle.
- Using this principle, you need to knit and remove all the following loops on the left knitting needle.
- The last loop is knitted as a purl crossed loop.
- Then the needles are changed places, turned over, the first loop is removed to the right needle without knitting.
- Next you can see a crossed loop - this is the yarn over and the slipped loop from the previous row, they are knitted together with a classic front loop.
- The next loop is a single loop, it is removed to the right needle with a yarn over.
- Then the pattern is repeated - crossed loops are knitted with a classic front loop, single loops are removed with a yarn over.
- The last loop is knitted purlwise.
Yarn over and loop slip can be combined in one movement. To do this, the working thread is brought out in front of the left knitting needle, the hook is placed under it and inserted into the outer loop from right to left, the loop with the yarn over is slipped onto the right knitting needle. In this case, the yarn over thread will need to be lightly held with the fingers of the right hand and try to keep it closer to the end of the left knitting needle.
As a result of such knitting, you get an elastic, tightly knitted fabric. Such a pattern looks equally good both from the front side and from the back. Depending on the composition and thickness of the thread, as well as the size of the needles and the density of knitting, you can make very soft, but stretchy fabrics or dense ones, more like elastic.
On circular needles
Circular needles are needles connected to each other with a thick line. The length of the needles in this case can be different, as can the length of the line itself. Such needles are also used for knitting straight fabric, but they are more often convenient for circular knitting (hats, socks or knee-highs).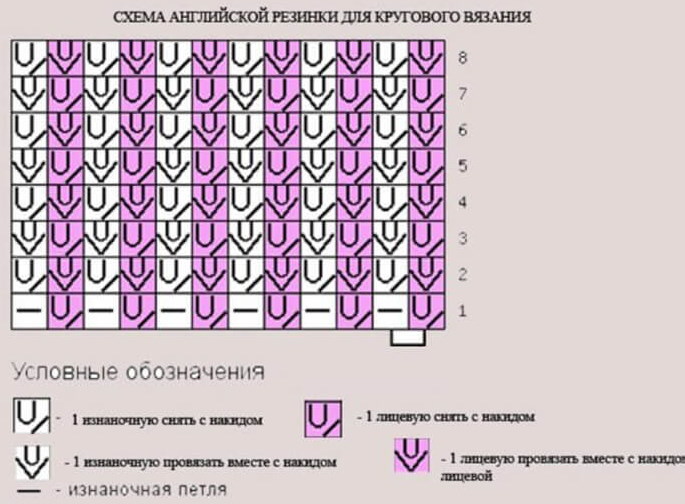
To cast on a large number of stitches on circular needles, place a single needle of the appropriate length on the first needle in the bundle, begin to cast on stitches in the usual way, and then carefully move these stitches to the second needle in the bundle and on the line. It is important to ensure that the “braid” of stitches is directed in one direction everywhere, inward, and does not twist during knitting.
How to join stitches on circular needles:
- The required number of loops is collected, plus one more for joining.
- The first loop is removed from the left knitting needle and transferred to the right one.
- The left needle picks up the front wall and knits the loop that was transferred to the right needle.
- The resulting loop is thrown off.
- Both threads are carefully pulled together and a knot can be tied.
- The knitted loop is returned to the left knitting needle.
The loop returned in the last step is considered the first loop of knitting. A knot can be tied between the loops, but it will be visible in the finished product - this is a matter of taste and accuracy of knitting. If the knot is not tied, in the first rows it is better to hold the place of connection with the fingers of the right hand so that the pulled loops do not come apart.
English elastic with knitting needles in a circle without a yarn over is knitted like this:
- In the first row, knit and purl stitches alternate. If the first stitch was purl, then the last stitch should be knit.
- For convenience, the first loop can be marked (with a marker or a small stitch of thread).
- In the second row, for the front loops, you need to pick up both the bottom (of the previous row) and the top (of the new row) threads at the same time, knitting as if 2 loops.
- Purl stitches are knitted in exactly the same way.
- In the next row, knit stitches are knitted like regular knit stitches.
- Purl stitches are knitted differently here - first the thread of the lower purl stitch is picked up, then the thread of the upper purl stitch, and both are knitted with a new purl stitch.
- Next, in each row, alternate knitting double loops - in one row these will be double front loops, in the other row, double back loops.
The main thing in this knitting is to remember at what moment and in what row it stops. For example, putting the work aside for some time, it is better to schematically mark the last row of loops (where the doubles are, from which loop the knitting will be resumed).
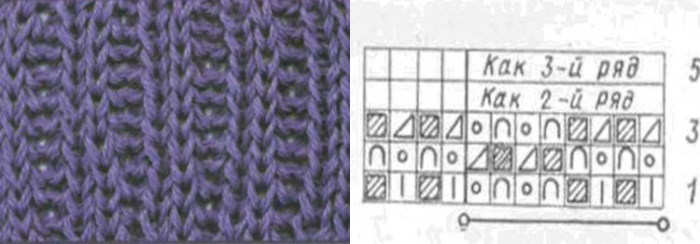
False English elastic
False (fake) English rib - this is the same pattern, but with less yarn and less time. You could say that this pattern was invented by lazy craftswomen to quickly make beautiful knitted patterns.
The knitting is also double-sided and can be used for both small items and large canvases. The big advantage of this type of knitting is that over time the item will not lose its shape and elasticity even after washing.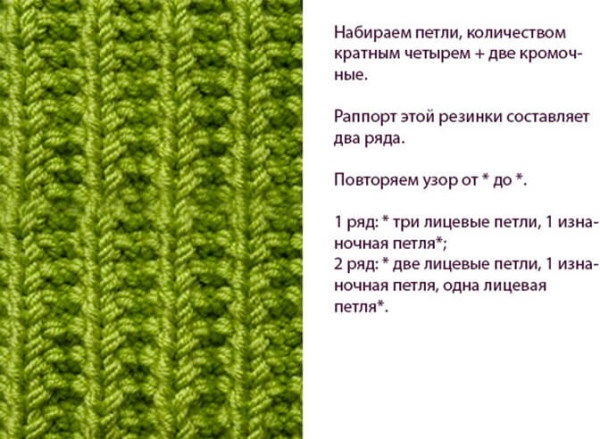
False English elastic is knitted on knitting needles in the following way:
- An odd number of stitches is cast on to the left knitting needle.
- The first loop is removed to the right knitting needle without knitting, it is considered an edge loop.
- Then knit 2 classic front loops.
- After them, 2 regular purl stitches are knitted.
- 2 loops are alternated to the end of the row until only 2 original loops remain.
- The penultimate loop of the row is 1 front loop.
- The last loop is a purl one, which also becomes an edge loop.
- In the second row, the first loop is not knitted again.
- Next, 2 loops are knitted as purl (front loops are knitted through the back wall).
- The next 2 loops are classic knit stitches.
- The same knitting principle continues until the end of the row.
- The penultimate loop is a purl (according to the pattern).
- The last loop is a purl (like an edge loop).
These 2 rows form the basic pattern of the entire knitting. They are easy to remember, after the first 10 rows the knitting movements will be done automatically, so the product can be knitted in just a few hours while watching your favorite movie or TV series.
The English elastic, called false, has another feature - its knitting is often denser than according to the classic pattern. Inexperienced knitting masters should create trial samples to "adjust" the knitting to the desired result.
English two-color elastic
The classic English rib pattern can be diluted with an interesting element - adding an additional color to the knitting. In such products, the "braids" in the foreground of one color and their connection of another color in the background are clearly visible.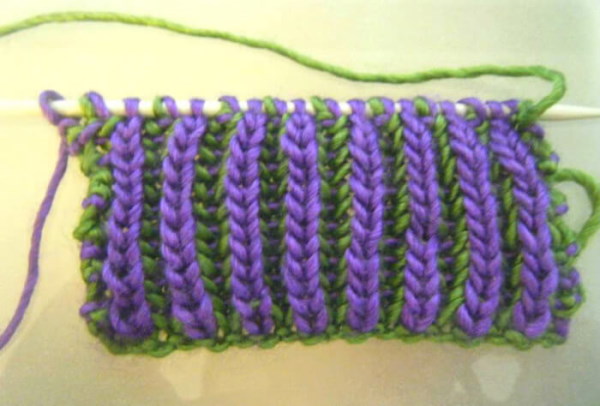
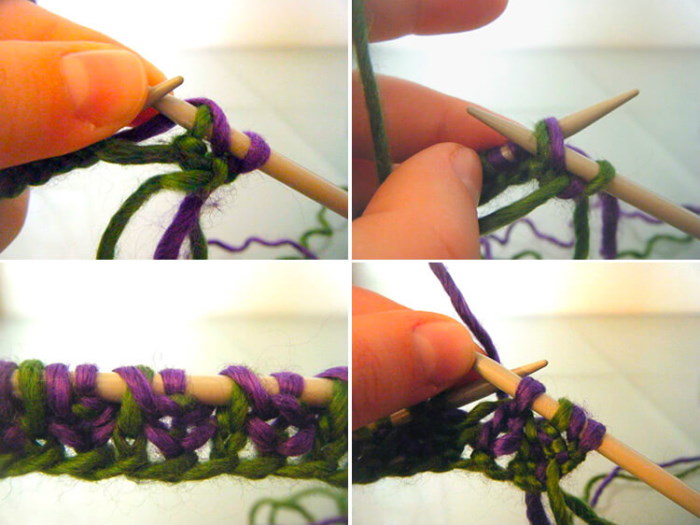
You can make English elastic band two-color like this:
- The number of loops to start knitting is odd.
- The first loop will still be an edge loop; it needs to be removed to the right knitting needle.
- The next loop is knitted as a front loop.
- The third loop is removed to the right knitting needle with the upper yarn over.
- Next, knitting follows the pattern of a front loop, a free loop with a yarn over, a front loop, and so on until the end of the row.
- The last loop in the row is a purl.
- In the next row, the knitting does not need to be turned over; here a thread of a different color is added.
- The first loop of this row is knitted with a front loop, capturing a new colored working thread.
- Yarn over from a new colored stitch and remove the next stitch without knitting – everything is the same as in the previous row, only with a new working thread.
- The loops of the first row with a yarn over are knitted together (that is, 2 at once).
- The last loop of this row is knitted as a front loop.
- There is no need to turn the knitting over, just continue working with the first colored thread.
- The first loop (it will be the second color) is removed to the right knitting needle.
- The next 2 loops (with a yarn over) are knitted as a purl stitch.
- The next loop is slipped with a yarn over.
- Next, knit a purl stitch on the double stitch of the previous row.
- The last loop of the row is the front loop.
- Then the knitting is turned over to the other side, and the colored thread is changed again.
- A yarn over is made and the working needle is inserted into the next stitch from the back, and is removed with the yarn over onto the right needle.
- The next stitch and yarn over are knitted as a purl stitch.
- The next loop is slipped with a yarn over.
- The pattern is repeated until the end of the row, the last loop here is a purl one.
- Next, the pattern is the same - the working thread needs to be changed to another, but now 2 loops will be knitted with a front loop and alternated with a slipped loop with a yarn over.
- The last loop of the row is a purl.
When both working threads are on the left side of the knitting, the work can be turned over. The main thing in this pattern is not to get confused in the alternation of threads. For practice, you can knit a test sample with two bright contrasting colors of yarn.
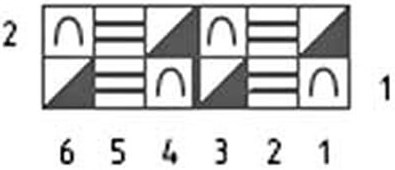
Double English elastic
Double (or faceted) English elastic - the pattern is a little more complicated, it turns out even more voluminous and textured. Unlike the classic version, the back track between the "braids" of such an elastic is always visible. The pattern is perfect for decorating large knitted fabrics, for example, for sweaters, long cardigans.
Double elastic in English style is knitted with knitting needles as follows:
- The number of loops to start knitting must be a multiple of 4 (already including 2 edge loops).
- The first row is a setup row (it will not be repeated according to the pattern).
- The first loop is removed without knitting.
- The next loop is knitted as a front loop.
- The working thread is brought down and in front of the left needle.
- The next loop is removed without knitting, then a yarn over is made, the working thread is again pulled behind the left knitting needle.
- The working yarn is again brought in front of the left needle and down so that a cross connection is created, preserving the yarn over.
- The next loop is removed again, a yarn over is made on top, the working thread remains behind the left knitting needle.
- Next, knit 2 classic front loops.
- 2 slipped stitches with a cross yarn over and 2 front stitches alternate - this is the pattern for the row.
- On the penultimate loop of the row, the working thread remains behind the left knitting needle.
- The last loop of the row is knitted as a front loop.
- The second row begins with a removed edge loop.
- The working thread is pulled out behind the left knitting needle.
- The next 2 stitches (the stitch plus the yarn over from the previous row) are knitted together as one knit stitch.
- Next, the thread is brought out in front of the left knitting needle, a yarn over is made, the next loop is removed – this is done 2 times.
- The next 2 loops (loop plus yarn over) are knitted together as one front loop – this way 2 times.
- 2 unknitted loops with a yarn over, 2 knitted loops (loop and yarn over of the previous row) front – diagram of this row.
- The penultimate loop of the row is removed with a yarn over.
- The last loop of the row is knitted with a front loop.
- Then the knitting is turned over and the pattern of the second row is repeated in all subsequent rows.
The pattern is double-sided, the knitting stretches well, and you can adjust the density and softness of the product using yarn of different compositions. This pattern is suitable for both women's and men's items.
How to close an English rib at the end of knitting
An important moment in knitting English rib is the last row, which should close the knitted element and not let it unravel. The last row should fit into the style of the pattern, be dense and neat enough.
English elastic band with knitting needles is closed like this:
- The first loop of the previous row is removed without knitting.
- Next comes the purl stitch - it is knitted as a purl stitch.
- The first slipped stitch is placed on the second stitch on the right needle, that is, the second stitch is pulled through the first and dropped.
- The knit stitch with a yarn over is knitted as a knit stitch (both stitches together).
- The first loop on the right needle must be pulled through the second one in the same way and pulled out, then dropped.
- Next, knit a single stitch as if it were a purl stitch, pull it through the first stitch on the right needle, and drop it.
- This pattern is repeated with all loops until the end of the row.
- The last stitch is knitted as a purl and pulled through again onto the right needle.
- The working thread is grabbed by the knitting needle and pulled through the last resulting loop, tightened.
You can hide the end of the thread by simply knitting it into the pattern, or you can simply cut it off if the style of the product allows it (for example, in a scarf with a "fringe"). By alternating front and back loops, you can close not only English, but also classic elastic. Such a row turns out elastic, like the rest of the knitting.
The English elastic is a fairly universal knitting pattern that can be transformed in several ways. Both experienced craftswomen and beginner knitters can easily cope with the knitting pattern of such a pattern. The main thing in this activity is to choose good quality yarn that will retain a presentable appearance for a long time, as well as choose a convenient set of knitting needles for work.
Video about English elastic
English elastic knitting: