Drawing human hands is one of the most difficult processes for artists, especially beginners. Very often in drawings you can see characters who always keep their hands in their pockets or have mitten-like hands. Such tricks with "bypassing" the anatomy of the hands are suitable only for amateur comics, but for drawing real pictures you will have to study the issue persistently.
Hand anatomy in drawing
Every artist should know anatomy or at least its basics. This rule applies not only to those who draw real animals and people in a realistic style, but also to fantasy artists. Any body consists of a skeleton, muscles, tendons, veins and vessels, skin, and also has its own unique proportions. To learn how to draw hands, it is important to understand the structure of this part of the body not only for the sake of proportionality of the image, but also to achieve authenticity in movements.
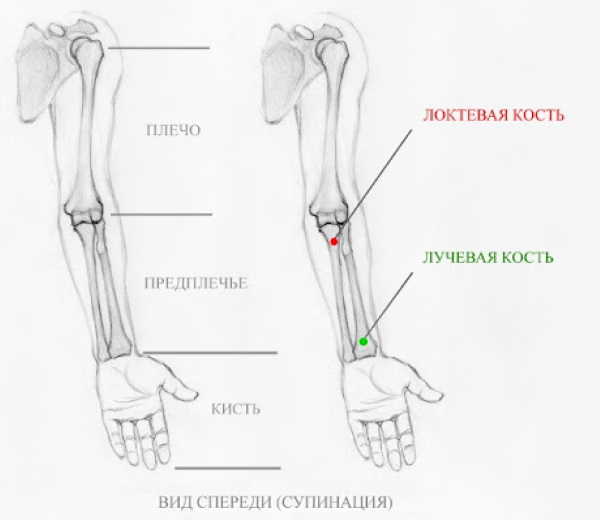
Human hands consist of 3 main parts:
- shoulder – in the anatomical sense, this is the upper part of the arm, ending at the elbow.
- forearm – the part of the arm that starts from the elbow and ends at the hand.
- brush - the palm and fingers starting from the wrist.
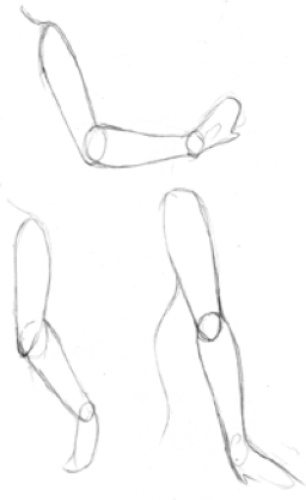
When drawing a hand in its entirety, it is important to understand the relationship between the bones and, in particular, the muscles and tendons of these parts. When using the fingers, a person tenses the muscles of the forearm, and when bending the arm at the elbow, he tenses the muscles of both the shoulder and forearm. Such nuances greatly affect the reliability of the drawing.
Structure of the bones and muscles of the shoulder
The shoulder consists of one bone – the humerus. It has a humeral head that attaches to the shoulder joint, so the bone is widened at the top. At the bottom, where it connects to the elbow joint, this bone also thickens.
| Muscles of the shoulder | |
| Deltoid | It is this muscle that is commonly called the shoulder. It is responsible for the movement of the entire arm, raising it, lowering it and moving it to the sides. |
| Biceps | Another name is the biceps brachii. It is located in front (relative to the inside of the palm) and is responsible for bending the arm at the elbow. |
| Triceps | The triceps is also called the three-headed brachii. It is located on the other side of the biceps, that is, behind (relative to the back of the hand). The function of this muscle is to extend the arm at the elbow. |
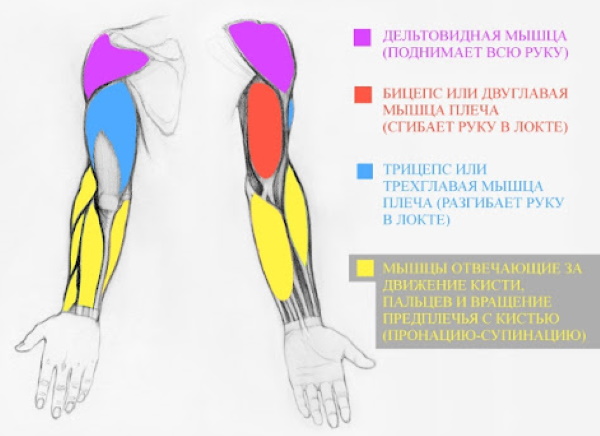
The tendon-muscle connections in this part of the arm are attached to the joints of the shoulder and elbow, as well as to the entire bone. Their function is to transfer tension from the muscle during contraction and to perform flexion and extension in the joint parts of the arm.
Features of the elbow joint
The shoulder connects to the forearm with the elbow joint. The joint is shaped like a ball and cup - the radius in this part rotates around the ulna, and vice versa, which ensures the bending of the arm in this place. The joint itself is not visible on the arm. Anatomically, a large number of tendons and muscle ligaments can be seen here.
From the outside, there are 3 key points of the elbow:
- external condyle;
- internal condyle;
- head of the ulna.
The head of the elbow bone and the inner condyle are visible in every position of the hand. When the hand is bent, the outer condyle also becomes visible (this element "goes" into the elbow pit in the straight position of the hand). The anatomy of hands for drawing is important precisely in such nuances as different positions of the hand, the whole hand. This helps to express not only the pose of a person, but also his desire for movement, tension.
The structure of the human forearm
The forearm is based on two bones located parallel to each other - the ulna and the radius. The first of them has a noticeable thickening on the elbow side, the second thickens closer to the wrist.
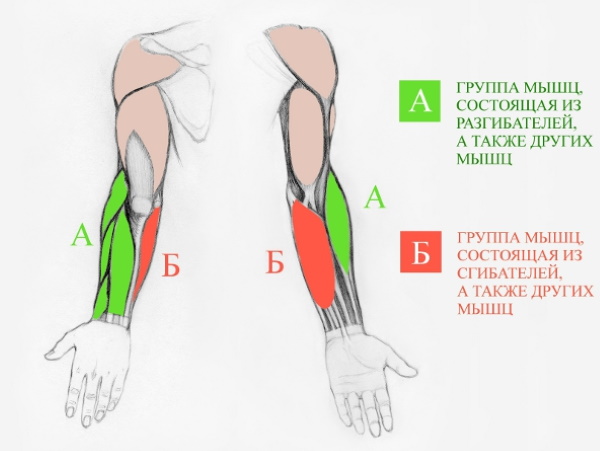
In this part of the arm, two groups of muscles can be distinguished:
- Responsible mainly for the extension of the wrist and fingers - located conditionally on the side of the thumb of the hand, occupying most of the forearm;
- Those responsible mainly for bending the wrist and fingers are located on the side of the little finger.
The part of the forearm that connects to the elbow joint is somewhat thicker than the part that passes into the hand. The tendons here accumulate mainly in the wrist area, which is what causes the different thicknesses of the forearm.
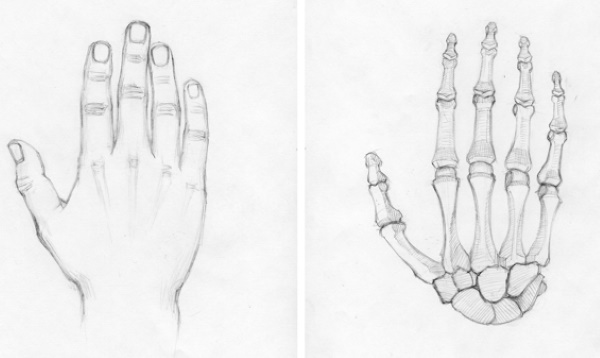
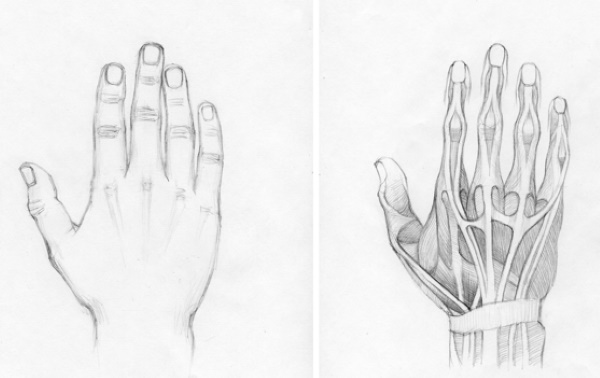
Features of the structure of the hand
Hand anatomy for drawing brushes is that important part that all beginning artists are afraid of. Here is the largest number of bones, muscles, tendons and the most complex of their interrelations.
First, it's worth sorting out the bones:
- There are 8 bones located in the wrist area;
- 5 metacarpal bones are connected to the carpal bones;
- From them come the phalanges of the fingers, 3 on the index, middle, ring and little fingers, and 2 on the thumb (14 phalanges in total).
The phalanges of the fingers have their own names. Those that connect to the metacarpal bones are called proximal phalanges. Next come the middle, and then the distal or nail phalanges. You need to learn to distinguish between them - this is important for maintaining the correct proportions.
There are muscles between the bones of the hand. There are fewer of them than tendons, so you can feel both the bones and often the tendons themselves on the hands. All the tendons tend to the fingertips, providing movement of the hand and fingers. In the wrist area there are strengthening transverse tissues that provide retention of the tendons of the flexor muscles.
Main muscles of the hand:
- opposing muscle of the thumb;
- adductor muscle of the thumb;
- lumbrical muscles;
- muscles of the little finger - flexor, opposing, abductor;
- short palmar muscle.
It is much easier to understand the location of these muscles and tendons, their interrelationships using your own hand as an example. You can draw the left hand for training from life, observing the movement of the fingers, their bending, tension.
Male and female hands
Male and female hands are not anatomically different from each other. But there are differences in other aspects - proportions, shape. Most often, female hands are drawn more graceful. This depends on the thickness of the bone, the amount of muscles on them. As for the hands of women, they will be narrower, with rounded protruding parts, the fingers are longer. The shape of the nails is another good tool that makes it possible to show the gender of the hands.
Women have longer, rounded, almond-shaped nails. Men's nails are more square and short. The angular shape of the protruding knuckles, less even fingers, an abundance of protruding veins - a way to show off men's hands. Men will have more "sinewy" hands, more muscles on the bones, especially in the shoulder area of the arm.
Of course, it is not necessary to follow these recommendations - all these features may depend not only on the gender of the character being drawn, but also on his build in general, as well as on his character and occupation.
Different proportions of the human hand, wrist and fingers
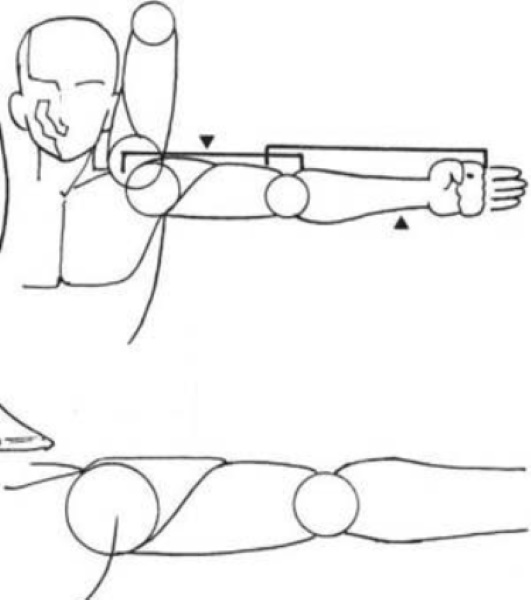
The anatomy of the hands is very important for drawing a person, but there are other primary nuances. Maintaining proportions when drawing the body is the basis of everything. If you initially build a sketch according to the rules, there should be no problems with checking individual limbs.
To make sure that the hands in the drawing are proportional, you need to pay attention to:
- The forearm should be shorter than the upper arm;
- The forearm together with the hand is longer than the shoulder;
- The length of the forearm is approximately equal to the height of a person's head;
- The distance from the elbow to the tips of the phalanges of the fingers is equal to the distance from the knee to the heel of the foot;
- In a straight position, the point where the elbow is located is in line with the navel point.
The proportions of the hands are a little more difficult to maintain and check. Here, both the number of bones and the special arrangement of the muscles play a role.
Basic proportions of the hand and fingers:
- The length of the hand is approximately equal to the length of the face (the face, not the entire head).
- The middle of the hand can be taken as the point located on the knuckle of the middle finger. The beginning of the hand is slightly above the end of the ulna (the protruding tubercle on the side). The distance from the beginning of the hand to the knuckle and from the knuckle to the fingertips is equal.
- The bend between the middle and proximal phalanges is the middle of the fingers (if you take the knuckles as the beginning).
- The tip of the thumb will be in line with a point located 2/3 of the way up the proximal phalanx of the index finger.
- The index and ring fingers are approximately equal in length.
- The tip of the little finger is approximately at the level of the bend of the nail and middle knuckles of the index and ring fingers.
- The length of the nails (cut) is approximately equal to the length of the nail knuckles of the fingers.
- The knuckle of the thumb is measured as follows: it is located on a line exactly in the middle from the tubercle of the end of the ulna to the knuckle of the middle finger.
- In most cases, people do not have perfectly straight fingers. They bend slightly towards the center.
- The joints on the phalanges of the fingers, covered with skin, form folds. On the back and inside of the hand, these folds are at different levels.
It is important to remember that the hand is not a perfectly even and correct part of the body. To simplify the construction, you can use a circle, since a "spread" palm will tend to this shape.
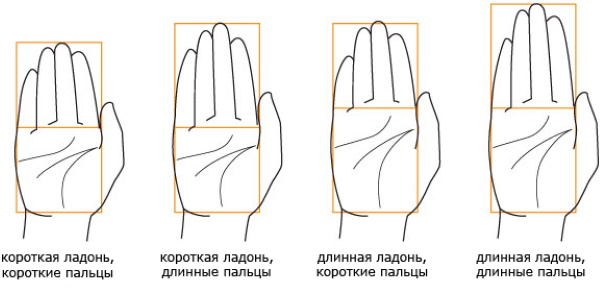
Hand and finger shapes
In addition to the fact that the shape of the hands differs in men and women in particular, it differs in all people in general. The features are clearly visible on the hands and fingers.
The shape of the brush can be something like this:
- short palm with short fingers;
- short palm with long fingers;
- long palm with short fingers;
- long palm with long fingers.
The width of the palm is also added to this - the hand may end up looking long and narrow, that is, more graceful, or it may turn out short and wide, like a "paw". The fingers may also have their own characteristics.
For example, they can be depicted:
- normal, proportional to the entire brush;
- thinner or, conversely, thicker;
- with tapered fingertips, that is, give them a conical shape;
- with "square" fingertips;
- spatulate in shape, that is, narrower only in the central part;
- knobby, with strongly protruding phalangeal joints.
A set of such features will easily help to depict male, female, childish or elderly hands. Some of them can be used to hint at the character's profession - musician, worker, seamstress or jeweler.
How to draw hands?
In order to learn how to draw hands, you need to not only study their basic anatomical features, but also select good references (that is, original images that you can rely on when drawing your sketch). It is better to take photographs, not other people's drawings, and several different angles at once.
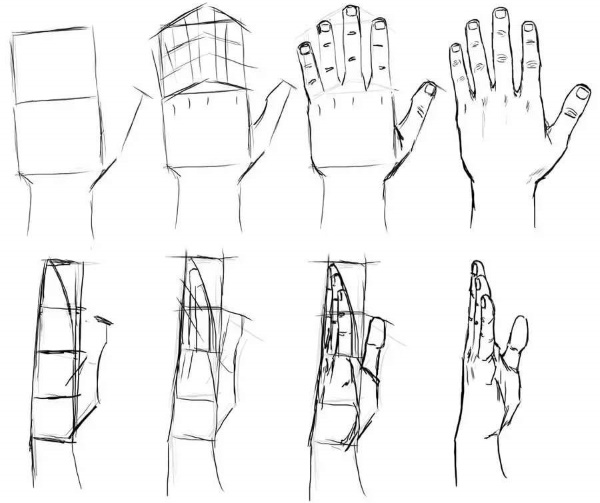
First practice for drawing a hand:
- You need to learn how to draw a hand using simple shapes. We divide it into three main parts - the wrist, the metacarpus and the fingers.
- The wrist is drawn as an oval at the base of the hand.
- The metacarpus is attached to the wrist and is drawn as a three-dimensional trapezoid. The trapezoid will be slightly narrower at the bottom than at the top.
- The fingers (4 of them, except the thumb) should be combined into a single shape - a pentagon with an elevation at the top, the lower part will also be narrower than the upper one.
- The thumb will consist of a pad underneath, attached to the metacarpus, and a cylinder on top.
- The overall schematic appearance of the palm should resemble a mitten.
As a training, you need to learn to analyze references with different angles of the hand into these basic figures. In this way, you can learn to feel the volume, shape of the hand, its basic positions.
Next, the refinement of the brush shape begins:
- In addition to the oval of the wrist, 2 bones are drawn. The 1st is more noticeable - on the side of the little finger, on the back of the hand. The 2nd is on the side of the thumb, less noticeable, located on the side.
- It is important not to forget about the folds that appear when the wrist moves. When the wrist is bent, the folds will be on the inside of the wrist, when it is bent, on the outside.
- Since the metacarpus consists of bones and tendons, and there are few muscles in this place, the relief will be visible here. In sketches and schematic drawings, the tendons on the back of the hand are often indicated as lines leading to the fingers. On the inside of the palm, these are the so-called lines of life, mind, and heart.
- A simple shape for depicting tendons at joints is a diamond shape.
- Three main "masses" are drawn on the palm - the pad of the thumb, the pad under the little finger, the pad of the index finger. There are also pads under the other fingers, but they are less noticeable when the hand is relaxed.
- The pads of the thumb and index finger will be clearly visible on the inside of the hand, and the "mass" under the little finger is the protruding part of the palm on the side. The protruding tubercle on the other side is the same pad of the thumb.
- The joints on the fingers are first marked as dots in the right places. It is important to note that they are all located along the line of arcs, and not along even parallels.
- The joints of each individual finger are located parallel to each other.
- All brush lines tend to form a circle. This rule applies to all angles.
- The space between the fingers on the back side looks like folds with depressions, on the inside – like arched lines.
The anatomy of the hands for drawing the brush ends here for now. After drawing the shape, checking the correctness of the proportions and range of motion, you can begin to detail the drawing.
Here you need to pay attention to the following nuances:
- Nails should look natural, have a cuticle, a semicircular shape. The place where the nail attaches to the finger is indicated, including shadows.
- There are small "wrinkles" on the knuckles anyway - they become deeper if you straighten your hand, and straighten if you clench your fingers. But they will be visible in any case.
- In addition to the joints visible on the back of the hand, veins can often be seen in this area. By drawing highlights and shadows, they can be made more or less pronounced.
- Depending on the position of the brush being drawn and the light source in the image, a shadow from the palm and fingers will fall on them.
- It is also important to take into account the brush's tendency to have a spherical shape when drawing light and shadow. The protruding parts, especially the knuckles, will have the lightest spots, while the folds and spaces between the fingers will have deep shadows.
It is also important to remember that it is important not to overdo it with drawing the skin structure and folds. The more such elements in the drawing of the hands, the “older” the hand will be. The presence of skin features (for example, scars, warts, tattoos) also need to be “adjusted” to the anatomy of the human hand. Jewelry such as rings and bracelets are easiest to draw at the last stages in order to better understand how exactly they will be located on the hand.
Range of motion
Human limbs have a large range of motion. This is especially true for hands. And in order to draw people in motion, to depict various life stories, it is necessary to understand this issue.
Range of motion in the shoulder joint
The human shoulder joint has a huge range of motion in different directions. The first movement to study the issue is raising and lowering the arm up and down (rest state). Here the deviation will reach 170-180° from the rest state. Arms extended forward reach an angle of 90°. In addition to moving up and forward, the arm can also be moved back. Here the range of deviation is approximately 40°.
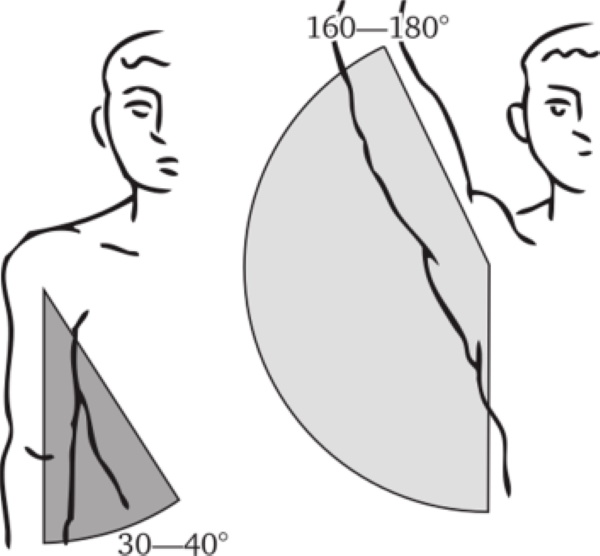
You can raise your arm at 90° and move it straight to the side. From this position, you can move your arm back at 40-50° and forward at 140-160°. From this position, you can raise your arm vertically upwards and lower it downwards at an angle to the opposite side – approximately 30-40°.
It is worth remembering that the arm, bent at the elbow, can be completely placed behind the back at a right angle, and at an angle of 30-40° when straightened.
Range of motion of the wrist
There are such concepts as pronation and supination of the hand. If we take the neutral position when the thumb is pointing up, then pronation is called a hand turned with the back side outward, and supination is a hand turned with the open palm up. It turns out that the range of motion of the hand alone is 180°. But by also involving the elbow and shoulder joints, the hand can be turned 360°.
Finger movements should be considered starting with the thumb. Its center of movement is very close to the wrist, significantly lower than the other fingers. Therefore, it moves as if separately from them. In a relaxed state of the hand, there is a small space between the thumb and the palm. This finger can be bent to the base of the little finger, moved away from the palm at an angle of up to 90-100 ° in different directions.
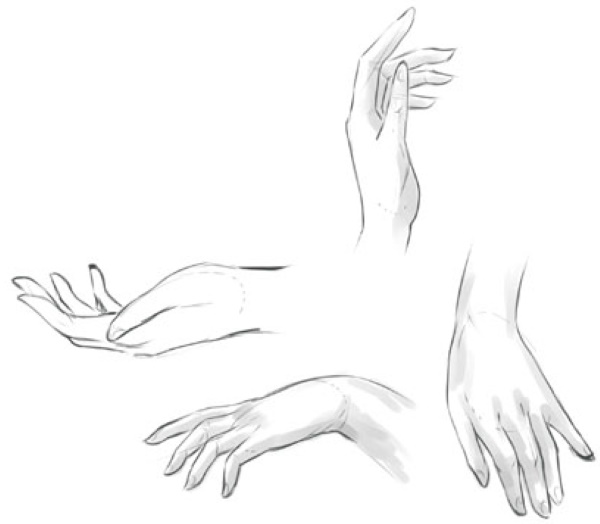
The remaining fingers are more tightly connected to each other, and therefore the movement of individual fingers most often provokes the movement of the neighboring ones. These four fingers can be "spread out" to the sides, bent at the junction of the phalanges, pressed to the palm and pulled back a short distance (maximum - 90° if you press on them).
Drawing a fist
The natural position of the fist is with 4 fingers bent and pressed against the palm, the thumb bent and pressed against them.
To avoid making mistakes in the drawing, it is important to take into account that:
- When bending the finger, folds are formed, which, when viewed from the side, form a cross;
- The more the finger is bent, the longer the crease will be at the bend;
- The fold formed when bending the thumb, in the natural position of the fist, covers the nail phalanx of the index finger;
- When the hand is bent into a fist, the knuckles are not at the same level. Usually the knuckle of the middle finger is slightly higher;
- The phalanx of the thumb is located on top of the middle phalanges of the index and middle fingers;
- The first knuckles of the fingers protrude as much as possible when clenching the hand into a fist.
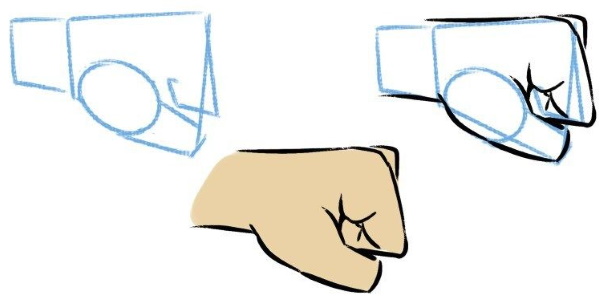
The following exercise will help you to anatomically correctly depict a hand clenching into a fist: imagine how the palm lies on a ball, which gradually becomes smaller and finally deflates. Different positions of the hand in this situation are a good idea for a training drawing.
Complex angles
Sometimes artists depict plots taken only "from their heads", and not spied on in real life. In some cases, there may be complex angles of the position of the arms and hands. To avoid obvious mistakes, you can use the method of constructing the position of the hand using lines with dots. Each line is a designation of a bone or knuckle, guiding the movement of the element. Each dot is a place of connection, bend, start of movement.
Further on these lines you can add simple geometric shapes – cylinders, parallelepipeds, circles. Geometric, schematic representation of people and different parts of the body is an excellent way to practice drawing movements.
The best way to avoid making mistakes when drawing complex hand angles is to try these angles on yourself. You can use a mirror or a photo timer to check your drawing. Thus, basic knowledge of human anatomy, drawing up a sequence of actions for building a composition and persistent training will not only help you learn how to draw hands and other complex body parts, but will also make the drawing process more interesting and conscious.
Video on how to draw hands
How to draw hands correctly: