The process of creation watercolor drawings may seem complicated for beginning artists. In reality, knowing the technique of the process in question, as well as understanding what tools are necessary for the work process and how to choose them, even an inexperienced artist or a child trying his hand at drawing will create a beautiful watercolor painting in an average of 2 hours.
Tools and materials
Watercolor drawings (for beginners, compositions with a minimum number of components are suitable) for their creation require the presence of:
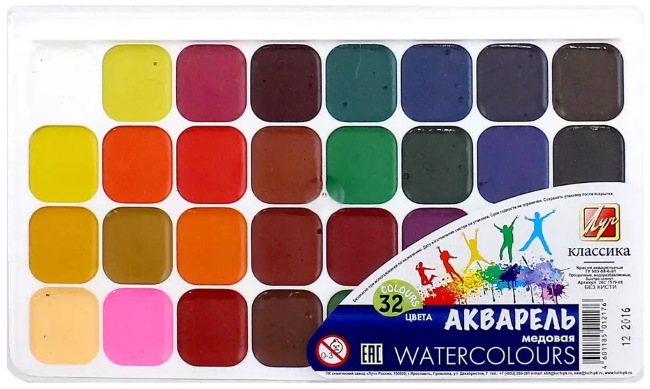
Watercolor paints, the composition of which should include only 2 substances - powder coloring pigment (in high-quality paint the amount of this substance should be at least 80-90%) and a binder (gum arabic is most often used.
In high-quality paint, its concentration should not exceed 10-20%). If in a particular watercolor the binder and the paint itself are in almost equal proportions (cheap products), then the pigment itself will be dense, but not durable.
Paper for drawing with watercolor paints, which is classified into 3 subspecies.
These are untreated (has a rough surface, making it difficult to distribute paint evenly), hot pressed (has the smoothest texture, no relief or graininess) and cold pressed.
The latter is the best option for beginners, as this type of paper has a fairly deep relief, which promotes high-quality adhesion of paint to the surface of the working plane.
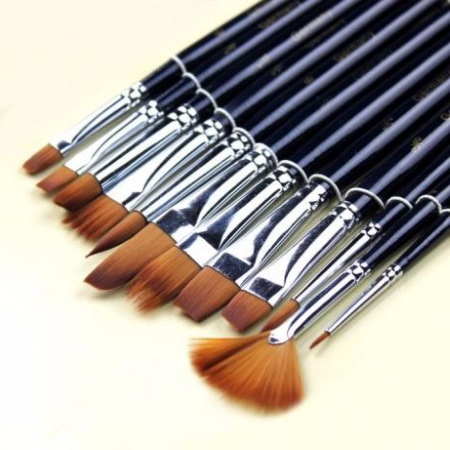
Brushes, which should be sufficiently elastic and resilient when wet. Kolinsky and sable brushes are considered optimal. Their main drawback is their high cost, which makes them inaccessible to many beginning artists.
An alternative to kolinsky brushes are brushes made of synthetic fibers, the type and size of which should be selected in accordance with the style in which the beginner plans to work.
Simple pencils of different hardness, necessary for drawing the outline of objects.
Eraser made of high quality rubber. A low-quality eraser leaves streaks on the work surface, which will be impossible to get rid of later.
Palette. A plastic plate used for mixing paints.
Watercolor painting techniques
Watercolor drawings (for beginners, it is best to familiarize yourself with the basic algorithms for creating drawings made according to the classical algorithm of the chosen style before starting work) can be created using several techniques:
Watercolor painting technique
Brief description
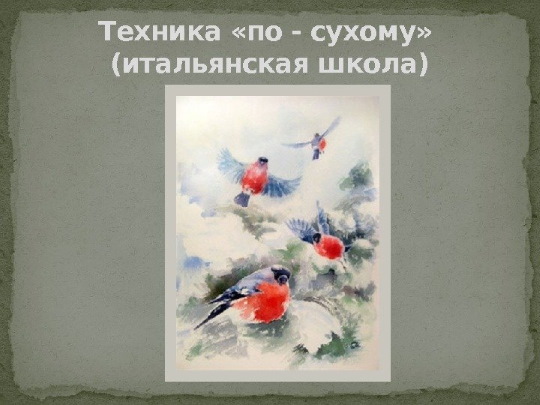
Italian Watercolor
Algorithm for creating a painting in the style under consideration:
Drawing the outline.
Applying shadows to the main objects of the composition.
Applying the first layer of watercolor. The strokes of paint should be precise, thick and short.
Adjustment of the final image (if possible).
The main advantage of working in this style is the minimal amount of time spent.
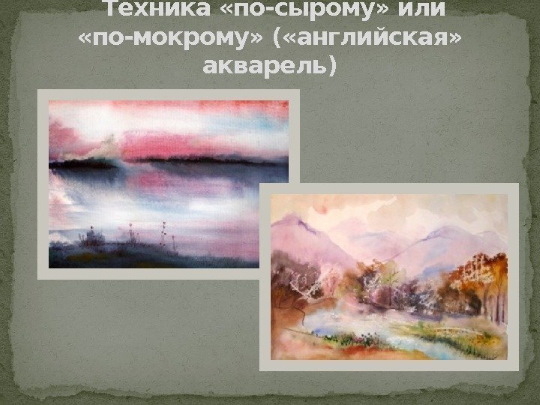
English Watercolor
Algorithm for creating a painting in the style under consideration:
Mixing watercolors with water in the proportions necessary to obtain the desired shade.
Uniform distribution of water over the work surface, followed by smoothing it out manually or using a press.
Removing excess liquid from the surface of the paper. For this, beginners are advised to use a regular cotton pad.
Creating an image with short, dense strokes.
Drying the drawing for 2-5 hours, depending on the size of the image.
Reworking of objects located in the foreground.
The main feature of this style of painting is the unpredictability of the result, due to the fact that paint applied to a wet surface can not only change its color, but also transform its texture.
Mixed media
A distinctive feature of this style is the use of several techniques within the framework of work on one painting.
Algorithm for creating a drawing in the style under consideration:
Applying the first layer of watercolor onto a locally moistened sheet of paper.
Correction of a drawn object, bringing it into line with the original idea (in terms of the degree of blurriness, color saturation, and so on).
Applying subsequent layers of paint.
Elaboration of objects located in the background and middle ground.
Watercolor drawings with examples
Watercolor drawings (for beginners, it is recommended to increase their drawing experience by copying the simplest images of other artists), namely their idea, should be developed taking into account the individual interests of a particular artist.
This recommendation is especially relevant if a child is working on creating an image. Drawing objects that are incomprehensible to him, he will quickly lose interest in the activity, and if the teacher forces him to continue working, the young artist may develop a negative attitude towards artistic activity in general.
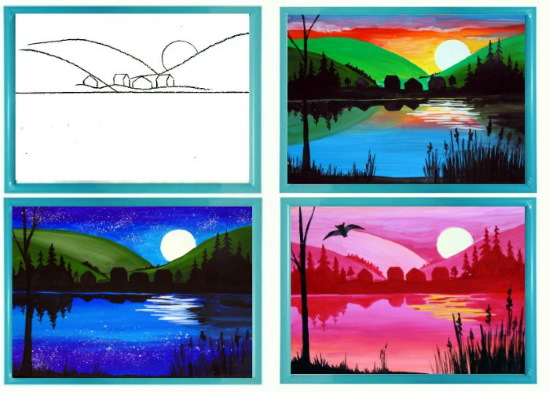
Scenery
It will be easiest for a child to draw a landscape with watercolors if the composition of the image does not require detailed drawing of objects.
Landscape version in watercolor
Algorithm of work
Mark the horizon line with a straight line dividing the working plane into 2 halves.
From the upper left corner of the sheet of paper used, step down 2-3 cm.
From the found point, draw 2 semicircles to the right, one of which should touch the horizon line exactly in the middle at the end point, and the second one should be 3-4 cm to the left of the center.
Step back from the upper right corner of the sheet of paper you are using, step down 2-3 cm, then draw a semicircle, the lower point of which will be located between the ends of the two semicircles drawn on the left.
From the border of the semicircle shown on the right, closer to the center, draw an even semicircle, curved upwards (the outline of the moon).
On the horizon line, in the area of intersection of the semicircles and the location of their extreme points, draw small rectangles and squares, placing them randomly (outlines of residential buildings).
Having chosen the necessary shade of watercolor paint, diluting it with water if necessary, paint individual sections of the image.
For example, paint the area above the semicircles (hills) with a rich blue or light blue color; the hills themselves - green; the moon - yellow or leave it white; the area under the horizon line - white (near the horizontal), light blue or light blue (the middle of the lower half of the working plane), rich blue or light blue (the lower area).
Alternatively, you can create a daytime landscape instead of a night one, using yellow, green, blue and blue colors to color the image.
Finish drawing the trees and the outline of the grass or flowers, placing them in the foreground (at the lower border of the working plane).
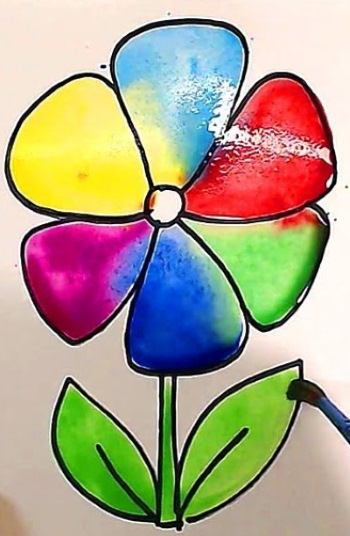
Flowers
The simplest algorithms used for painting flowers with watercolors are considered to be:
Variant of a drawing of flowers in watercolor
Algorithm of work
Step back 2-3 cm from the lower border of the working plane.
Draw 2 vertical lines from the center, no more than 8 cm long.
Connect the lines at the bottom and top with horizontal lines.
From the bottom point of the resulting elongated rectangle, draw 2 ovals with pointed edges (leaves).
Draw diagonally inside the leaves (veins of the plant).
Step back 3-5 cm from the main figure and draw a small circle at the found point.
Draw 6-7 identical figures around the circle (a rectangle with a narrowed base, located close to the middle of the flower bud).
Paint the drawing with watercolors, having first moistened it locally with water.
At the bottom edge of the sheet of paper used, draw an elongated narrow rectangle, the length of the sides of which is equal to the boundaries of the working plane.
Spread water evenly over this area and then paint it with watercolors.
From the middle of the rectangle, draw up 2 semicircles with bends directed in opposite directions.
Continue the semicircles with parallel verticals.
Connect the top points of the vertical lines with a horizontal line (vase).
From the horizontal, draw vertical lines of different lengths, directing them randomly.
At the top points of the straight lines, use closely spaced strokes to depict flower buds.
When working on this image, you should use paint of one color. For example, if the child decides to paint in blue, then it is recommended to paint only the buds with the original shade.
To draw the stems, paint the vase and the rectangle at the base, blue should be mixed with white, yellow or purple.
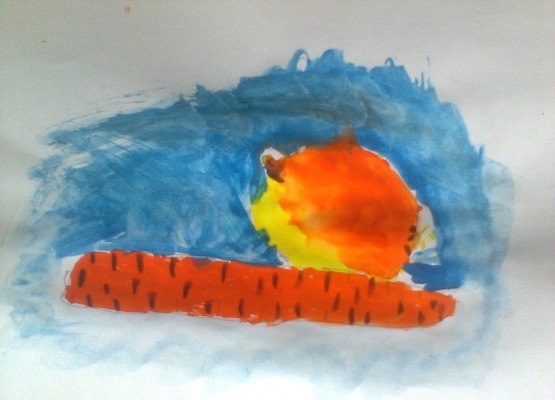
Still life
Watercolor paintings (for beginners) with images of several food products (fruits, vegetables, drinks) are called still life.
If the young artist is no more than 8-10 years old, a still life in his case may look like a drawing of several fruits arranged in a row. An older child should be given the task of determining the shape and size of the depicted objects, taking into account their location from the viewer and the horizon line.
Variant of a still life drawing in watercolor
Algorithm of work
Distribute water evenly over the middle part of the sheet of paper you are using.
Using blue watercolor, paint the wet area of the working plane so that the top is the brightest part and the bottom is light blue.
After waiting for the background image to dry, you should draw any vegetables or fruits (for example, carrots and onions).
On the light blue area, draw 2 diagonal parallel lines (slightly curved), the end points of which are connected on the right by a straight line, and on the left by a triangle (carrot).
Wet the inside of the carrot, and then wait until it dries completely, then draw black vertical lines, placing them randomly.
Closer to the pointed edge of the carrot, draw a strongly curved upward semicircle, so that its extreme points are located on the edge of the carrot drawn earlier.
Visually divide the inner part of the bow into 2 parts with a diagonal line so that the lower section is located diagonally and is approximately 3 times smaller in size than the upper section.
Wet the inside of the onion, then wait until it dries completely, paint the small area yellow and the large area orange.
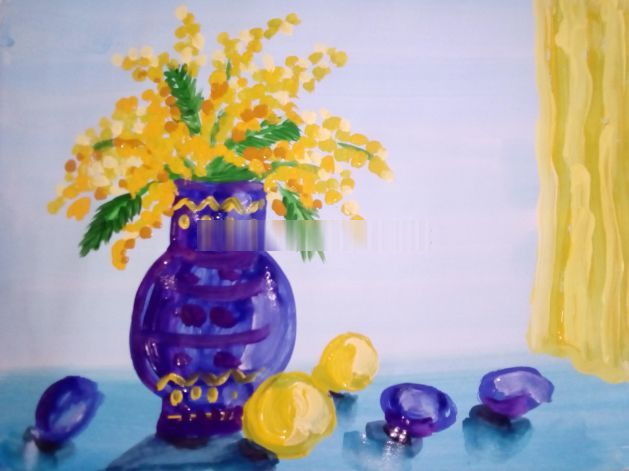
Mark the horizon line by drawing a horizontal line at a distance of 7-14 cm from the lower border of the working plane.
Step back 4 cm from the right edge, and then draw a vertical line from the horizon line.
Paint the space between the bottom edge of the sheet of paper and the horizon line in any color, making the shade minimally saturated.
At a distance of 2-3 cm from the lower border of the working plane, depict a vase (2 short parallel verticals, smoothly turning into semicircles with opposite bends and continuing with vertical lines that are twice as long as the lower ones).
Paint the inside of the vase in any way you like (with or without first spreading water over the paper surface).
Draw branches of any kind of plant from the top edge of the vase. It is preferable to use a contrasting color of watercolor in relation to the shade in which the vase was drawn.
Draw several ovals at the base of the vase, placing them randomly. The size of the objects should be determined by their distance from the viewer (the higher the location, the smaller the object).
Color the ovals in the colors you chose earlier to draw the vase and flowers.
Color the distance between the right edge and the vertical line light brown or beige (wall).
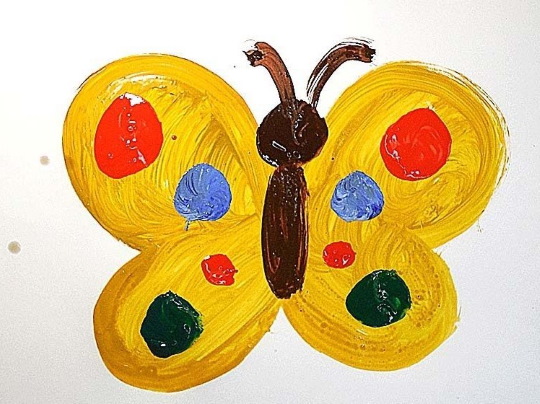
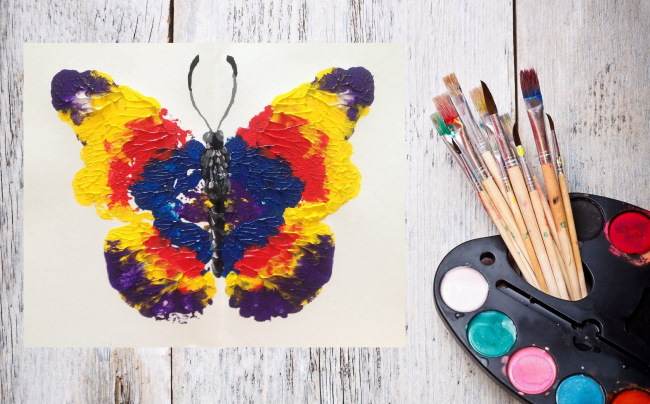
Butterfly
Beginning artists will most likely draw a butterfly the way they see it on the pages of books or in cartoons.
There is no need to limit a child if he refuses to draw in realism.
Otherwise, the young creator will begin to experience negative emotions towards drawing, and later will give up such activities altogether.
Variant of a butterfly drawing in watercolor
Algorithm of work
In the central part of the working plane, draw an elongated oval (the body of the butterfly).
Draw a small circle on top – the butterfly’s head.
From the upper border of the head, draw 2 lines, the ends of which are curved in opposite directions.
From the upper border of the oval, draw semicircles to the right and left, depending on the side of the figure (from the right border, the semicircle should be directed to the right, from the left - to the left).
The semicircles should be adjusted so that they acquire curves, resulting in the formation of 2 semicircles connected to each other (butterfly wings).
Paint the inside of the butterfly's body and head with dark, undiluted watercolors using brush strokes.
Paint the wings in a bright color and let the paint dry.
When the pigment used to paint the butterfly wings dries, you need to draw 4 circles of different sizes on each side of the wings (wing pattern) inside.
The circles must be painted in contrasting colors.
Using a simple pencil, draw a schematic outline of the butterfly's body and wings.
The body should be an elongated oval with a circle on the upper edge (the butterfly's head). From the butterfly's head, it is necessary to draw 2 curved lines directed in opposite directions (whiskers).
The wings should be gently curved lines that form 2 separate areas on each side.
The wings should be painted with undiluted watercolors, using randomly sized strokes, placing them close to each other.
To color a butterfly, you should choose contrasting colors that, when placed close to each other, will emphasize the depth of the color of the neighboring shade.
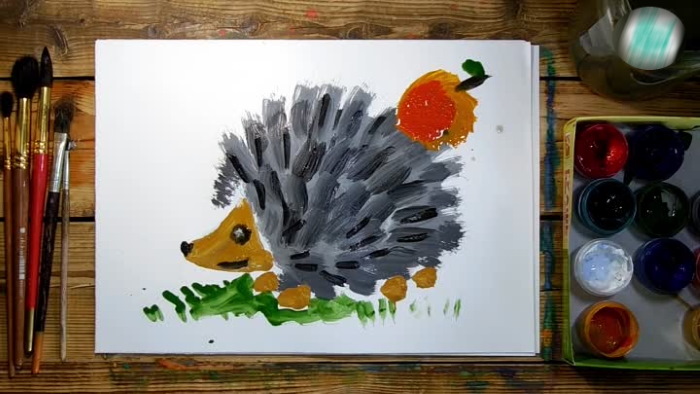
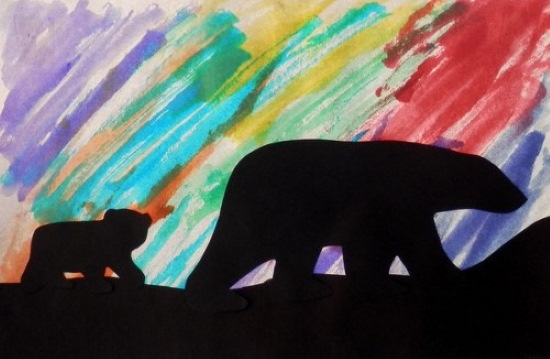
Animals
For beginning artists trying to work in watercolor technique, creating drawings of animals will be quite difficult. You should start drawing such compositions only after the child has mastered the basic techniques of watercolor painting.
Variant of animal drawing in watercolor
Algorithm of work
Step back 2-3 cm from the lower border of the working plane, then use short strokes of green undiluted watercolor to schematically depict the outline of a forest clearing (grass).
Draw an isosceles triangle above the grass, placing the main angle on the left.
Draw a small black circle on the main corner (the hedgehog's nose), and near the base - a black circle with a white dot in the center (the eye). Draw a slightly curved line at the bottom of the figure.
To the right of the triangle, draw 4 ovals, grouping them in 2s and placing them approximately 5-9 cm apart.
Using thick short strokes directed towards the hedgehog's head, draw its needles, visually limiting the area of the animal's body to a semicircle.
Draw an apple in the upper right corner (a reddish circle with a green semicircle drawn from the top of the fruit).
To create this drawing, it is recommended to use watercolors of gray, black, green, red, as well as their derivative shades.
Step back 5-6 cm from the lower border of the working plane and draw a horizontal line with several smooth bends at this level.
Its right end should be on the right edge of the sheet of paper used, 2 cm above the level of the other part of the line.
Paint the space from the edge of the sheet to the drawn line with thick black watercolor.
Wet the top of the paper evenly with water and then let it dry on its own.
Fill the space above the black area with washes using purple, blue, orange, yellow, red and blue watercolors.
Draw the outlines of a large bear and its cub walking on all fours, with the soles of their paws level with the black area of the paper.
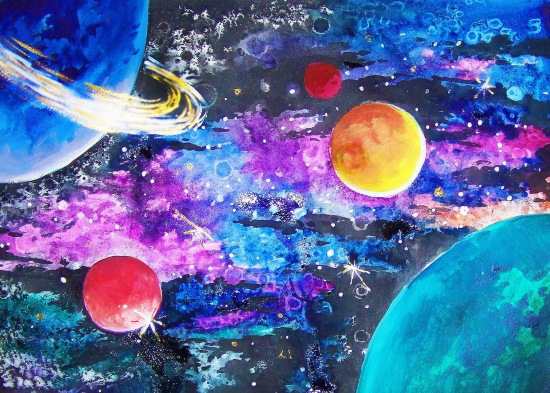
Space
Space-themed drawings are especially beautiful and the colors are realistic if the artist used watercolors in his work. The advantage of creating such images for children is that there is no need to draw real objects in detail.
To draw space, you need to follow the standard algorithm:
Distribute water evenly over the entire working surface.
Using purple, blue, light blue, yellow and violet colors and their shades, make chaotic stains on a sheet of paper, smearing the transitions.
Let the drawing dry, and then, if desired, add celestial objects (for example, planets, stars, the moon, etc.).
Watercolor Paintings for Beginners - Space
It is recommended that young artists begin painting under the supervision of experienced teachers.
If a child decides to learn how to create watercolor paintings at home, parents should not only provide him with all the necessary tools for the lessons, but also independently study the basic techniques of this creative process, formulate an algorithm for the upcoming work and acquire basic watercolor painting skills themselves.