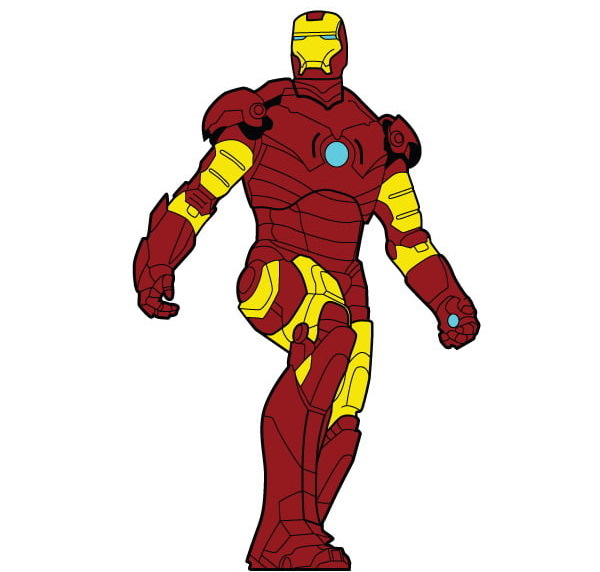
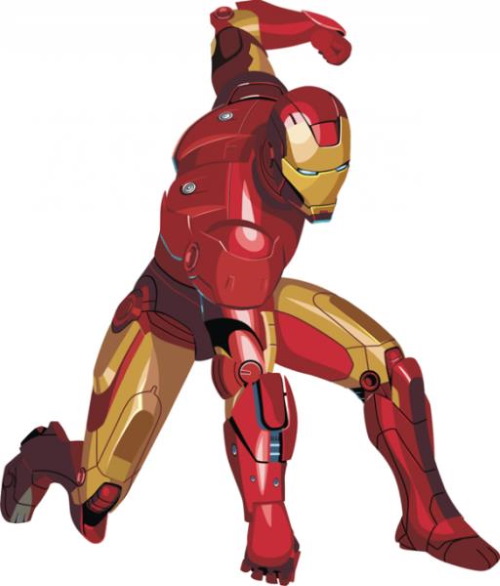
Many children will be interested in creating a drawing of Iron Man, a popular comic book and movie hero from the Marvel franchise. He can be drawn using a simple pencil. But it should be taken into account that this idea may not be suitable for very young children. Drawing people is quite difficult.
On the other hand, this superhero wears an iron suit all the time, which makes the task much easier.
Who is Iron Man
This is one of the most popular Avengers heroes. Iron Man is actually called Tony Stark. He is a millionaire who was engaged in the creation of modern devices and new technologies. One day he was kidnapped and while he was a hostage, he came up with the idea of creating a suit made entirely of iron.

Thanks to him, he was able to resist numerous terrorists and became a real hero. Having improved his suit, he also came up with how he could shoot and fly, which became his main "trick". Iron Man is part of a franchise. A huge number of films have been made with this hero. Therefore, it is not surprising that children adore this character and enjoy drawing him.
Materials for drawing
Iron Man (a pencil drawing can be made very realistic) is primarily a suit with many details. To draw it, it is most convenient to do this using standard tools.
| Materials for drawing | Peculiarities |
| Paper | It is better to use thicker A4 sheets. For example, you can buy a drawing pad or just thick enough paper. Then you can use an eraser without fear. |
| Simple pencil | It is recommended to choose pencils of medium fat content. It is easier to draw with them, as they will not scratch the paper. Such a pencil is easier to erase. |
| Eraser | You need to use an eraser specifically for a simple pencil (you can also find coarser erasers on sale, designed for ballpoint pens). |
Usually, a simple pencil is used only to create the drawing itself. When coloring it, you can use colored pencils, markers, paints, crayons and much more. If you outline the contours with a thin black marker, you will be able to highlight the image more successfully.
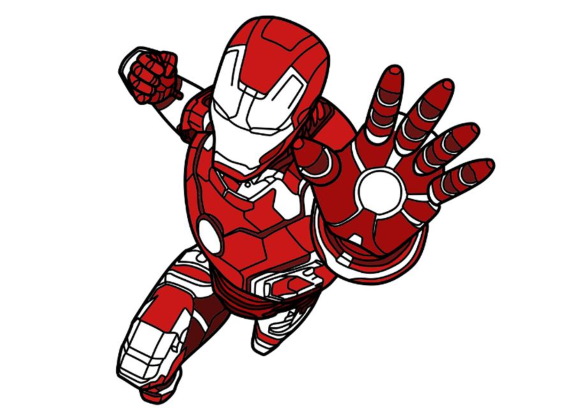
How to Draw Iron Man Shooting in Flight
One of the most spectacular moments in superhero movies is when a character shoots a villain in mid-air.
To depict Iron Man in this pose, just follow a few steps:
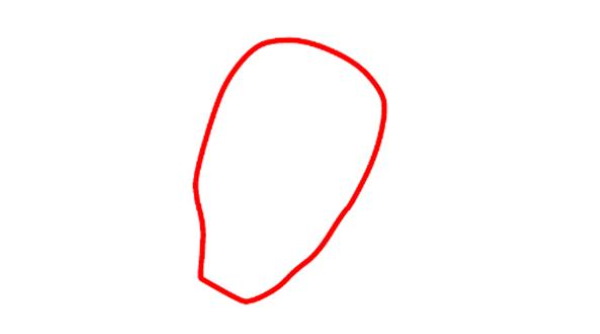
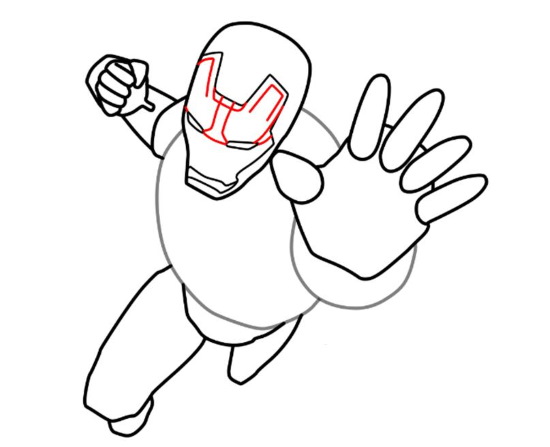
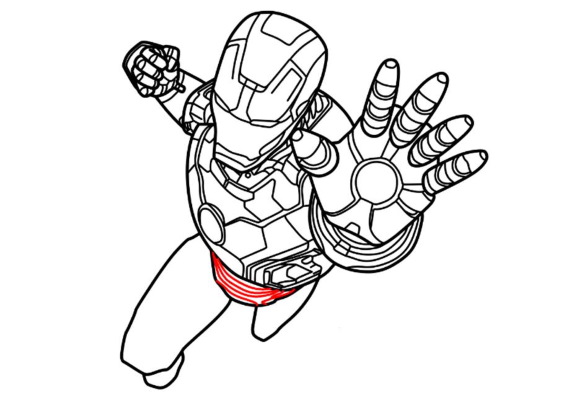
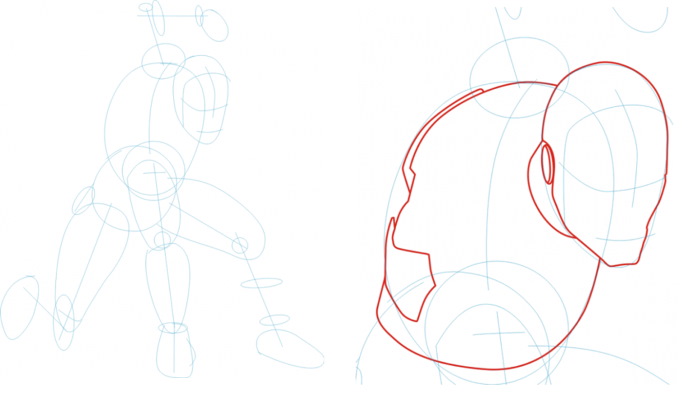
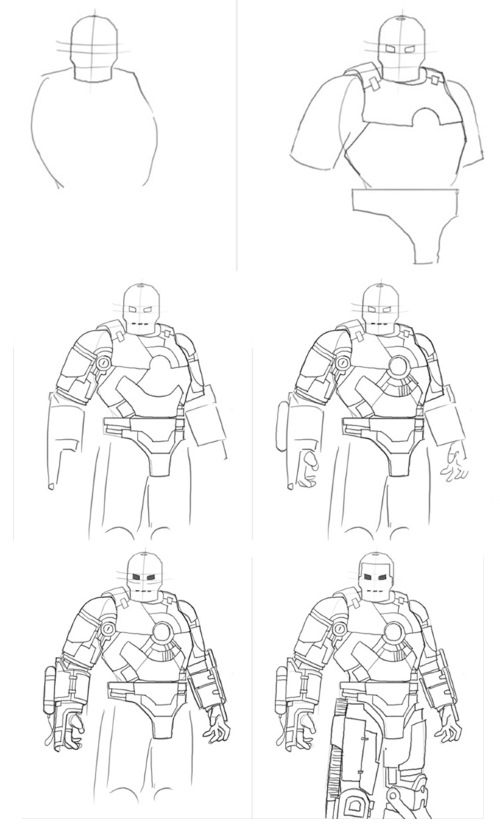
- First, you need to lay the A4 sheet vertically and mentally or with the help of a barely noticeable line divide it into 3 lines. This will allow you to create guidelines, with the help of which it will be easier to follow the proportions. In the central part, you need to draw a slightly tilted oval, which is more elongated at the bottom. This will be the basis for the helmet.
- A little lower, you need to draw another, larger oval. At this stage, only sketches are created that will allow you to mark the areas. Detailing will be done later.
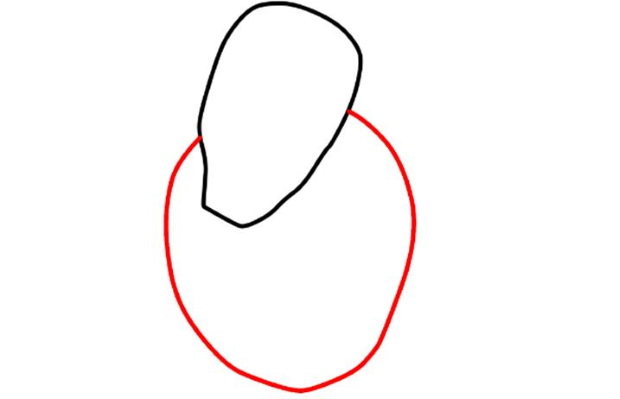
- The next step is to draw a half circle on the right side of the body. This is another auxiliary element, so you don't need to press hard on the pencil.
- The semicircle is needed to create the palm of the iron man. Since the perspective of the image is such that the hero is looked at from top to bottom, the size of the limb can be even larger than the head, since the hand is closer. At this stage, you need to create the lower part of the palm and create a place where the thumb will be depicted later.
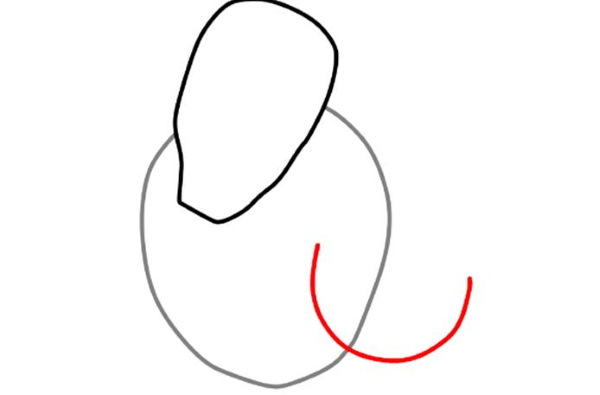
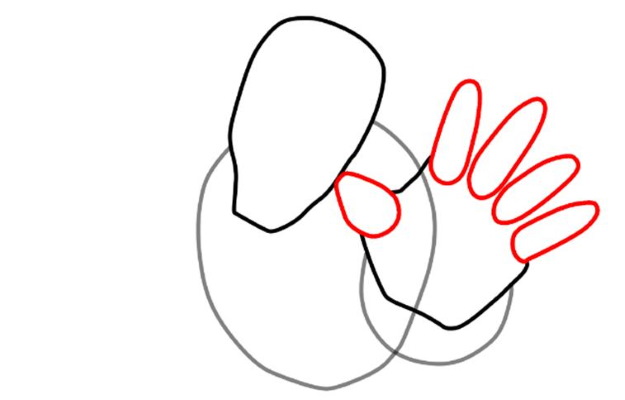
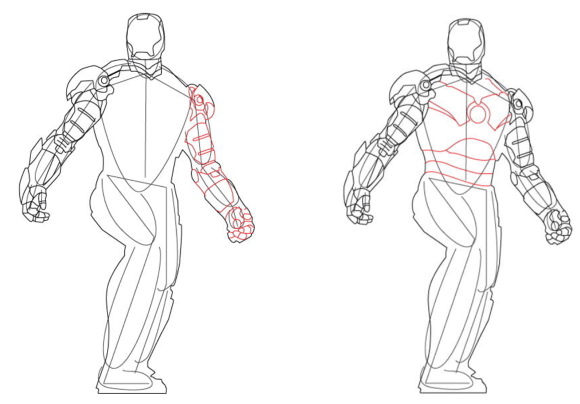
- Now you can draw all the fingers that extend from the palm. During the shot, Iron Man completely opens his hand, from the center of which comes a beam that can hit a long distance.
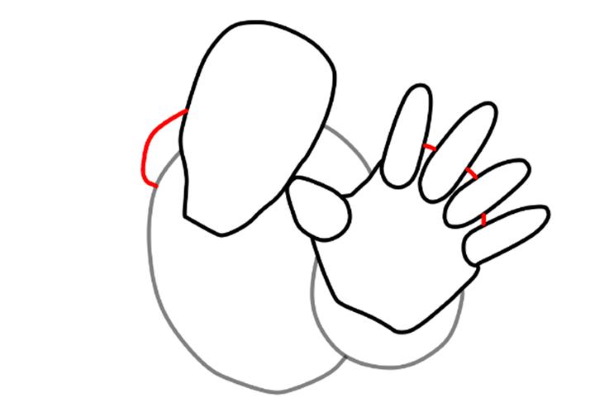
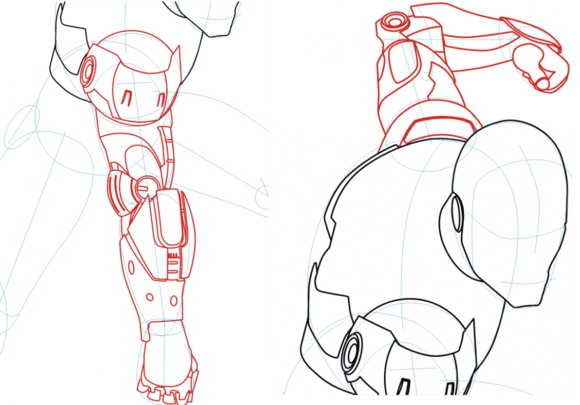
- The second hand should be depicted much smaller, as it is behind the hero's back. According to the perspective, it is removed. Also at this stage, the second shoulder should be brought out. To do this, it is enough to depict a small semicircle.
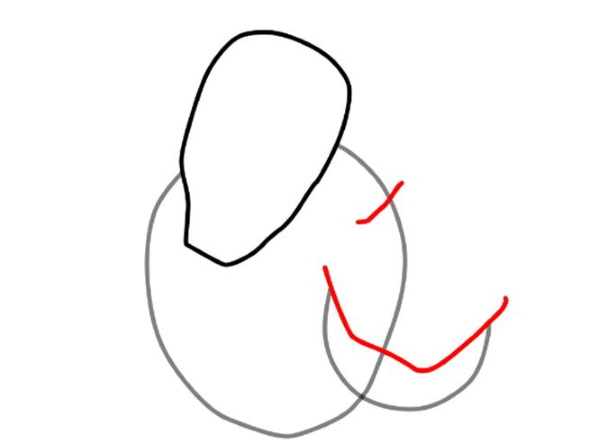
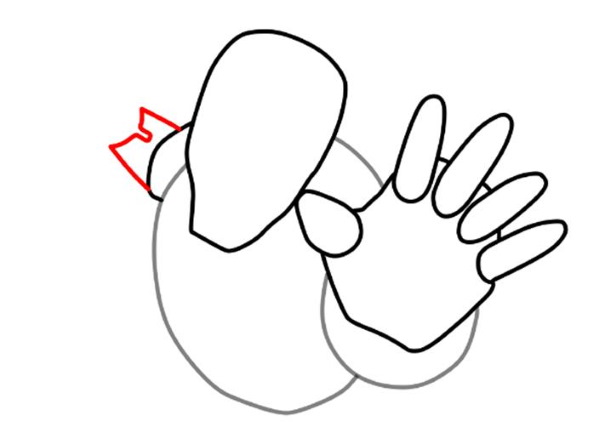
- It's time to work on the back arm and add a costume element. It has the shape of a complex rectangle. In its upper part, you need to depict notches, as shown in the picture below.
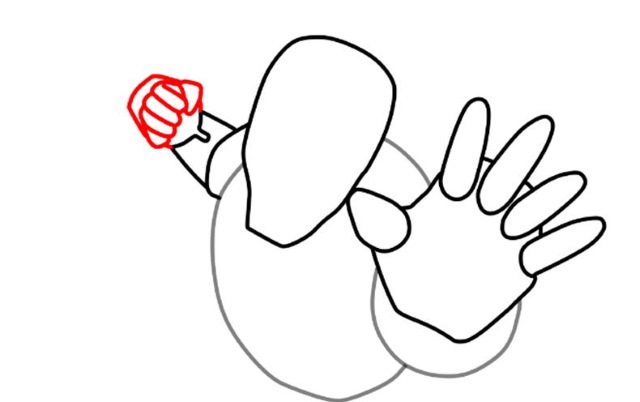
- Now we can continue to detail the back hand. It should be, on the contrary, not open, but clenched into a fist. It should give the impression that after Iron Man uses the beam, he will punch the villain to finish the attack.
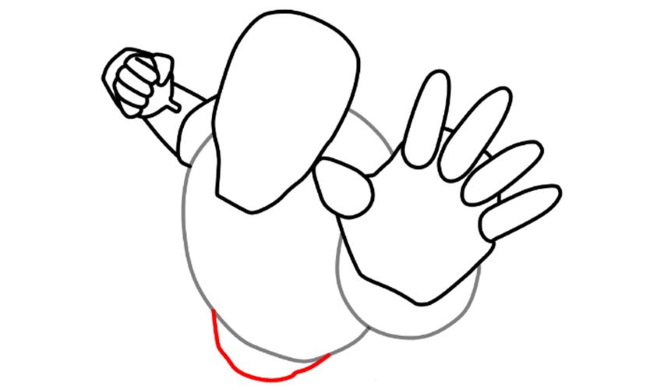

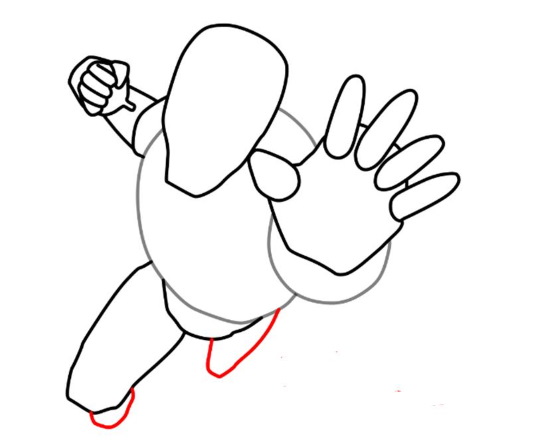
- To get the right proportions, you can't forget about the legs. Since they are also the furthest from the camera, the limbs should look significantly smaller than the upper body and especially the arms. The lower body can be drawn using a small oval, which should be smaller in width than the main body.
- Now draw a leg to the left of the lower part of the body, only up to the knee. And again, an oval comes to the rescue. Most of the basic elements can be drawn using the simplest geometric shapes.
- The leg bent at the knee is higher, according to the perspective of such a drawing. Therefore, the second leg should look smaller. Also, based on the frame, it turns out that the foot of the right limb should also be smaller.
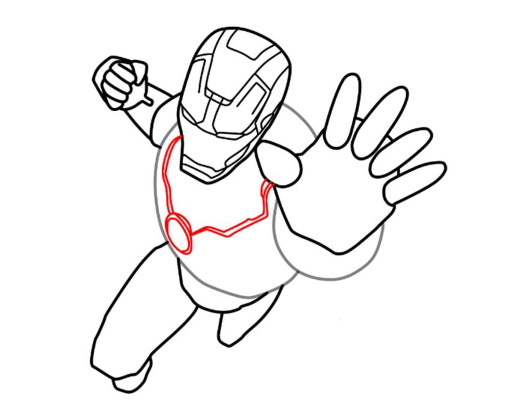
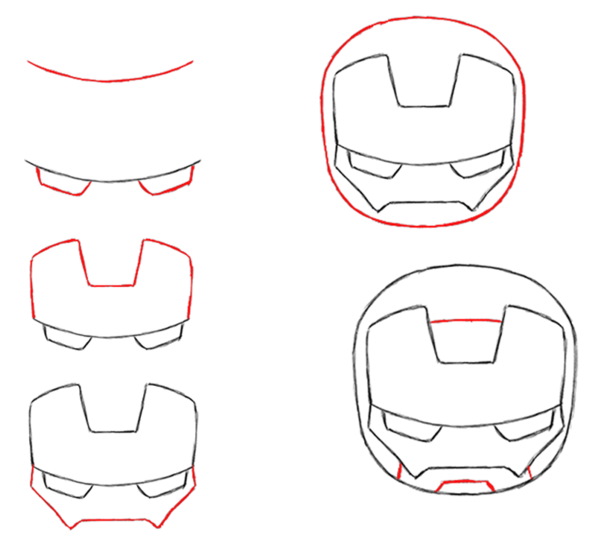
- Now we can move on to detailing the image. It is worth starting with the head, or more precisely with the Iron Man mask. To do this, you need to select the outline in the center. The lines should be quite angular.
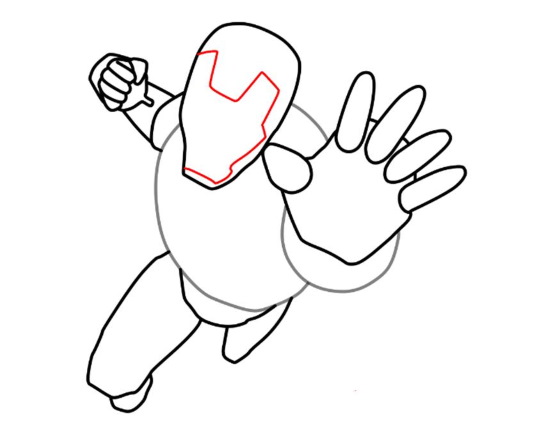
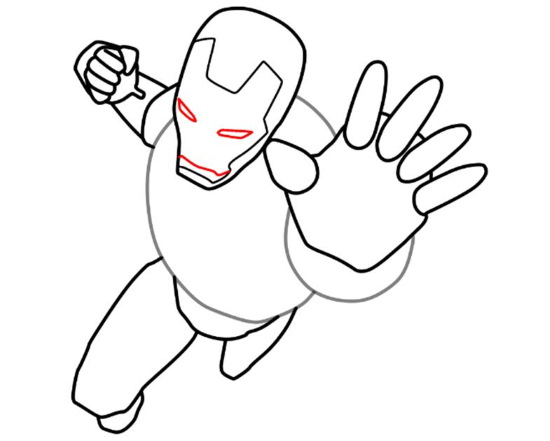

- Step back from the chin and draw the mouth. It is almost a straight line that goes down a little at the edges. After that, step back a little higher and draw the eyes. To do this, draw 2 beveled rectangles.
- Next, you need to detail the mask even more. To do this, add straight lines to mark the bridge of the nose. It is also worth adding a few lines a little higher, repeating the shape of the inner edging.
- The next step is to add more elements to the helmet. This time for the outer part. As you can see from the image below, you can still use only straight lines.
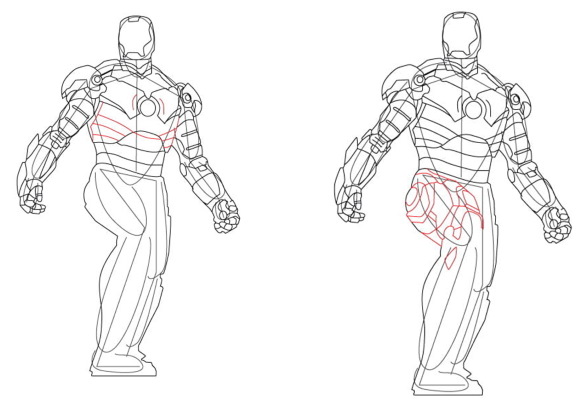
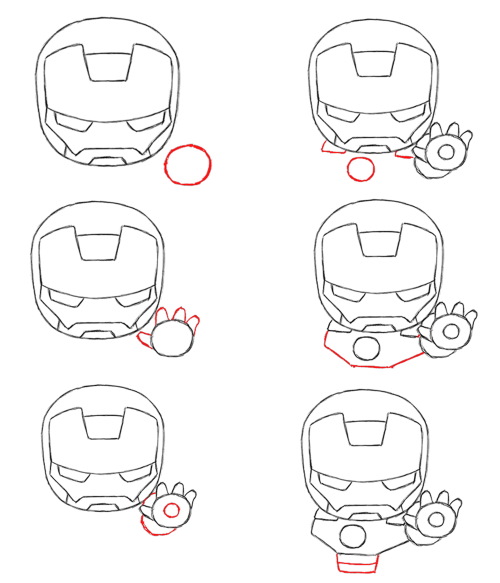
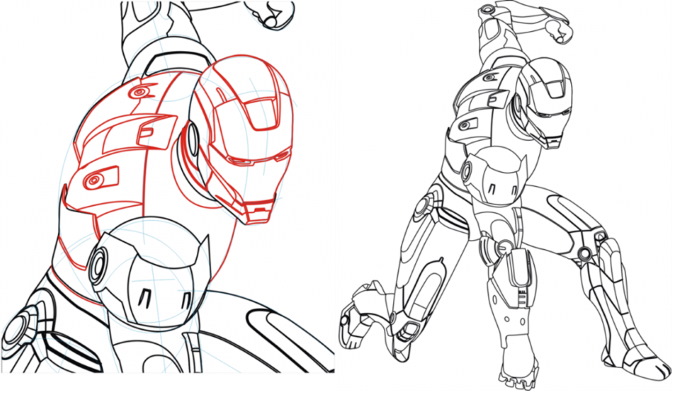
- Continuing with the detailing, move on to the hero's torso. On his chest is a glowing core that generates the energy needed to operate the heavy suit. Draw a circle as the core and outline it with another slightly larger one. From the core, draw several pairs of lines upward.
- Next, you can move on to more painstaking work and add more elements. Using straight lines, create unique sections of the suit. To make the work easier, you can use a ruler. If some line does not fit into the image, it is easy to correct with an eraser.
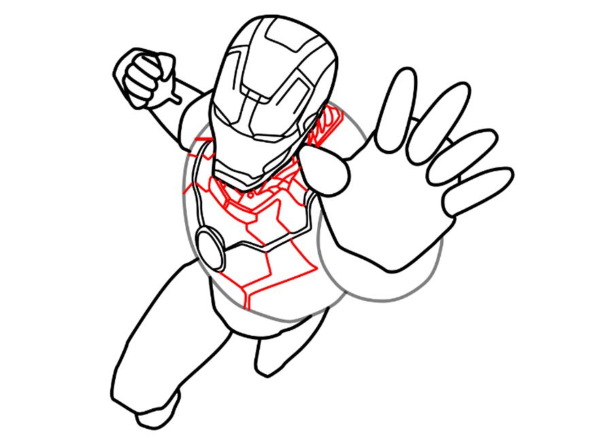


- Now the same thing needs to be repeated with the lower right part of the body. Here, too, it is necessary to create peculiar branches. There is no need to draw too many such segments. But there is no need to leave empty spaces either.
- Now it's time to detail the fingers so that the whole costume looks harmonious. To do this, add horizontal lines and semicircles in the folds. It is necessary to highlight such elements on each finger. There is no need to rush, this is a rather important part of the drawing, as it is in the foreground.
- Don't forget about the center of the palm, where the Iron Man beam shoots out from. To do this, draw a circle and add lines going in different directions from it. This will give this central part more impact.
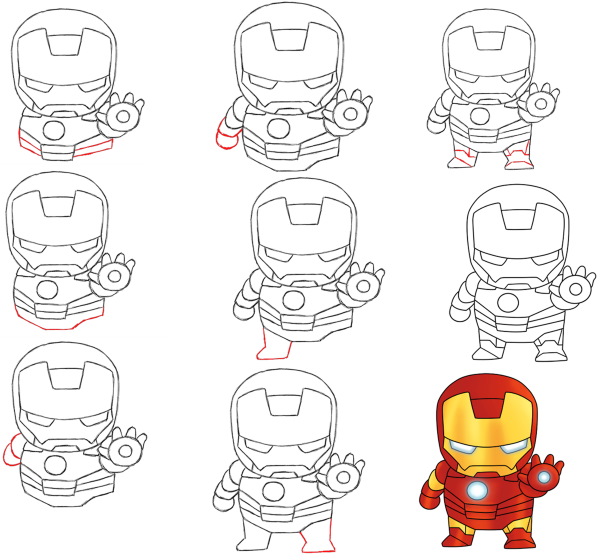
- Now you can move on to the far arm. It also requires lines so that the image looks complete in the end. You need to detail both the shoulder and the fingers (also where they bend).

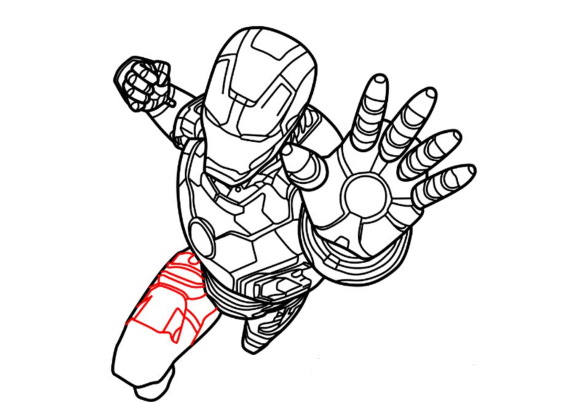
- At this stage, the lower part of the body looks like a canvas, so we need to fix this situation. To do this, draw a few slightly curved horizontal lines.
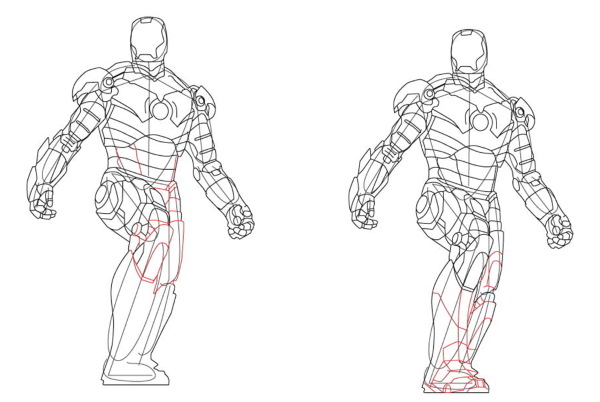
- The upper part of Iron Man is ready, we can move on to the lower part. For this, we detail the left leg. As in the previous steps, you can use simple lines, creating additional sections.
- The leg, which is bent at the knee, needs to be drawn more carefully, creating different geometric, mainly square, shapes. It is necessary to create unique places of connection of metal elements.
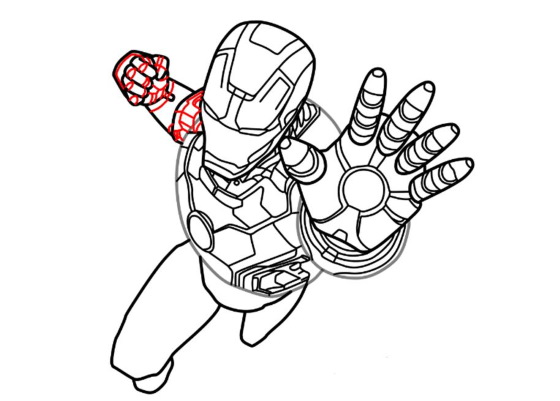
- Draw additional elements on the remaining parts of the legs.
What colors to paint
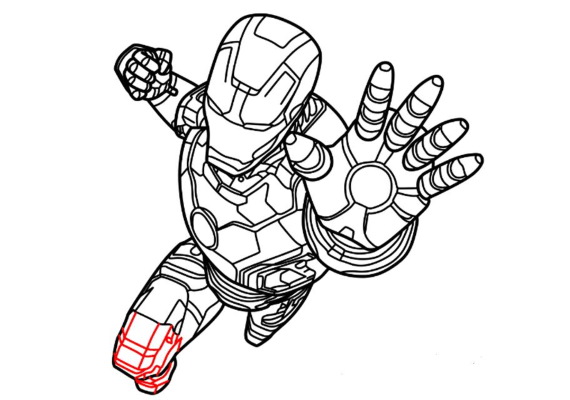
Iron Man, whose pencil drawing has already been done, looks great, but to complete the image, it needs to be colored. You can first outline all the contours with a thin black marker. This will allow you to visually separate all the small details. After that, you need to decide on the materials. Colored pencils, markers, paints, etc. are suitable for coloring.
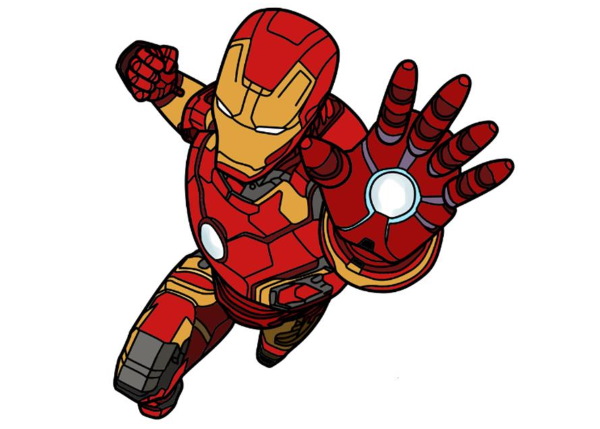
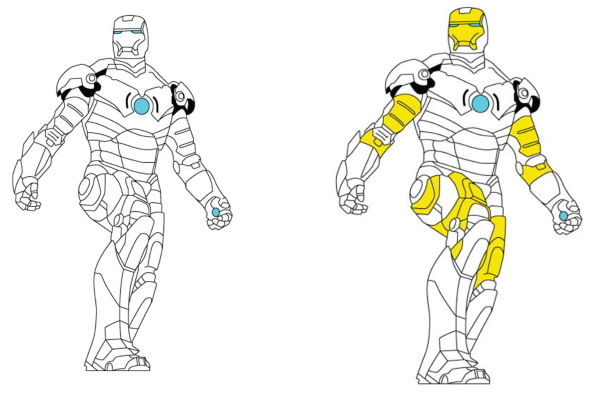
The main thing is to remember the main colors of the Iron Man suit:
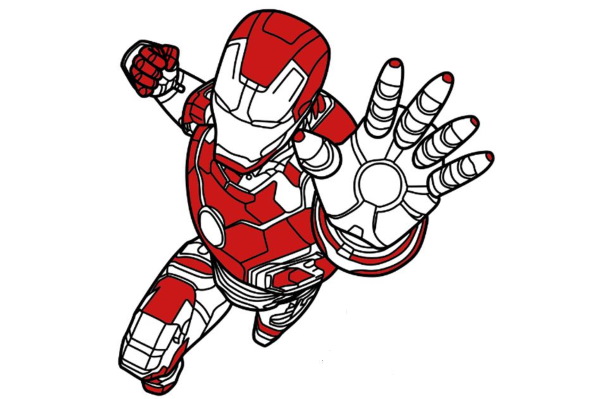
- First, you should use the main color - red. Tony Stark chose the winner's color for his suit, quite bright. Therefore, it should be the most in the picture.
- Using dark red, highlight the palm and some other parts of the suit, mainly the joints and places that should be in shadow. The image below will serve as an example.
- The second most important color of the suit is yellow. It should almost completely paint the helmet, leaving the eyes white and adding yellow elements on the hands and body. It is better to highlight the circles on the hero's palm and rudiments in blue.
- You can also use brown, dark yellow, violet and other colors. But they should not be toxic or too bright. Gray looks very harmonious with red and yellow.
The result is a very realistic image. If you want to complicate the drawing, you can add more half-shadows and add highlights. The latter will be especially beneficial, since the Iron Man suit should shine, it is made of metal after all.
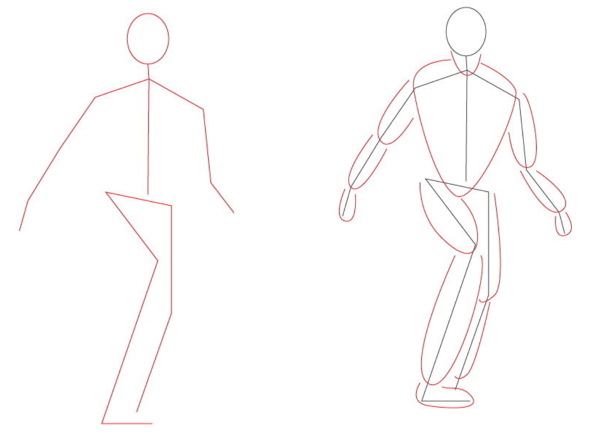
How to draw iron man in half turn
Iron Man (a pencil drawing can be done, depicting the hero in a different pose) often takes epic poses. You can choose them to your taste, having watched the film again.
To depict a superhero in a half-turn, you need to follow several steps:
- First, create the base. To do this, draw an oval at the top of the sheet as the head. The guidelines for the body can be depicted using the simplest lines. The main thing is to mark the shoulders, hips, slightly bent arms. Iron Man in the drawing will be facing forward, and the body will be half-turned.
- Add ovals to give the image shape. This will create areas for the limbs, torso, and other body parts.
- At the next stage, add more details. To do this, draw the Iron Man suit in the shoulders, on the legs. At this stage, it is also not essential to go into details. It is worth working on creating its front part.
- The hero's right leg should be slightly raised, as if he is taking a step or planning to take off. Gradually, you need to start drawing the elements of the right hand. Photos that can be found on the Internet are suitable as a reference.
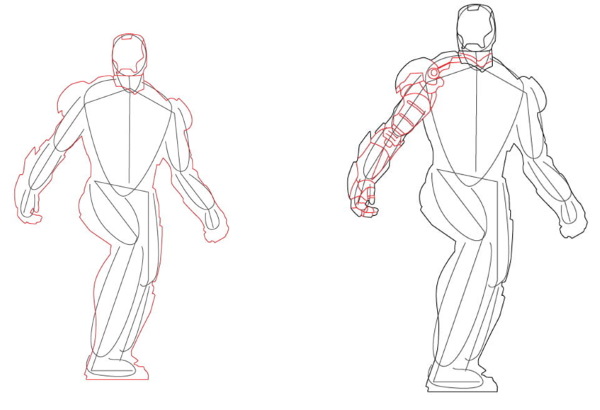
- Now it's time to move on to the other hand. The left hand is the most painstaking work. You need to create realistic fingers that are slightly raised up. If you have no experience in drawing upper limbs, then you should take a separate sheet and practice on it.
Otherwise, it will be very disappointing if the original drawing has to be erased many times. Don't forget that Iron Man shoots beams from his hand, so circles are needed in the center of the palms.
- The next step is to move to the chest area and add another circle in the center.
- Next, you need to continue adding details to the costume. You don't have to focus on one area, as it may seem boring to the child. Therefore, you can move around the entire image and add to it.

- In the next step, start drawing the details of the raised leg. Straight and semicircular lines are enough for this.
- At the connection points, draw circles that resemble modern gears.
- The lower part of the legs is very similar to large boots. But if you add metal details, it will look more impressive.
- Next, detail the helmet. You need to add eyes and a mouth.
- Now you can move on to coloring. It is more convenient to start with the circles located on the chest and in the palms. Since Iron Man shoots blue beams, these parts need to be colored accordingly.
- Under the metal parts on the shoulders, it is worth using black color. This will favorably shade and highlight the protruding parts.
- The central parts of the arms, legs and body should be painted yellow.
- It remains to move on to the main color - red.
The pose is very heroic, and if you draw Iron Man using the steps described above, it won't take much time. You can first practice drawing individual elements separately.
Mini Iron Man
You can choose a completely different Iron Man for a children's pencil drawing. For example, if it is difficult to draw a realistic hero, then it is worth creating a stylized image. For example, a practically toy superhero will look very unusual.
The step-by-step actions will be as follows:
- The first step is to draw a slightly curved line in the center of the sheet.
- Under it, you need to draw 2 elongated rectangles. This will be the stern look of the iron man.
- By drawing a few vertical lines from the eyes and connecting them, you can get the top of the helmet.
- Also draw the lower part.
- Next, draw an oval for the head. In this case, it is more rounded. Moreover, the hero's head will be disproportionately large in relation to the rest of the body.
- Now it's time to add some details to the head.
- The next step is the hand. First, draw a circle a little distance from the lower right part of the head.
- Draw 3 short fingers (not 4 like on a normal hand) on the top and one on the left. This will be the thumb.
- Draw a circle in the center of your palm. Iron Man will shoot a blue beam from it.
- Next, draw a circle on the chest. It should be slightly larger than the one drawn on the palm.
- Now draw a few more lines to highlight the chest.
- After that, add a few rectangles just below.
- And a few more, but a little wider.
- The next step is to draw the lower part of the body. Mini Iron Man is not as muscular as the original. On the contrary, he is more rounded.
- Now draw the second hand, which is placed behind the back.
- Next, draw a few ovals.
- The legs of the toy hero are very short and look more funny.
- The second leg should be depicted as if it is standing straight.
- Next, detail the legs and, if desired, add additional elements to the body.
- The result is a very unusual, small, but serious-looking Iron Man.
It remains to paint the image. As usual, preference should be given to red and yellow colors. Blue lines should be drawn inside the circles and eyes. This will create the effect that the superhero is shooting rays.
Iron Man Landing
Iron Man (it is better to draw it in stages) lands very effectively, so you can depict this scene.
To do this, you need to follow the step-by-step instructions:
- If the child is already ready for more complex drawings according to all the rules of fine art, then you can show him how to correctly make a sketch when creating more complex poses.
- Next, detail the head and upper body area. These are mostly ovals and circles. Since the head is turned, you can draw places for the ears.
- The foreground hand needs to be more detailed. When creating an image like this, it's not enough to just draw lines, you need to create elements of Tony Stark's suit.
- Next, draw the arm located behind. It is bent at the elbow almost at a right angle. It also needs to be properly detailed. A very interesting example is presented below.
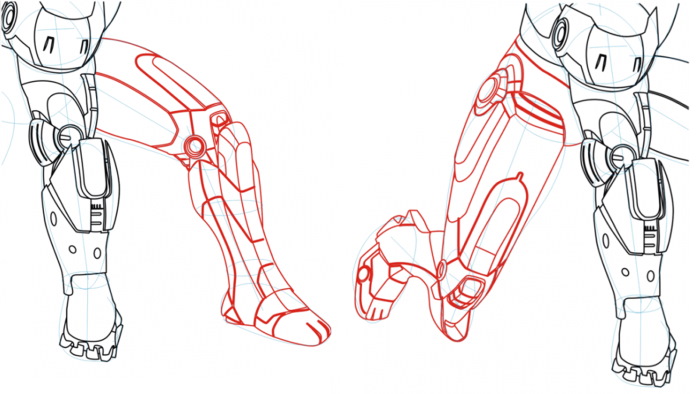
- Now you can move on to the leg, which is also bent at the knee.
- The second leg should be extended back.
- Next, you need to detail the back.
- It remains to supplement the image with additional complex elements.
All that's left is to paint everything. The colors remain unchanged. The example below shows which parts of Iron Man are best for highlights and where it's best to create shadows.
Pencils, paints and other materials are suitable for coloring. You can also first draw Iron Man on paper, then scan it and, using a graphic tablet, create the most realistic picture.
The first iron man suit
Today, few people remember that in the first part of the franchise, Tony Stark created a suit practically from scrap metal that he could find. Therefore, the very first version of the legendary Iron Man looked more bulky and clumsy.
To draw this, you need the following steps:
- First, you need to mark where the upper part of the body will be, and where the head will be. Also create markings for the eyes. After that, draw the lower part and upper parts of the arms.
- Next, move on to detailing. It is important to remember that the first suit did not contain such a number of elements.
- All that remains is to gradually add elements. The helmet in this case should be the simplest.
This way, you can get a variety of Iron Man drawings. You can draw it with a pencil or other tools. For younger children, it is better to use step-by-step instructions for drawing a miniature version of the hero. If the child goes to art school, he or she will be able to handle more complex options.
Video about drawing
Iron Man pencil drawing: