To keep your curls in order and your hairdo looking neat, use not only hairpins, but also hair clips that you can make yourself. The process of making an original decoration is exciting and does not take much time.
How to Make Hair Clips
It is easy to learn how to make hairpins with your own hands. Beginners should start working with simple compositions and elements, for example, with ordinary rubber bands. Using glue, they are decorated with beads, ribbons, rhinestones and small beautiful elements.
At home, as a rule, they make do with improvised means. Thus, an original hair clip can be made from large beads and satin braid. The finished product will need to be attached to a special base so that it stays on the strands. Decorations are also attached to a hoop or various clips.
Necessary materials
Hairpins are made from both improvised components and from components available in stores.
You will need the following materials:
- bases for the craft;
- flower centers (buttons, beads, braid, stones);
- decorative elements;
- additions in the form of buds, leaves, cones and grass;
- satin ribbons of different widths;
- multi-colored braid;
- organza and rep stripes;
- beads;
- cord.
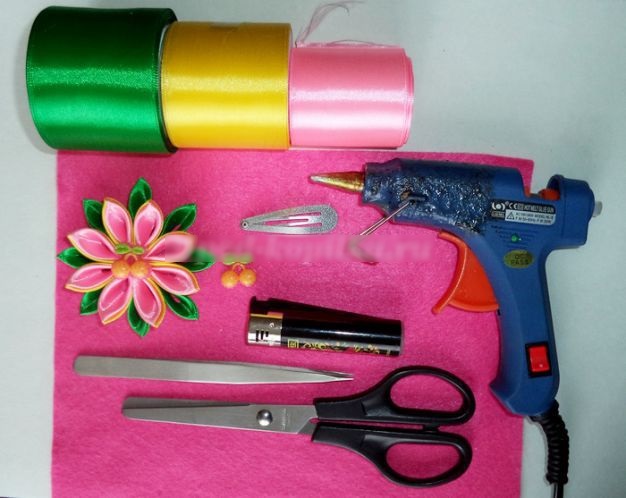
The basic equipment you need to have is:
- glue gun and regular glue;
- tweezers;
- small round nose pliers;
- round nose pliers;
- various needles;
- crochet hook;
- centimeter.
Base for hairpin
Depending on the craft being created, it is necessary to choose a base for it, which can be as follows:
- With an automatic fastening mechanism that can withstand a large volume of hair. The decor of such an ornament requires a large composition that could hide a large structure.
- Click-clack, in the form of invisible pins, fixing small strands.
- Hairpins made of high-strength metal, which are decorated with a regular bead or fabric weave.
- Hoop or wreath.
- Metal base from an old hair clip.
- Special blanks with frames, mounts and platforms.
Step-by-step instructions for creating flowers for kanzashi
Hairpins are made by hand using the kazanshi technique as follows:
- Take a ribbon of two shades, 4 and 5 cm wide. Cut out 8 squares measuring 5x5 cm from the wide strip. Make 13 blanks measuring 4x4 cm from the narrow cord.
- Fold the small piece diagonally, repeat the action 2 more times. Trim the edges. Use a lighter to burn the ends so that the fabric does not unravel. Make 13 more petals in this way.
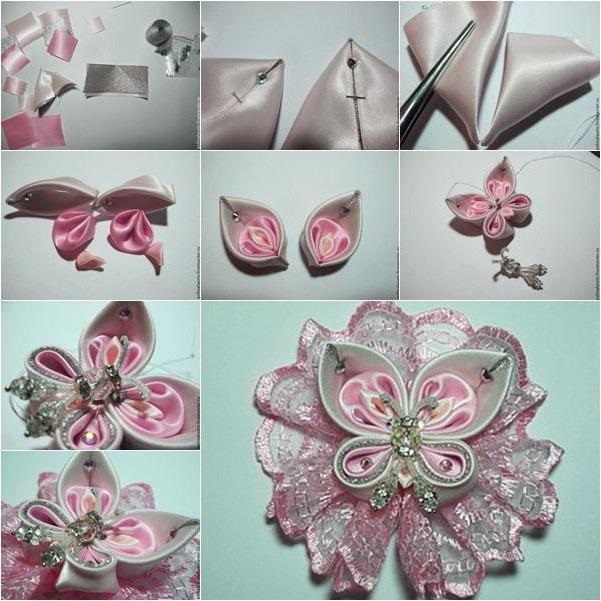
- Place the resulting leaves on a thread to form a flower. To strengthen the structure, cut a small circle from a ribbon of the same color and glue it to the back of the product.
- Make the next tier from 8 petals of a different shade.
- Glue 2 flowers together with glue.
- Decorate the middle. To do this, glue a large bead to the center.
- Finally, attach the composition to a hoop or automatic clamp.
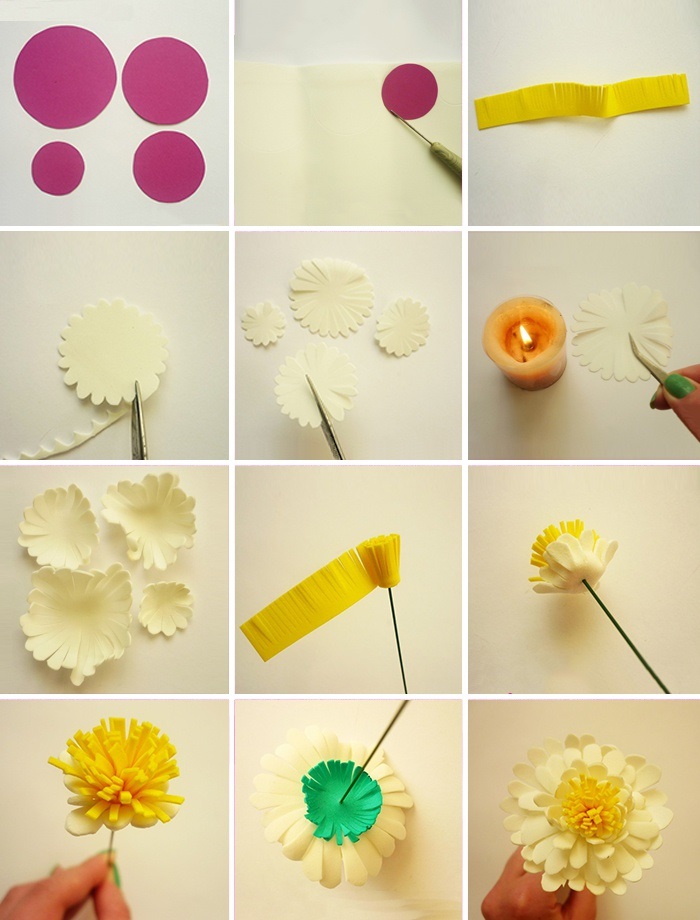
Satin Ribbon Lily for Beginners
Materials required:
- satin ribbon 5 cm wide;
- fabric glue;
- sticky web;
- wire;
- iron;
- candle.
Step-by-step implementation technology:
- To make leaves 7 cm long, you need to cut the ribbon into 14 cm pieces.
- Fold the ribbon in half and insert the wire with the webbing inside one of the halves across the entire width. Place the metal piece in the center of the petal.
- Cover with the other half and iron so that the parts of the tape stick together.
- Give the leaves a shape. Trim the ends according to the template prepared in advance.
- To process the edges of the petals and give them a wavy shape, you need to singe them in parts using a candle, while simultaneously stretching them with your hands.
- Make a rounded base for the craft from the same ribbon as the main product.
- Glue the leaves to the base in two rows of 3 pieces, or more.
- Because the petals are on wire, it is easy to give them the desired configuration.
Master class: Kanzashi rose
Method of making an original rose using the kanzashi technique:
- Take a wide strip, cut it into squares and carefully burn the edges with a lighter.
- Fold the workpiece diagonally.
- From the formed triangle, fold two corners down to the third, cut off the sharp ends, giving them an oval shape, and fix by singeing each corner with a lighter.
- Thus, 1 petal was formed. To obtain a rose, it is advisable to make from 15 to 25 such parts.
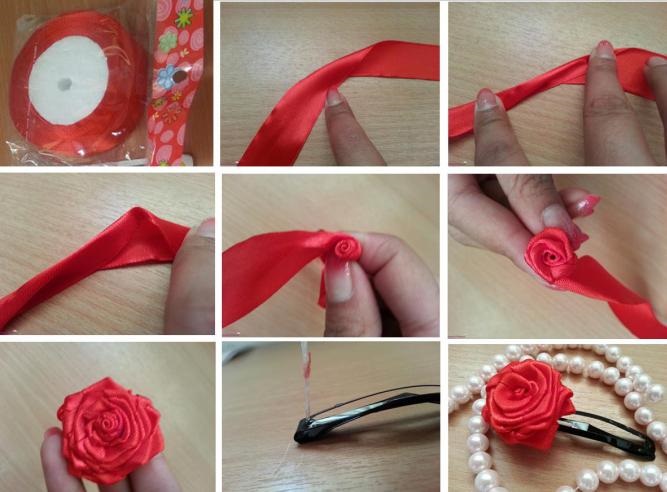
- Turn the sheet over onto a smooth surface - this will be the face of the product.
- Roll the first petal of the flower into a tube and attach the next piece to it with glue.
- Place each subsequent leaf on 1/3 of the previous one.
- Glue all the parts together and glue a small circle of tape with scorched edges to the back side.
Forget-me-nots kanzashi do it yourself
Step-by-step execution of delicate forget-me-not kanzashi:
- prepare a blue ribbon 2.5 cm wide;
- mark 5 cm and cut into pieces, singe the ends;
- for the inflorescence you will need 5 parts;
- fold the first square diagonally;
- using a running stitch, sew both sides of the resulting piece;
- pull the thread tight and you will get one of the flower petals;
- With the same thread make 4 more leaves. At the end of making, sew the first and last parts of the forget-me-not, carefully pulling the thread;
- Glue a bead in the center.
Daisies from ribbons and beads
You will need the following materials:
- white satin ribbon 0.5 cm;
- felt with a diameter of 2.5 cm;
- yellow beads;
- glue;
- devices.
Manufacturing method:
- Cut the tape into 24 pieces of 8 cm each.
- Fold each piece in half with the wrong side inward and use your fingers to form a fold in the center.
- Place one end of the strip on top of the other and fuse over a candle.
- Glue the first tier of 8 petals face up to the felt base.
- Glue the second row on top between the first leaves in the amount of 8 pieces, shifting the blanks towards the center.
- Glue the last layer of 8 pieces under the bottom of the chamomile.
- Put a drop of glue in the middle and spread it around the circle. Sprinkle yellow beads on top and leave for a few minutes. Shake off the rest.
- Use tweezers to adjust the shape, making it rounder.
- Add some more glue and sprinkle some more beads. Turn the product over, and the excess beads will fall off. Set aside for 5 minutes, then shape the middle into a circle.
Kanzashi hairpin made of three types of petals
Do-it-yourself technology:
- Cut the 5 cm wide peach ribbon into 22 squares. Cut the 4 cm white ribbon into 6 identical pieces.
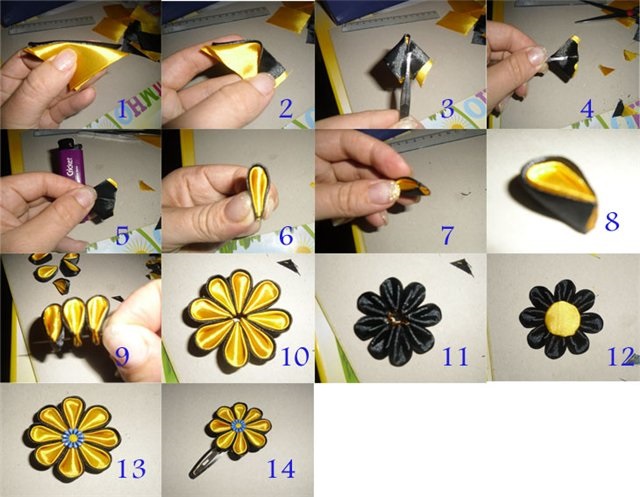
- To create a large rounded petal, bend the yellow-red blank into a triangle, bending the edges to its top to form a rhombus. Fold it in half and grab the ends with tweezers. Cut the edges slightly and solder with a lighter. Cut the bottom and solder the cuts as well. Make 6 parts.
- To form a small oval leaf, take 2 squares (one large, the other smaller), bend both in half diagonally and put them together. Lower the corners of the resulting triangle to the top. Fold the resulting rhombus in half and grab the edges with tweezers. Cut the ends so that all the tiers are connected, and solder the cuts with a lighter. Cut off the bottom and also fuse the ends. Make 6 similar blanks.
- To make a sharp petal, take a large square and bend it diagonally to make a triangle. Fold the piece in half 2 rows. You will get a small triangle. Trim the edge and solder the cut. Trim the bottom of the leaf and process the cuts with a lighter. Make 10 pieces in a similar manner.
- Assemble the lower tier from round leaves, and the upper tier from double oval blanks.
- Connect both parts with glue. Glue a bead in the center.
- Glue two pointed green petals together at the corners. Glue a third leaf between them. Repeat the same steps.
- Glue the base of the hair clip. To do this, cut a rectangle from a wide ribbon (5 cm), the length and width of which are 2 times larger than the dimensions of the automatic hair clip. Singe the edges of the part, coat with glue and glue along. Glue the resulting strip to the metal base.
- For the flower base, prepare a peach section 8 cm long and glue it in half. From the created square, cut out a circle 3 cm in diameter. Singe the edges.
- To assemble the hairpin, you need to glue the made base to the flower. Attach the finished decoration to the center of the product. Glue sheets of five pointed petals on all sides.
Bow for a schoolgirl: popular options
Bow options for schoolgirls:
- made of tulle;
- in black and white with lace or polka dots;
- two-layer multi-colored;
- in the form of a butterfly;
- fan decoration;
- dragonfly made of colored stripes;
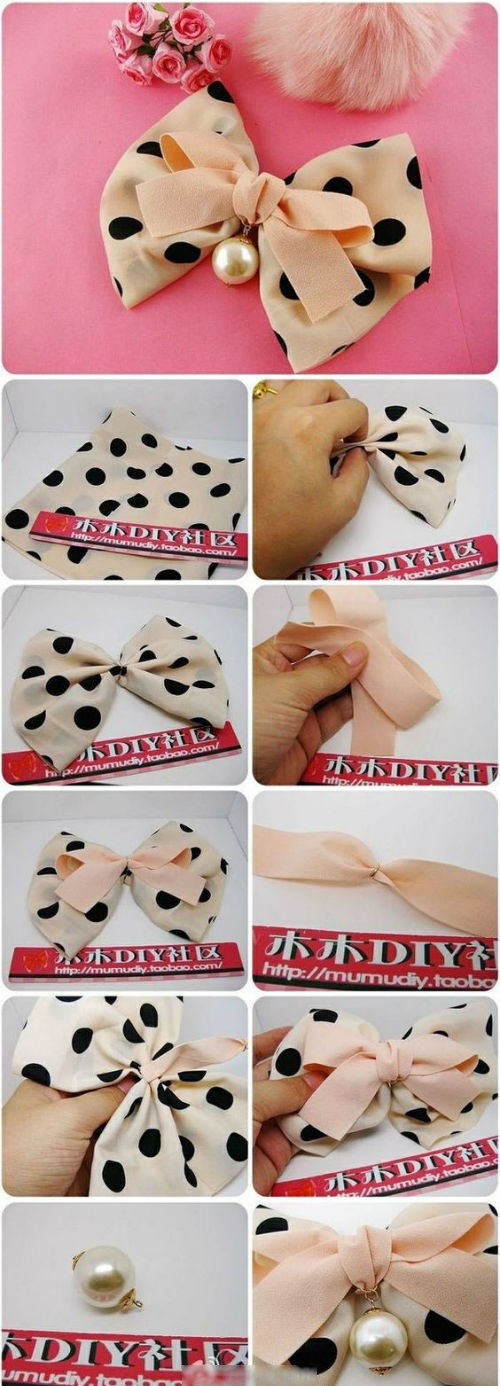
To make a two-color bow you will need:
- two multi-colored satin ribbons of different widths;
- thin patches of one of the selected colors;
- threads.
Implementation step by step:
- A three-layer base should be formed from a wide ribbon. To do this, select the diameter and evenly wind three turns of the ribbon, fasten the middle with a thread.
- Make the top bow from two layers, one on top of the other. Fasten the ends of the ribbons in the middle, and tie the two layers together.
- The finished product will consist of a three-layer base, a two-tier blank and two thin hanging strips.
- To form, place all the layers one on top of the other and tie tightly with a ribbon in the middle.
- The decoration can be attached to the hair using an invisible hairpin or a hairpin.
How to Make Hair Clips from Satin Ribbons
Step by step execution:
- Cut into 6.5 cm pieces. 1.1 m of black ribbon with light dots and 1.5 m of white ribbon with dark polka dots.
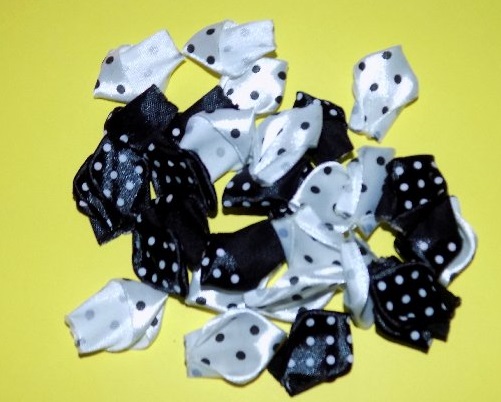
- For one inflorescence you need to create 8 black petals and 11 white ones.
- To form a leaf, bend the ribbon in the middle at an angle.
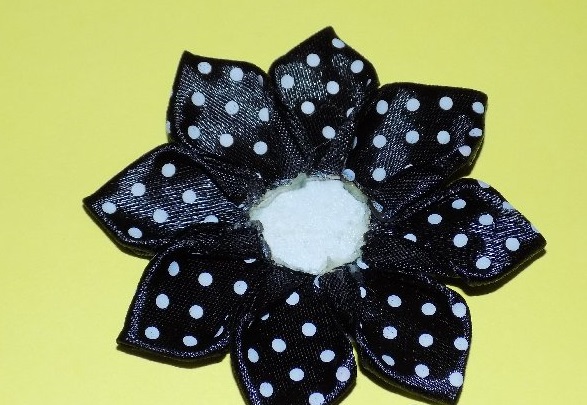
- Fold it again to get an even triangle.
- To fix it, singe the base of the petal with a lighter.
- Make a fold at the bottom of one end, then the second.
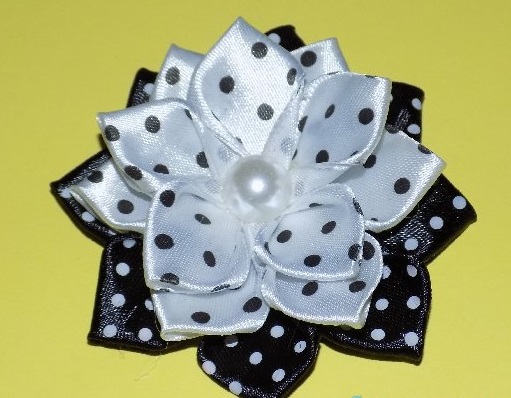
- There should be a lot of details.
- It is advisable to assemble the decoration on a felt circle.
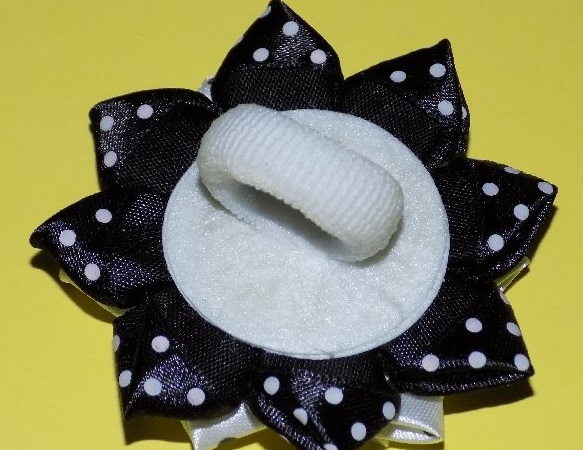
- The first tier is dark, the next two are light.
- Take another felt circle, make 2 cuts on it and attach the elastic using glue and a strip of fabric.
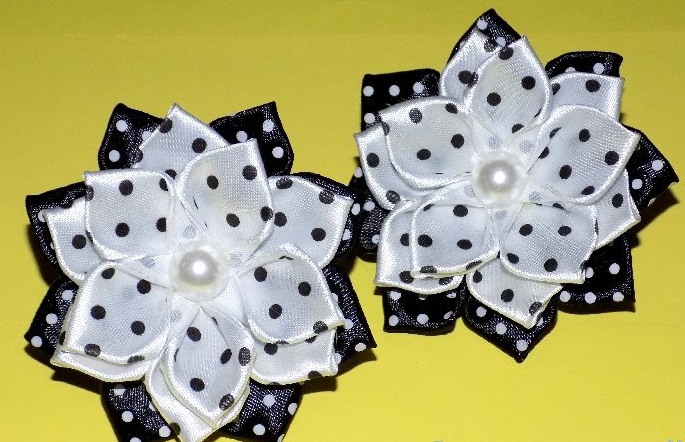
- Glue the base and the flower.
Leather hairpin: flowers
Leather flowers can be made in the same way as fabric flowers, by cutting out petals and treating their edges with flame. It is advisable to assemble leather leaves with a special needle with a triangular cross-section. When piercing the material, it will not cause the parts to break.
To make a leather rose, you need to divide a rectangular piece into two parts with a longitudinal wavy cut in the middle. Each of the created flaps is a ready-made pattern. The wavy edge needs to be treated with fire, which will increase its volume. Then roll the resulting pattern into a tight tube and fasten with invisible stitches from the side of the straight cut.
Flower from jeans
Step-by-step technology of denim flowers:
- Make a small flower out of paper and make similar templates on its base, each time increasing them by 0.3-0.5 cm.
- Cut out the blanks from the fabric using the patterns.
- Place the pieces one on top of the other, starting with the largest one. Mark the center with a button.
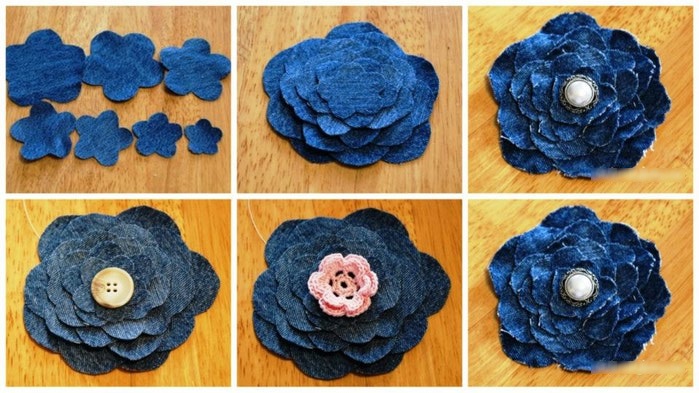
A hair clip made of jeans is very easy to make. It is recommended to decorate such hair clips with beads - Using a thick needle, stitch all layers at the same time.
- Decorate the middle as desired.
- Spray the product with a little water.
Hairpins with flowers made of foamiran
Hairpins are made with your own hands from foamiran, which can be seen in the example of making a rose:
- Cut out two templates of different sizes but the same petal configuration from cardboard.
- Using a toothpick, trace 5 large and 5 small pieces onto the foam using the templates and cut them out.
- Move each piece towards the iron and give it a waviness by pulling on the edge.
- Roll a circle out of foil, wrap one small leaf around it like a cone and attach it with glue.
- Create a bud from the remaining small pieces, and glue the larger ones on top, making wavy edges with an iron.
- Cut out 6 leaves from the original green material, place them against the iron and then glue them to the rose.
Hairpin Decor
The decorative component of the hairpin can be made from various materials:
- fabrics;
- feathers;
- wooden elements;
- skin;
- plastic;
- beads;
- buttons;
- stones;
- ribbons;
- cones;
- metal parts.
Centerpieces for jewelry made of beads, beads and rhinestones
To make the middle from beads, you need to drop a little glue in the center and sprinkle beads on top in an even layer, shake off the excess. Apply more adhesive to the created bead elevation and, if necessary, add more glass beads. Leave for a few minutes and level the shape with your hands or a toothpick.
For the middle of beads, you need to tighten 6 pieces of elements of the same size with a thread, and attach another one in the center. For the base, make a small felt circle and glue the prepared blank to it. Rhinestones can be sewn onto a round fabric base, or glued with glue.
Bead and wire decor
To make a feminine bead wreath you will need:
- satin braid;
- beads;
- wire of thick and thin diameter;
- scissors.
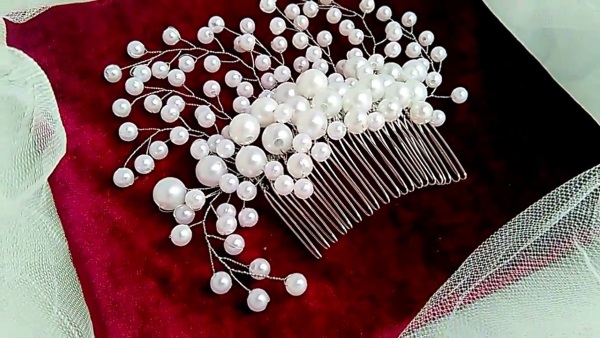
Work execution procedure:
- Place a glass bead on a thin metal cord up to the middle.
- Fold the wire in half and cut it so that its ends are 10 cm.
- Create several parts in a similar manner.
- From a thick metal product, form a ring equal in size to the diameter of the head and weave pre-prepared wire blanks around the resulting circle in the form of a wreath.
- To mask the gaps, wrap the wire with tape.
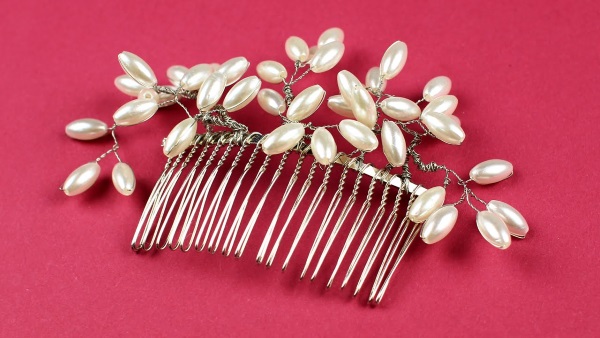
Using a similar technique, you can decorate any hairpin with beads. Hairpins and combs are good as a frame. Many people choose such elegant homemade decorations as wedding accessories.
Hairpins made by yourself are stylish decorations that will help to emphasize individuality and exclusivity. When making original decorations with your own hands, the main thing is not to be afraid to experiment and use a variety of ideas. Then the new thing will turn out unique and attractive.
Article formatting: Vladimir the Great
Video on the topic: DIY hairpins (kanzashi)
DIY Kanzashi:
DIY bow hair clip:
I make hairpins using polymer clay and satin fabric. The product gains weight, but it turns out very skillfully
I decorate any hairpin with decor. It can be a circle, and I decorate it with a rhinestone on top. I draw beautiful patterns. You can decorate with winter patterns, lines and dots. In the center I decorate with different details, I glue everything with a gun or glue.
Such hairpins can be varied due to different decorations, you can make several of them or as desired. Always make my loved ones happy)