Pattern for sewing It is not difficult to make women's shorts yourself. Beginning seamstresses need to know how to take measurements correctly, study the calculation formulas for creating drawings, and also consider several models of shorts.
Taking measurements to create a pattern for women's shorts
Sewing any piece of clothing begins with creating a pattern. To make a correct drawing for modeling women's shorts, you need to take measurements correctly.
You will need to measure:
- waist circumference;
- hip circumference in the buttocks area;
- circumference of one thigh;
- seat height.
It is important to decide on the length of the product and its fit in advance. If you plan to make low-rise shorts, you need to measure the length from the place where the belt will presumably be placed. In other cases, the length is measured from the side, from the waist to the knee or higher. The measurement is designated by the letters DI. Example: DI - 50 cm.
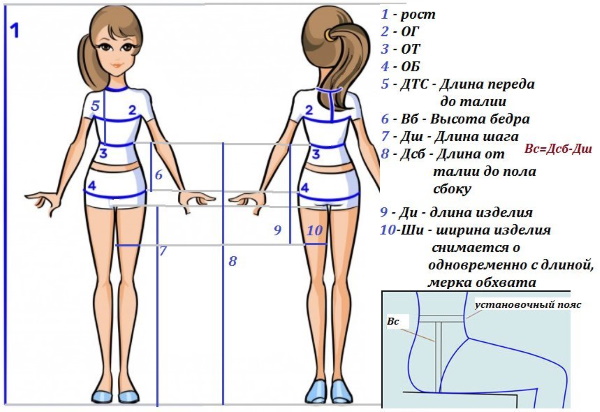
To measure your waist correctly, wrap a tape measure around your stomach, placing it 2-3 cm above your navel. Don't pull it too tight, as this will make the garment look small. Write down the result and use the abbreviation OT. Example: OT - 72 cm.
To measure the hip circumference, place the tape measure on the buttocks where they protrude the most. The values are written down approximately as follows: OB – 102 cm, and the half-girth is designated as POB. This is 102\2 = 51 cm. The circumference of one hip is the measurement of the leg in the groin area. The tape is wrapped around the same way as when measuring the waist. Write down: OB1 – 47.5 cm.
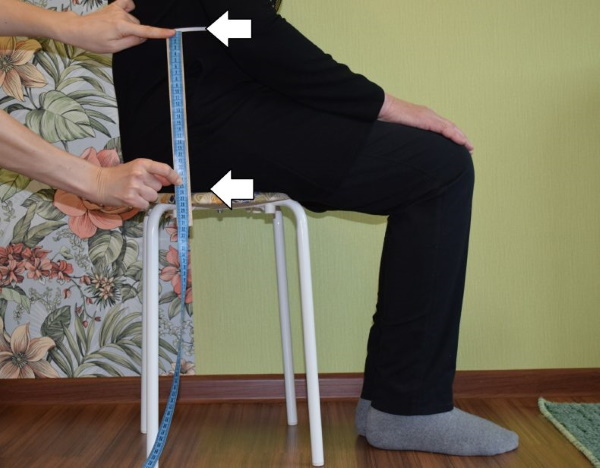
The seat height needs to be measured to cut the garment correctly. If you do not take this measurement, the finished shorts may be loose when standing, but very tight when the model bends over or sits on a chair. To take the measurement, you need to sit upright on a chair and apply the tape from the waist to the point where the buttocks touch the seat. The result is designated: BC - 34 cm.
The parameters above are approximate, you need to insert your own values. To make the measurements more accurate, after taking the waist measurements, you can attach a rope or a loose elastic band in place of the tape. This technique will help you take further measurements from one point.
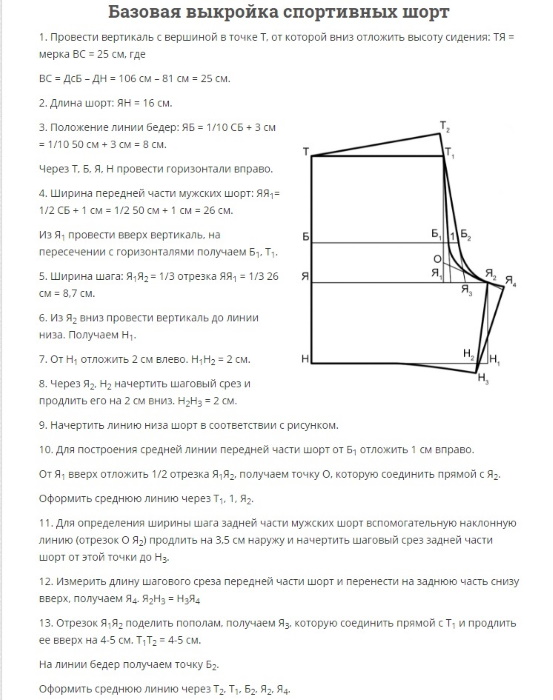
Step-by-step instructions for creating a basic pattern for elastic shorts for beginners
The pattern of women's shorts for beginners should be simple. The easiest sewing option is a model without pockets and with an elastic band.
This product consists of 3 main parts:
- front bar;
- back bar;
- belt.
Experienced seamstresses recommend creating a drawing on graph paper. Such a canvas has markings that allow you to draw straight lines without unnecessary measurements. To create a pattern, you can use simple but thick paper, such as Whatman paper, vinyl wallpaper or cardboard.
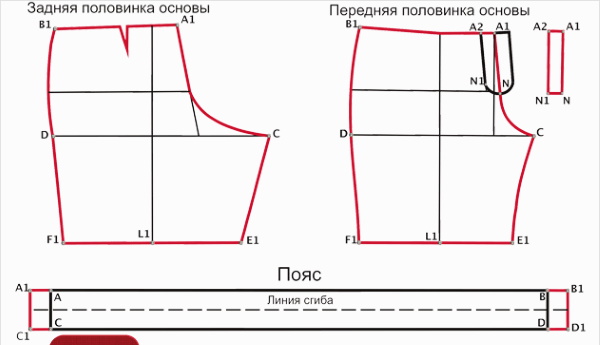
Front half of shorts
Step-by-step instructions for constructing a drawing:
- You need to draw a rectangle and label its corners with letters. As a result, the vertical sides will be called AB and A1B1, and the horizontal ones - AA1 and BB1.
- Sides AB and A1B1 should be equal to the length of the product. Above, for example, the values were indicated, where DI is 50 cm. This means that the vertical sides of the rectangle correspond to this length. You need to add about 3 cm for seam allowances. Total: the height of the figure is 53 cm.
- The horizontal sides AA1 and BB1 are the width of the shorts. The half-girth of the hips should be divided by 2. Example: POB 51 cm/2 = 25.5 cm. It is important not to forget about the allowances (+3 cm).
- Now you need to draw a line of the seam, which will be located on the inside of the leg, it is called the inseam. To calculate its location, you need to divide the POB by 2 and add 4 cm. Example: POB 51/2 + 4 = 25.5 cm.
- Now on side AB you need to put a point, measuring 40 cm from corner A and call it C. On side A1B1 you need to do the same, but the line should go beyond the rectangle.
- Now you need to find point C1, for this calculate 1/10 of the POB. Example: 51\10 = 5.1 cm. On the continuation of the inseam line behind side A1B1, you need to measure 5.1 cm and put point C1.
- From the intersection of the inseam line and side A1B1, you need to make a retreat equal to 1/10 POB = 5.1 cm. From the resulting point, you need to draw a line to C1, and from C1 to point B1.
- Now, from the top, from A1, you need to measure 1 cm and mark the resulting segment as point A2.
- A2 needs to be connected with a straight line to A, this is the new upper horizontal line of the pattern.
The figure needs to be outlined with a bright marker so that the outlines of the pattern are more clearly visible.
Back half
For beginners, for convenience, you can draw the back of the women's shorts over the front. At the end, the pattern should be outlined with a marker of a different color, and then transfer each detail to clean sheets.
Step-by-step instructions for constructing a drawing:
- The line from C1 must be continued, having previously calculated 1/10 of the POB. Example: 51\10 = 5.1 cm. This is how much must be extended from point C1. Designate the end of the segment as C3.
- From C3 you need to draw a perpendicular line 4 cm long and mark point C4.
- From B you need to retreat 1/10 POB and mark point B1.
- From point B1 you also need to draw a perpendicular of 4 cm to obtain point B3.
- From A1 measure 5 cm to the left and mark the end of the segment with point A3.
- Now from A3 measure 1/10 of the POB upwards and put point A4.
- You need to add 3.5 cm to the angle bisector, and from angle A, step back 3 cm to the left and draw a perpendicular line to the bottom.
- Connect all the dots.
All that remains is to transfer the drawing to different sheets, and then cut out the pieces. The front and back pieces need to be cut out in 2 pieces. It is important to note that the step and side lines of the patterns of both parts must match.
Belt
The pattern of women's shorts for beginners can be without a belt. It is enough to sew a wide elastic band on the inside. If you still plan to make drawstrings for the elastic, then you should take into account their width and draw patterns for the front and back wall shorter in length. If the width of the belt is 7 cm, then DI = 43 cm.
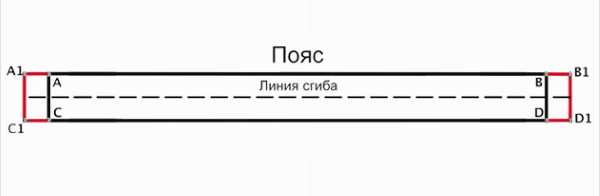
The drawing and pattern are quite simple. Draw a rectangle with sides OT 72 cm, and a tire x2 = 14 cm. Seam allowances on each side are 2 cm. The paper template is applied to the fabric and cut out. Only 1 copy is required.
Modeling
All that remains is to assemble the product.
Before you sew the seam, you need to pin the pieces together with tailor's needles so that the fabric doesn't slip:
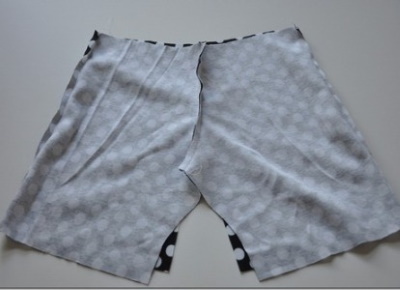
- First, you need to sew the front and back parts of the shorts separately. They are placed on top of each other and stitched along the sides. It is recommended to process the allowances on an overlock and iron them, folding them back.
- The next line is drawn along the step lines.
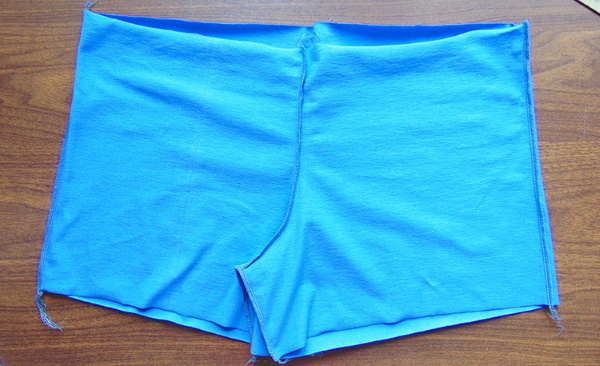
- Now you need to connect the 2 parts together. To do this, turn 1 leg inside out and put it into the other, placing them face to face. Match the step lines, then sew the cuts of the back and front strips.
- The trouser leg inserted inside is pulled out and the step line is ironed where it is rounded, bending it to the side. A machine stitch is started.
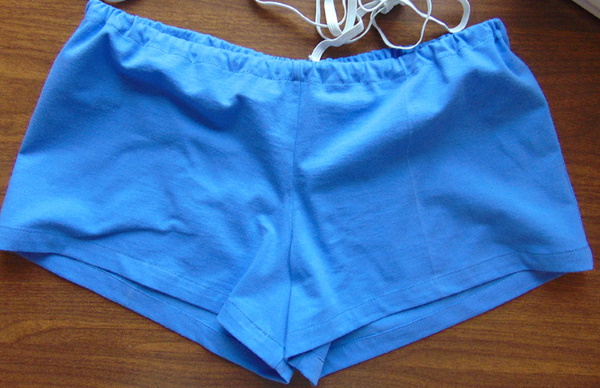
- It remains to sew the belt. The fabric band needs to be sewn into a ring, placing the joints with the right side facing each other. The belt needs to be sewn from the bottom only to the middle, as it should be folded in half. A small 1-1.5 cm joint needs to be made at the top, the rest should be left open.
- The belt is folded in half and then ironed to mark the fold line. The seam allowances also need to be ironed, after which the belt should be straightened again.
- The belt is sewn to the shorts with the right sides of the fabric facing each other.
- The seam allowance at the top is ironed inwards, the belt is folded and sewn on.
- Now you need to make drawstrings for the elastic bands. The belt needs to be divided into 3 equal parts and stitched in a circle. The elastic bands are passed through the place where the unstitched joint remains using a pin. The ends of the elastic bands are stitched.
To complete the work, you need to stitch the lower edges. They are folded by 1 cm, ironed inward and stitched in a circle.
Patterns of fashionable models of women's shorts
The pattern of women's shorts (for beginners, the description is presented further in the article) can be a little more complicated than the previous one. There are more than 20 different styles that you can try to sew yourself. For all the models presented below, you can take the pattern of simple shorts with an elastic band as a basis and slightly modify it.
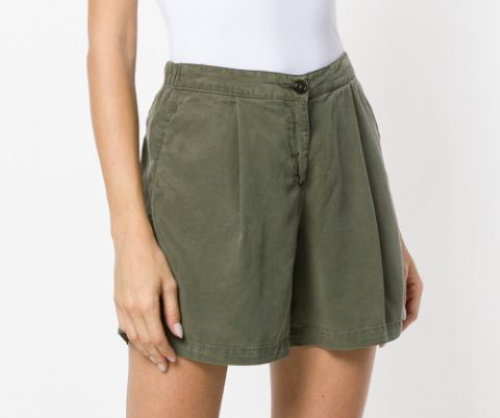
Short fitted shorts
The pattern of shorts with an elastic band needs to be transferred to the draft, then finished off:
- The length of the product must be shortened to the desired length.
- From the step seams of each part, measure 4 cm down and mark the points.
- From the new points, draw a line to the intersection of the side seam lines and the seat height.
- To ensure that the shorts fit well on the buttocks, you need to mark the 2 cm wide darts. They are placed from the bottom to the intersection of the seat height and the hip line.
The bottom is slightly adjusted, then the shorts are assembled according to the classic pattern. You can add patch pockets at the back.
Pajama shorts without side seam
You can work with a copy of the pattern of shorts with elastic. The only thing you need to change is to add another 2 cm for seam allowances, because sleepwear should be looser than everyday wear.
It is also important to insert a wide elastic band. For pajama shorts, it is not advisable to sew it on the inside; it is better to make 1 wide drawstring in the waistband. The elastic band should be made loose. If the waist is 72 cm, then 65-68 cm of tape will be required, depending on its elastic properties.
Skirt-shorts
To create a pattern for this style, you can use the same pattern, but it is more convenient to use the drawing of a basic straight skirt as a basis.
Instructions:
- From the center lines in the front and back, in the waist area, you need to measure the height of the seat with an addition of 2 cm. Mark these places with dots.
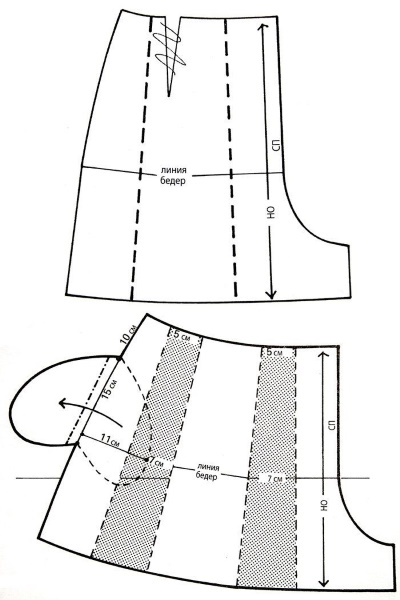
- From these points, you need to draw the lines of the length of the seat perpendicular to the middle ones, indicating the panels of the skirt.
- To calculate the beginning of the step line, you need to move 1/10 of the POB to the left from the middle of the back half of the pattern along the seat line and add 2 cm.
- To mark the top of the step line on the front pattern, you need to repeat the steps from the previous step.
- From these points, you need to draw vertical lines of 7 cm in front and back.
- Below the points of the crotch seams, lines are drawn indicating the bottom of the shorts skirt.
- To make the product wider, you should cut the pattern pieces along the line in the middle at the back and front, from the bottom to the darts on the waistband located on the sides.
- The darts at the front need to be reduced by 2 cm to make the width of the front part a little narrower.
The pattern is transferred onto the fabric, and later all the parts are sewn together.
Fluffy skirt-shorts
The drawing from the previous description is suitable for constructing the pattern.
It remains to make some minor improvements:
- The darts need to be removed from the drawing and replaced with assembly lines.
- The width of the product must be increased in accordance with the number of folds and their length.
- The back and front of the full skirt should look almost identical.
- The width of the belt is reduced to 5 cm. You only need to make 1 wide drawstring for the elastic.
The more folds there are on the fabric, the more voluminous the product will be. Visually, it will be difficult to distinguish such shorts from a simple skirt.
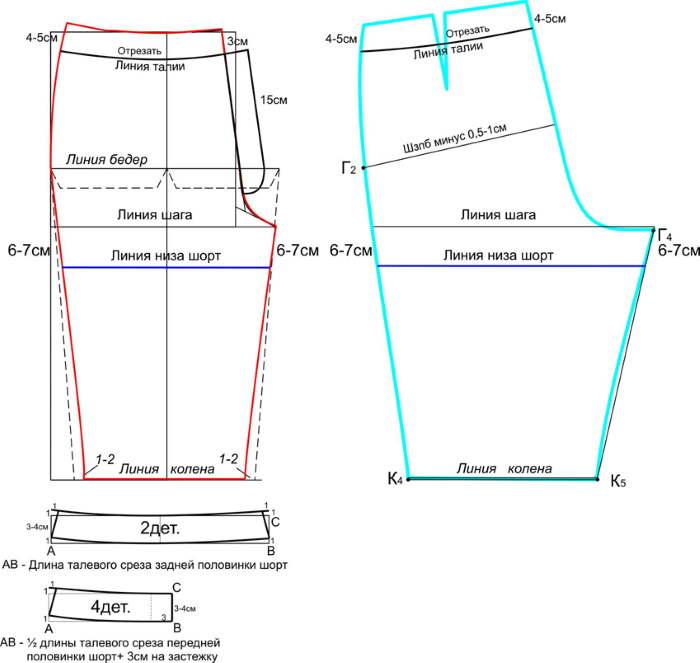
Straight model with pleats at the front
This pattern involves a few more changes to a simple pattern:
- The length of the product should be increased to the knee with an allowance of 4 cm for the cuffs.
- It is necessary to prepare pocket patterns on both sides. They will be located in the side seams. It is important that the depth of the pockets is 2 cm more than the length and width of the arm.
- Under the belt you need to make several folds, this must be taken into account when drawing the rectangle of the pattern in width.
The belt in the straight model is not elastic. It has a clasp, as well as loops for fixing the strap. Its width should be 3 cm when folded.
Short shorts with side slits
To make the pattern for this item, you need to take the drawing of short fitted shorts as a basis. To add vents, you need to step back from the bottom along the side seam in the front and back by 6 cm up. Along the bottom edges of the shorts, you need to put aside 1 cm up to get the width of 1 vent equal to 2 cm. The belt in such a product should be non-elastic, as in a straight model with pleats. The width of the belt is 4-5 cm.
Trousers-shorts
In this version, the belt also remains on the fastener. A zipper needs to be sewn in the front. 4-5 loops need to be attached to the belt to secure the belt. The shape of the shorts remains unchanged, you just need to add length so that the leg ends in the middle of the knee.
The folds need to be made slightly wider than 3-4 cm. On the sides, you need to sew on internal pockets, and pentagonal ones on the back. In order for the products to be beautiful and look good, you need to choose the right fabric.
The table contains suitable options:
| Model | Textile |
| Short tight model | Jeans, knitwear |
| Pajama shorts with elastic | Cotton, satin, jersey |
| The short skirt is simple and fluffy | Staple, cotton, satin |
| Straight model with pleats | Twill, denim, shirting fabric |
| Trousers-shorts | Linen, viscose, chambray |
For beginners, constructing a pattern for women's shorts may seem difficult. To begin with, you can practice by creating small samples. This method will help you identify the most difficult places and find a solution. Then, when sewing shorts in natural scale, it will be easier to correct mistakes.
Video about sewing women's shorts
Pattern of short women's shorts:
"Now you need to draw a line for the seam that will be located on the inside of the leg, it is called the inseam. To calculate its location, you need to divide the POB by 2 and add 4 cm. Example: POB 51/2 + 4 = 25.5 cm."
Isn't it 29.5 cm?
“Now on side AB you need to put a point, measuring 40 cm from corner A and call it C. On side A1B1 you need to do the same, but the line should go beyond the rectangle.”
Where did 40 cm come from?
Everything is terribly unclear, where does 40 cm come from???
What a horror, what is this? I wanted to make a pattern for shorts, where did 40 cm come from, and what is this? I don't rate it at all.