Crochet mittens usually have simple patterns and descriptions, so they are popular among needlewomen, especially those with little experience in knitting.
Choosing yarn for knitting mittens
When choosing yarn for mittens, you need to make sure that it is not only beautiful, but also warm.If the mittens will be worn by a child, then hypoallergenic threads should be preferred., which will not get wet quickly and will be able to retain heat longer.
For men, a coarse thread of rustic shades is traditionally used. If a man spends a lot of time outdoors, then it is better to make double mittens with a lining of fleece or other "warm" fabric.
Women's mittens are distinguished by a variety of colors and patterns, so the thread is chosen so that the pattern is clearly visible on it. And for warmth, you can knit mittens in 2 threads, one of which will be downy.
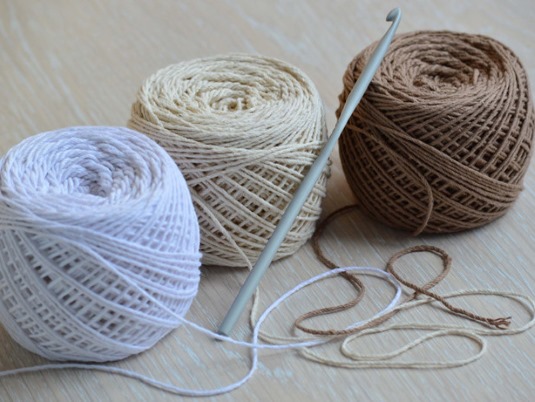
The ideal winter yarn is wool. It can be sheep wool. Its disadvantage is that it is prickly, but after several washes the product becomes quite soft. Goat wool or down is also suitable, but the thread of such yarn is usually thin, so the product from it should be knitted in several threads or used in pairs with other yarn.
Yarn with a high acrylic content is not expensive, but it does not retain heat well enough and gets wet quickly. If you knit mittens from such threads, they need to be additionally insulated with a lining, especially if they will be worn by children.
Yarn for very young children should be chosen especially carefully. It should not cause or provoke the development of allergies.
The following yarn composition is suitable:
| Alpaca | Ideal for small children. Hypoallergenic and retains heat well. |
| Merino | In rare cases, it can cause allergies, but it is still recommended for children's products. To reduce the risk of allergic reactions, acrylic can be added to wool. However, the artificial additive will lead to heat loss. |
In terms of use, acrylic mittens are the easiest to care for. They will not be damaged by moths during storage, are easy to wash, and do not form pellets. Alpaca mittens are also durable and do not lose their presentable appearance for a long time, but they should be washed by hand or on gentle modes of the washing machine.
It is not recommended to use yarn containing angora. It rolls up quickly, losing its appearance and thermal qualities. For active children aged 2 years and older, it is better to choose a mixture of wool and acrylic. This will allow you to wash the mittens more often with the possibility of drying them on a radiator. And you can additionally insulate them by making them double with an internal fleece or knitted part.
Calculating the amount of yarn by hook number
When starting knitting, it is important to correctly calculate the consumables. Otherwise, at best, there will be unused balls of yarn left over; at worst, there may not be enough thread for the item.
The hook size is usually indicated on the product and is indicated in millimeters. However, there are products where the marking is not indicated, in addition, the numbers on foreign-made hooks may not correspond to Russian ones.
The hook size is the diameter of the hook head, which can be measured with a caliper. Another way to determine the size is to puncture a piece of paper with the hook and measure the width of the resulting hole with a ruler.
When choosing a hook for a specific yarn, you need to make sure that the size matches or is close to the thickness of the thread. You can check this by placing the thread directly into the hook. The thickness of the thread should not protrude beyond the boundaries of the bent part, but it should not be too loose in the recess.
A mismatch between the hook and the yarn will result in a knitted item that is either loose or very dense. The recommended hook size is usually indicated on the packaged skein of yarn.
You can use it as a guide, but it is always better to knit a sample. Depending on the cost and structure of the yarn, sometimes you need to buy 1 skein to correctly calculate the volume required to make the item.
Calculation of thread by sample:
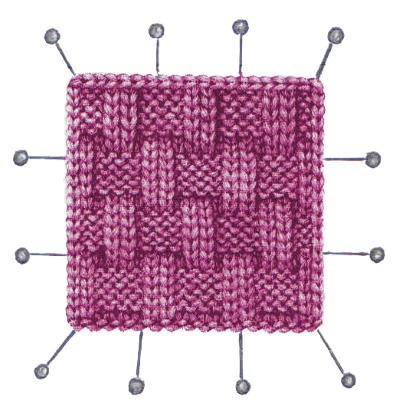
- knit a 10cm x 10cm sample using the main pattern,
- wash to determine shrinkage,
- count the number of rows and loops in each row,
- unravel the sample and measure the length of the resulting thread,
- Using the pattern of the desired product, you should calculate how many similar samples will fit on it.
By multiplying the number of required squares by the calculation data, you should determine the exact number of rows, loops in a row, and the footage of the threads. The footage of the thread and the weight of the skein are always marked on the purchased skein. Accordingly, having the calculation of the length of the threads, you can determine the number of skeins. It is recommended to buy 50-100 g more threads, in case of shrinkage of the yarn.
In addition, the thread consumption will depend on the pattern. Braid patterns always require more yarn, while openwork patterns can be used to save money. Also, an incorrectly sized hook can unjustifiably increase yarn consumption.
Preparation for knitting
Crochet mittens, the patterns and descriptions of which are given in magazines and on the Internet, complicate the choice of the craftswoman with their diversity.
Sizing
An easy way to determine the size and make a pattern for mittens is to trace your palm on paper, keeping your fingers relaxed., slightly separated from each other.
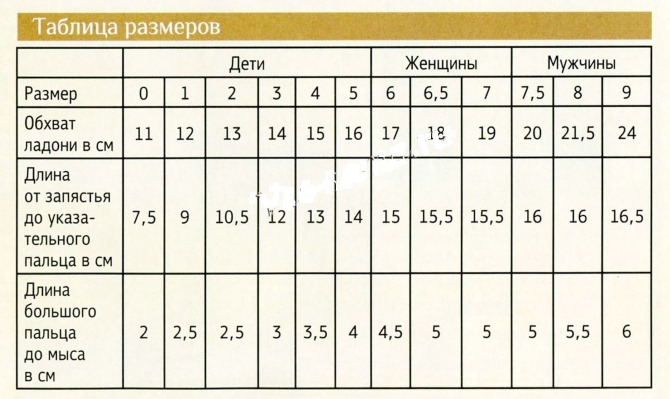
When choosing a size, you need to make sure that the elastic fits tightly to the wrist, but does not press; the fingers inside should be free, but not too spacious. You can also use the average data from the table if you cannot measure your hand.
Selecting a pattern
Since mittens are crocheted simply and quickly, the craftswoman can knit several items for different looks. Mittens with "braids" are always in fashion.

Beginners in crocheting can use crochet with or without double crochet. If the appearance of such a product seems too simple, it can be “complicated” by using stripes of yarn of a different color.
Mittens are an accessory that can be used to make use of leftover threads, which knitting enthusiasts usually have in abundance.
Crochet mittens, the patterns and descriptions of which are offered by the authors, can be designed for different seasons. The colder the season, the denser the fabric should be. Openwork patterns can only be used for products for warm autumn.
Knitting density
The density of knitting is affected by:
- selected pattern,
- the ratio of the hook number to the thickness of the thread,
- the thread tension is adjusted by the craftswoman, which is individual for everyone.
Experimenting with each of these criteria, you can achieve the desired density of the product - make it warmer or less. For example, classic single crochet will make the item warmer than a piece made with a double crochet. The thinner the thread relative to the hook, the more gaps there will be between the loops.
Crochet Mittens for Little Kids: A Simple Master Class for Beginners
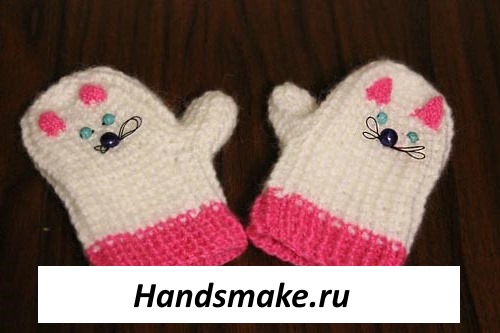
Mittens decorated with kittens are suitable for children from 2 to 4 years old.In addition to standard air loops, double and single crochets, relief columns are used in the work. This type of columns gives greater thickness and density.
Thus, knitted mittens will not only retain heat better, but will also be able to stay dry longer, which is important for small children. To prevent the increased density of the product from leading to excessive rigidity, you need to use soft yarn.
Relief stitches can be front or back:
- Facial.
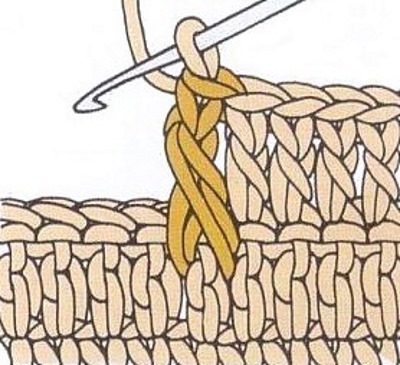
The relief column of the front is made in the same way as the usual column with a yarn over, but the hook should be inserted not into the loop of the previous row, but behind the column. Having grabbed the thread, it should be pulled out with a hook and then knitted as a dc.
- Purl.
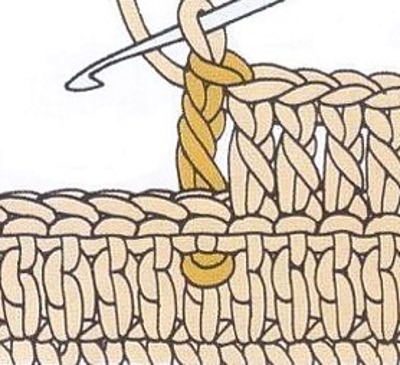
The purl stitch should be knitted by inserting the hook from the wrong side of the stitch in the bottom row.
For mittens you will need:
- hook No. 1-1.5,
- yarn with angora, the desired colors.
- 4 medium-sized beads for making eyes (color of your choice from green to black),
- 2 larger beads for the nose (can be replaced with buttons),
- needle,
- black thread, regular sewing thread or floss.
Mitten
To begin, you need to dial 4 ch and close them into a ring:
- 1 row: you need to tie the air loops so that you get 11 dc.
- 2-3 rows: 2 ch for lifting, then in each loop of the row, one by one, you need to knit first a dc and in it a relief column with the front grip of the lower column. Total - 48 sts.
- Rows 4-18: 2 ch for lifting, then alternate relief columns (1 front and 1 back). Total – 48 sts.
- On row 19, you need to make a hole for the thumb piece.
- Row 19: 2 ch for lifting, sc, chain of 11 ch, sc in the 12th loop, finish the row by alternating front and back relief columns.
When knitting the second mitten, remember that the finger hole should be placed symmetrically, i.e. not at the beginning, but at the end of the row.Next, continue knitting the mitten in the same way as rows 4-18 and apply it to the child’s palm, achieving the desired length.
Rubber
For the elastic, it is advisable to take yarn of a contrasting color and knit 5 rows with the same pattern as the palm (1 front relief column, 1 out relief column).
The final row should consist of half-columns only.
Thumb binding
When knitting the finger part, you should start working from the wrong side.In the first row, on one edge of the hole, you need to make 2 ch, 2 incomplete dc and knit the resulting loops together. Knit the same way on the other edge, the rest of the row is knitted with the main pattern.
To determine the length of the finger piece, it is recommended to place it on the hand of the future owner while working. If this is not possible, then you need to knit 8 rows with the main pattern, then pull all the loops together by knitting double crochets. The thread should be cut, leaving a tip long enough to secure it on the back side.

Next, the mittens need to be decorated. For the ears, you need to knit 4 triangles. There will be 5 loops at the base, 3 in the next row and then 1 loop. Having applied 2 parts to each other, they should be sewn and carefully sewn to the mitten by the base.
In place of the eyes, you need to sew on beads. Then make whiskers with black threads, securing the elongated loops, and sew the cat's nose on top.
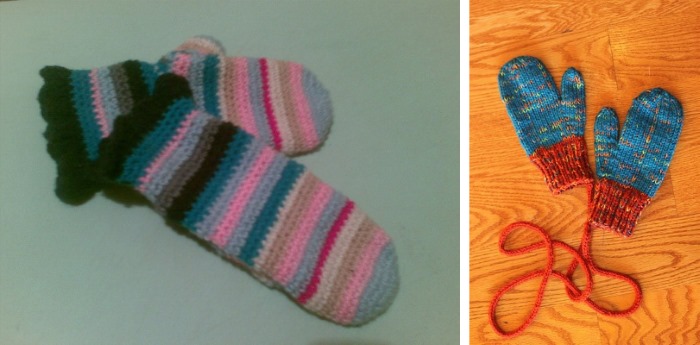
Crochet Scratches for Newborns: Instructions
It is difficult to overestimate the value of scratching mittens for newborns. As a result of chaotic hand movements that babies make, they can injure themselves. At best, they will get scared, at worst, an infection can occur in the immature organism. Therefore, scratching mittens are a must. Crochet mittens (patterns and descriptions are simple and accessible to beginners) for newborns are knitted in one evening.
To work you will need:
- threads - cotton of contrasting colors,
- hook – No. 2,
- satin ribbon, thickness 5 mm.
Stages of work:
- It is necessary to make an amigurumi ring. For this you will need pink cotton.
Step back 2.5 cm from the end of the thread and make a ring-loop. Pass the working end of the thread between the index and middle fingers, insert the hook into the loop and pull the thread forward.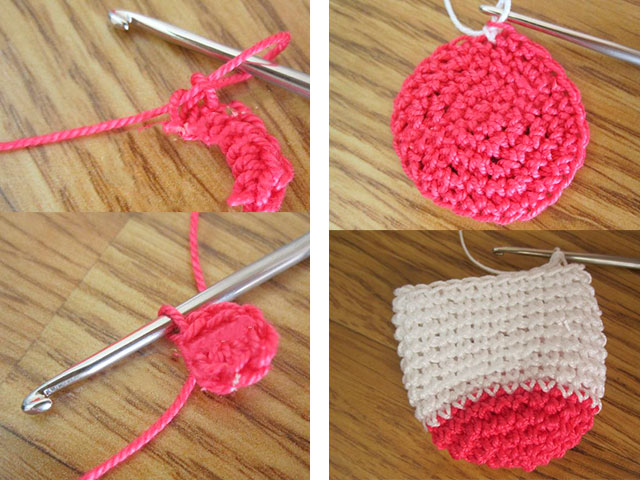
Next, you should crochet the working thread through the resulting loop. The resulting loop is not taken into account in the calculation. Next, on the large ring, you need to tie 6 single crochet stitches and, pulling the end of the thread, tighten the ring.
The amigurumi technology is used here to make the hole, which always forms at the place where the knitting begins, as invisible as possible.
- In the first row, on each loop you should make an increase of 1 sc. In total there will be 12 loops.
- Row 2: *sc, inc* (6 times). Total 18 sts.
- Row 3: *2 sc, increase* (6 times). Total 24 sts.
Then continue knitting with white thread.
- 4-12 p.: 24 p.
- In row 13 you need to switch to the pink thread again and knit 24 sts.
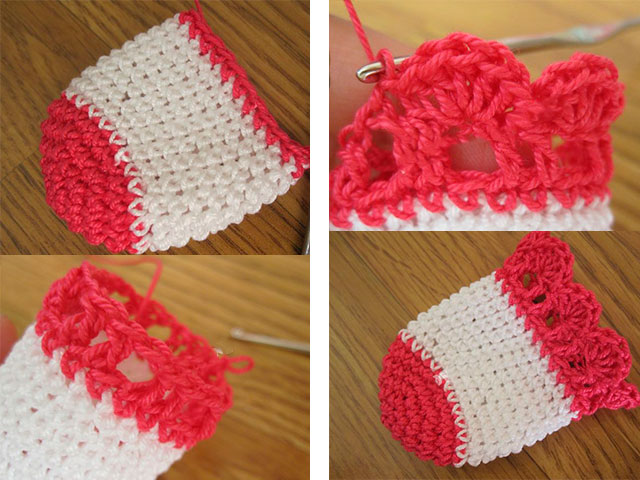
- 14th row: 2 lifting loops, dc, ch through 1 loop of the previous row 1 sc. Until the end of the row, knit according to the pattern *2 dc, ch*. The row ends with a sl st.
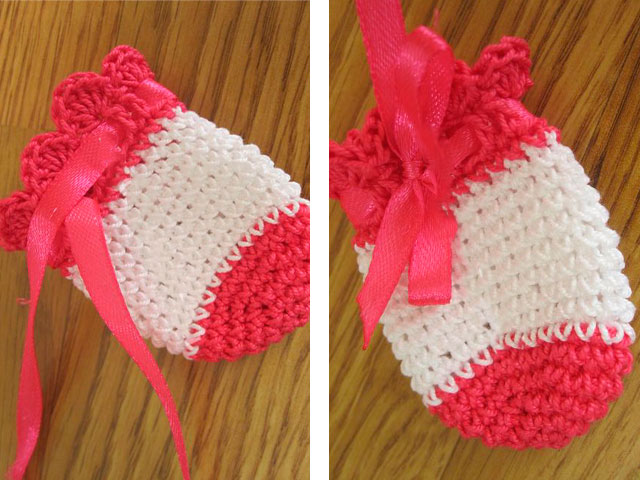
- Row 15 is the final row, it should be knitted with a shell pattern according to the scheme *in the second loop from the hook 5dc, sc*. The pattern should be repeated along the entire row. Next, the thread should be cut and secured. By analogy, you should knit a mitten for the second hand. You need to thread a ribbon through the resulting holes of the 14th row and tie a bow.
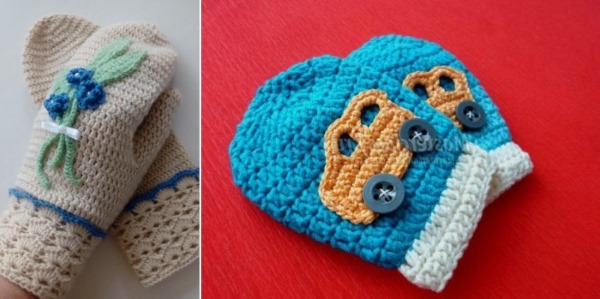
Crochet mittens for a boy step by step
Mittens made with a crochet hook, with patterns and descriptions suitable for boys, differ little in the technique of execution from mittens for girls.
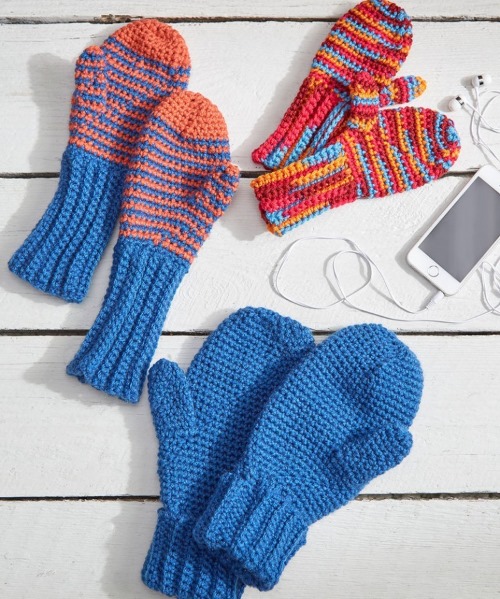
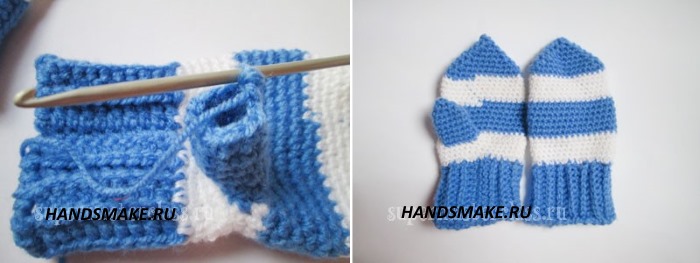
Nowadays, manufacturers of children's clothes make bright, multi-colored clothes for boys, so accessories can be not only traditional male colors: black, gray, dark blue. The pattern of striped white and blue mittens is designed for boys aged 4-6 years.
Materials for work:
- yarn - 2 colors,
- hook No. 2-3.
Stages of work:
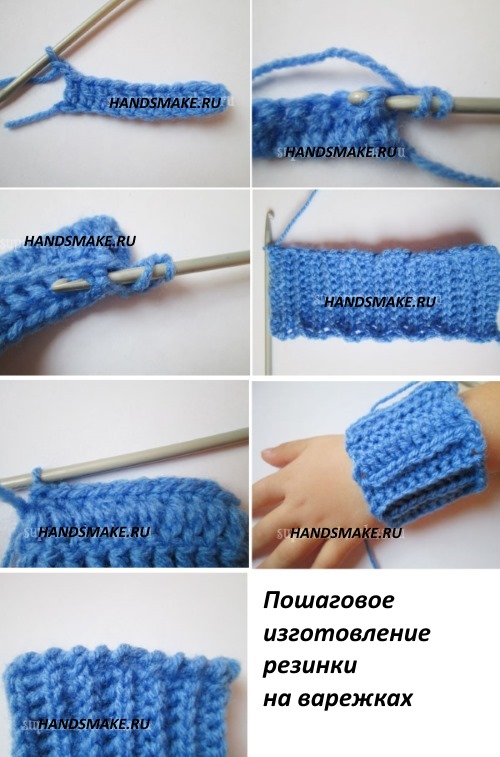
1. Elastic band.
It is necessary to dial 12 air sts in a chain, two of which will be used for lifting. Next, you need to make 10 dc and 2 air sts for lifting. The cuff should be knitted with a rectangular cloth. Therefore, after each row, the knitting should be turned.
The next row is also made with dc, but you should pay attention to the type of knitting of the columns. The loop of the previous row should be captured for the front wall of the loop. Then you should turn the knitting and knit dc with a capture for the back wall of the loop of the lower row.
The elastic band should consist of 14 rows, each of which will alternate the grip when performing the dc. When the elastic band is finished, it must be folded in half and “sewn” along the edge from the wrong side using single crochets, cut the thread and secure. Decorate the edge of the product with a “crayfish step” binding.
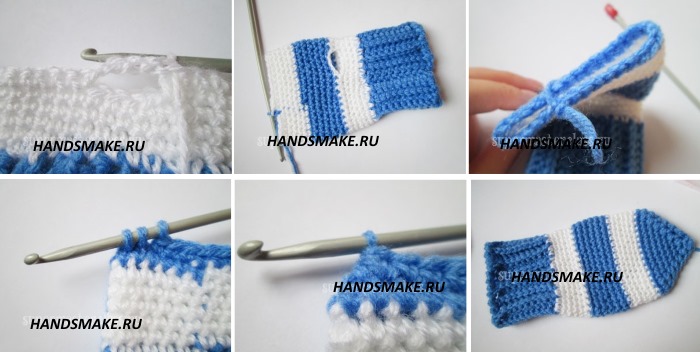
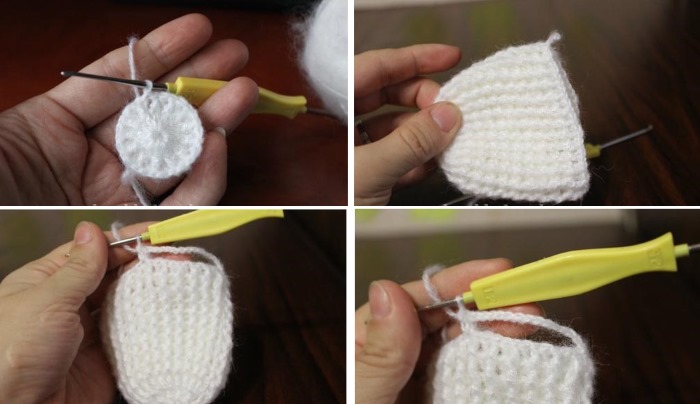
2. Mitten detail.
The mitten itself should be started knitting with white yarn. The edge of the elastic should be tied with sc so that there are 32 of them. The work should be continued with sc. It is necessary to knit 4 circular rows.
On the 5th row, you need to leave a slit for the future detail of the thumb. To do this, the 5th row is filled with sc to the place where the thumb should be. After this, the knitting is turned around and with the help of 1 ch. p. for lifting, it continues in the opposite direction to the place of the second end of the slit for the thumb.
According to the diagram, the slit corresponds to 4 loops, but depending on the size of the child's hand, it can be increased. Having reached the second end of the slit, it is necessary to knit 4 ch. p. and secure them on the other side of the hole.
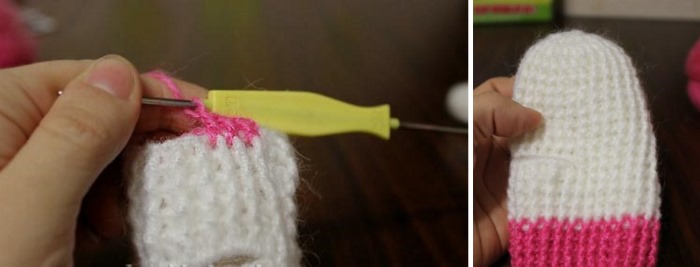
Continue working with blue yarn and sc. You need to make 6 rows. Then change the thread back to white and do 6 more rows. The last stripe in the mitten will be blue. After the white stripe, you need to switch to blue thread and do 1 row similarly to the previous ones.
Next, you should start decreasing the loops. The decrease is carried out by 2 loops in each row and only in the places where the mittens bend, until the fabric is completely closed. You should get a pattern similar to knitting mittens with knitting needles.
3. Thumb.
The slit left for the finger should be tied with 12 sc. And make 7 more rows with such columns. In the next 2 rows, you need to decrease every 2nd loop. After that, the remaining loops should be closed once, the thread should be cut and secured. The second mitten should be knitted similarly to the first, taking into account the mirror position of the thumb and color transitions.
Crochet mittens for a girl
Crochet mittens, the patterns and descriptions of which are suitable for older children, require more practicality and should have firmly fixed parts. Satin ribbons and felt and ruffle appliques are not suitable for such products. Mittens, knitted for a girl aged 6-8 years.
To work you will need:
- yarn of 3 colors - purple, peach and raspberry,
- hook #2-3,
- needle.
Stages of work:
1. Elastic band.
You should start by knitting 40 air loops. Then the chain should be closed into a ring.
1 row: 3 ch, *step back 3 loops of the chain into the 4th you should knit a connecting column, step back the next 3 loops you need to knit 5 dc*. Repeat the pattern to the end of the row, except for the last loop, where instead of 5 dc, you need to make 4 dc, which are connected into a chain of ch from the beginning of the row.
Row 2: Changing the thread color to peach, you should make 3 ch with a slip stitch, which will fall in the middle of the fan of the previous row. The main pattern must be repeated in such a way that 5 dc fall in the space between the raspberry fans, and the slip stitch is located above the 3 dc of the lower row.
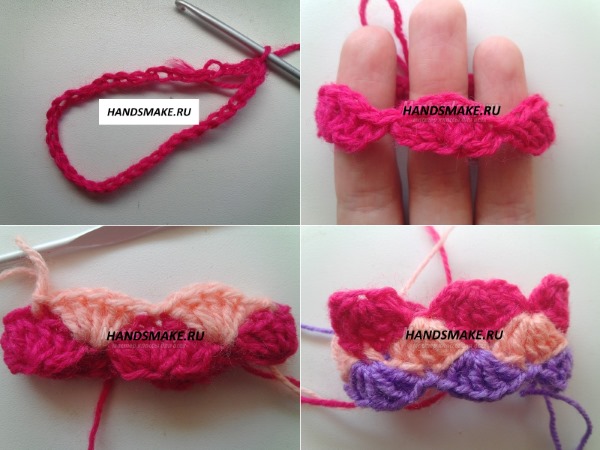
Row 3: Use purple thread for knitting. Knit in the same way and make sure that the fan pattern is staggered. From rows 4 to 6, repeat the previous 3 rows.
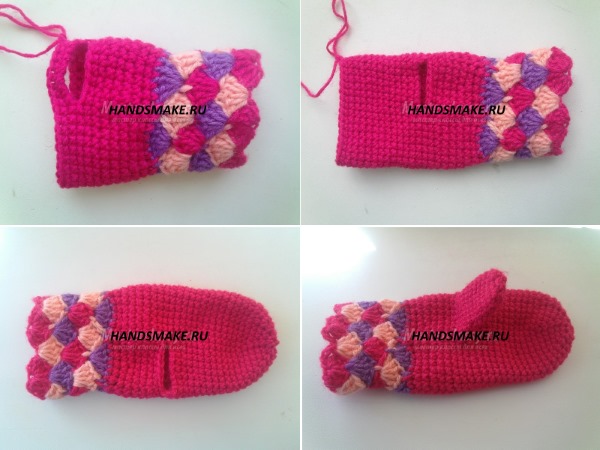
2. Mitten.
The main part of the mitten should be in raspberry color. From the elastic band it is necessary to knit 10 rows of sc. In the next row it is necessary to leave a slit for the thumb. For this, a chain consisting of 9 air loops is knitted, which should be knitted with the help of sc, skipping 9 loops of the previous row.
Continue working with the main pattern for another 13 rows. From the 14th row, you need to decrease the loops. If it is possible to try on a mitten for a child, then the reference point for starting the decrease will be the place of the first phalanx of the middle finger - where the finger bends. After the first row with uniform decrease, 30 sts should remain in the row.
In the next row, decrease in every 5th loop. In the remaining rows, in every 4th, 3rd, 2nd loop respectively. In the last row, decrease in every loop, then fasten and cut the thread.
3. Thumb.
The finger should be knitted in a circle, the hole left in the mitten, with single crochets. You need to knit 10 rows or a length corresponding to the distance from the base of the thumb to the middle of the nail. Finish knitting the finger by decreasing in each loop, then fasten and cut the thread.
4. Bow.
To make a bow, you need to knit a chain of air loops using three colors of thread at the same time. From the resulting chain, you need to form an even bow and firmly sew it to the mitten.
How to decorate mittens: ideas, description
The options for decorating mittens can only be limited by the imagination and skills of the needlewoman.
For example, you can do:
- Cross stitch of a simple pattern.
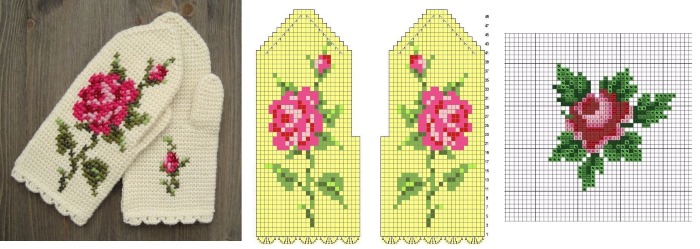
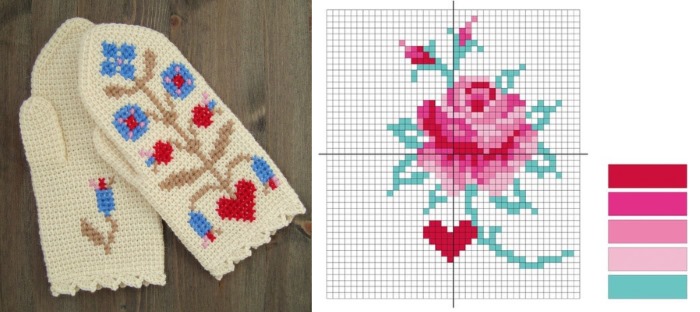
- Embroidery can also be done with satin stitch, ribbons, beads or pearls.
Any handicraft accessories will do for decoration. For example, pompoms or buttons.
- Applique with other knitted details.
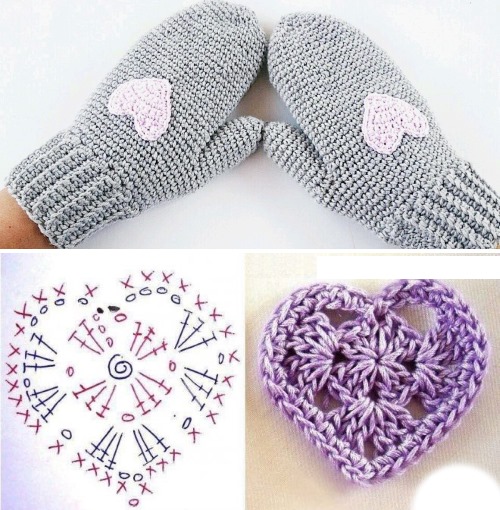
- Heart applique.
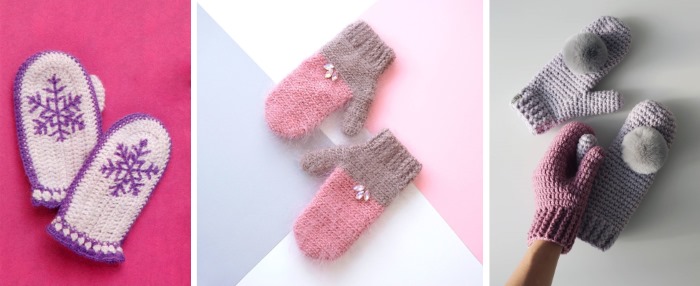
Openwork children's mittens
Mittens with openwork patterns can be knitted for children for the off-season. Acrylic, cotton, and viscose are suitable for such products.
The simplicity of making crocheted mittens allows you to make several pairs, spending very little time on the work. Thanks to the patterns and descriptions available on the Internet, each pair can become an original accessory for any clothing.
Author: Vorobyova Nadezhda
Article formatting:Natalie Podolskaya
Video about knitting openwork mittens
Crochet mittens - diagrams and description in this master class: