Drawing a person is not an easy task even for an experienced artist. There are various tutorials that can make this kind of work much easier. They explain in detail the features of the human figure and how to draw it.
Proportions of the human figure
In order for a drawn human figure to correspond to the real proportions of a person, it is necessary to observe the ratio of its individual parts to each other. Over many years of practice, artists have created a method for drawing a human figure, according to which The human body is divided into 8 parts:
- Head (from the top to the chin).
- Upper chest (from the bottom of the head to the nipples).
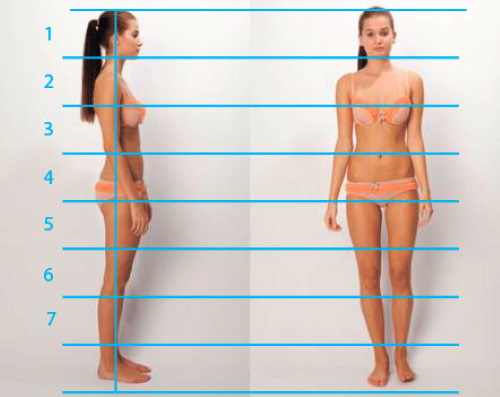
- Lower part of the chest (from the nipples to the navel).
- Pelvic part of the body (from the navel to the beginning of the hips).
- The thigh part of the leg (from the beginning of the thighs to their middle).
- Knee (from the middle of the thigh to the beginning of the calf muscles).
- Shin (from the beginning of the calf muscles to the top of the foot).
- Foot.
If we consider a person in full growth, then when depicting him on paper, each of these 8 parts should have the same height. It turns out that the head is a standard unit of measurement for the rest of the drawing. Such proportionality is used in the standard drawing model.
Tutorials on drawing a person describe in detail the methods for determining the proportions of the human figure of different body types, including non-standard sizes.
For figures of model or heroic build, the height of the drawing will accommodate more than 8 heads. For model type, the height should be 8.5 heads, and for heroic build - 9 heads.
In addition to the height of individual parts of the drawing, there are a number of other equally important ones. proportions that must be observed when creating an image:
- the width of the shoulders should correspond to 2.3 times the height of the head;
- the width of the waist should correspond to the height of the head;
- the hips should be wider than the waist and narrower than the shoulders;
- elbows should be level with the center of the abdomen;
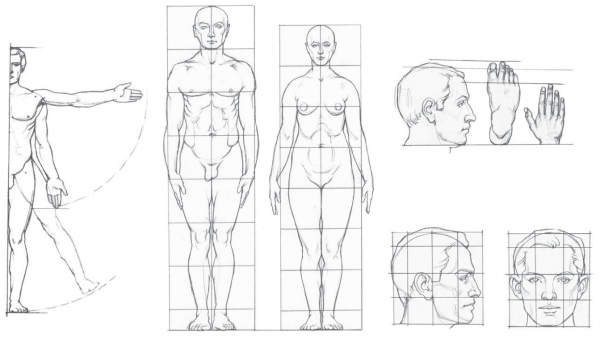
- the length of the arm from the elbow to the end of the hand should be equal to the length of the leg from the knee joint to the bottom of the foot;
- The transition from the neck to the shoulders should be trapezoidal.
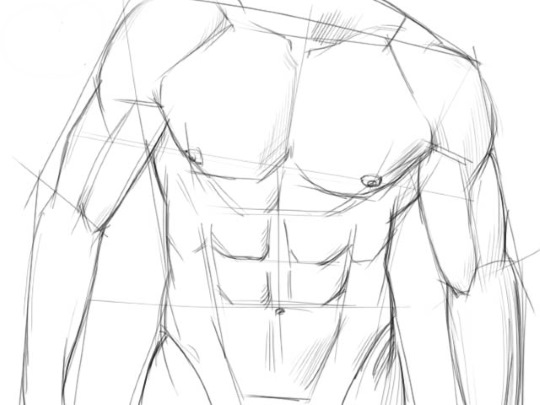
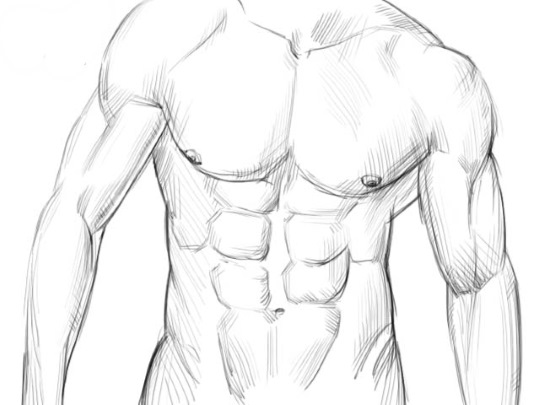
In addition to proportions, one should also take into account the peculiarities of the muscular structure of the human body.
Anatomical differences between male and female figures
In the process of drawing a person, it is necessary to take into account some differences that are inherent in men and women:
- Women have a more rounded body shape than men;
- The shoulder width and muscle size of men are much larger than those of women;
- the shape of the outline of the male torso has a more angular and trapezoidal shape;
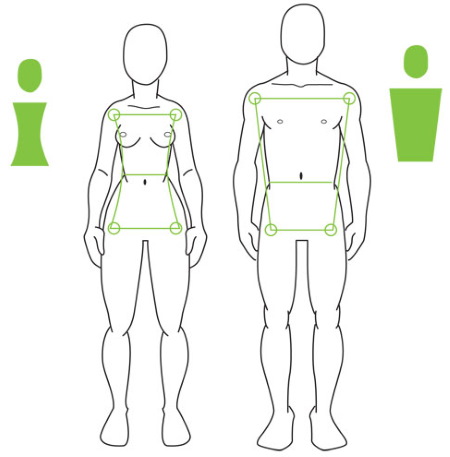
- the female waist is narrower and its transition to the hips is smoother than that of men;
- women's hips are wider than men's;
- Men's feet and palms are slightly longer than women's.
Ethnic features
To correctly draw people of different races, one should take into account their ethnic characteristics.
The following table lists these features and the physical differences between them:
| Race | Facial features | Features of the body |
| Caucasoid | The shape of the head is oval or triangular. The eyes are large, the nose is straight and narrow. The lips are thin. The hair can be of different colors. | Slim build. Tall. Long legs. |
| Asian | The head shape is round or oval. Narrow eyes, high cheekbones and a small nose. Hair is almost always dark. Lips are of medium thickness. | Stocky build. Short stature. Short legs. |
| African-American | The head shape is oval or square. The eyes are large, the nose is wide. The lips are thick. The hair is usually curly and dark in color. | Athletic build. Tall. Long legs. |
Angles
The human head can be depicted at different angles to the observer. There are several types (angles) of such arrangement.
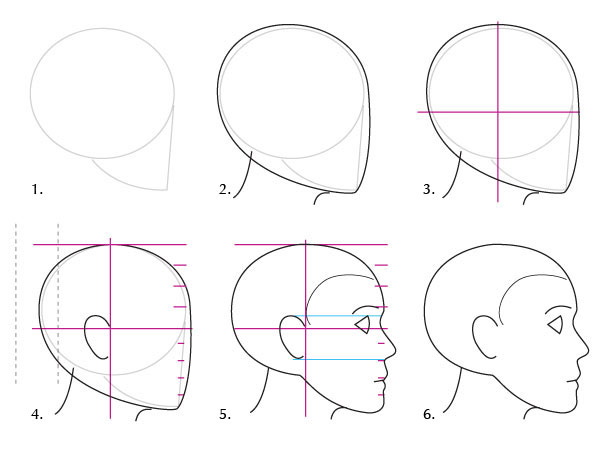
Profile
The face is displayed from the side. If you fit the drawing into a square, the ear of the head should be located in the middle of the square, and the visible eye should not reach its edge. The nose and mouth should protrude slightly beyond the edge of the square.
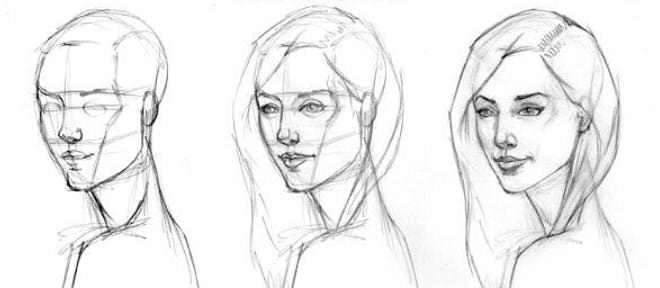
3/4
The face is displayed rotated 45° towards the observer. In this perspective, one part of the face (where the ear is visible) is closer to the viewer and should be depicted somewhat larger than the other. The nose is depicted tilted toward the far side of the face.
Looking down
The face is shown looking down. In this position, the back of the head takes up most of the drawing.
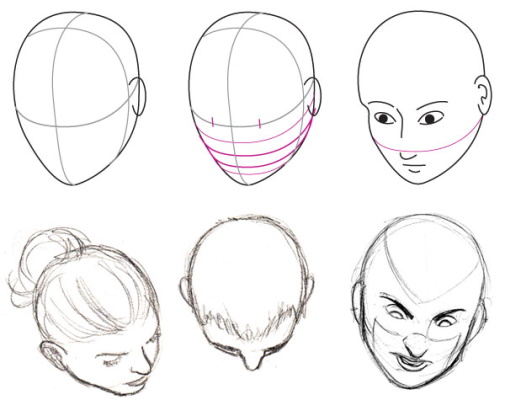
The nose somewhat covers the mouth area, and the eyebrows partially cover part of the eyes. The ears are located above the eyes.
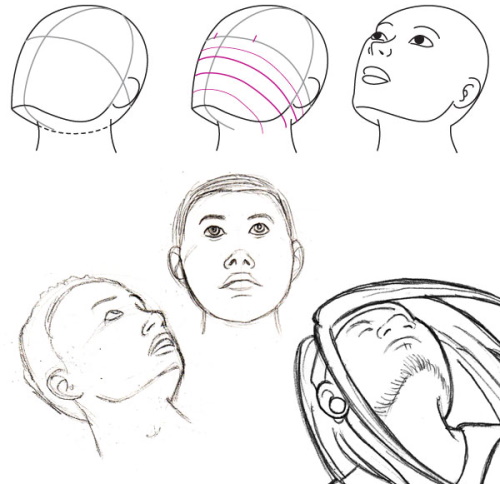
Looking up
The face is shown raised up. In this perspective, the lower part of the face is slightly larger than the upper. The nose covers part of the eyes, and when depicted, the nostrils are clearly visible. The lower part of the chin is visible in the drawing. The ears are located below the eyes.
Emotions and facial expressions
Tutorials on drawing a person include not only a description of the construction of the body shape and its proportions, but also the features of depicting individual parts of the face depending on the emotions experienced by the person.
The expression of emotions by a person is accompanied by facial expressions. Experts have identified 6 main emotions that people most often experience, and it is very important for an artist to know how the position of individual parts of the face changes at the moment of their manifestation.
These are the emotions:
- Astonishment (eyebrows raised, mouth slightly open, eyes wide open).
- Fear (eyebrows raised and drawn together, eyes wide open, mouth slightly open, lips curved downwards at the edges, eyelids narrowed, jaw pulled back);
- Disgust (the nose is wrinkled, the upper part of the mouth is raised, wrinkles and folds form around the nose and mouth);
- Anger (eyebrows lowered to the bridge of the nose, mouth slightly open, teeth clenched, nostrils widened);
- Joy (cheeks and outer parts of the mouth are raised upward, eyes are covered with eyelids, there are wrinkles along the edges of the eyes);
- Sadness (eyebrows are raised in the area of the bridge of the nose, the outer parts of the mouth are lowered down, the upper eyelids are raised).
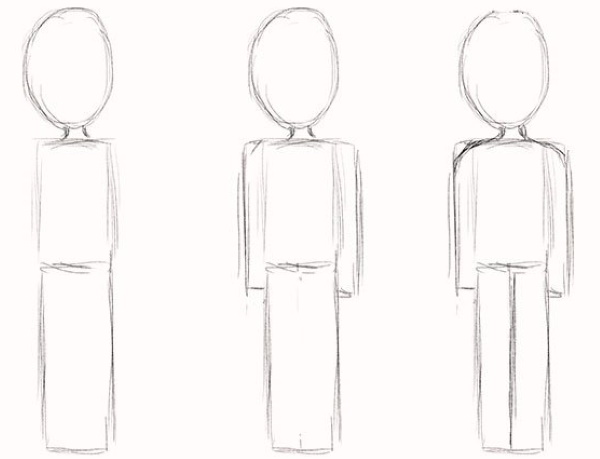
How to draw a person with a pencil step by step for beginners
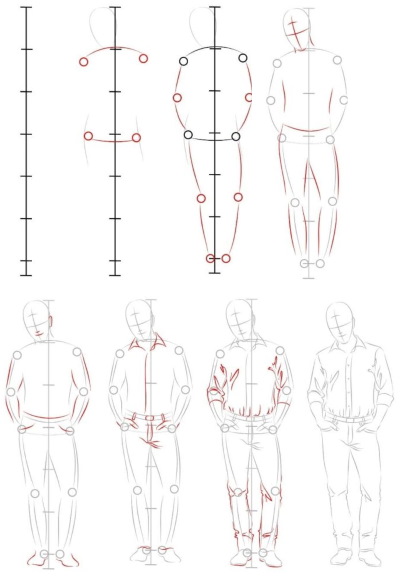
Tutorials on drawing a person can help a beginner master the technique faster. According to the established rules, drawing begins with marking the proportions of body parts. To do this, a vertical line is drawn, the height of which determines the height of the person, and then divided into 8 equal parts.
If you count from top to bottom, the head is located in the 1st part. Starting from the 2nd and ending with the 4th part, the torso, pelvis, and arms up to the beginning of the hand are depicted. The remaining parts from the 5th to the 8th include the hands, legs, and feet.
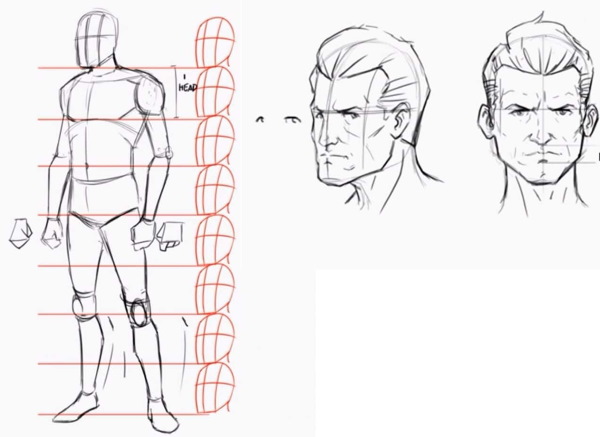
Head and face
To draw the head and face, you need to do the following steps:
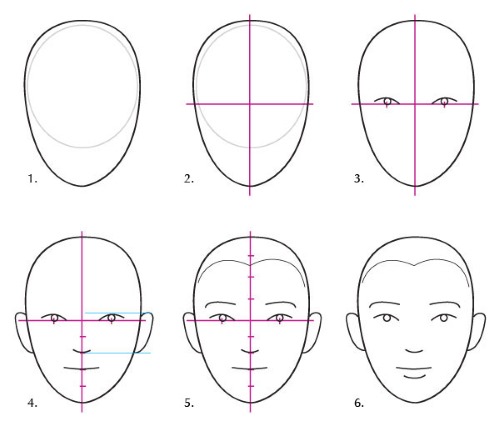
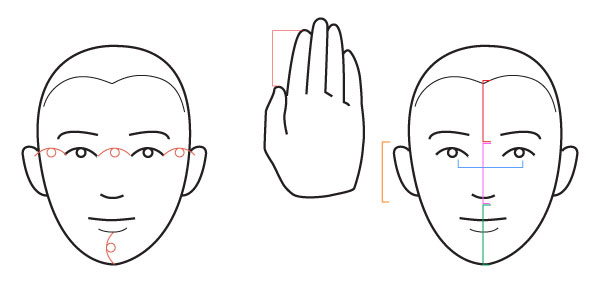
- In the 1st part of the vertical proportion line, draw the outline of the head in the form of an oval, slightly narrowed downwards and cut off at the base. The vertical line should pass through the center of the oval.
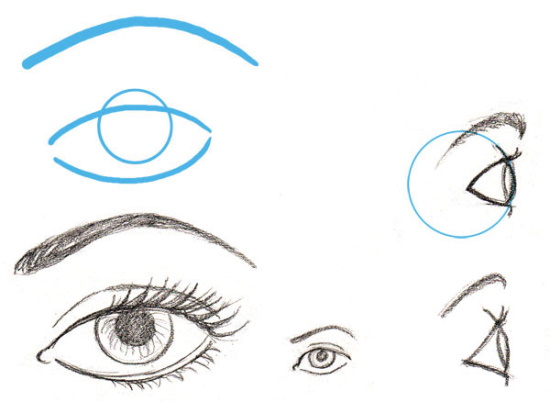
- Divide the outline of the head in half with a horizontal line, which will determine the level of the eyes. Then, symmetrically to the center of the head, draw the eyes in the form of two horizontal ovals, pointed at the ends.
The size of the eyes should be 2 times smaller than half the head. Then, in the center of each eye, draw a pupil in the form of a circle and color it, while leaving a small area at the top uncolored (glare).
- Draw eyelids at the top and bottom of each eye in the form of arched lines parallel to the outline of the eye.
- Divide the head area into 3 equal parts using 2 horizontal face lines.
- At the level of the 1st line of the face, draw the eyebrows in the form of curved lines parallel to the upper part of the eye contour. Then you need to give volume to the eyebrows using inclined hatching, which should be drawn over the eyebrow lines.
- Draw the nose by drawing two parallel vertical lines symmetrically to the center of the face, starting between the eyes and ending at the level of the 2nd line of the face.
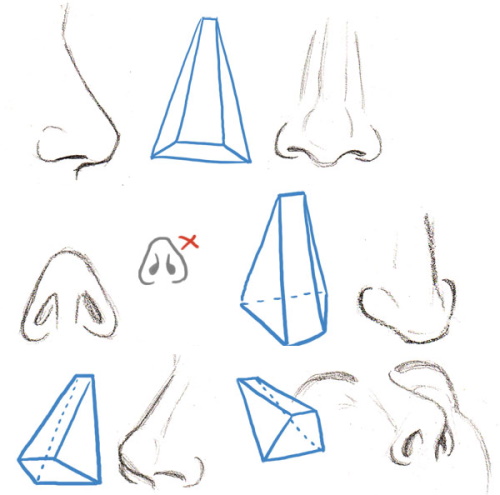
- Then, at the level of the same line, you need to draw the tip of the nose in the form of a semicircle and two nostrils in the form of two semi-ovals coming out from the tip of the nose on the left and right. The size of these semi-ovals should be 3 times smaller than the tip of the nose.
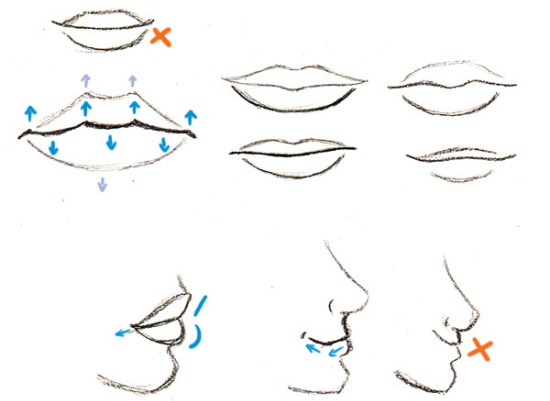
- Between the 2nd line of the face and the chin, draw the lips. To do this, draw a horizontal arched line in this area that is twice as wide as the width of the nose.
- Then draw the upper lip above this line in the form of a wavy line. Then draw the second lip under the mouth line in the form of the same arched line, but slightly smaller in size.
- Using light shading, draw shadows in the area of the cheekbones, nose, above and below the lips, and also under the eyebrows.
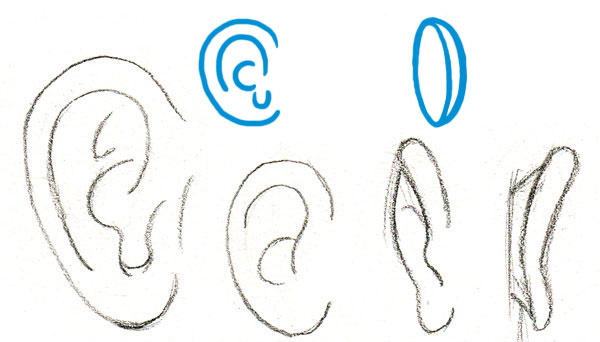
- Draw ears in the form of elongated semi-ovals on the left and right sides of the head contour. The upper point of the ear should be at eye level, and its lower point should be at the level of the tip of the nose. Then, inside the contour of each ear, draw the auricle in the form of a small semi-oval, and then shade it with hatching.
- Draw hair along the contour of the top of the head using small shading lines.
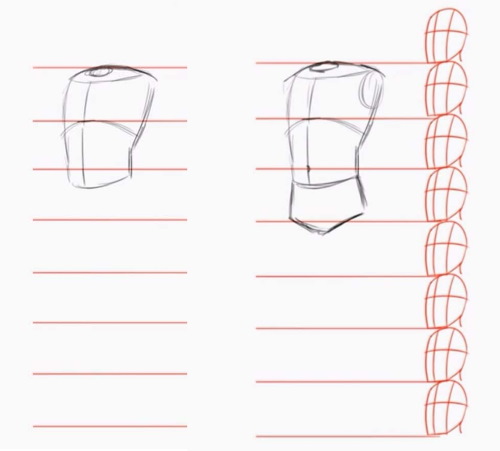
Torso and pelvis
Before you start drawing the torso, you need to determine the distance from the top of the head to the tip of the nose. This distance is equal to the length of an outstretched hand. Drawing the torso begins with marking the location of the yoke (the center of the collarbone) and the chest on the vertical proportion line.
Step by step:
- Mark the location of the yoke on the vertical proportion line, putting down the length of the hand from the tip of the nose. Then, to the left and right of this mark, draw the collarbone in the form of two lines, the length of which should also be equal to the length of the hand. The lines should be directed slightly upward relative to the yoke.
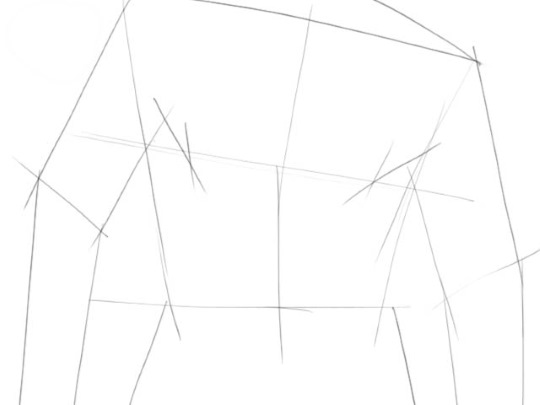
- Mark the bottom line of the chest, putting down the length of the hand from the yoke. Then, symmetrically to the collarbone, draw the chest in the form of two half-squares with rounded corners directed downwards.
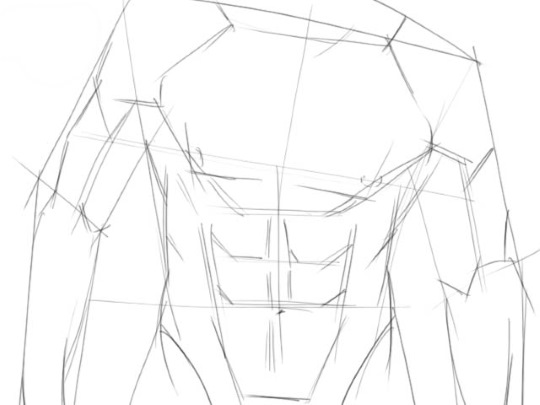
- Starting from the level of the cheekbones, draw the neck in the form of two parallel lines directed downwards. The length of the lines should be equal to half the length of the hand.
- Then from the lower points of these lines, it is necessary to draw the shoulders in the form of two inclined lines directed in different directions and smoothly turning into rounded deltoid muscles of the arms. The width of the shoulders should be equal to 2.3 head lengths.
- Mark the elbow line, putting the length of the hand down from the bottom of the chest. Then draw the torso in the form of two lines coming from the outermost points of the bottom of the chest and directed downwards.
These lines should taper slightly downwards, thus forming the waist. Then draw the two upper arms using two parallel lines coming from the beginning of the shoulder and the starting top point of the torso.
- Mark the pelvic line by putting the length of the hand down from the elbow line. Then, from the lower part of the waist, draw the pelvic part of the body, which is depicted by two slightly convex lines that originate from the lower part of the waist and are directed downwards until they connect with the pelvic line.
Then draw the forearms as two parallel lines tapering downwards, originating from the elbow joint and directed downwards at a slight angle relative to the upper arm. The forearms should end at the lower level of the 4th part of the vertical proportion line.
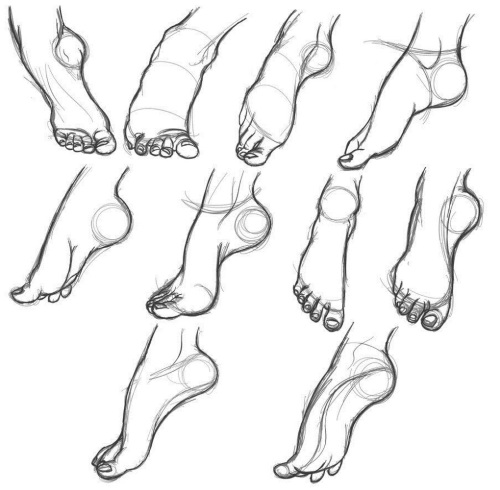
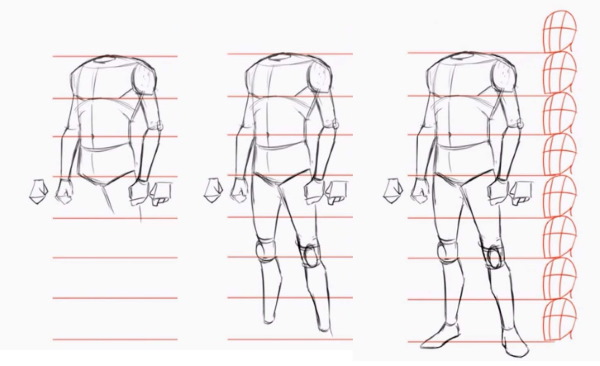
Limbs, hands and feet
The height of the foot should correspond to half the length of the outstretched hand.
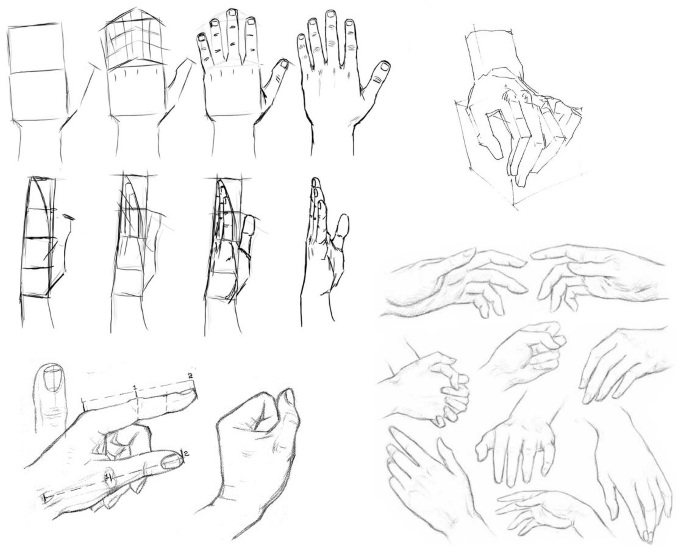
Step by step:
- From the lower part of the forearms, draw 2 hands in the form of triangles bent in the middle part.
- From the bottom of the pelvis, draw the hips in the form of two columns tapering downwards from the 6th part of the vertical proportion line.
- Draw the kneecaps and shins of the legs in the form of two columns widened in the middle and narrowed towards the middle of the 1st part of the vertical proportion line.
- Draw the feet as small trapezoids emanating from the lower part of the shins.
Master class on drawing a full-length human
This drawing will show a man in full height, wearing a shirt and jeans. The man's head will be slightly tilted to the left and directed at the viewer. His hands will be lowered into his trouser pockets. The man will stand slightly tilted to the side, leaning more on his left leg.
To draw such a man, you need to follow these steps:
- Draw a vertical proportion line and divide it into 7 equal parts. The height of the line determines the height of the character, and the segments on the line help to navigate when drawing individual elements of the body.
- Inside the first segment, on its left side, draw a head in the form of a rectangle with rounded corners, tilted slightly to the left.
- Under the bottom of the rectangle, draw a chin in the form of a triangle with a rounded corner at the bottom. Then you need to erase the bottom line of the rectangle.
- At the level of the lower part of the 1st segment of the proportion line, draw a horizontal line of the shoulders in the form of an upward convex arc, and also a horizontal line of the pelvis at the level of the lower part of the 3rd segment in the form of a downward convex arc. The pelvis line should be 1.5 times shorter than the shoulder line.
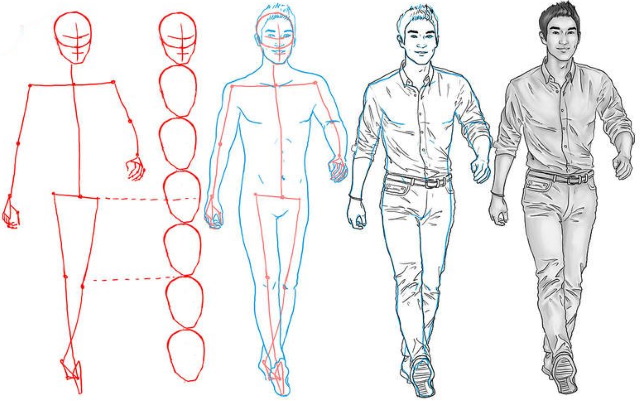
- Mark the location of the elbows just below the 2nd segment, as well as the location of the knees in the area of the middle of the 5th segment of the vertical proportion line.
The distance between the elbow marks should be slightly greater than the distance between the extreme points of the shoulder line. The distance between the knee marks should be 2 times less than the distance between the extreme points of the pelvic line.
- Connect the edges of the shoulder line with the elbow marks using contour lines, and connect the elbow marks with the pelvic line. Since the man will be keeping his hands in his trouser pockets, these lines should intersect with the pelvic line a little closer to the center of the pelvic line.
- At the level of the upper part of the 7th segment of the proportion line, mark the location of the feet. The distance between these marks should be 2 times less than the distance between the knee marks.
- Use contour lines to connect the edges of the pelvis line with the knee marks, and connect the knee marks with the foot marks.
- Draw a three-dimensional figure of a man using the previously drawn contour lines, and then erase the contour lines.
- Draw the shirt collar, buttons and belt on the trousers.
- Draw the pockets on the jeans as small slanted lines on the sides, and then draw part of the hands, which, together with two thumbs, stick out of the pockets.
- Draw folds on the shirt and jeans.
- In the area of the feet, draw shoes in the form of trapezoids with rounded corners.
- Draw the eyes, nose, mouth, and then draw the hair in the form of a fluffy cloud.
Poses and features of their drawing
Tutorials on drawing a person describe not only the construction of the proportions of the figure, but also help to understand what position individual parts of the body occupy depending on the pose of the person being depicted.
Depending on a person’s posture, the direction of individual parts of his body changes, as well as the direction of the curvature of the spine:
- Sitting position (knees and elbows are bent, the spine is curved slightly downwards).
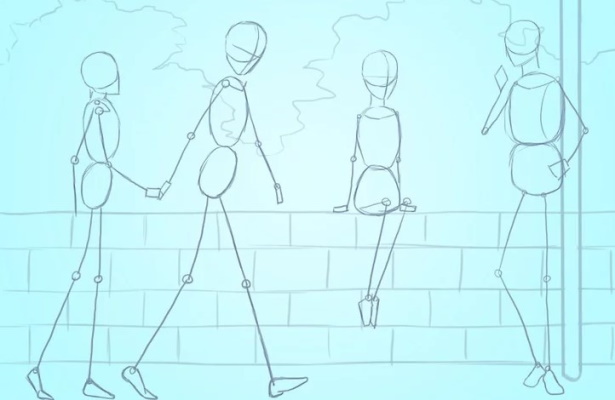
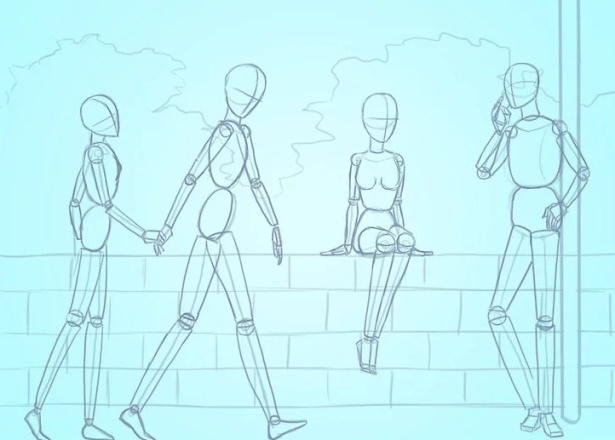
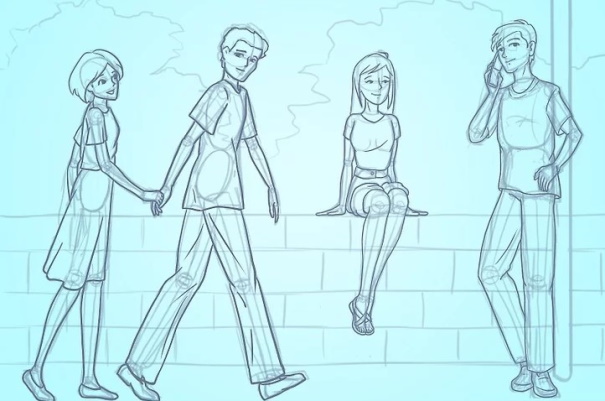
- Posture while running (one leg and arm pointing forward, the other leg and arm pointing back, the bend in the elbows and knees is quite pronounced).
- Posture during a walk (one leg is positioned vertically, the other leg is directed forward, the bend in the knees is minimal, the elbows are also slightly bent);
- Bent-over posture (the spine is curved to the left or right side, one leg is blocking the other, one side of the pelvis is located slightly higher than the other).
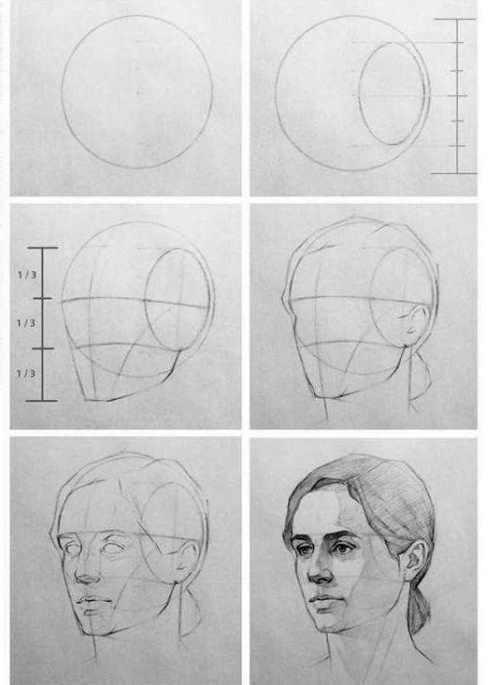
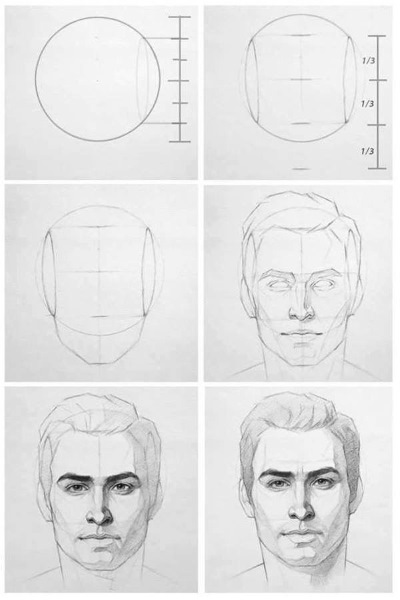
Portrait
Tutorials on drawing portraits include the features of constructing the proportions of parts of a person's face, as well as methods for detailed drawing of all components of the drawing.
When drawing a portrait, you must first draw the outline of the head and mark the location of all parts of the face, and then proceed to detailed drawing of each individual element.
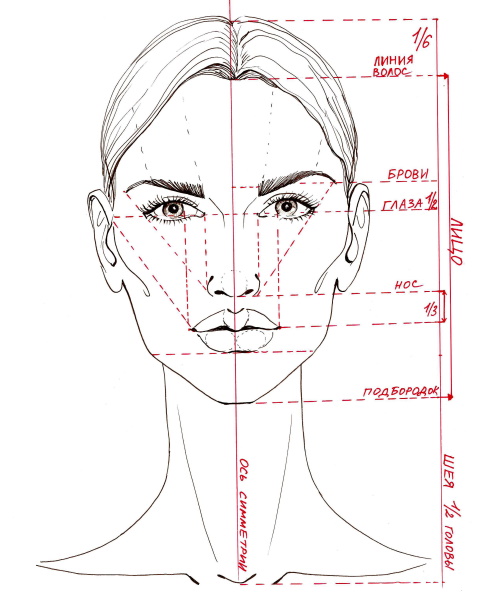
A portrait can be drawn in 3 angles: profile, full face and half-turn. For beginning artists, it is recommended to first master drawing a face in profile, and then move on to half-turn and full face. A portrait can be drawn both from life and from a photograph.
When learning to draw portraits, photography is often used because it allows you to take various measurements of proportions using a ruler, which helps you better master the rules of the relationship between individual parts of the face and determining their sizes.
The process of drawing a portrait consists of the following steps:
- Draw the outline of the face in the form of an oval, slightly narrowed at the bottom.
- Draw a horizontal line for the eyes exactly in the middle between the top of the head and the chin.
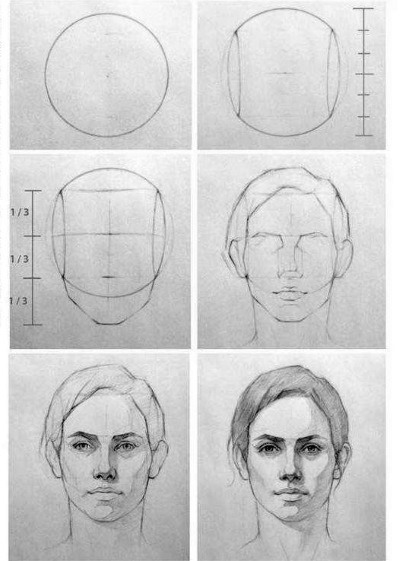
- Then you need to divide the head into 5 equal parts vertically and draw in the 2nd and 4th parts the outlines of two eyes in the form of horizontal ovals, the center of which should pass through the previously drawn horizontal line of the eyes.
- Divide the head into 3 equal parts vertically using 2 horizontal lines. Then, at the level of the 1st line, draw the outline of the eyebrows in the form of two arched segments, and at the level of the 2nd line, draw the tip of the nose in the form of a tick and semi-ovals to the left and right of it.
- From the center between the eyes to the tip of the nose, draw the middle part of the nose in the form of two parallel stripes.
- Between the 2nd line of the face and the chin, draw the lips. To do this, draw a horizontal arched line in this area that is twice as wide as the width of the nose.
- Then draw the upper lip above this line in the form of a wavy line. Then draw the second lip under the mouth line in the form of the same arched line, but slightly smaller in size.
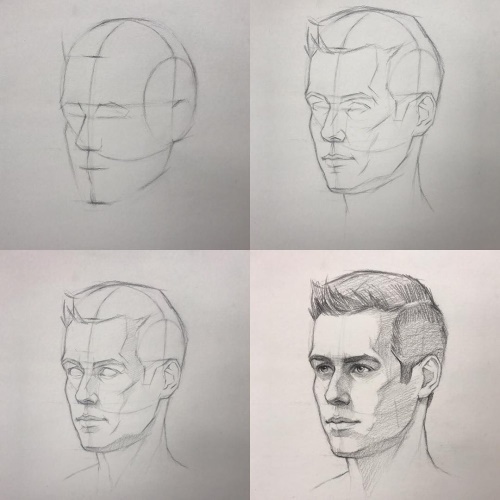
- On the left and right sides of the head outline, at the level of the eye line, draw ears in the form of elongated semi-ovals.
- Draw the hair according to the model's hairstyle.
- Perform a detailed drawing of the eyes, eyebrows and nose according to the features of their shape on the model.
- Apply shading to the face to give the portrait volume.
You can draw a person using various tutorials, but it will take months of artistic practice to ensure that the drawing you create reflects the emotions and features of the person's pose as accurately as possible.
Video about drawing
Tutorials on drawing a person: