Pencil drawing can be a useful activity for developing creative abilities. Before starting to work on the illustration of the frog princess, familiarize yourself with the plot of the fairy tale or tell children about the key events of the story so that the child is mentally transported to a magical environment and thinks about the characters, their character. Then you get a detailed image of the character with conveyed character traits.
Easy way to draw a frog
The plot of the fairy tale about the frog princess tells the story of an enchanted girl, Vasilisa the Wise. Koschei was offended by her and bewitched her, so the princess was in the form of a frog until night, and then shed her skin and became a girl.
Vasilisa's fiancé, Ivan Tsarevich, decided to burn the frog's skin so that Vasilisa would remain a beauty forever, but then Koschei's magic worked and the prince had to get his bride out of captivity.
During the fairy tale, Vasilisa changes her image several times, so she can be drawn as a frog or as a girl. You can ask the child to choose one of the episodes of the fairy tale to draw the main characters at a certain moment.
The pencil drawing of the frog princess can be created as a simple image in 7 steps.
For this process you will need:
- sheet of paper;
- simple pencil;
- eraser;
- pen or liner;
- colored pencils.
Draw the Frog Princess using the following steps:
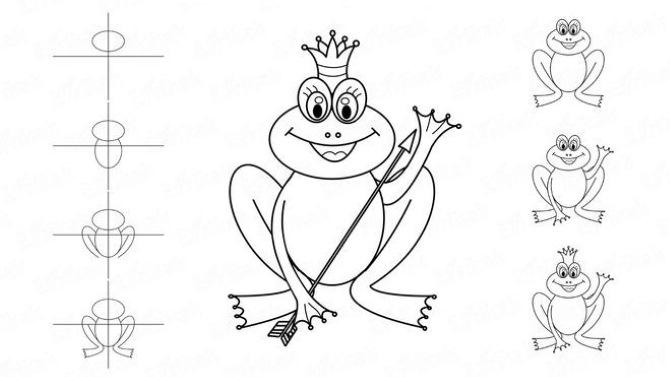
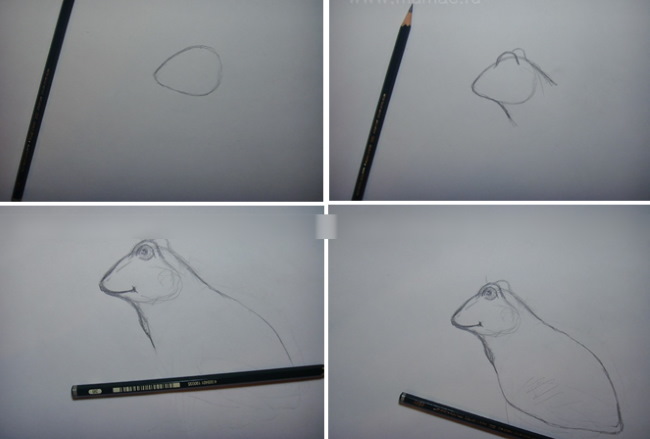
- The sheet is placed vertically. In its upper part, the frog's eyes are drawn in the form of 2 elongated ovals. In the corner of each oval, a circle is drawn and inside it, another circle. The larger circle is painted over to create a pupil with a glare. Both pupils should be the same, so that the eyes look in the same direction.
- Using schematic movements, draw the shape of the frog's head. If you can't draw it straight, first make a horizontal oval and form the frog's muzzle from it. Make protrusions on the side of the cheeks and chin, draw semicircles above the eyes, and narrow the muzzle at the temples. Erase unnecessary lines.
- A downward curved arc is used to draw a smile from one cheek to the other. The arc is finished with semicircles, showing the cheeks.
- Draw the frog's body with 2 vertical lines down from the head. Indicate the legs.
- From the center of the body, draw the hind legs folded in a squat on both sides. Draw rounded triangles looking in different directions. Draw a line in the center to show that the legs are folded.
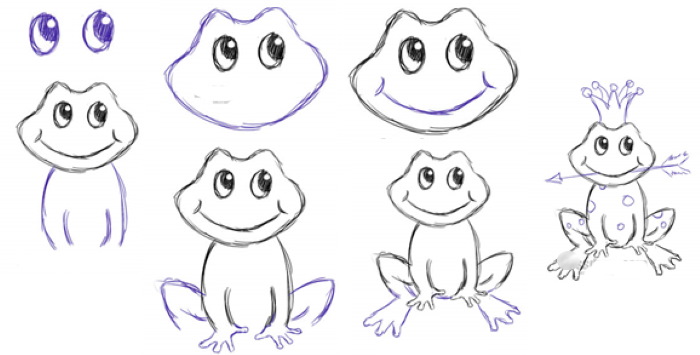
On the front paws, 3 fingers are drawn. Between the little ones, there is a rounded distance, as with membranes.
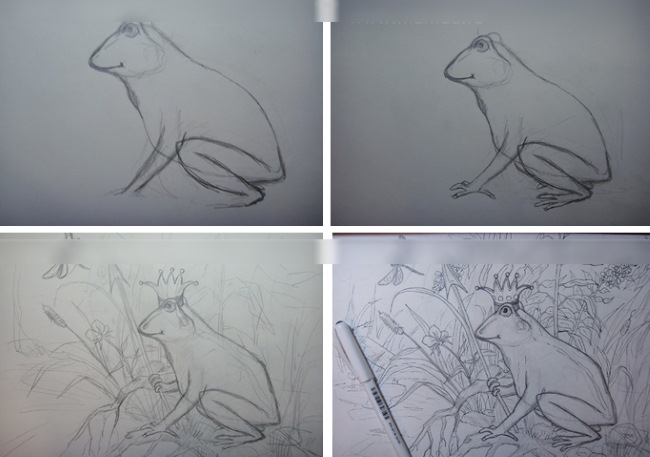
- Finish drawing the lower part of the body and the hind legs, which are shaped like flippers.
- They add details to the image of the frog princess - a crown on her head, Ivan Tsarevich's arrow in her mouth. They draw spots in circles of different sizes all over her body.
- They outline the drawing and erase the extra lines. They color the drawing.
The Frog Princess in Half Turn
The Frog Princess (a pencil drawing of this character can be done step by step in a simple form, but from a different angle) is visible from the side, in her hands is an arrow that she caught from Ivan Tsarevich, and on her head is a crown.
Step by step:
- The sheet is placed vertically, in its upper part a rounded part of the head is schematically drawn, it is sharpened on the right, where the cheek is. On the head vertical lines indicate where the crown is.
- The lines of the muzzle are drawn in more detail - the line of the nose, eyes and cheeks is indicated. The boundaries of the body are indicated.
- Eyes with oval pupils are drawn with circles. Small circles indicate glare and direction of gaze. Three curved eyelashes are drawn above the eye circles.
A curved line is used to draw a smile - the mouth rises in the nose part, then goes down again. The smile ends with a semicircular line, indicating the cheek. The frog is visible in half a turn, so the cheek and smile are not drawn on the right, the eye is also not fully visible - it is hidden by the nose.
- A pointed crown is drawn along the marked lines. A pattern is marked inside it with triangles and horizontal lines.
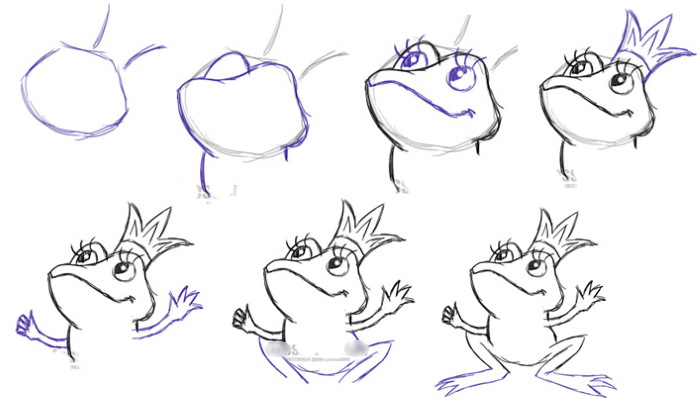
- Draw paws on the sides of the body. The right paw ends in spread fingers, the left one is bent into a fist, an arrow will be drawn in it.
- Finish the body line on the right side. Draw the hind legs in the lower part of the body in the form of rounded triangles, they are directed in different directions. Each triangle is divided in half by a line, showing the bent legs.
- Draw the hind legs in the form of flippers.
- They finish drawing an arrow in the left paw and spots of different sizes all over the body.
- They trace the drawing and erase the extra lines. They color the resulting image.
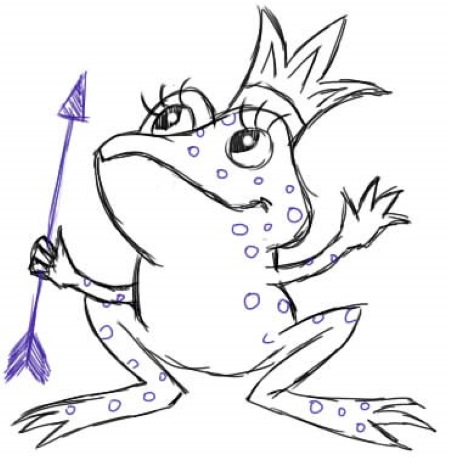
The Frog Princess with an Arrow
A simple version of the image of the frog princess is suitable for children of preschool age. In the process, only even round and straight shapes are used, so it will be easy for the child to repeat the drawing on his own.
The following tools will be required for this process:
| What is needed | For what |
| Paper | The thickness of the paper is chosen based on what the finished drawing will be painted with. If the frog is painted with paints, then the paper needs to be thick so that the sheet does not bend from the water. |
| Simple pencil | To draw the image of a frog, children are recommended to use a hard pencil so that the sketch turns out with thin lines. |
| Eraser | Remove unnecessary lines at the end of the drawing. |
| Ruler | Draw the center of the future drawing at the beginning of the process. |
| Felt-tip pen or pen | Trace the desired outline. |
| Colored pencils or paints | They choose at their own discretion. |
Step by step:
- The sheet is placed vertically. A ruler is used to draw vertical and horizontal lines to mark the center of the sheet. This is where the frog's chest will be.
- Above the center, draw a head in the form of a horizontal oval.
- The body emerges from the head in the form of a vertical oval, slightly larger in size. The oval intersects the center and ends below it.
- On the sides of the body, draw the frog's hind legs, ending with flippers.
- The frog's eyes are drawn with ovals; they extend beyond the head. The nose is drawn with two dots and a smile.
- Draw the front paws and finish them with webbed toes.
- Above the head, between the eyes, draw a pointed crown. At the ends of the crown and all the fingers, draw small circles.
- The frogs are holding an arrow in their hands.
- Erase all unnecessary details, outline the outline with a felt-tip pen or pen. Color the drawing with paints or colored pencils.
Realistic Frog Princess
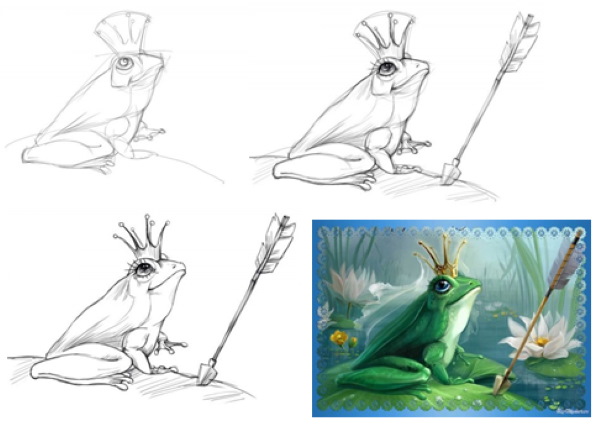
In a more complex version of the image of the fairy tale heroine, you can take any picture with a frog, and at the end add key details - an arrow and a crown.
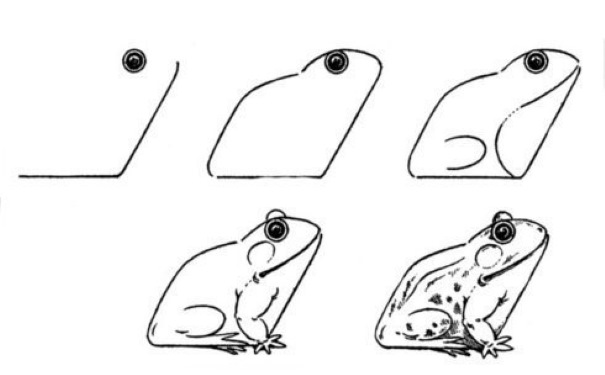
Start with a step-by-step drawing of a frog in profile:
- The corner marks the boundaries of the frog's body, and a schematic eye is drawn in the place where the head will be.
- They finish drawing the outline of the body, drawing a semicircular head and a curved back.
- The abdomen and hind leg are marked with lines.
- Next to the eye, draw the eyelid of the other eye. Mark the cheek below the eye with a semicircle. Draw the back and front paws with fingers.
- A pointed crown with beads is drawn on the head.
- Next to the frog, draw an arrow stuck in the ground. Draw the eye in more detail, add eyelashes, and use hatching to depict a shadow across the entire body. The outline of the body is outlined with a thick pencil.
- Erase excess details, outline the outline with a liner or pen, and color the drawing in a convenient way.
The Frog Princess as in the cartoon
The Frog Princess (a pencil drawing of this fairy-tale character can be repeated step by step from the Soviet cartoon) is done as follows:
- The sheet is placed vertically, and eyes are drawn in the upper part in the form of 2 circles. In each circle, another smaller one is drawn and the pupil indicates the direction of the gaze.
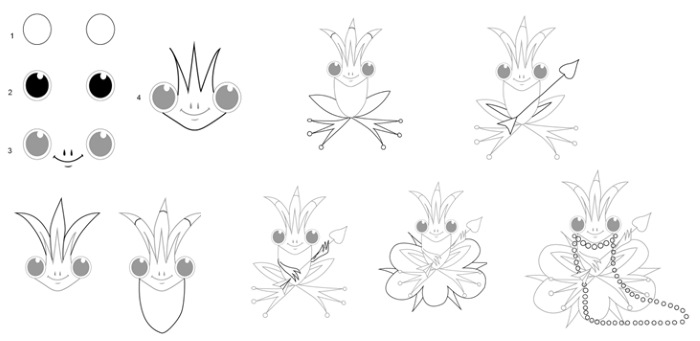
Between the eyes, a little lower, draw a nose with dots and a smile. Connect the eyes with a pointed line, and draw a pointed crown on top.
- From each triangle of the crown, draw the same figure above, add patterns with lines. Under the head, draw an oval-shaped body.
- Draw the frog's paws and knees in different directions from the body. The paws end in narrow triangular fingers and circles.
- Add fold lines on the hind legs. Draw an arrow in front of the frog's body.
- Short legs are added that hold the arrow.
- The semicircular lines depict the water lily leaf on which the frog sits. Between each semicircle, draw narrow triangles depicting leaves.
- Using small circles, draw a long string of beads that goes around the frog's neck and down.
- Erase the extra lines. Use a liner or pen to outline the main outline and color the drawing.
Detailed image of the Frog Princess
The Frog Princess (the pencil drawing of this fairy-tale character can be made more detailed and as many moments of the fairy tale as possible can be shown in the illustration) can be more than just copied, if desired.
You can add characters or objects at your discretion to make the drawing unique:
- The sheet is placed horizontally. In the central upper part of the sheet, a head is drawn in the form of a drop, pointed to the left.
- The places of the eyes on the top of the head are marked with semicircles. The neck and body are extended with smooth lines. The nose is rounded.
- Under the brow ridges, draw an eye and pupil in a circle. At the bottom of the muzzle, draw a curved smile. Extend the neck line into a curved back. Draw the sternum in front.
- Complete the outline of the body with a pointed tail. Using shading, add shadow to the eye and chest.
- In the lower part of the body, draw a bent hind leg with oblong lines. The leg is slightly pointed at the knee and heel. Sketch out the line of the front leg resting on the ground.
- Draw the toes of the front and back paws. The toes end in rounded lines, with webbing between them. Draw the paws with a clear outline.
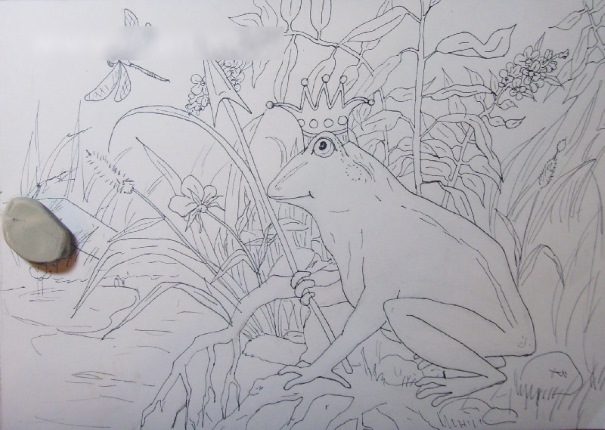
- Near the sternum, draw a short paw and an arrow in it. On the head, draw a pointed crown with beads on the ends. Make a sketch of the earth and plants around - leaves, grass, flowers, water, etc.
- The liner is used to outline all the contours of the frog and other objects in the drawing.
- Use an eraser to erase the pencil sketch and fill in the gaps in the outline.
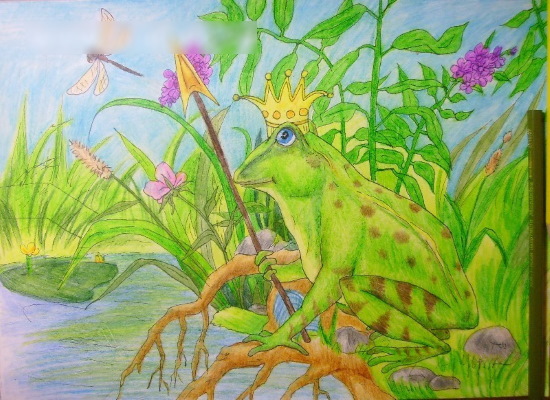
- Color the entire illustration with colored pencils.
The Frog Princess in the form of a girl
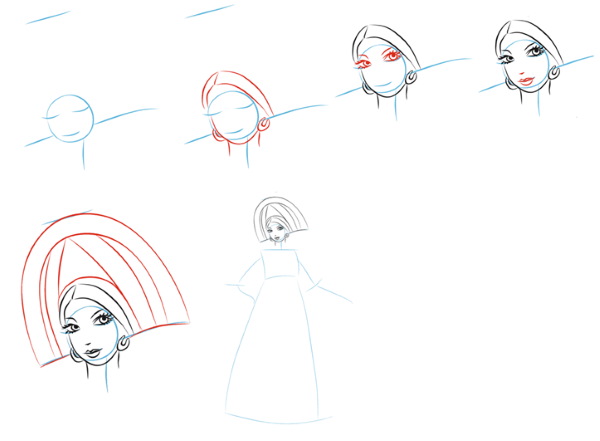
The Frog Princess (a pencil drawing of this fairy-tale character can be depicted as a girl) appears in different guises in the plot. The girl is drawn on a sheet of paper turned vertically, and starts from its central upper part.
The figure is drawn schematically starting from the head, gradually moving towards the legs and drawing the silhouette in more detail:
- The head is schematically depicted as a circle. Lines mark the level of the kokoshnik and its height, the length of the neck, eyes and mouth.
- They outline the face in detail: they draw out the chin with pointed lines, and mark the thickness of the neck with vertical strokes. They draw the parting and the growth of hair on both sides of the face. Below the end of the kokoshnik, they draw hoop earrings.
- Draw the eyes with pupils and eyelashes in detail, don't forget about the fold on the eyelid. Draw the curve of the eyebrows, which end behind the hair. Use a short curved line to mark the tip of the nose. Draw the lips below the nose - mark the arc of a smile. Draw the lower lip under it in a semicircle, and the upper lip in 2 semicircles.
- A semicircular kokoshnik is schematically depicted. It ends with a straight line along the level of the earrings. Inside the kokoshnik, a semicircular bend is repeated and a sketch for the ornament is made with lines.
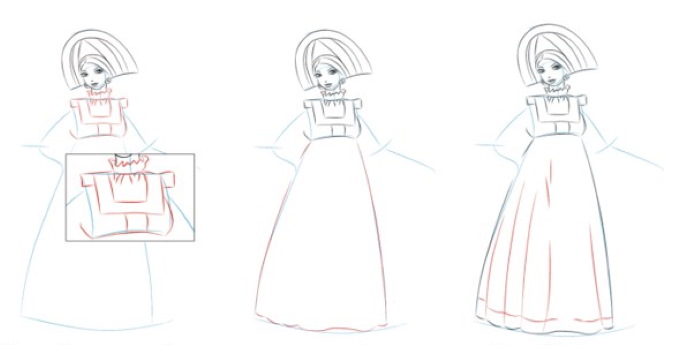
- The princess's body is outlined. The torso is marked with a rectangle, from which the arms, bent at the elbows, are drawn with lines. The rectangle ends under the chest level, from where the skirt of the dress flares out to the floor.
- They draw the details of the clothes. Under the sarafan the princess wears a shirt with frills - they are depicted with small wavy lines on the neck. Along the shoulder line the collar is compressed and folds are drawn under it with short vertical lines.
The neckline of the sarafan is shown with straight lines. The bust line is shown with rounded strokes. A clear outline of the skirt is drawn, and folds are indicated on the hem with a wavy line. The horizontal line of the hem is duplicated with a small indent upwards to create a frill. Along the entire length of the skirt, folds are drawn with vertical strokes.
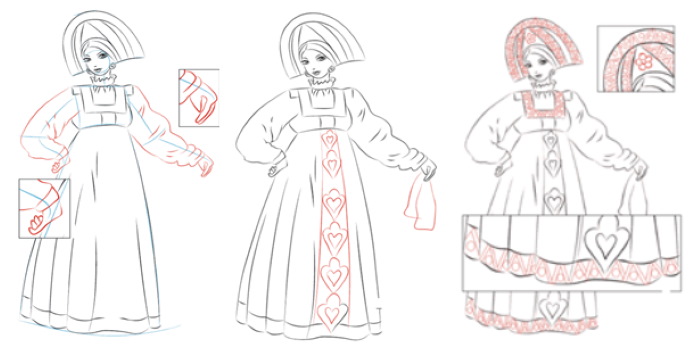
- The lines of the arms are outlined with wide sleeves of the shirt. The sleeves end in rectangles-cuffs. In places of bending of the sleeves are drawn with gathers and strokes depict folds. Bent wrists are drawn. The left hand is resting on the side, the right one is moved aside and holds a handkerchief.

- In the center of the sarafan skirt, draw 2 vertical lines on which a pattern of rounded triangles is depicted. In the right hand, draw a kerchief schematically.
- Patterns are added to the kokoshnik and the hem of the skirt in the form of inclined straight lines and circles of different sizes. A flower is drawn in the center of the kokoshnik. If desired, the pattern can be replaced with any other.
- All contours are outlined with a liner or pen. Unnecessary fragments and pencil lines are erased with an eraser. The illustration is colored with colored pencils or paints.
The Frog Princess - a scene from the cartoon
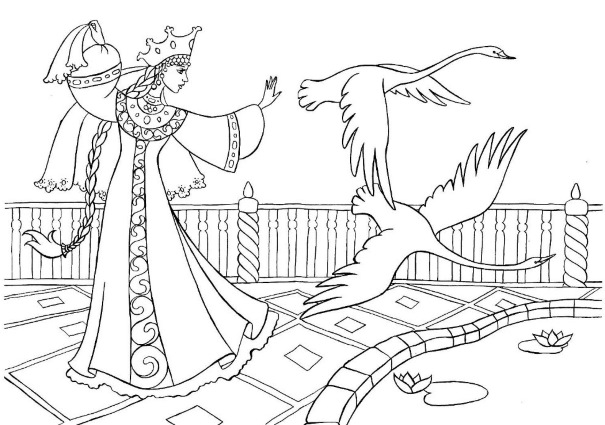
The version of the image of the Frog Princess is a scene taken from the plot of the fairy tale. You can ask children to draw their favorite moment themselves or repeat the scene from the cartoon. As an example, there may be a scene where Vasilisa the Wise releases swans from the sleeves of her dress.
Step by step:
- The sheet is placed horizontally. The figure of the princess is depicted on the right side of the sheet using schematic lines and circles. On the left side, the figures of two swans are marked. A horizontal line of the floor of the royal palace is drawn in the area of the girl's knees.
- The face, neck and kokoshnik on the head are outlined with smooth lines. A sarafan with wide sleeves and a flared skirt is drawn. The swans have a head with a beak, long necks, a body with a short tail and wings curved up or down in flight.
- They depict the details of the face turned in profile: the nose, mouth, eyebrows and eyes with curved eyelashes and pupils looking at the swans. They draw a long and twisting braid behind the princess's back. At the end of the braid they draw a braid or ribbon. They add lines for the future ornament along the edge of the sleeves, along the curve of the chest and in the center of the dress.
- Draw a pattern along the selected lines in the form of circles and ovals or curved lines. Outline the edge of the kokoshnik with small circles, depicting precious stones and beads. Draw a veil behind the back of the princess's head. Draw a handkerchief in her hand. Add folds to the hem with wavy lines.
- They draw details of the pattern on the floor and walls of the royal palace.
- Outline all the contours with a liner or pen. Erase any extra lines and pencil marks.
- Color the image with paints or colored pencils.
Useful tips and recommendations
A pencil drawing of the frog princess can turn out better and faster if you follow some simple tips.
This:
- They think through the composition of the drawing in advance - the number of characters in the drawing, how they interact, the details of their appearance and the background.
- Imagine the hero of the drawing relative to the location of the sheet. Otherwise, in the process, the outline may go beyond the paper.
- They start with an image of the frog itself, then add details of its appearance and outfit.
- It is easier to draw a frog with ovals and circles. The finished sketch is narrowed and sharpened in the necessary places. The excess is erased with an eraser.
- Preschool children are given medium-soft or hard pencils so that the lines are not too thick and the pencil does not stain the sheet of paper.
- The paper density is chosen based on the method of coloring the finished illustration. Thick sheets are used if the drawing is colored with paints.
Video about drawing
The Frog Princess drawing: