Half double crochet is one of the basic techniques that any craftswoman needs to master. This half double crochet is considered the "golden ratio" crochet, as it is between the standard stitch and the double crochet in size, but gives a denser knit and an interesting pattern on the front and back sides.
Necessary tools and materials
The half double crochet has its own characteristics, which are associated with the choice of hooks and yarn for knitting. This technique is performed in one movement, in which the hook pulls the thread through 3 loops, so The choice of hook is very important so that the craftswoman's hand does not strain or get tired while knitting.

The thickness of the hook and yarn should be almost identical, you can put the thread and hook next to each other and compare. Another way to select a hook is to place the thread in the curve of the hook (barb) with almost no tension. If the thread fills the hook completely, then this tool is suitable for the yarn. Also, do not neglect the recommendations of the manufacturers, usually the hook number is indicated on the yarn packaging.
To make the loop loose, you can choose a hook slightly thicker than recommended., and for decorative elements (hearts, flowers) - a little thinner so that the knitting does not spread.
For example, a #5 hook is suitable for a cord or yarn made of knitted fiber, a #3 hook is suitable for standard acrylic or semi-woolen yarn, and a #2 hook is suitable for the “Narcissus” cotton yarn. Ideally, the thread should be single, since it is difficult to pick up a double thread and pass it through 3 loops in one movement.
The half double crochet stitch results in a very dense knitting pattern, which is not suitable for all items. In addition, technically, it is more difficult to knit this way than the classic single crochet or double crochet, so it is used less often. Among the items that are made with this half double crochet stitch, there are simple things.
They are required to be durable and visually attractive:
- rugs;
- potholders;
- coasters;
- teapot and cup warmers;
- bags;
- cosmetic bags;
- baskets.
For these products, a fairly thick yarn is chosen. For coasters and potholders - thick acrylic, cotton yarn, also cotton with acrylic or acrylic with wool, for rugs and bags - cotton ribbon threads or cord yarn.
The half double crochet stitch is not difficult to learn, but it does require some practice to perform quickly and accurately.
How to crochet a half double crochet stitch
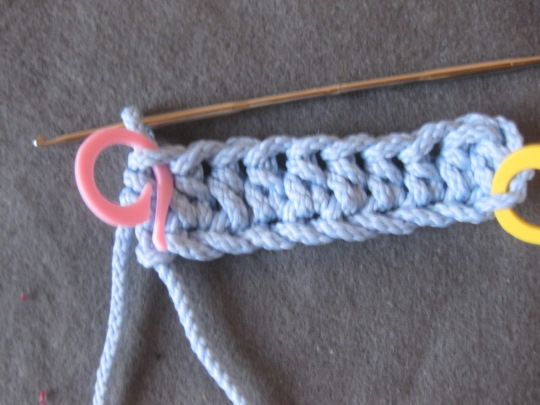
First, you should knit a chain of several air loops, the final loop in the chain, not counting the thread on the hook, mark with a special marker, paper clip or pin. This will be the first loop of the next row.
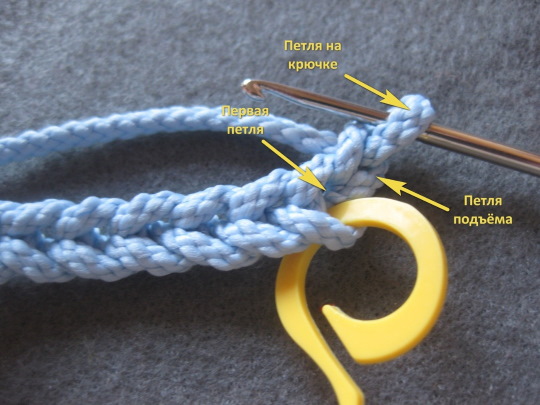
The size of the half double crochet is between the single crochet in its classic version and the double crochet, so you can make either 1 or 2 loops for lifting. In the first case, the product will have a rounded edge, in the second - a square one.
The half double crochet itself is performed in 3 steps:
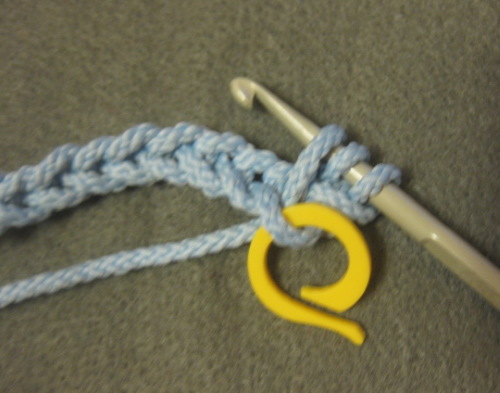
- First you need to make a lifting loop and throw the yarn over onto the hook.

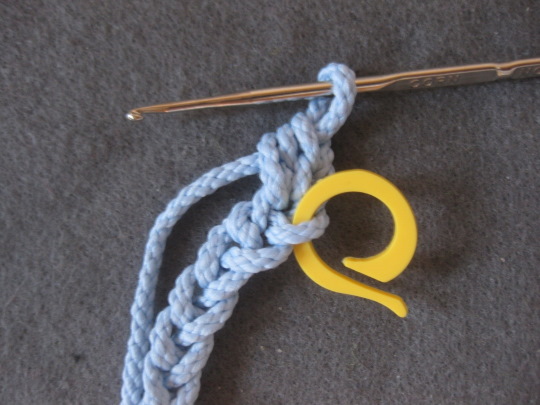
- Then you should pass the hook through the marked first loop and pull the thread out. There will be 3 threads on the hook.
- In one movement, you need to hook the thread from the ball and pass it through all 3 loops at once, tighten. The first half-column is ready. Next, you need to repeat the same with the second loop.
At the end of the row, make 1 loop for lifting and turn the sample over.
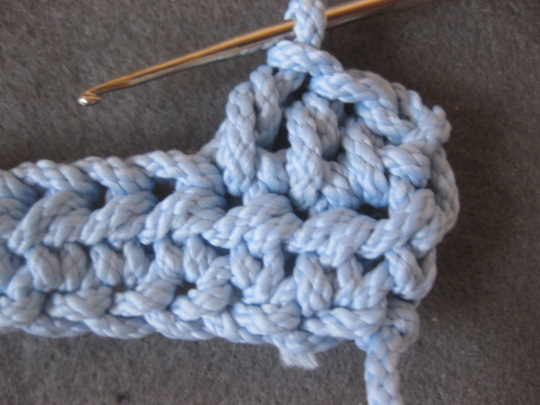
At the beginning of the next row, you need to make a yarn over again and pass the hook under the entire loop of the previous row, under both threads. Then you should follow the same order of work, knit half double crochets.

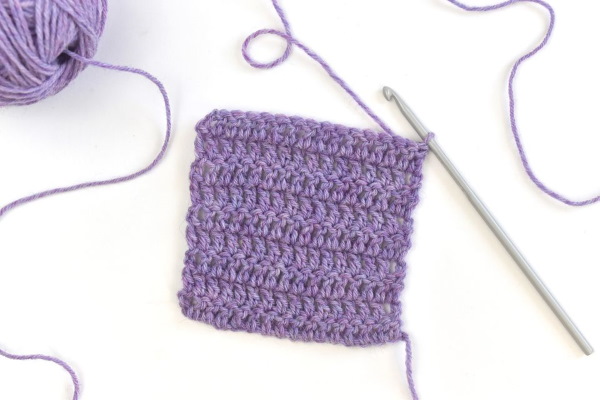
The result is an even, dense pattern that is the same on both the front and back.
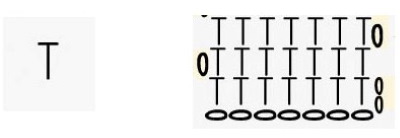
In the diagrams, a half double crochet is indicated by a symbol resembling the letter "t".
Using this technique, you can quickly knit simple, useful items for your home or as a gift.
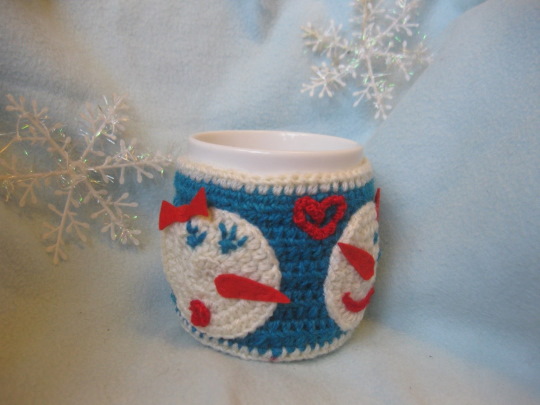
Crochet Mug Warmer "Snowmen in Love"
You can create a stylish and at the same time useful thing with a half-column – a mug warmer. A warm “outfit” crocheted will turn the simplest mug into a meaningful gift for a friend, loved one, mother or grandmother.
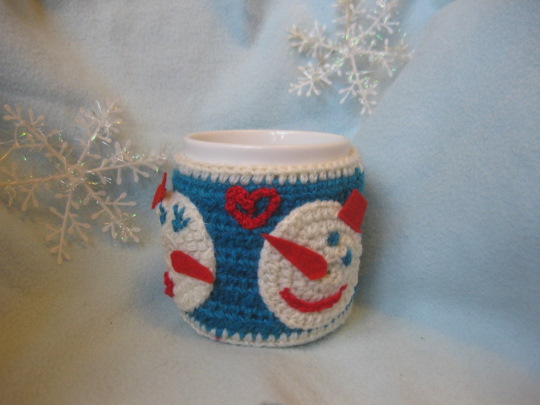
The warmer is not only for decoration, it warms your hands and prevents the cup from burning your fingers, as the yarn over is quite thick. If you make several warmers in the same style, you can bring different mugs to the same denominator and effectively set the table for a birthday party or Valentine's Day.
Materials and tools
You will need:
- Yarn of one of the shades of blue (quite dense, in one thread).
- White yarn for decorative elements (softer and thinner than the main threads).
- Red yarn in small quantities (thin, cotton threads are fine – for example, “Iris”, “Narcissus” and others).
- Hook #3, hook #2.
- A small piece of red felt.
- A thick needle with a very large eye.
- White and red threads for sewing elements to the base.
- Needle.
- Mug - model.
Manufacturing process
Making the base:
- Knitting begins with the main part of the warmer.
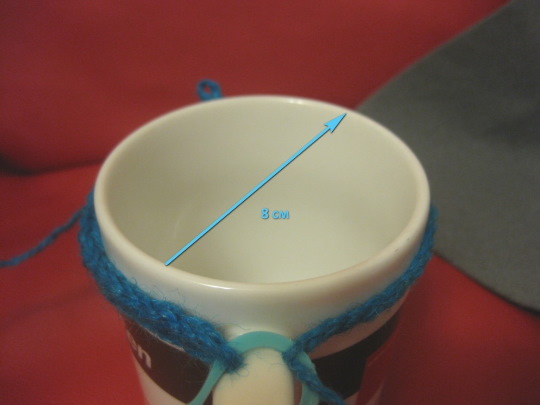
To do this, make a chain of air loops, it is better to immediately try it on the mug, the chain should cover the entire volume. For a standard 250 ml mug with a diameter of 8 cm, you need to knit a chain of 60 free air loops.
- At the next stage, make 1 air loop for lifting and knit the first half double crochet into the second loop from the hook, starting the second row.
- Next, knit the entire second row with half double crochets, trying not to miss a single loop. At the end of the row, make a lifting chain stitch and turn the product over. This algorithm must be followed when knitting all subsequent base rows.
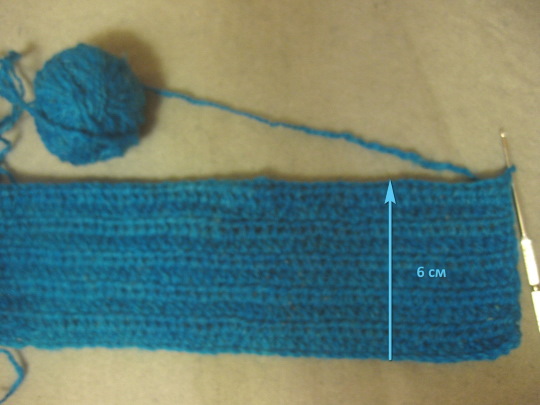
- The half double crochet stitch is quite high, so you won't need more than 6 rows.
The result should be a smooth rectangle approximately 24 cm long and no more than 6 cm high (for a standard mug), as it is necessary to leave empty space at the edge of the mug to make it comfortable to drink.
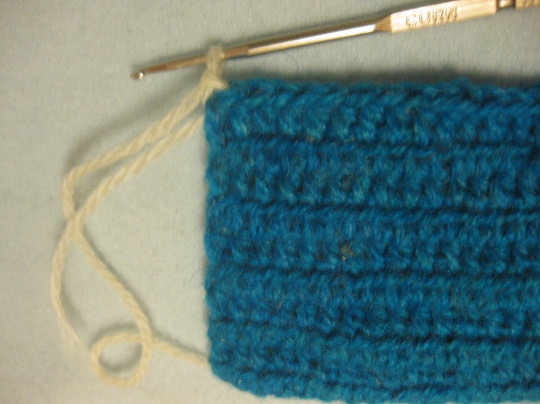
- At the end of the last row, you need to introduce white color for edging in advance. To do this, when making the final half double crochet, you need to bring out a white thread through 3 blue loops on the hook.

- After this, begin to tie the rectangle with half-columns with a yarn over in white. There is no need to cut the blue thread, it will be useful for making the fastener loop.
- When the binding is finished, connect the white and blue threads together and make 9-10 air loops. Then attach the fastener to the base with a connecting loop (half-column without a crochet) and tighten the loop. Next, you need to cut the thread and hide it with a hook inside the lush half-columns.
- After this, make a button, thanks to which the warmer will stay on the mug. For the button, you need to connect blue and white yarn together and knit 6 air loops in 2 threads. Then you need to combine the chain into a ring with a half-column. Then knit half-columns with a yarn over in a circle, knitting each loop. The size of the button is adjusted based on the length of the loop.
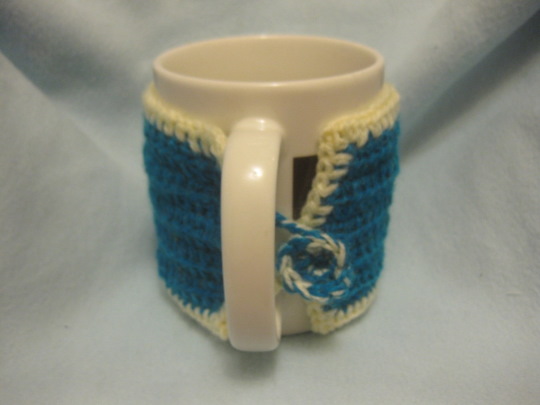
- The button is sewn or tied to the base with the tails of the threads left over from knitting. Before determining the location of the fastener on the base, you need to try it on the mug. The rectangle of the base should very tightly cover the mug, as if stretching, and not dangling.
Decorating
After completing the main part, you can move on to the decor - the composition "Snowmen in Love". Small details of the applique may differ from the sample - for example, carrots can be knitted, and not cut out of felt, but it is better to adhere to one rule.
When composing a composition, you should use no more than 3 colors, and 2 of them should match the color of the base and border, that is, blue and white, and instead of red, you can use orange or pink.

Decor:
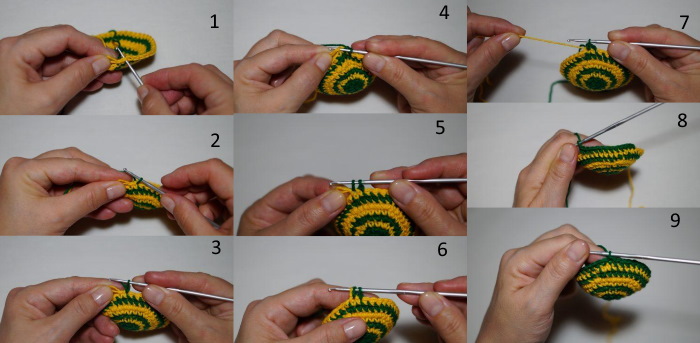
- First, knit 2 identical white circles, the snowmen's heads. Make 6 air loops, connect them into a ring with a half-column. In the second row, knit 1 half-column with a yarn over into each loop (you can knit these 6 single crochets into a magic ring or simply into the second air loop from the hook, without making a starting chain of air loops).
- In the third row, 2 half-double crochets are knitted into each loop of the previous row, resulting in approximately 12 loops. In the fourth row, 2 single crochets, knitted into 1 loop, alternate with 1 standard crochet, resulting in 18 loops. In the fifth row, 2 standard crochets follow 2 double crochets, knitted into one loop.
It is important to keep track of where a new row begins. To do this, it is convenient to mark the first loop of the row with special markers or a regular pin.
- You need to continue knitting until you get a circle with a diameter of 5 - 5.5 cm. You need to repeat the same algorithm with the second snowman.
- For the snowmen's mouths, you need to knit chains of 9-10 air loops, it is better to connect 1 of the mouths in advance into a circle of half-columns. For the heart, you need a chain of 24-30 air loops.
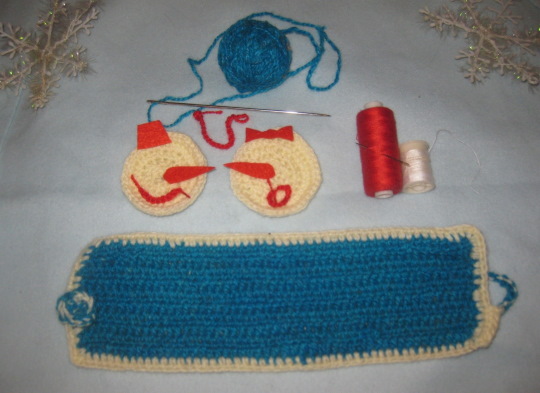
- Next, cut out the noses, bucket and bow from felt. Everything is ready for assembly.
- Sew the noses onto the snowmen with red threads, so that the tips extend beyond the edge of the heads. Without cutting the thread, attach the mouths and the bucket with a bow. With a large needle, embroider the eyes in the form of snowflakes with blue threads.
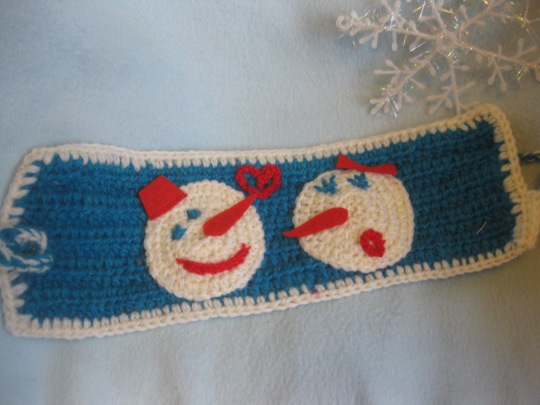
- It is logical to start assembling the composition on the base with the heart, it is attached exactly in the middle. Then, on both sides, at a small distance, sew snowmen, their noses can even touch.
If the snowmen's heads still turn out convex, you can put cotton pads underneath, and the composition will become voluminous.
Crochet Cup Coaster "Heart"
Half double crochet is an ideal technique for crocheting coasters for mugs. The coaster can be made in any color scheme and come up with any pattern for it.
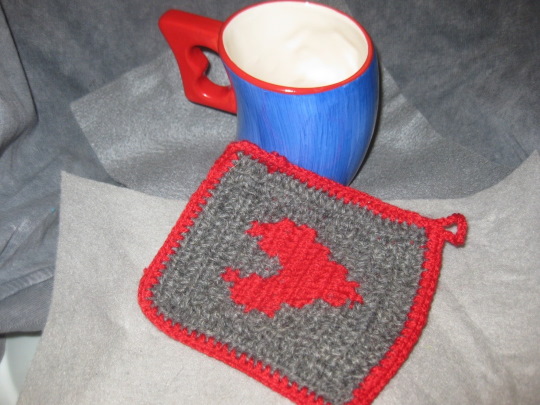
You will get a personal little surprise gift that you can give to an office colleague or a loved one. Several coasters in the same style will effectively complement the setting of any festive table, such an unusual element will definitely be remembered by guests.
Materials and tools
You will need:
- Thick yarn of grey or other colour (preferably in one strand).
- Red yarn (slightly thinner than the warp threads).
- Hook No. 2.5.
- Mug model.
Manufacturing process
How to knit:
- To get a stand in the form of a square with a side of 12 cm, at the start you need to knit a chain of 15 air loops. Then make a sixteenth loop for lifting and knit the first half-column with a yarn over into the second loop from the loop on the hook.
- Then knit 3 rows of half double crochets. Before the fourth row, you need to decide on the pattern for the heart and start counting the loops according to your plan.
For example, you can knit a heart using this pattern of 11 rows:
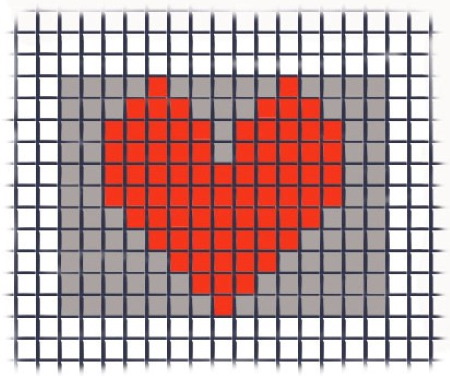
- 7 gray half double crochets (HDC), 1 red half double crochet (RDC), 7 gray half double crochets (7 HDC).
- 6 SPPN, 3 KPPN, 6 SPPN.
- 5 SPPN, 5 KPPN, 5 SPPN.
- 4 SPPN, 7 KPPN, 4 SPPN.
- 3 SPPN, 9 KPPN, 3 SPPN.
- 2 SPPN, 11 KPPN, 2 SPPN.
- 2 SPPN, 11 KPPN, 2 SPPN.
- 2 SPPN, 5 SPPN, 1 SPPN, 5 SPPN, 2 SPPN.
- 2 SPPN, 5 SPPN, 1 SPPN, 5 SPPN, 2 SPPN.
- 3 SPPN, 3 SPPN, 3 SPPN, 3 SPPN, 3 SPPN.
- 4 SPPSN, 1 KPPN, 5 SPPN, 1 KPPN, 4 SPPN.
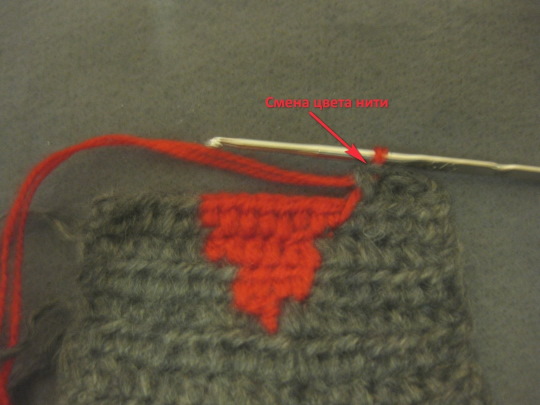
To make the product neat, it is important to correctly introduce a new color and mask the threads of the previous color. Red is introduced already on the last column of gray color, the red thread is pulled through 3 gray loops on the hook. Then, having knitted a half-column with a yarn over, do not cut off the red thread, but leave it for the next row.
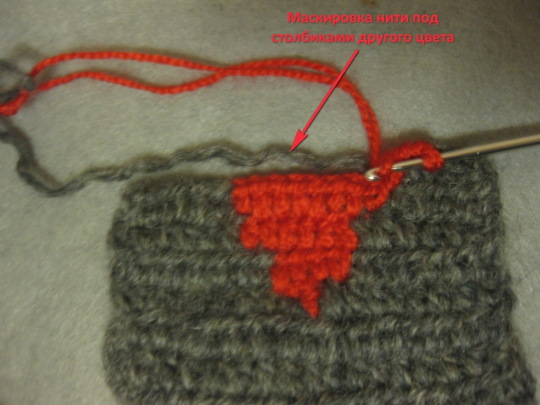
In the first row of the heart, the gray thread does not need to be masked yet, since there is only one red column, but starting from the second row, knit the red half-columns of the heart, capturing the gray thread laid along the row, thereby covering it until the moment when it is necessary to knit gray again.
The same manipulation is carried out with the gray thread in all rows and with the red thread in the center of the heart, covering it with gray columns.
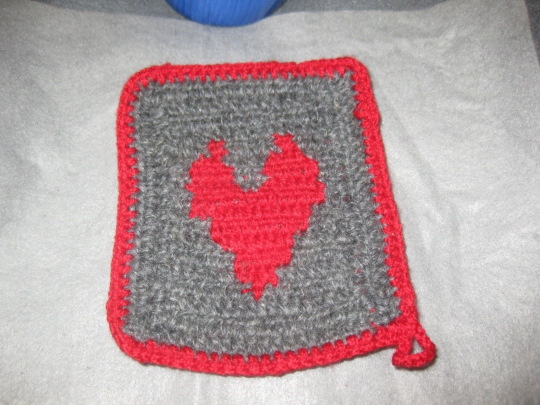
- After finishing the heart, knit 2 rows of half double crochets. From the second row, do not move to the third, but turn the product on its side and continue working, tying the left edge. Having reached the end of the side edge, make a lifting loop, turn the product over and continue tying the letter "p", then turn the product over again, tie the right edge.
- Then add red color, tie the entire square, and finally make a loop of air loops so that the stand can be hung on a hook.
The number of columns and the algorithm for tying around the heart can be changed; these parameters depend on the thickness of the threads, how the product fits when making the heart, and what size the stand should be.
Secrets for Beginners
When crocheting with a half-column, beginners encounter some problems. Small tricks that are easy to apply in practice will help solve them.
| Main problems | Solutions |
| How to change color without being noticed | When knitting, you often have to change colors. To do this neatly, you need to enter the new color in the last column of the previous row. You should start knitting a half-column, reach the stage when there are 3 loops on the hook, and pass a thread of a new color through them, then you need to make an air loop, turn the product over and knit with a new color.
|
| How to disguise thread tails | There may not be any tails of threads at all. When the color needs to be changed in the middle of a row, there is no need to cut the previous thread, it can be hidden under the columns of a different color, carefully laid along the main chain.
In this way, you can bring the thread to the edge of the product or until the moment when you need it again.
|
| How to behave if the thread breaks | When pulling the thread through 3 loops, if the craftswoman does not have enough skill, the hook often catches on the fibers and the thread breaks. In this case, there is no need to redo the entire product.
You can tie the thread with a regular knot, and straighten the ends along the thread and knit them inside the columns. If the yarn is too thick and this is difficult to do, then the ends can be pulled through with a hook to the back side and hidden inside the columns.
|
| How to maintain an attractive shape of the product | Half double crochet is a technique in which the craftswoman pulls the thread through 3 loops, which often results in too much tightening. A rectangular sample turns into a trapezoid, and a circle into a cap.
During knitting, you need to constantly check whether the product retains its shape. If a violation occurs, it can be quickly corrected. For a rectangle, it is usually enough to pull the edges in different directions so that the loops in the row straighten out. In the case of a circle, you can not only pull, but also make an increase of 1-2 loops, that is, knit 2 columns in 1 loop an extra time. If you knit a little, you can unravel the row and knit again. |
The crochet master classes presented in the article are a guide for your own experiments. It is enough to learn how to use a half-column when making a rectangle and a circle to create many interesting things - potholders, bags, coasters. Strong threads and crocheting with a yarn over will make things durable, and the needlewoman's imagination will make them unique.
Author: Pichugina Stanislava
Videos about crochet
Half double crochet: