For children, making crafts from plasticine is not only an interesting creative process. Modeling classes accelerate the physical development of the baby, which is expressed in an increase in the sensory sensitivity of the fingers, the development of fine motor skills and hand coordination. And the perception of form, color and texture instills in the child an aesthetic taste from childhood.
Features of modeling with children by age
Crafts from plasticine for children can become a favorite and useful activity if parents can properly introduce the child to this material and patiently teach different techniques of modeling. Usually, they begin to do this from 1.5-2 years, but some experts believe that for early development it is useful to start mastering modeling from 1 year.
The first lessons with the baby should be the simplest and last no more than 5-15 minutes.
It is worth choosing the softest plasticine, for example, “Luch Kroha”. First, give the child a piece of plasticine to get acquainted with, show that it can be kneaded with hands, make dents, flatten on the board with the palm or finger in the form of a flat cake. With ready-made plasticine balls, you can add snowfall or apples on a tree, flower petals or berries on a plate to the pictures.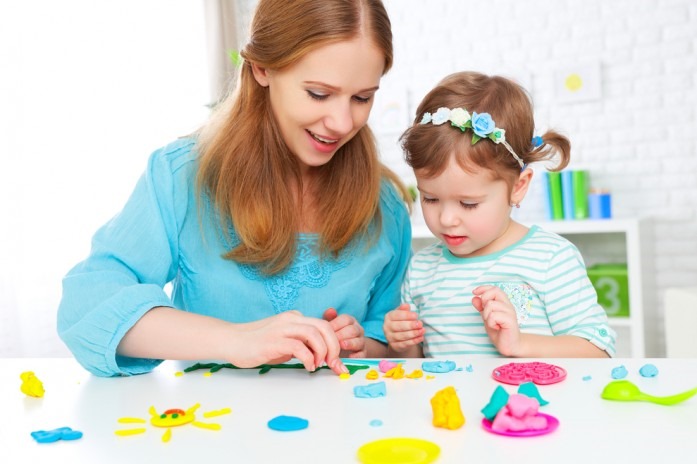
From 1.5 years, you can gradually complicate the tasks. Everything should happen in a playful way, for example, pinching off pieces is needed to feed toy birds, and spreading plasticine on a drawing of a bear cub to hide it in a den from the winter cold. This will keep the child interested in modeling.
At 2 years old, it is still difficult for a child to work with both hands at the same time, as there is a lack of coordination of movements. This quickly develops during the following modeling processes: rolling balls, rolling sausages and flattening them between the palms. From these parts, simple figures are later assembled, for example, a caterpillar, a mushroom, a pyramid.
The adult demonstrates all the actions on his piece of plasticine, and the child repeats after him. The connection of parts and the creation of different textures by pressing a stack, a toothpick and other objects that give interesting prints are studied. You can try to mold simple vegetables, fruits and symbolic figures of animals.
It is important not to impose anything on the child, to encourage his natural curiosity and experiments. At 3 years old, children understand speech well, they already have a developed ability to imitate the actions of other people. They distinguish geometric shapes, can find similarities and differences. Children learn the techniques of pinching and gluing parts, adjusting the pressure, working with the index finger and thumb.
They sculpt objects of medium complexity:
- fruits and vegetables;
- plates and cups;
- buns and cakes;
- towers, houses and animals.
A meaningful modeling on a cardboard template, including numbers and letters, will do. At this age, you should already teach your child to decorate crafts by applying small plasticine and other details, as well as various objects. You should offer your child to choose the color of the plasticine for crafts, and to make it easier for him, limit the choice to several options.
It is useful to preserve children's products and boast about them to guests. Children aged 3-4 play with toys and crafts as if they were alive, so molded figures can be included in ready-made or invented fairy tales. From 4-5 years old, children can be taught complex step-by-step modeling, create large panels and volumetric compositions in different techniques. It is worth mastering smooth transitions between adjacent colors.
You can sculpt complex animals and birds, figures of people and cars. It is also useful for creative development to create various crafts using natural materials. Over time, the child will learn to embody fairy-tale and cartoon characters without templates and step-by-step pictures.
Children aged 6-7 can easily handle modelling from plasticine. They may be interested in creating complex crafts with a large number of different details.
What you will need for the craft
Modeling classes should be held at a well-lit table, the surface of which should be covered with oilcloth. The child can wear an apron with armlets or a robe.
To make classes easier and more interesting, you need special tools:
- wooden or plastic board;
- plastic or wooden stacks of different shapes for drawing details, texture and cutting plasticine;
- plastic molds for extruding figures;
- toothpick or pen rod to create small holes;
- bowl of water;
- cardboard for plasticine compositions;
- templates with pictures;
- caps from pens or markers for squeezing out circles;
- toothpicks, skewers and sticks for fastening parts;
- any other available means.
Then you need to choose the appropriate plasticine.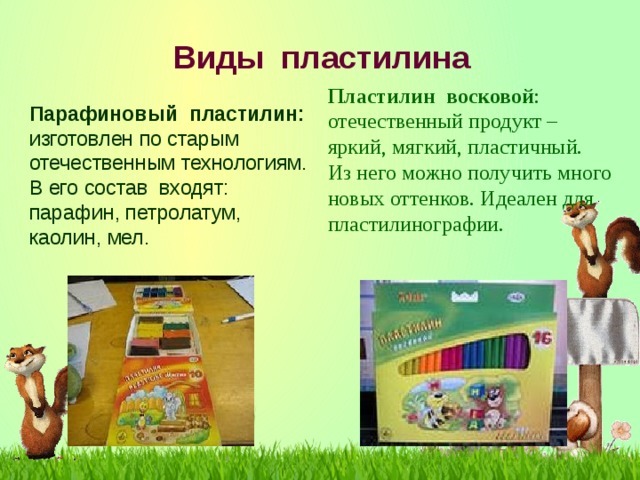
There is now a wide range of its varieties on offer:
- Plasticine of medium hardness It is used in regular modeling. It is easy to knead, holds its shape well and holds parts together.
- Soft plasticine (wax) is ideal for little ones. It requires almost no kneading, spreads well on cardboard, and is easy to make crafts from.
- Sculptural The type is suitable for children from 4-5 years old. It is created for wireframe modeling.
- Ballpoint Plasticine does not stain hands or surfaces.
For plasticine crafts you can use different additional materials:
- beads, rhinestones, buttons;
- peas, buckwheat, fancy pasta;
- seeds, cones, cotton wool;
- other suitable materials.
Materials for crafts:
| Craft | Necessary colors of plasticine | Additionally | |
| 1 | Carrot | Green, orange | — |
| 2 | Apple | Red, yellow, brown, green | 2 cloves |
| 3 | Grape | Green, purple | — |
| 4 | Watermelon | Red, white, dark and light green, yellow, black | Toothpick |
| 5 | Turtle | Green dark and light, brown, white, black | — |
| 6 | Lamb | Blue, black, white | Toothpick |
| 7 | Butterfly | Blue, light blue, brown, black, yellow, red, etc. | — |
| 8 | Tank T-34 | Green dark and light, black | Muzzle stick |
| 9 | Passenger car | Black, white or grey, 3rd color to choose from | — |
| 10 | Spiderman | Red, blue, black, white | Toothpick or match |
| 11 | Princess | Beige, soft pink, brown or yellow, white, blue | Beads or rhinestones, match |
| 12 | Palm | Brown, bright green, yellow | 6 toothpicks |
| 13 | Rose | Green, scarlet (white or pink can be used instead of scarlet) P | Stem stick |
| 14 | Aster | Yellow or orange, green, choice of pink, red, white or lilac | Stem stick |
| 15 | Plum | Green, brown, purple or dark blue | — |
How to mold vegetables and fruits from plasticine
Plasticine crafts for children will be made quickly and easily if you start creating them in the form of simple vegetables.
Carrot
Course of action:
- Several long cone-shaped blanks are rolled out of orange plasticine.
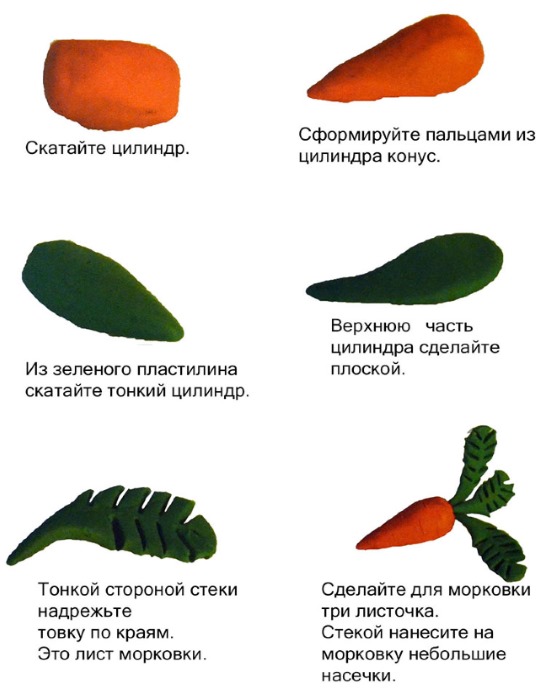
- To show the texture of this root vegetable, short lines are cut on the cones in a checkerboard pattern with a stack.
- Next, green oblong leaves are molded, and their side edges are cut with a stack into the form of a fringe.
- The leaves are attached to the fruits.
Apple
Course of action:
- A ball is made from dark red plasticine.
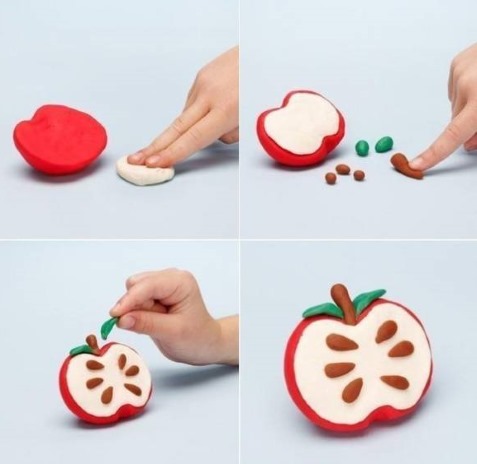
- On one side of the future fruit, a small thin cake of yellow plasticine is applied, the edges of which are smeared over the ball with a finger.
- After rolling the ball between your palms until it reaches a smooth shape, use your finger or a stack to make indentations at the top and bottom of the apple.
- You can insert a tail made of brown plasticine or take 2 cloves from spices. The fruit is stuck into the cavity from below with the long part, and from above with the cap.
- You can attach a green leaf molded from a flattened piece of plasticine.
Grape
Course of action:
- Roll 10-15 purple or lilac balls.
- Make them more oblong.
- Tie the balls together like a bunch of grapes.
- Roll out thin and long strands of green plasticine for the antennae.
- Make round green flat cakes. Use a stack to cut out five-pointed leaves from them.
- Attach leaves and spirally twisted tendrils to the brush.
Watermelon
Course of action:
- Cut a large piece of pink-red plasticine and make a ball out of it. For greater authenticity, you can give it a slightly oval shape.
- A small portion of white plasticine must be rolled between the palms into a thick sausage, which should then be kneaded into a thin layer of 2-3 mm.
- Then wrap the red ball with the resulting white ribbon and carefully smooth out the seams.
- For the watermelon rind, you will need 3 plasticines: dark and light green and a little light yellow. First, you need to mold 3 separate ribbons from them, and then twist them all together into a sausage, which should then be kneaded into a thin layer. You should get a ribbon with green-yellow streaks.
- You need to wrap the watermelon with this tape and smooth out its surface, trying to maintain an oval shape.
- Cut the watermelon in half and divide one half into slices.
- Use a toothpick to make small indentations in each slice and the remaining half.
- Stick small pieces of black plasticine in the shape of watermelon seeds into these indentations. It is convenient to do this with a needle or a toothpick.
The set of fruits and vegetables is ready.
How to make animals from plasticine
Step-by-step diagrams for sculpting a turtle, a lamb and a butterfly.
Turtle
How to sculpt:
- Roll out a ball of dark green plasticine.
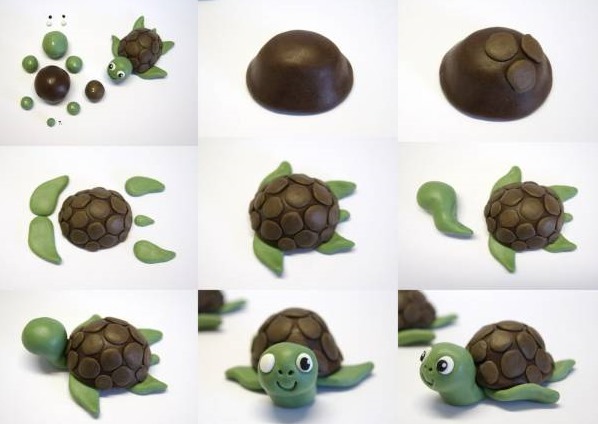
- Flatten it and attach a brown tortilla to it.
- On the brown part, make transverse lines with a stack, and on the green part, make deep square notches to imitate the texture of the shell.
- Roll out small balls of light green plasticine for the legs, tail and head.
- They need to be slightly flattened, given the desired shape, and attached to the body.
- At the ends of the paws, fingers are cut with a stack.
- Attach white eyes with black pupils to the round head.
- Use a stack to draw the turtle's mouth and nose.
Lamb
The process of making the craft:
- Roll a small oval out of black plasticine.
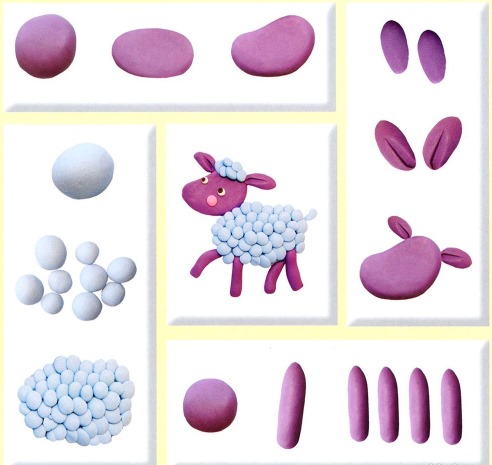
- Make and glue on elongated ears.
- Sculpt and attach white eyes with black pupils.
- Make nostrils using a toothpick just below the eyes.
- The body is made from an oval, slightly larger than the animal’s head.
- Next, you should roll many small oblong balls of white or bluish color.
- They are neatly and tightly attached to each other to the body as wool.
- Short cylindrical black legs are attached to the bottom of the body.
Butterfly
If you carefully follow the step-by-step instructions, you will get a beautiful butterfly.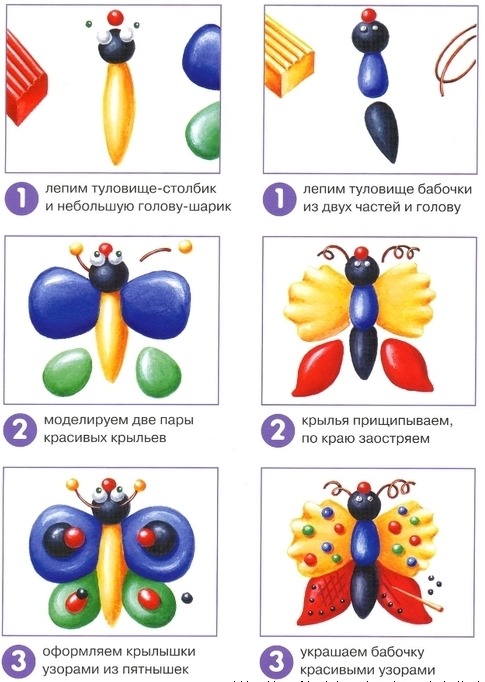
Course of action:
- Make a ball for the head from brown plasticine, as well as 2 sausages (short and long) for the body.
- The short middle part should be cylindrical. On the long part, narrowed at one end, transverse notches are made with a stack.
- These 3 elements need to be connected together.
- Small balls for the eyes are made from black plasticine, and antennae are made from thin flagella. Then they are attached to the butterfly's head.
- Knead a ball of blue and light blue plasticine until you get beautiful streaks.
- Then sculpt a pair of large and a pair of small wings.
- Using a stack, it is necessary to draw many longitudinal lines on the wings to create relief.
- Next, the wings are attached to the body.
- Small circles of different sizes are made from the plasticine colors you like and attached to the butterfly's wings. Double spots, where circles of different sizes and colors are located one inside the other, look elegant.
How to mold a tank, car from plasticine
Let's sculpt the most recognizable tank and car step by step.
Tank T-34
Course of action:
- It is more convenient to start modeling any tanks with track structures. For this, a long sausage with a diameter of about 1 cm is rolled out of green plasticine.
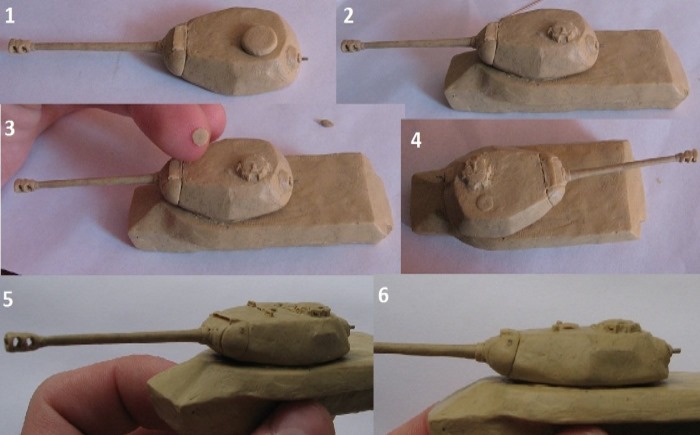
- It is cut into 10 identical segments. These are the future wheels, so they should be adjusted to an even cylindrical shape.
- It is necessary to make 4 more wheels of smaller diameter using the same scheme.
- A thin sausage is made from black plasticine, from which a thin and long pancake is created with fingers for the tank tracks. It does not require perfect evenness.
- On this flatbread, 5 large wheels are tightly laid out in the middle, and small ones are placed along the edges.
- The remaining ends of the tape cover all the wheels and are fastened to each other. Excess tape should be cut off.
- Make a second track structure.
- Add a small light green round flatbread to the center of each wheel.
- Using a stack, apply longitudinal stripes onto the black tapes.
- It is necessary to prepare 2 identical ribbons from green plasticine. Their width is the same as the black ribbons, and the length is 2 times less.
- Green ribbons are attached to the top of the black caterpillars.
- Now a rectangular block and a thick cylindrical part are made from green plasticine. Their length should be slightly shorter than that of the caterpillars.
- This piece will be the axle, it is attached along the middle of the bottom side of the block, which will become part of the body.
- Wheels should be attached to the axle on both sides.
- A diamond-shaped tower is placed on the block, and cylindrical structures are placed on the sides.
- Two round hatches are attached to the turret. Various small parts can be glued to the tank hull if desired.
- The barrel is made by spreading plasticine on a thin stick and sticking it into the tower.
- All that remains is to add the machine gun barrel and a red star to the side of the turret.
Passenger car
The color of the car is chosen according to your taste, the rest is done according to the instructions:
- Prepare a block of plasticine of a bright color and rectangular shape.
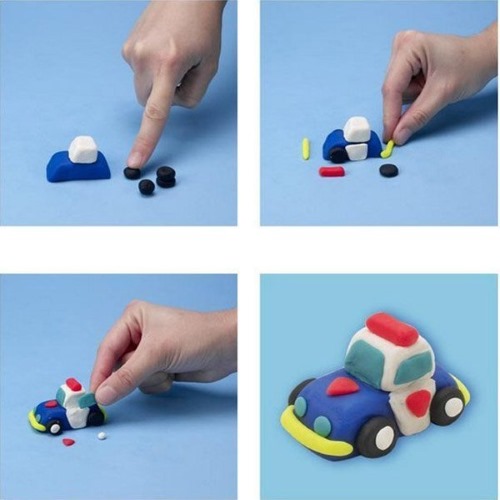
- Use your fingers to form the desired shape of the car body. Work on the corner elements, outline the hood and trunk areas with a stack or a toothpick.
- Use a knife to cut out small semicircular recesses for the wheels.
- Roll into a thick, black, cylindrical sausage.
- Cut off 4 segments from it and make wheels out of them.
- Insert the wheels into the cut-out recesses of the body.
- Roll out the light plasticine into a wide layer, from which the car windows and headlights are cut out.
- They are glued to the right places.
- A white circle is attached to the center of the wheel.
- Side mirrors are added in body color.
- Thin black strips of plasticine can be attached to the windshield as windshield wipers.
The car is ready!
How to mold a person from plasticine
Plasticine crafts for children can be difficult to make if you have to sculpt human figures.
Spiderman
The image of Spider-Man is still popular among children.
https://www.youtube.com/watch?v=Zjjtz9Q2Ilc
The sequence for creating this character is as follows:
- Roll a small piece of red plasticine into a ball.
- Give the balloon an oval shape of a human head.
- Use the flat part of the stack to make wide indentations for the eyes. Insert eyes from white plasticine into them, then stick thin black strands along the contour of the eyes.
- Cut a block of red plasticine the size of a matchbox.
- For the waist, one side of the block needs to be narrowed with your fingers.
- On the other side of the body, the neck should be formed.
- Thin layers of blue plasticine are attached to the sides.
- For the legs, a thick blue sausage is made, which is bent in the middle in the shape of a check mark.
- On the resulting part, it is necessary to sculpt the relief of the upper part of the legs. Then knees and calves are added.
- Next, add 2 sausages, flattened on one side to form red boots.
- Now the torso and legs of Spider-Man should be firmly connected.
- Arms with powerful biceps are molded from a thick red conical sausage, with long blue cakes attached to the inside.
- To convey the movement of Spider-Man, it is better to attach the arms to the shoulders in different positions.
- The web will be more accurate if you use not thin plasticine strips, but drawing with a stack. A little black plasticine is periodically collected on the tip and stripes are drawn on all the red parts of the suit and head.
- The final step is to connect the head and neck with a match.
Princess
For children, creating this craft from plasticine will require accuracy and diligence, then at the end of the modeling you will get a beautiful princess.
Progress of sculpting:
- Roll an oval out of beige plasticine. Make it sharper on one side and use your fingers to mark the chin.
- Make elongated indentations for the eyes with a stack. Insert the white parts into them first, and then the blue circles.
- The nose is sculpted and eyebrows are added.
- Using a stack, a smile is cut out, and lips and eyelashes are carefully drawn with plasticine.
- For hair, thin threads of brown or yellow color are rolled out.
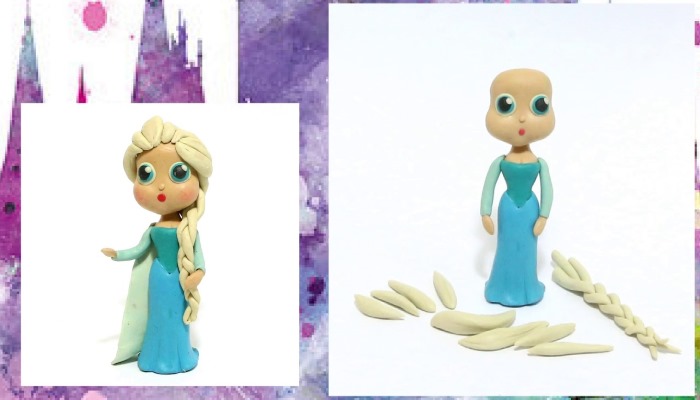
- The resulting threads are attached to the head in the form of a smooth hairstyle or spiral curls.
- A cone is made from a block of soft pink plasticine to mold a long skirt.
- A wide hem in the shape of a bell is pulled out with fingers around the entire circumference of the cone.
- The body part is made from a piece of pink plasticine, where one side is narrowed to indicate the waist, and the wide side highlights the chest.
- The neck and the continuation of the chest are molded from a beige block.
- The two parts of the body are connected, and pink puff sleeves and short beige parts of the arms are added.
- Roll sausages from pink plasticine to create hands in long gloves. In places of hands the plasticine should be flattened and cut with a stack into 3-5 parts.
- Attach the gloved hands to the princess's elbows.
- On the parts and in the joints, the plasticine should be carefully smoothed out.
- The skirt is decorated with vertical stripes and numerous rhinestones. The bottom of the hem can be decorated with large beads.
- You can make a necklace out of rhinestones for your neck. The rest of the outfit depends on your personal imagination.
- A match is inserted into the head from below, the other end of which is stuck into the neck of the body.
- The princess's hair can be topped with a crown made of yellow plasticine or rhinestones and beads.
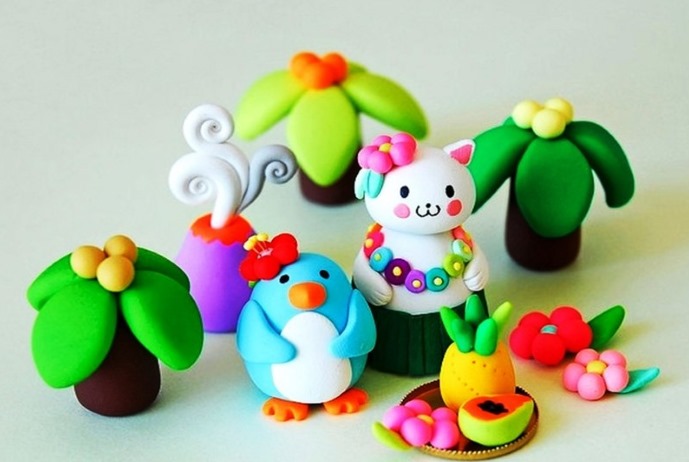
How to make flowers and plants from plasticine
With the help of step-by-step actions, anyone can create original flowers and trees.
Palm
The sculpting process:
- Make lots of balls for the trunk out of brown plasticine and flatten them so that they look something like wheels.
- These parts are strung on a toothpick.
- Five long thick palm leaves are made from green plasticine.
- Veins are made on them with a stack.

- One end of the toothpicks is inserted into the base of the leaves and the other end into the top brown ball.
- Attach the finished palm tree to a yellow layer of plasticine, symbolizing a sandy island.
Rose
Progress of sculpting:
- A layer of green plate is applied to a long, rigid stick.
- From 10 balls, thin flat cakes with uneven edges are created.
- One of the flat cakes should be made long. It is attached and wound on a stick in the form of a bud.
- Further formation of the rose occurs by adding new petal cakes. To get a beautiful flower, each subsequent petal should overlap the previous one by at least a third.
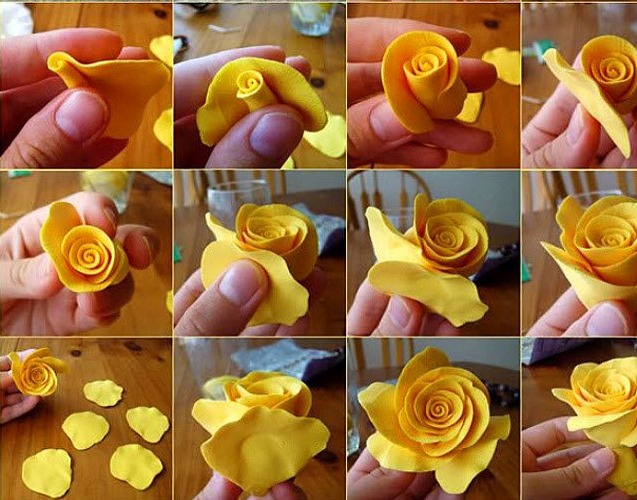
- Once the bud is complete, the leaves of the plant are assembled from thin green sausages and teardrop-shaped flattened parts.
- These leaves are then attached to a stick.
- For authenticity, thin thorns rolled from plasticine are added to the stem.
- The rose is ready. It can be placed in a low vase.
Aster
Progress of sculpting:
- Cover a strong stick with a layer of green plasticine.
- Make the aster's receptacle in the shape of half a ball.
- Sculpt thin, elongated leaves and attach them flat to the flat part of the receptacle.
- For the aster petals, roll out the bright pink plasticine into a flat long strip. You can also use other colors for the aster.
- This tape should be cut with a stack into a thin fringe, similar to a comb.
- The yellow strip for the center of the flower is prepared in the same way. Its size is 3 times smaller than that of the long ribbon.
- First, the yellow fringe is rolled into a bundle, then the pink fringe is wound around it.
- To make the flower beautiful, the flower petals must be straightened and fluffed up.
- Glue this colored part to the flat part of the receptacle on top of the leaves.
- Next, the stem is attached to the inflorescence.
- Long narrow leaves are attached to the stem.
If you make several flowers with buds of different colors, you will get a beautiful bouquet.
Plum tree
Progress of sculpting:
- A green ball forms a round tree crown with small dents and protrusions.
- A thick cone-shaped trunk is made from brown plasticine.
- The upper part of the trunk is cut into 5-6 branches, which must be spread apart.
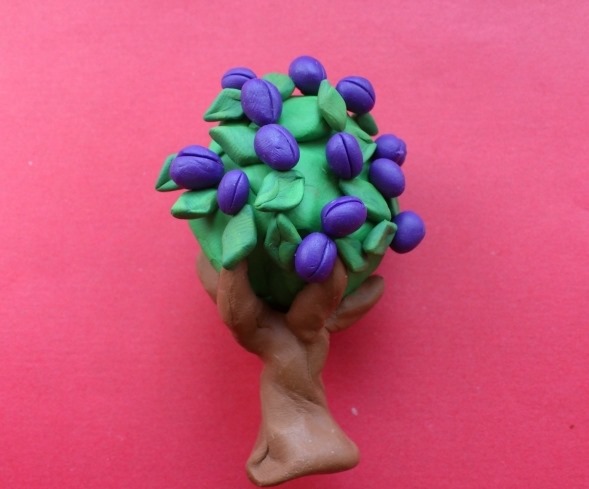
- A green crown clings to the branches on top of the trunk.
- For the fruits, small oval balls are made from purple plasticine.
- Using a stack, make a cut along the fruit, just like on real plums.
- Next, diamond-shaped green leaves are made, which will give the tree volume.
- Fruits and leaves are evenly attached to the crown from all sides.
- The tree is ready.
Crafts made from plasticine using simple step-by-step instructions will become the initial stage of mastering decorative applied art for children.
Author: Victoria Ivanova (viktoriia447)
Article formatting: Oksana Grivina
Video about plasticine crafts for kids
Collection of ideas for children's crafts:
Wow, how much you can make from ordinary plasticine. These are real works of art!
Very good!