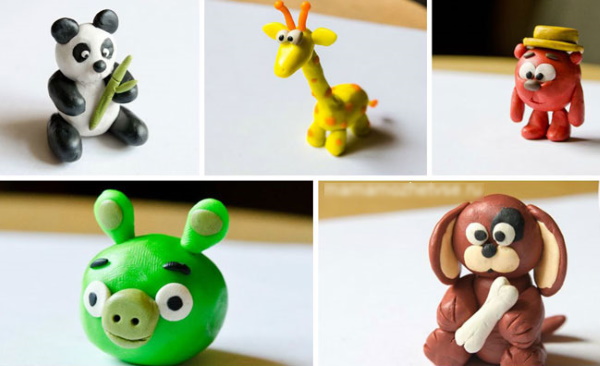
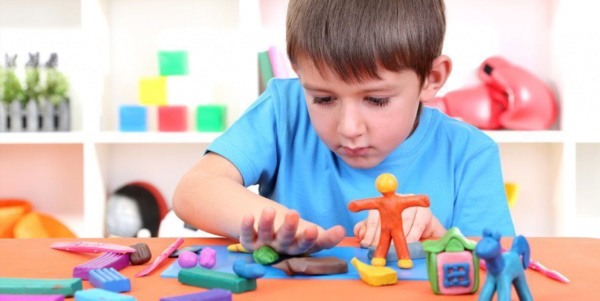
All types of creativity are used for the harmonious development of children. Plasticine modeling classes are included in the Kindergarten Education and Training Program. This is one of the developmental activities for children starting from 2 years old, which is in the section "Artistic and aesthetic education". Schoolchildren aged 7-8 are more conscious in modeling, and their crafts can be very interesting.
According to some information, plasticine appeared more than 500 years ago, and its samples were white or gray. The first official data on this craft material appeared only at the end of the 19th century. The author of this discovery is not known for certain, since a soft plastic mass similar in its qualities was patented almost simultaneously in several countries by different people.
In addition, this material was used in different ways: somewhere as clay, somewhere as window putty, and later for children's modeling activities. Over time and with new discoveries in different areas of science, plasticine began to be produced in several, not very bright colors. It had to be warmed up for a long time and kneaded in the hands so that it became soft and pliable for modeling. Nowadays, you can buy plasticine of different types, colors and degrees of plasticity.
This makes it possible to use it as an interesting material for a variety of crafts:
| Types of plasticine | Peculiarities | Purpose |
| Classical | · Not particularly soft; · you need to knead it in your hands for a long time. | Suitable for working with older children. |
| For children's creativity | · Very soft;
· easy to mix; · has high plasticity; · stretches well. | Suitable for working with children of preschool age. |
| Wax | · Stretches well;
· plastic; · easily smudged; · sticks well. | Suitable for working with small children. |
| Floating | · Does not sink in water;
· does not stick well. | Children need help from adults when working. |
| Vegetable | · Made from natural ingredients (flour or starch);
· does not stick well. | Children need help from adults when working. |
| Ballpoint | · Pleasant to the touch;
· easy to work with; · safe. | Suitable for working with children of any age;
good for developing fine motor skills in young children. |
What you need to work with plasticine
Crafts from plasticine for children aged 7-8 can be very interesting. In addition, at this age, children already have good modeling skills. The variety of crafts largely depends on what material and tools are prepared for work.
Tools required:
- board or thick oilcloth (plastic) with a flat and smooth surface for modeling. These items are necessary to protect the surface of the table and roll out the modeling material;
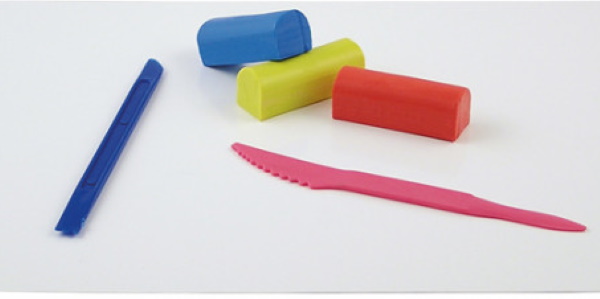
- stacks. These are plastic tools of various shapes, designed to divide plasticine into parts and give it different shapes and textures. They can be in the form of a smooth knife or with serrations on the blade. They can have a point, loop or spatula at the end;
- rolling pin. It can be smooth for rolling out a perfectly even layer, or embossed for creating texture on a plasticine canvas;
- texture sheets needed to give texture to the molding material;
- molds. They resemble sand molds and are used to form figures and create relief on them.
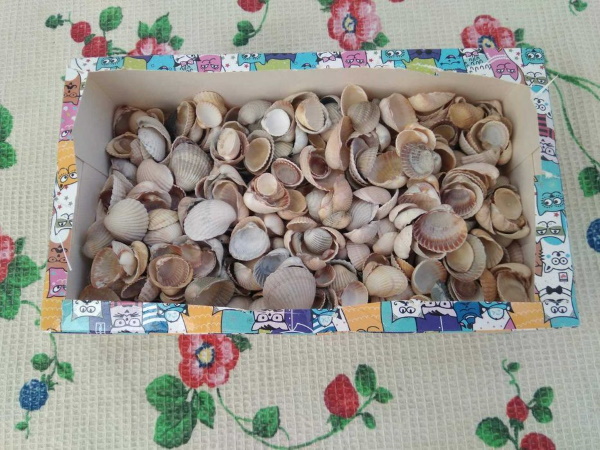
In addition, to create a variety of interesting crafts from plasticine, you can use all sorts of improvised and natural materials.
These could be:
- wire;
- toothpicks;
- cardboard;
- colored paper;
- twine;
- shells;
- small stones;
- eggshell;
- cones;
- acorns;
- twigs.
Organization of the workplace
Not only children aged 7-8 like to make crafts from plasticine. Modeling is a favorite activity for children of different ages. In order for this activity to be fruitful and effective, it is necessary to properly prepare the workplace. It is better to place it closer to the window so that the light source is located on the left. The table at which the work will be carried out should have a flat horizontal surface and correspond to the height of the child.
It should be remembered that the height of the chair should be such that the legs, having support, are located at an angle of 90 degrees in relation to the floor surface. In the evening, it is better to put a lamp on the work table for additional lighting. The organization of the workplace includes the preparation of tools and materials for working with plasticine, which were discussed above. After all the preparations, you can start sculpting.
Master class on making a craft from plasticine called "Horse"
To work you will need:
- plasticine in 4 colors: brown, black, white, red, yellow and gray;
- smooth board for modeling;
- a glass with a smooth blade for cutting plasticine.
Work order:
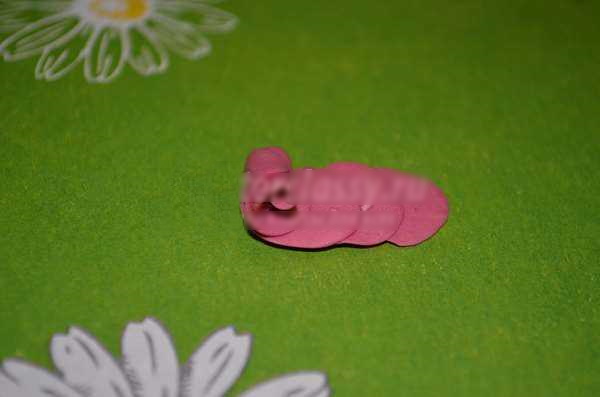
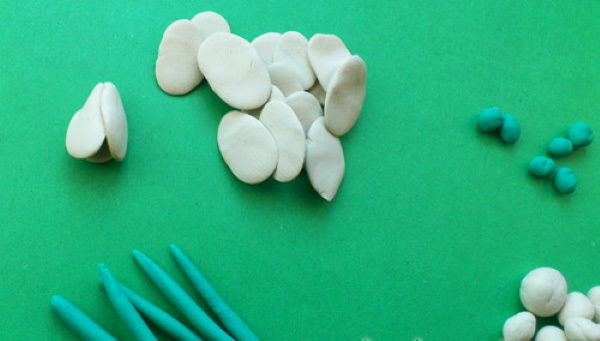
- Take a block of brown plasticine and use a stack to divide it into 2 equal parts. One of them will be used to mold the body and neck, the other - the head and legs.
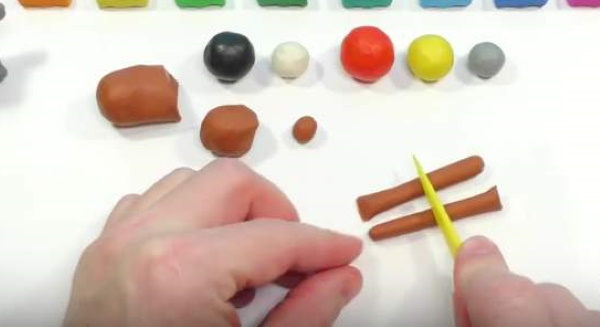
- Divide one half into 2 equal parts (head and legs), and cut off a small piece of plasticine from the 2nd to make the ears.
- Roll one of the 2 pieces cut off for sculpting the head and legs on a board into a long sausage and divide it with a stack into 4 equal parts. These are the legs.
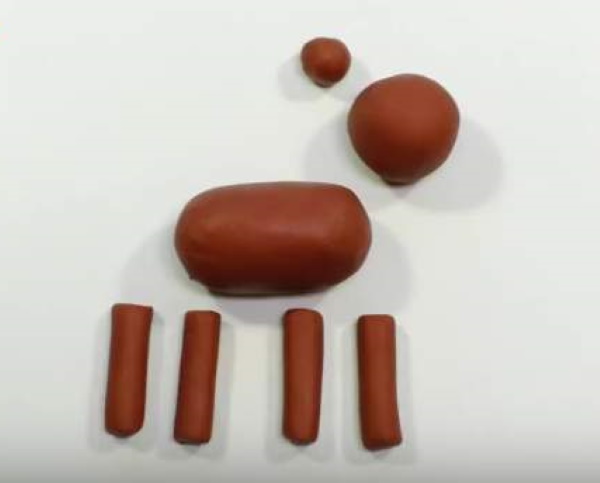
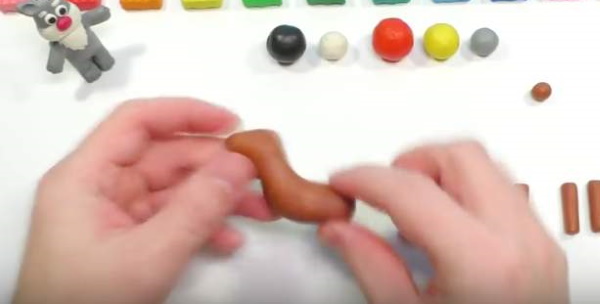
- Sculpt the body and neck from the largest piece of plasticine that remains after separating all the parts. To do this, roll a thick sausage and slightly stretch it, bend one part of it slightly upwards. This is the neck.
- Smooth out any uneven areas with your fingers.
- Next, roll a ball from the part of the plasticine that was separated for the head.
- Pull one side slightly and smooth it out. This is the head.
- Place the head on the neck on the body and smooth the joint with your fingers. You now have a body with a head and neck.
- Take the smallest piece of plasticine that was separated for the ears and divide it in half with a stack.
- Roll each resulting piece into small balls with your fingers, slightly stretching them into a drop shape, flatten and stick to the head on both sides.
- Smooth the joint with your fingers.
- Stick the sausages rolled for the legs to the body and smooth out the joints. Where this is difficult to do with your fingers, smooth out the plasticine with a stack.
- Use a stack to make small indentations on the inner surface of the ears.
- Pinch off a small piece of black plasticine and roll it into a thin sausage on a board. Flatten it and apply it to the head from the crown along the neck to the back. This is the mane.
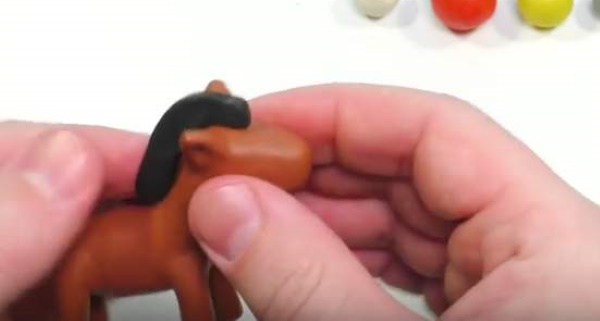
- Use a stack to draw stripes in the form of hair on the surface of the mane.
- Separate a piece of black plasticine, roll it into a small sausage, and divide it into 4 equal parts. These are the hooves.
- Glue each resulting piece to the 4 legs of the horse.
- Roll a piece of black plasticine between your fingers, forming it into a flattened triangle.
- Draw 3 stripes on each side with a stack.
- Glue the resulting tail to the back of the horse's body with the sharp end. The wide part should be directed downwards.
- On both sides of the muzzle, use a stack to make small indentations for the eyes.
- Roll 2 small balls from white plasticine and 2 (even smaller) from black.
- Place white balls into the holes you made, then black ones on top of them. Press lightly. You have eyes.
- Use a stack to draw a mouth on the face.
- Use a toothpick to make nostrils.
- Separate a small piece of red plasticine and roll it into a sausage.
- Flatten the sausage into a flat, thin oval.
- Roll a thin, long sausage from a small piece of yellow plasticine and glue it along the outline of the red oval.
- Place the resulting figure on the horse's back. You will get a red and yellow saddle.

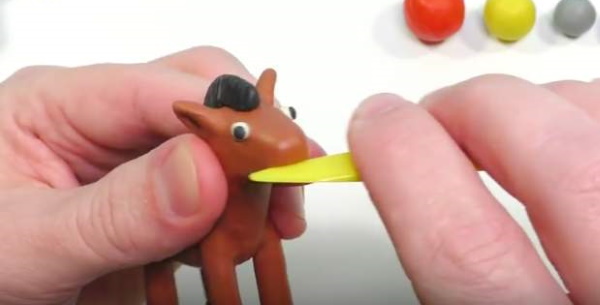
- Roll a thin, long sausage out of a small piece of red plasticine.
- Wrap one part of it around the horse's muzzle in the form of a ring. Stick one end of the other part of the sausage to the ring on one side of the head, and the other end to the other side. This is the bridle.
- From a small piece of gray plasticine mold stirrups. To do this, roll a thin sausage and separate 2 small parts from it.
- Make rings from the resulting flagella and align them on one side.
- Attach a small yellow plasticine flagellum to each side of the saddle.
- Glue the resulting stirrups with the rounded end facing up and the straight end facing down.
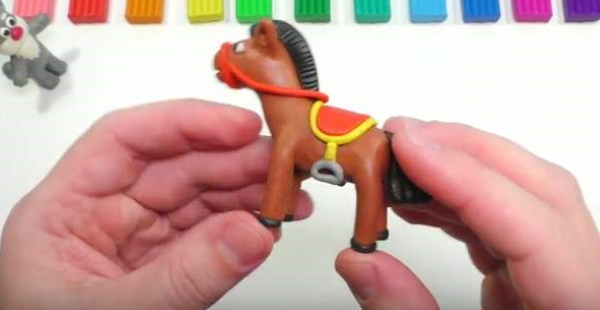
The horse with saddle, bridle and stirrups is ready.
Crafts made from plasticine for children aged 7-8 can be appliques that can be given, for example, to mom on March 8th.
Master class on making applique from plasticine on cardboard "Roses in a basket"
To work you will need:
- plasticine of 3 colors: brown, red, green;
- yellow cardboard;
- simple pencil;
- smooth board for modeling;
- scissors;
- compass;
- a glass with a smooth blade for cutting plasticine.
Work order:
- On the back of the cardboard, use a compass to draw a circle with a diameter of 20 cm and cut it out. This can be done in advance.
- Use a pencil to outline the outline of the future basket, trapezoidal in shape, on the resulting base.
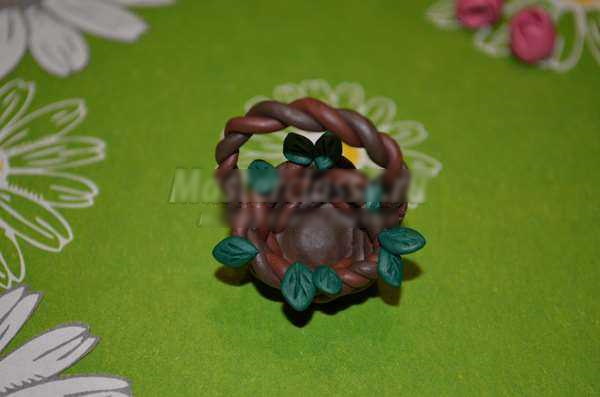
- Cut a block of brown plasticine into pieces using a stack.
- Roll all the pieces on a board into thin long ropes. They will be used to make a basket on a round base cut out of cardboard.
- Using a stack, cut the resulting bundles into “rods” for the basket.
- Place the resulting parts on the outline of the image. Cut off any excess pieces with a stack.
- Twist the longest brown plasticine strands together in pairs. Make an arched basket handle from one of the resulting pieces.
- Decorate the top and bottom of the basket with twisted strands. It is ready.

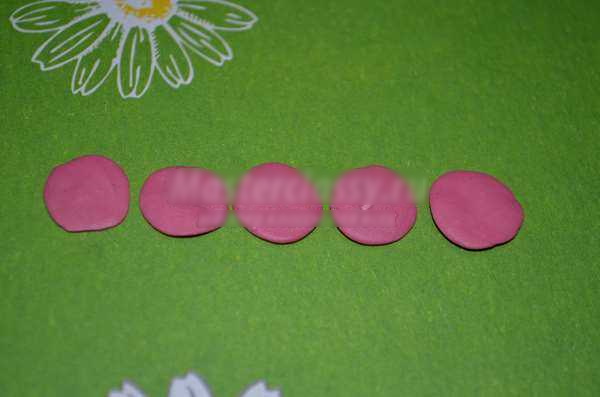
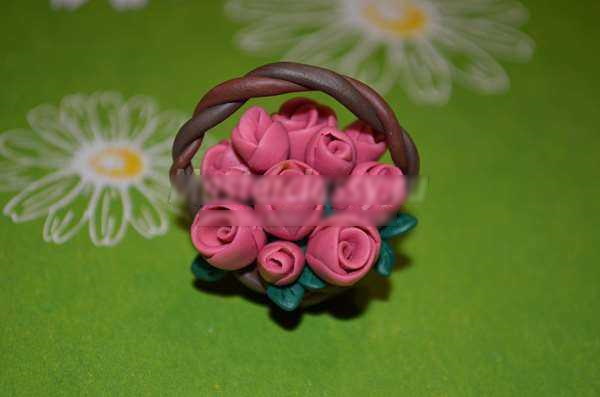
- To make roses, divide the red plasticine into parts. For 2 flowers, you will need 5 parts in the form of plasticine balls of different sizes.
- Each ball needs to be rolled into a flat round cake. This can be done simply with your fingers.
- Roll the smallest of the resulting pieces into a tube.
- Place it on a slightly larger piece and wrap it around the first one.
- In this way, place and roll up all the prepared rose “petals” one by one.
- Cut the resulting bundle of "petals" in half with a stack. You will get 2 roses.
- Carefully straighten the petals with your fingers. You can use a stack to help with this.
- Make the required number of flowers and arrange them beautifully on a yellow cardboard base.
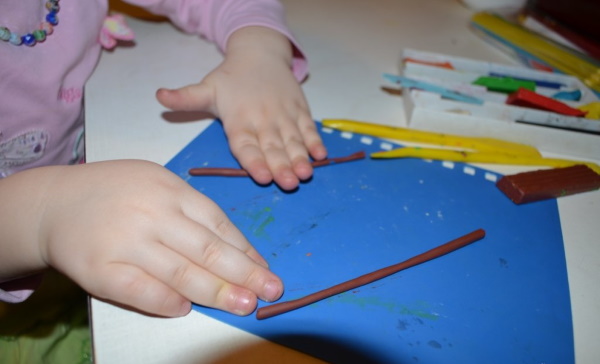
- Roll thin ropes from green plasticine.
- Cut them with a stack into pieces of the desired size. These are the stems.
- Glue them to the base of the roses in the basket.
- Flatten small balls of green plasticine with your fingers and mark sharp corners on both sides. These are leaves.
- Attach them to the stems of the flowers in the basket (all parts should be pressed lightly against the cardboard base).
A beautiful bright postcard with roses in a basket as a gift for mom is ready. Crafts from plasticine for children aged 7-8 can be made in the form of a panel on any topic. These can be images with volumetric elements or flat ones, made with strokes of plasticine plastic mass.
Methods of such modeling are called plasticineography. Using this method, children are taught to correctly apply and spread plasticine on the surface, make strokes with it, and regulate the pressure on the parts when making crafts.
Master class on making a picture from plasticine "Snowdrop"
To work you will need:
- plasticine of 3 colors: blue, white, green;
- A-4 format cardboard;
- stack.
To create the base of the painting, you will need a large amount of blue plasticine.
Work order:
- After warming up the blue plasticine in your hands, apply small pieces of it with large sweeping strokes from top to bottom over the entire surface of the cardboard. This is the background for the painting.
- After covering the background with a blue layer, smooth the entire surface with your fingers (you can use a rolling pin). Then, using a stack or pencil (pressing the lead), apply the outline (contours) of the objects on the future painting (snowdrop and snow at its base), mark the center.
- Divide the green plasticine into 3 parts and roll out long sausages (strands) from it. These will be the stems and elongated leaves of the flower.
- Place all the resulting stems on the background according to the sketch from the center up.
- Press it onto the background with light movements and flatten everything slightly.
- Roll 3 small sausages from white plasticine, flatten them between your fingers and place them overlapping at the bottom, at the edges of the stems in the center of the picture. Press them to the base. This is snow.
- Divide the white plasticine into 5 parts using a stack: 3 large and 2 small.
- Divide the 3 larger parts into 3 more parts, and divide the 2 smaller parts into 2 parts each.
- From each part of the resulting white lumps, form oblong sausages with pointed ends on one side.
- All the resulting parts are slightly flattened, giving them a flat shape. These are the petals of the snowdrop.
- Attach 3 petals to 3 stems and 2 to the remaining ones.
- Press everything lightly onto the base.
A beautiful spring picture made of plasticine is ready. You can combine different techniques in a craft made of plasticine. For example, a combination of painting with strokes of plasticine with three-dimensional figures from it looks beautiful.
Master class on plasticine painting "Bullfinch on a snowy rowan branch"
To work you will need:
- a sheet of blue A4 cardboard;
- plasticine of 5 colors: white, blue, red, brown, black;
- stack;
- simple pencil.
Work order:
- Prepare a sheet of blue cardboard and draw the outline of a bullfinch on a snow-covered rowan branch.
- Using a stack, divide a piece of black plasticine into 3 parts.
- Using your fingers, apply strokes in 2 parts, filling in the contours of the bullfinch image (head, upper part of the wing and tail), trying to make the image flatter.
- Divide the remaining piece of black plasticine into 6 equal parts and roll out small sausages of the same size; these are the fingers on the bird's feet; place them on the drawing and press.
- Use a stack to divide a piece of blue plasticine into 4 pieces of different sizes.
- Roll thin flagella from 3 pieces, flatten them slightly and apply to the lower part of the wing (these are feathers).
- From the 4th piece, mold a triangle and attach it to the drawn outline of the beak; use a stack to draw a strip on it.
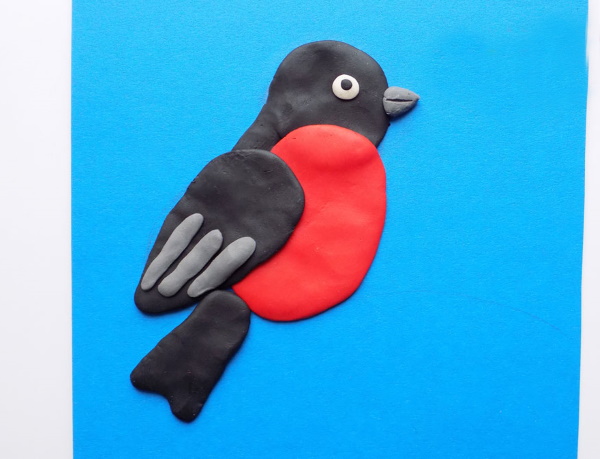
- Roll out flagella of different sizes from brown plasticine and apply them to the image of a rowan branch.
- Divide the red plasticine into parts: 1 large and many small ones.
- Apply most of it with strokes onto the image of the bullfinch's chest.
- Roll small pieces of red plasticine into balls and place them on the image of rowan berry clusters, pressing and flattening them slightly.
- Roll many different sized balls from white plasticine and glue them onto the branches, pressing them down. This is snow.
- Roll the smallest pieces of white plasticine into balls and stick them onto the cardboard in different places to make snowflakes.

The combined plasticine picture craft with a winter theme is ready.
Tips and tricks
Crafts from plasticine for children aged 7-8 will be easier to make and save if you listen to some recommendations and advice:
- It will be easier to work with classic hard plasticine if you first place it in a sealed container and lower it into hot water;
- It is better to pre-cool light, too soft plasticine by placing it in a sealed bag and cold water, or simply in the refrigerator; after cooling, it will be easier to cut out small parts;
- To securely attach the parts to each other in plasticine figures, you can use improvised materials: wire, fishing line, threads, toothpicks and matches;
- Plasticine goes well with various natural materials, which will make crafts more interesting and varied; you can safely use shells, pine cones, acorns, seeds, pasta, pine needles and various types of cereals in crafts;
- For storing children's crafts, you should use plastic boxes, this will protect them from drying out and deformation;
- to create large crafts and save plastic material, you can use various forms (cut plastic bottles, plastic cups, Kinder Surprise cases, etc.), they can be covered with plasticine on top and then create the intended figures;
- Children's crafts that are dear to their hearts can be stored for a long time by placing them in a cool place where there is no access to sunlight.
Making crafts from scrap materials and plasticine can be a fascinating activity not only for children aged 7-8, but also for their parents. Joint creativity and common interests bring people together and give them a lot of positive emotions and useful skills.
Video about plasticine crafts for children
How to make a snail from plasticine: