Creative activities for first-graders often include working with plasticine. This type of creativity develops imagination, thinking, and fine motor skills, preparing the child's fingers for writing. Often, crafts become gifts for parents.
Features of modeling with a child aged 6-7 years
At the age of 6-7 years, it is still difficult for a child to think through the course of action and imagine the final result, but the degree of complexity of the work that he can perform is significantly higher than for a younger child.
When starting out with modeling, it is recommended to provide a visual example. At first, the child will constantly look at the sample, then the time needed to remember the details will decrease.
When working with first-graders during modeling classes, the teacher should approach each student individually, discussing their work and offering to tell others about it. This way, the child develops a desire to achieve better results, to be more successful than others.
Crafts from plasticine 1 class usually performs in stages with great interest and enthusiasm. It is important to accompany the lesson with a game. This way creative abilities will be revealed better and easier.
And the most important thing is to take into account the characteristics of each student. Since children come to 1st grade completely different, one child knows how to work with plasticine well from kindergarten, while another encounters difficulties during work.
What you will need for the craft
Materials and tools needed to make crafts with 1st grade students, are not much different from those required for other age groups:
- Plasticine.
- A board or mat for work.
- Stacks.
- Paper scissors.
- Rolling pin.
- Molds for repeated production of flat figures.
- Apron and armlets.
There are many varieties of plasticine suitable for modeling with children aged 6-7 years.
Important! Particular attention should be paid to the composition. The material should not contain substances hazardous to the body.
| A type of plasticine | What kind of work is it suitable for? | Pros | Cons |
| Paraffin | for most jobs, this type of plasticine is used more often than others in modeling classes | affordable price, easy to find in stores, composition of natural ingredients | quite hard, stains clothes and hands |
| Floating | — | floats on water, soft, does not stick, does not stain hands | price |
| Wax | — | soft, flexible, easy to mix different colors, does not stick, easy to wash off hands and clothes | price |
| Freezing | ideal for crafts | plastic, suitable for sculpting figures and statues that last for a long time | price, not suitable for repeated molding, hardens quickly |
| Ballpoint | — | does not stick to hands and clothes, large palette of colors, easy to mix with each other | price |
| "Smart" | — | It has different consistencies, stretches easily, tears, can be magnetized, and is pliable. | price |
Stacks are used for cutting plasticine or giving it relief. They can be made of wood or plastic. Plastic ones are considered the most convenient and safe for children of any age, including first-graders.
Scissors are used to cut plasticine into pieces when a more even and clear cut is needed, which a stack cannot provide. A rolling pin is needed to roll out the layers. A special rolling pin of small sizes is available for sale.
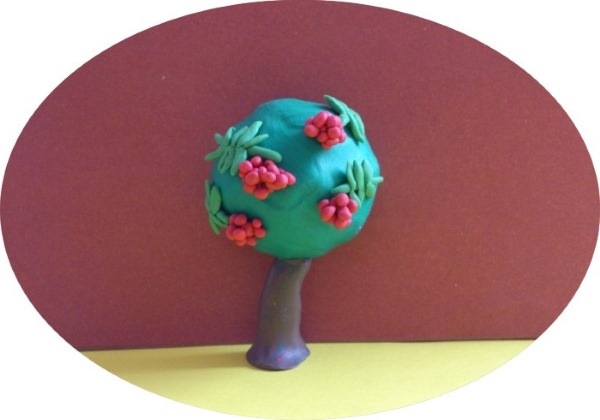
Step-by-step instructions for sculpting rowan
Crafts from plasticine of the 1st grade usually include various figures of the world of flora and fauna. This craft is not particularly difficult to make, while children develop fine motor skills and study shapes of different sizes.
To work you need:
- plasticine of green, brown and red colors;
- a stack or scissors for cutting plasticine.
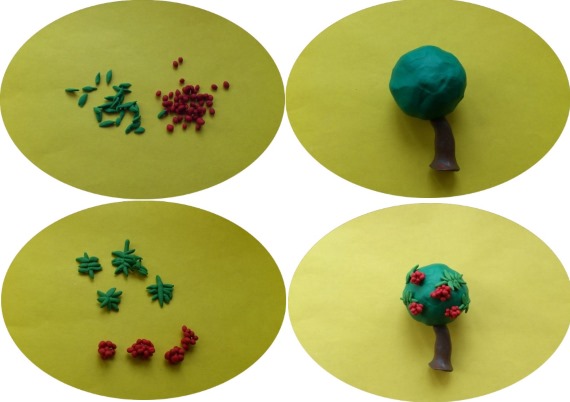
The creation process consists of the following steps:
- Form a ball from a small piece of green plasticine.
- Form a cone from brown plasticine, make it slightly curved – this is the trunk of the future tree.
- Connect the ball and the cone.
- You need to make small balls from red plasticine and leaves from green plasticine.
- Then you need to form rowan berry clusters. To do this, you need to connect the leaves and red balls.
- The next step is to place the resulting bunches on the base made in step 3.
The result was a beautiful and easy to make tree.
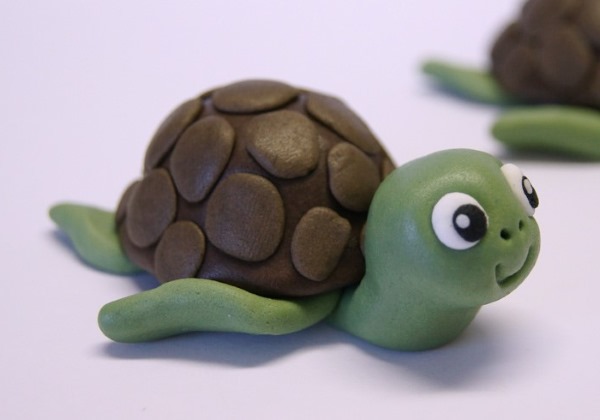
Step-by-step instructions for sculpting a turtle
A first-grader can easily make a cute turtle out of plasticine, despite the fact that it is a little more difficult to make than the previous figure.
So, for work you will need:
- plasticine of brown, green, white and black colors;
- cutting stack or scissors;
- glass with a sharp end.
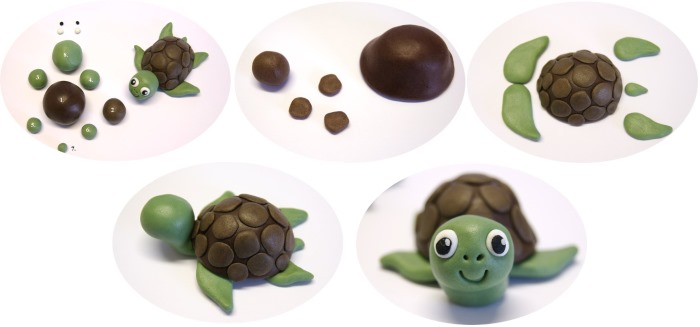
Step-by-step modeling:
- The first step is to make the necessary preparations:
- 1 ball with a diameter of 4 cm, brown;
- 1 ball with a diameter of 2.5 cm, 2 balls with a diameter of 1.5 cm, 2 balls with a diameter of 1 cm and 1 ball with a diameter of about 0.8 cm, green;
- 2 small white balls;
- The 2 smallest ones are black.
- The brown ball must be formed into a shell by cutting off the bottom and flattening the edges.
- From the remains you need to make small flattened circles and attach them to the shell.
- The head, paws and tail are made from green balls. After that, they are attached to the shell.
- Use your fingers to make small indentations on your head for the future eyes.
- To make the eyes, flatten the white balloons from step #1 and attach the black balloons on top. Then attach to the marked places.
- Using a sharp-ended stack, draw a nose and mouth.
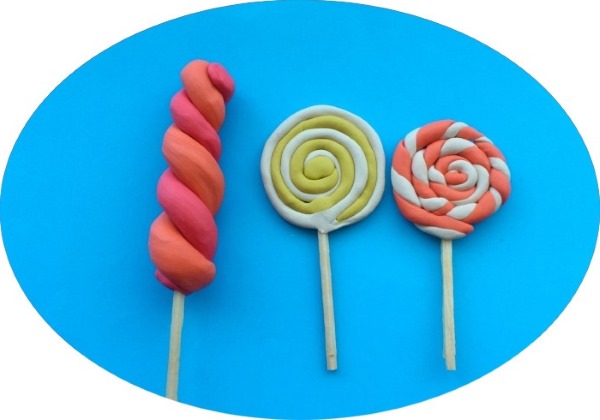
Step-by-step instructions for making candies
Making candies from plasticine is incredibly exciting. And they look almost like the real thing.
To work you need to prepare:
- plasticine - it can be any color you like, but the most suitable ones are white, red, yellow, orange;
- cutting stack or scissors;
- matches or wooden sticks.
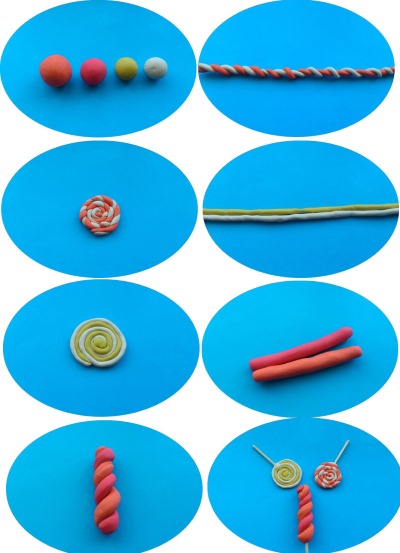
Execution scheme:
- Using colored plasticine, you need to make the base - balls.
- From white and orange plasticine you need to make long and thin bundles, and then twist them together into one bundle.
- This structure is then rolled into a spiral shape. The first candy is ready.
- Plasticine of yellow and white colors is also rolled into thin threads, after which they are placed next to each other.
- Afterwards, they need to be carefully twisted into a spiral. The second blank is ready.
- From red and orange plasticine you also need to form 2 bundles, only thicker.
- The bundles need to be intertwined. The third piece is ready.
- The last step is to put the blanks on matches or wooden sticks.
Step-by-step instructions for sculpting a panda
This craft, despite its apparent complexity, is quite easy to make.
To complete the work you will need:
- plasticine of white and black colors;
- cutting stack or scissors.
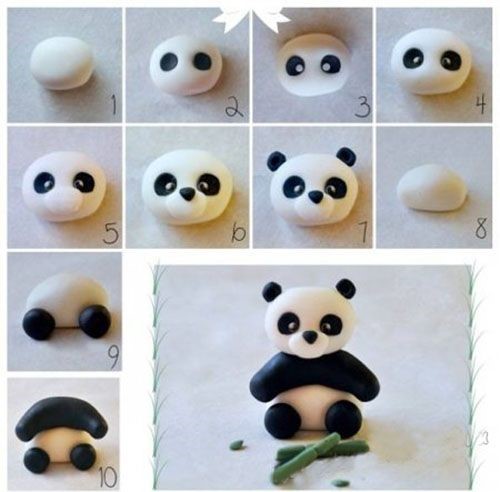
Progress of work:
- What needs to be done:
- 1 ball of white plasticine – panda’s head;
- 2 balls of black plasticine – panda eyes;
- 2 small white balls.
- Using your fingers, make 2 small indentations on the head base, flatten the black blanks and place them in the indentations.
- Place small white balls in the inner corners of the eyes, and attach small black dots to them.
- Make ears from black plasticine. The panda's head is ready.
- You need to make a ball out of white plasticine, slightly flattening it at the top and bottom.
- From black plasticine you need to make legs - 2 identical balls, and the upper part of the body - a thick bundle in the shape of an arc.
- The last step is to connect all the parts together.
Step-by-step instructions for making a fly agaric mushroom
Making such a craft is a very exciting task.
You need to prepare the necessary materials and tools:
- plasticine of white, red and green colors;
- cutting stack or scissors;
- glass with a sharp end;
- a stack for making small cuts.
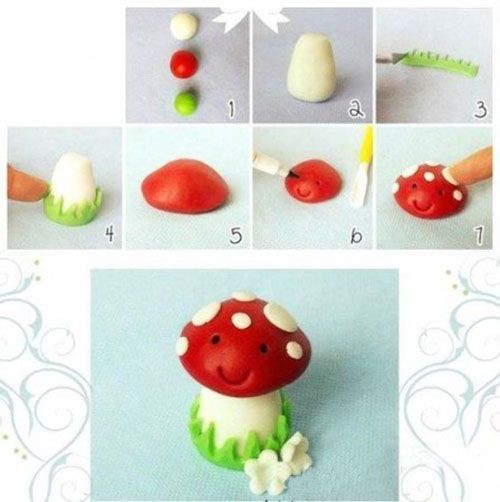
The work is performed in the following sequence:
- From each color of plasticine you need to make balls of approximately the same size.
- Using a white ball, you need to prepare the stem of the mushroom. To do this, you need to make a shape that resembles an egg, making the top and bottom slightly flat.
- From the green ball you need to roll out a thin strip, on which you make cuts using a stack to make grass, and place it below the previous blank.
- A red balloon is used to make a mushroom cap, then using a stack with a sharp end, eyes and a smile are drawn on it.
- Balls of different diameters are made from white plasticine and then flattened. The resulting parts are attached to the cap.
- Now you need to connect the stem and the cap. Done!
Useful tips
By following the steps in the described master classes, you can easily make excellent crafts with a 6-7 year old child.
Here are some additional tips that will make the process of modeling easier and more interesting:
- To speed up the work with children, you can prepare containers with warm water for them, then place the plasticine there for a couple of minutes. This will make the plasticine softer and more pliable.
- It is worth explaining to children that there is no need to throw away the remains of plasticine; later they can make equally wonderful crafts from it.
This is interesting! You can suggest that the children collect the remains of plasticine in one container. Afterwards, it can be melted and distributed again for work.
- Crafts and plasticine can be painted! To do this, you need to sprinkle it with flour, and then prime it with white paint. After drying, you can start painting.
- The most common is paraffin plasticine, but it is worth working with children from time to time with other interesting types of plasticine. Ball plasticine will be especially useful. It perfectly develops fine motor skills and massages the child's palms.
Plasticine is an excellent and, for the most part, accessible material for the comprehensive development of first-graders; thanks to it, you can make many of the most interesting and unusual crafts.
Article formatting:Natalie Podolskaya
Video about crafts from plasticine
Plasticine crafts (grade 1) step by step in this video: