Crafts made from sea stones or all kinds of shells can be used to decorate not only your home, but also the area adjacent to it. Even children can create a huge number of toys and various things from them.
What you need to create crafts: tools and materials
Any stones collected on the sea or river shore are suitable for making souvenirs.
The pebbles can be any:
- by size;
- smooth, like gloss, or rough;
- plain or decorated with veins or inclusions;
- transparent or translucent.
It is used to create panels, decorate frames for paintings or photographs, decorate a variety of containers, sometimes even large surfaces, create all sorts of characters, pave garden paths. They combine perfectly with other natural materials. They decorate the interior of rooms or garden plots.

For especially valuable shells, you even have to dive deep. They are collected in the summer, although on overseas beaches this can be done at any time of the year, and only empty ones. Some people buy them in souvenir shops. And although many unusual shells are found on the shores of lakes or rivers, It is sea shells that are considered the most attractive and suitable for handicrafts.
They will look great on all kinds of frames, and you can create panels and paintings from them – real masterpieces.
Glue, paints and other materials for creativity
Sea stones and shells are not the only things you will need when working on crafts. Usually, you can find a lot of what you need in your household, and if something is missing, you can always buy it.
What you will need:
- ordinary plasticine and hardening plasticine, which is distinguished by its ability to harden after some time in the air;
- clay;
- paints – gouache, watercolors or acrylics;
- glue;
- nail polish (sometimes acrylic);
- salt dough:
- Take a glass of flour and salt, mix with half a glass of water and a tablespoon of starch or PVA glue. Glue is used when it is necessary to mold thin figures.
- For storage, the dough is put in a bag and in the refrigerator for no more than a month. Later, it is enough to paint it with gouache, watercolor or food coloring to give the product the desired color, cover it with varnish, dry it in the oven and remove it from it completely cooled.
- gypsum;
- any sand;
- shards of glass;
- flexible soft wire;
- scraps of fabric, leather, suede, fur, yarn or thread;
- cardboard (plywood is also possible);
- beads, beads, buttons;
- glass or ceramic containers.
Crafts from sea stones and shells with such a set of very valuable things in the house will not be difficult to make.
Tools
To do this you will also need some tools:
- pencil;
- awl;
- tassels;
- various stacks;
- round nose pliers for working with wire;
- drills;
- file;
- sandpaper.
Workplace and safety
The workspace must be properly organized.
It is recommended to use:
| Under | What |
| Tools and materials | desk drawer, separate boxes are possible |
| pebbles and shells | plastic containers |
| threads and ribbons | plastic bags |
| small and bulk materials | banks |
The work table should be covered with old oilcloth or newspapers. The work place should be provided with a source of light. A work robe or apron will help keep clothes clean. An old T-shirt is enough for a child. In summer and in the fresh air, you can work on the veranda or balcony.
You will have to use a portable box to accommodate the necessary materials and tools.
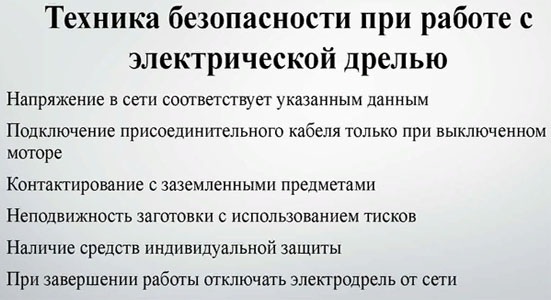
Particular attention should be paid to safety precautions, especially if children are involved in the work process:
| Job | Precautionary measures |
| With a drill | Goggles or mask to protect eyes, gloves (not for children) |
| With salted dough | Electric or gas oven (under adult supervision only) |
| With varnish | You can't keep the container open for a long time. You can pour some varnish into a plastic cup and close it again. The room should be well ventilated. After work, the brush should be washed in solvent |
| Working with 10% hydrochloric acid solution | When working with acid, use an old toothbrush and wear gloves to protect your hands. Protect your eyes. |
Preparing shells and stones
Pebbles just need to be rinsed with boiling water and they are ready to work. Shells require some work.
The first thing is cleaning:
- “Dead” shells can be soaked for half an hour in a chlorine-containing solution diluted with an equal part of water;
- shells that are too dirty are soaked longer, then cleaned with a brush and rinsed in water;
- "live" ones, which contain remains of mollusks, because of which they emit a disgusting smell, must be cleaned especially carefully. Boiling for 5 minutes will allow you to easily remove the remains of mollusks with tweezers or nail scissors, after which the shells should be treated with a chlorine-containing agent.
Some crafts require drilling a hole. The main thing is that the shell does not crack or delaminate at the drilling point. It is recommended to first cover the shell with masking tape, place it on a flat surface and put a mark on the inside.
There are two ways to make a hole in it:
- Manual. If you have neither a screwdriver nor a drill, you will need a nail and a hammer. Carefully place the nail against the mark and start tapping with a hammer until the initial hole is formed. Expand it to the desired diameter, making translational movements inside the hole with the same nail.
- Automated (with a drill or screwdriver). You will need a drill with a diameter no greater than 0.8 - 2 mm. If you drill a hole through the tape, the shell will not be damaged.
How to remove chips and cracks on sinks and stones?
The processed shells should be carefully examined to make sure that there are no chips or cracks on them. It is quite difficult to find perfect shells without such damage.
To polish the surface of shells you can use:
- sandpaper;
- with a bar;
- disk.
The varnish coating will hide even invisible cracks and give the material a shine.
Master class
Crafts from sea stones and shells are not the only things you can do with your own hands. Interior items and landscape design elements are created from these materials. You can involve children and all household members in this business.
DIY Sea Shell Frame
Materials required:
- shells, pearls, starfish, or seahorse figurines;
- unnecessary paper;
- epoxy glue (if necessary);
- scotch;
- glue gun.
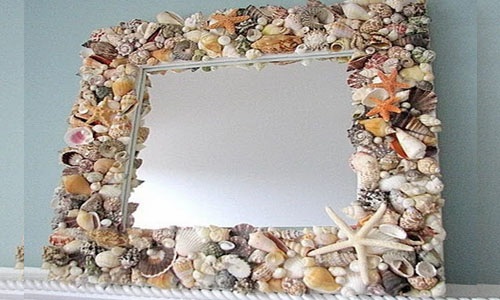
Instructions for making:
- The mirror should be covered with paper and tape should be used to secure it.
- The shells need to be sorted according to size.
- Glue even shells from among the small or medium ones into the first row, closest to the mirror.
- Now you can glue the large ones, filling the gaps between them with smaller shells.
When using epoxy glue, the frame must be allowed to dry first.
Panel of shells and sea stones
Materials required:
- shells;
- leg-split;
- cardboard;
- scissors;
- glue gun.
Video selection of panoramas made of stones and seashells:
Instructions for making:
- Draw the shape of the future panel on cardboard.
- Cut out the base from cardboard.
- Make two holes.
- Glue the shells onto the cardboard base as close to each other as possible, leaving the holes for the loop open.
- Pass the two ends of the rope of the required length through the holes from the inside. Double knots will prevent the loop from slipping out of the holes.
In a product with seashells, you can alternate pebbles.
Painting from shells
Materials required:
- shells;
- a template or stencil of a drawing on paper;
- canvas on a stretcher;
- acrylic paint and brush (if necessary);
- glue gun.
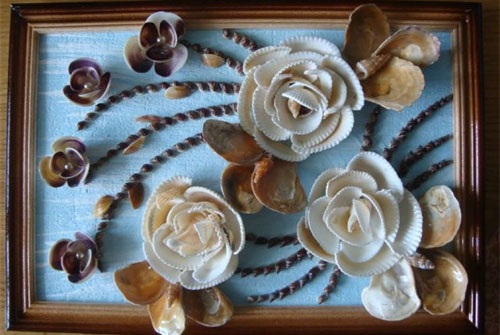
Instructions for making:
- You should create a background on the canvas using paint of the desired color.
- Wait until completely dry.
- Fix the template to the canvas with masking tape.
- Trace the outline of the drawing with a pencil.
- Glue the shells one by one, trying not to go beyond the boundaries of the drawing.
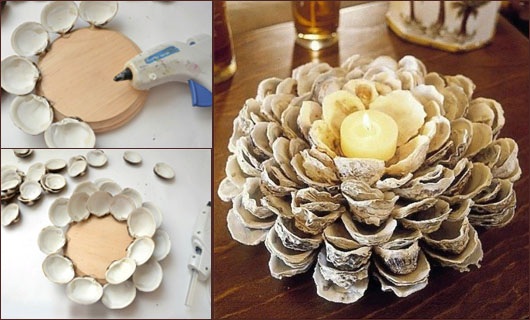
Seashell Candlestick
Materials required:
- large shells;
- candles in molds;
- pot;
- water;
- PVA glue (you can use double-sided tape).
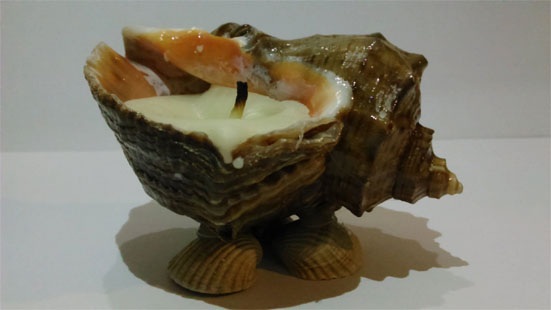
Instructions for making:
- It is necessary to remove the candle so that the wick, container and the candle itself are separate.
- Glue the wick to the center of the shell.
- Melt the paraffin in molds in a water bath until it turns into liquid.
- Carefully pour paraffin into the shells.
The paraffin will harden completely after 20 minutes.
Candlestick made of bivalve shells
Materials required:
- flat shells;
- plate as a base;
- glue gun;
- beads, marine-themed figurines.
Instructions for making:
- It is necessary to sort the shells by size.
- Glue one layer of shells – the largest ones – to the base.
- Glue new tiers on top of the bottom one, one after the other (it is recommended to place the shells overlapping).
- Close all free spaces with decorative elements.
- Cover the finished product with clear varnish (you can use white paint).
Wind music from sea shells
There should be a ring at the base, but this is not necessary. The shapes can be different.
Materials required:
- shells, starfish, beads, corals, pieces of glass;
- jute twine or any other thread;
- beading wire;
- willow branches;
- crochet hook;
- knitting threads;
- scissors;
- varnish;
- glue gun (you can use a drill with a small drill bit, manicure scissors or a needle).
Instructions for making:
- Willow branches must be boiled for 2 hours, then cooled and the bark removed.
- Form a ring from the branches, braiding some branches with others (the branches must be damp), straighten it out and leave it overnight to dry.
- Prepare flowers from clear nail polish and wire.
- Knit the shells (let them be openwork).
- Prepare several beads, stringing each one onto a wire and securing it.
- Cut 8 ropes of 120 cm each.
- Attach the parts to the string: some are simply tied, some are glued, and the string is tied to the base ring, leaving a hanging end. Do the same with the other strings.
- Gather the loose ends into a bundle and tie it with a separate thread. If the ropes are loaded with parts unevenly, it is difficult to achieve balance. And this is necessary for the correct manufacture of the craft. So, when distributing beads, fragments, stars and shells along the rope, you will have to watch the balance.
- From the resulting start, tie a braid up to 10 cm long and form a loop from it. Wrap one of the threads around the base and cut off the rest.
Willow branches can be replaced with hoops and wrapped with twine.
Ship of shells
The basis of the sailboat will be a large rapana shell.
Materials required:
- shells of different sizes;
- stone as a stand;
- wooden skewers;
- threads (preferably with lurex);
- glue gun.
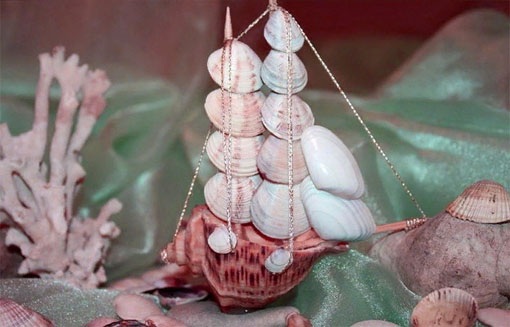
Instructions for making:
- It is necessary to draw a schematic of the ship on paper (it is recommended to indicate the order of the shells with numbers).
- Fold the future sails of the sailboat from shells: there should be 2 masts, one lower than the other, in which there are 4 and 5 shells.
- The first larger shell needs to be glued to the skewer, it is recommended to apply glue in 2 places: on top and on the side. Each subsequent shell should be smaller than the previous one (or, conversely, all the same size).
- Next you will need to make a nose for the boat - glue a skewer along the rapana.
- First glue the finished masts perpendicularly to the large shell, then the side sails.
- Place a drop of glue on the end of the skewer and wrap the end with thread.
- First, pull the thread to the mast, wrap it, lower it down and glue it with the shell. Then lift the thread up again and wrap one mast, throw it to the other and repeat the steps. After the thread is glued to the rapana, the excess can be cut off.
- The boat needs to be fixed to the stone using glue – it should stand firmly on the stand.
A child will be happy to take part in the construction of such a ship.
Flower made of shells
Materials required:
- shells;
- wire;
- frame;
- velvet fabric;
- beads and seed beads;
- glue;
- clothespins.
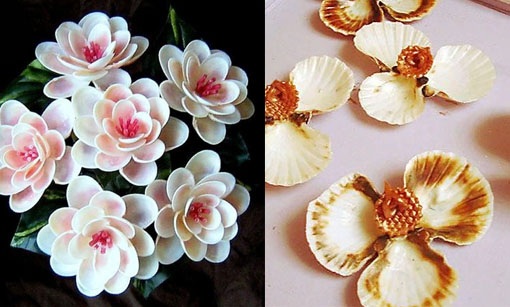
Instructions for making:
- You need to make several flowers. For one, you will need to connect 3 shells of the same size using transparent glue. The flowers may be of different colors and sizes.
- Cover the finished products with varnish, decorating each of them with a large bead or seed beads in the middle.
- Glue the fabric to the frame.
- From the wire you should construct something like a stem and leaves and attach it to the fabric.
- Attach the buds along the wire in any order.
- Wait until completely dry and cover with glass.
Applications for children
Crafts from sea stones and shells are best done together with children. You can create appliques on a variety of topics, for example, the underwater kingdom.
Materials required:
- shells, pebbles, feathers and dry moss;
- corrugated paper of blue and brown colors;
- wooden frame;
- plasticine;
- salt, colored yellow;
- PVA glue.
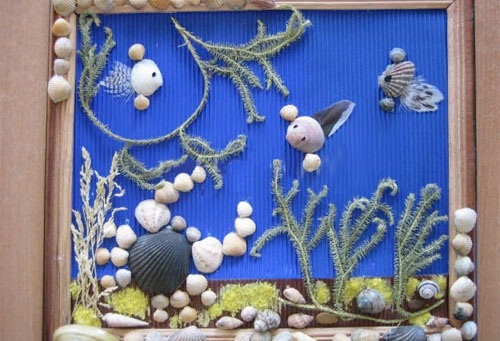
Instructions for making:
- The paper needs to be fixed to the frame, it will become the background – blue water and brown sea bottom.
- Glue on dry blades of grass - seaweed.
- For the crab figurine, select shells: 1 larger one – body, 4 smaller ones – legs, 2 very small ones – eyes.
- Transfer the crab onto the paper, carefully gluing each shell.
- Make several fish (shells instead of bodies, a tail made of a feather and plasticine eyes), and “set them swimming” in the picture.
- Add dry moss.
- Glue the shells to the bottom.
- Coat the free areas of the bottom with glue and sprinkle with salt painted with gouache.
- Decorate a wooden frame with a variety of shells.
Decoupage
If you manage to find a large stone on the seashore, smooth and flat, you can decorate it using the napkin technique. It is called "decoupage".
Materials required:
- white water-based paint;
- 3-layer napkins with a bright large pattern;
- PVA glue.
- acrylic paints.
Step by step instructions:
- The stone must be painted with water-based paint.
- Separate all layers of the napkin and cut out the design from the first one.
- Soak the picture in glue (it is recommended to start from the middle) and carefully glue it to the stone so that no folds form.
- Wait until completely dry.
- Draw with acrylic paints, paint, add glitter, rhinestones, and other additional decorations if necessary.
- Varnish the surface.
- Dry for 2 days.
- Varnish on the other side.
In total, up to 3 layers of varnish are required. The finished product can be used to decorate a flower pot or simply left on a coffee table.
Decorations for landscape compositions
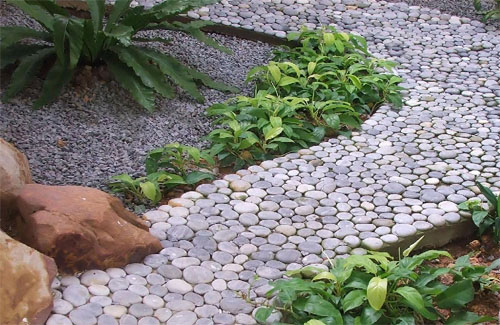
Pebbles fit perfectly into the surrounding landscape, which is why they are widely used in landscape design of various stylistic directions. For a creative person, this is just a godsend. A garden path made of sea stones will be quite durable.
Materials required:
- pebbles of different sizes;
- stone chips;
- sand;
- concrete mix;
- level;
- plywood (can be replaced with film or tarpaulin);
- water;
- hose;
- hammer (wood or rubber);
- hard brush.
Step by step instructions:
- Remove the soil layer and install curbs along the edges of the path.
- Lay polyethylene on the ground.
- Pour a layer of sand and then crushed stone on top of it.
- Prepare a solution: 4 parts sand and 1 part cement, pour it over the embankment.
- Lay the pebbles, having first wetted them.
Advice! The solution dries too quickly, so it is better to lay the path in small sections.
- Tamp the pebbles down with a rubber mallet once you have paved a small area.
- Fill the space between the stones with a more liquid solution.
- After about 3 hours, spray water along the path and cover with film.
- After some time, spray with water again, but do not cover with film anymore, wait until it dries.
While the cement mortar is drying, it is recommended to moisten it with water twice a day. This will give it extra strength. On a dry path, you need to brush the stones at the end.
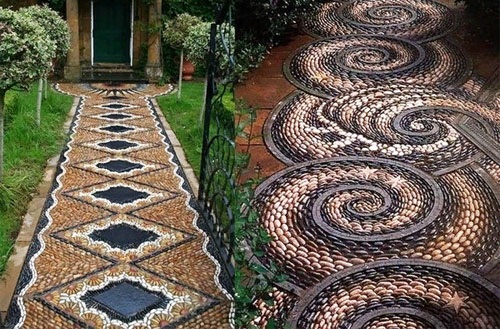
About the ornament
Patterned paths look impressive. First, you will need to sort the stones by size, shape and color, then make a sketch of the ornament and its template, and lay the latter on the solution. Pebbles look great regardless of whether they are laid flat or on edge.
A path is a classic and most common option for decorating a site.
Make a backlight and it, created from a light stone, will become “lunar”, and from a colored one – contrasting. However, this is not the only design technique. Pebbles will help to hide uneven terrain or not particularly attractive objects on the site.
This could be:
- raised flowerbed, steps or alpine slide;
- garden sculptures - no limits for creativity;
- fencing.
Interesting ideas for crafts
Crafts from sea stones and shells that you can make with your own hands are a source of countless ideas for creativity. Sea pebbles can easily be turned into sea creatures. A child can even do it himself. The main thing is to tell him how to make fish of various colors using a brush and paints.
And finding a use for them later won’t be difficult:
- put in the aquarium;
- make a mosaic on the garden plot;
- just play with them in the water.
You can assemble a whole town of fairy-tale houses on the playground or, armed with a glue gun, transfer pebbles to a panel, using as a basis:
- cardboard;
- plastic;
- even a wooden fence.
You can lay out a flower bed in the form of a mosaic of stone flowers. Pebbles will make a great portrait of a friend. You can make several stone people and even lay out a whole scene from life. The child will be happy to turn ordinary pebbles into funny animals.

You don't have to limit yourself to miniature crafts. You can create something more significant from this material, such as a dry stream, a mosaic carpet near your home or pool. If you have a cowrie shell and go to a craft store for accessories, you can make a boho-style bracelet.
If you do crafts together with children, they will be happy to paint sea stones and glue shells. Such a joint pastime will definitely bring family members even closer together.
Article formatting: E. Chaikina
Useful video about crafts from sea stones and shells
Video of a master class on making a rug from sea pebbles:
The shells are falling out of the frame! I had a frame like that, it was a birthday present. A year later, almost half of the shells had fallen off (