From a regular plastic bottle, you can form products that will be useful in playing with children, in the household, and in the interior of the house. From a simple material, you can prepare a craft for kindergarten. Children can independently cope with elementary manufacturing schemes with almost no help from adults. In addition to plastic bottles, you may need a glue gun, paints, and scissors.
What you need for crafts from plastic bottles
To make any craft from a plastic bottle, you need to prepare the necessary tools and materials:
- plastic bottles are the main material;
- scissors, blade and utility knife - used for cutting;
- acrylic paints - useful for decorative finishing;
- brushes of different thicknesses for painting;
- candle for burning sharp edges;
- glue gun for joining parts;
- a construction stapler to attach other elements to the base.
Depending on the complexity and decorative finish, additional materials are selected.
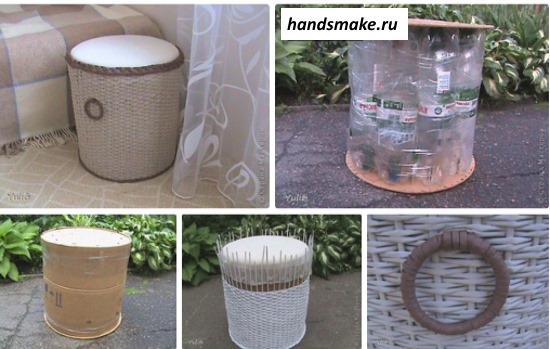
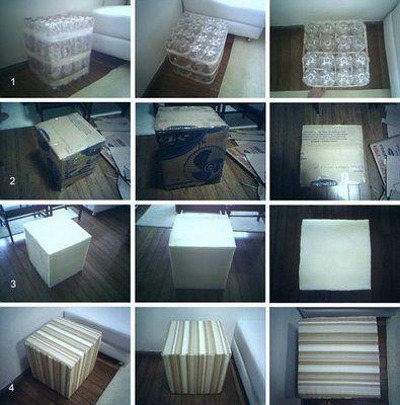
DIY Pouf from Plastic Bottles
Crafts from a plastic bottle for home improvement are the best option in terms of price and quality. From the raw material, you can make a variety of furniture, including an ottoman.
You will need the following tools and materials:
- 38 plastic bottles of the same volume and shape;
- a roll of wide office tape;
- plywood sheet;
- jigsaw, scissors, stationery knife;
- rolled synthetic padding;
- construction stapler;
- measuring tape and pencil;
- dense fabric for furniture upholstery.
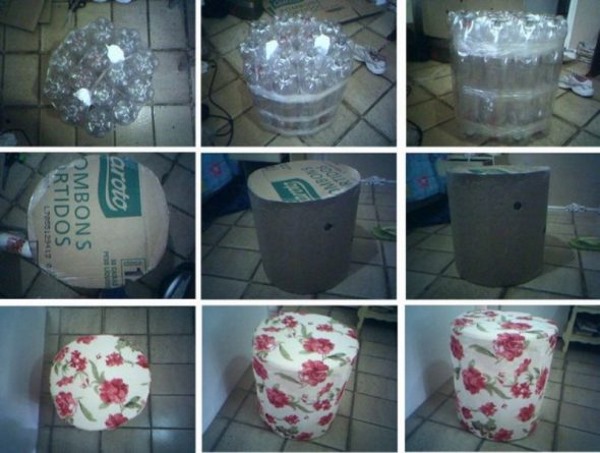
Algorithm for creating an ottoman:
- Place the bottles so that their shape resembles a honeycomb. In the 1st row there are 4 elements; in the 2nd – 5; in the 3rd – 6; in the next – 7. The remaining 3 rows are arranged according to the principle of the 1st, 2nd and 3rd.
- Wrap tightly with duct tape. Make several layers and wind from the top of the bottles to the very bottom in a spiral - this will be the basis of the future pouf.
- Measure the diameter of the resulting honeycomb. Draw a sketch of a circle with the obtained diameter on plywood. Make 2 such parts. It is advisable to try on the circles so that they correspond to the parameters of the base figure.
- Using a construction stapler, nail plywood circles to the top and bottom of the pouf base.
- Wrap the sides with padding polyester. Cover the circles with soft material as well. Secure the soft base with a construction stapler.
- Take measurements from the resulting blank and make patterns from textiles. Sew a cover, which is then put on the body of the pouf.
Furniture of this type can be made in a few hours, it looks presentable, and the costs are minimal.
Flowers from plastic bottles
There are many options for creating flowers from plastic bottles.
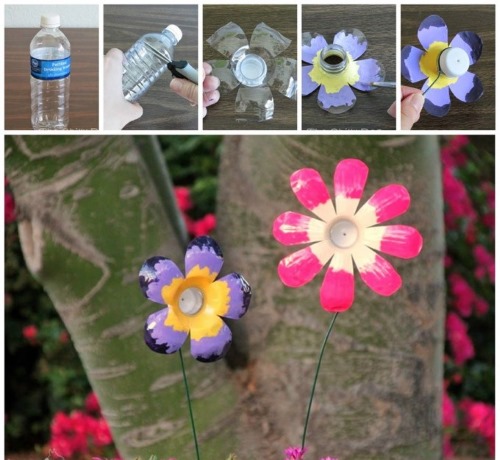
The easiest way to create a voluminous flower:
- Cut off the bottom of the bottle so that the resulting object is 5-6 cm in height.
- Divide the circle into 5 equal parts with a marker. Mark so that each part includes the convexity of the bottom. Cut the plastic to the very base of the bottom at each of the marks.
- To form attractive petals, you need to round each resulting strip.
- Finish the edges of the cuts by dusting them over a candle flame.
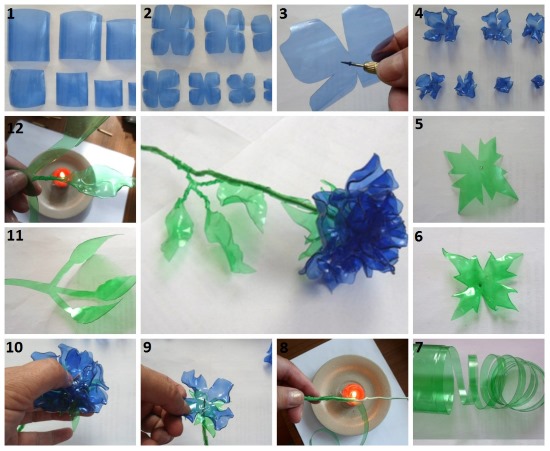
Make a hole in the center of the bottom using a heated nail, awl or soldering iron. Thread a thick wire through it, which will become the stem of the plastic flower.
Toys from plastic bottles
A craft made from a plastic bottle can become a strong, interesting and budget-friendly toy for a child of almost any age.
Several toy options:
| Apple-box | Octopus | Piggy bank |
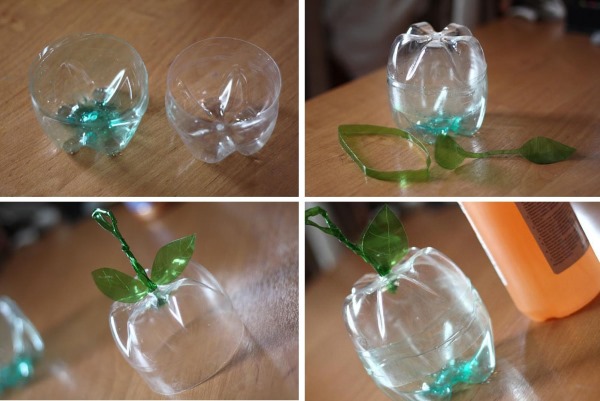
| Cut off the bottoms of two identical bottles. The height of each element should be the same and more than 6 cm. Make a hole in the center of one of the parts with a hot nail. Cut a strip from the green bottle, roll it into a tube – you will get a stalk. Cut a leaf from the same strip.
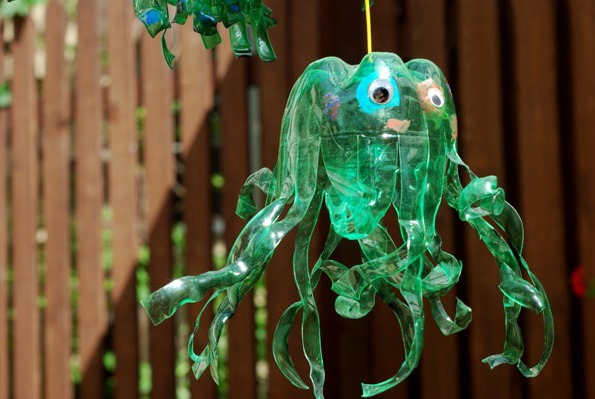
Glue a leaf to the stem, thread the tube through the hole in the bottom. Fix everything with a glue gun. If you insert one bottom into the other, you will get a full-fledged apple in which you can store small items. | Cut the bottle in half. Measure a distance of 5-8 cm from the cut. Divide the circumference into parts, the thickness of each should be 1-2 cm.
When cutting the plastic along the marks, strips are obtained. Twist the elements using the blade of scissors.
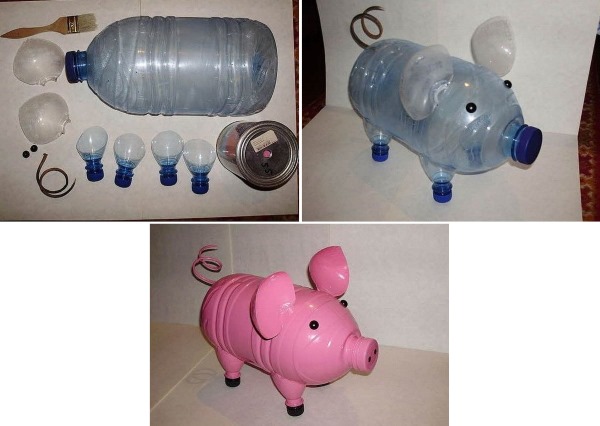
Make eyes from the lids. Draw pupils with a marker, and then attach the blanks to the octopus's body with a glue gun. Make a hole in the bottom and thread a string through it. You will get a toy similar to "Yo-Yo". | Find a bottle with a wide bottom. Use a marker to draw nostrils on the lid and eyes on the bottle itself.
Cut a narrow rectangular hole in the base of the body.
Make stable legs and stands from the lids, attaching the elements with a glue gun. Cut out ears from thick cardboard and glue them to the base. |
You can make any toy from bottles by creating a model of the product:
- beetles;
- fruits;
- vegetables;
- transport;
- dolls;
- figurines.
House made of plastic bottles
You can create a house from plastic bottles, which will be a shelter for children in the yard, and the basis for a sandbox.
You need to make blanks:
- more than 500 bottles of the same volume and shape;
- timber and plywood;
- nails, wire, construction stapler;
- sharp knife, nails;
- 4 hemp;
- tools for taking measurements and markings.
"Construction" algorithm:
- Make the frame of the future house from timber. The wooden bases are knocked down in such a way that frames are formed – the bases of the future walls. Knock down 2 more frames, which will become the roof slopes. Install the frame on stumps-legs. Lay plywood at the bottom.
- Determine the diameter of the container. Mark the upper and lower bars in accordance with the obtained parameter. Hammer a nail into the center of each strip.
- Cut off the neck of each bottle to remove the narrowing points of the element. Make a hole in the center of each bottom using a hot awl.
- String so many blanks onto a piece of wire that they form a full strip from the upper beam to the lower body. In the process of forming the wall strip, you need to make sure that all the parts fit tightly relative to each other.
- Secure one end of the wire to a nail driven into the top beam. Stretch the metal base like a string and secure it to the nail of the bottom wooden base. Make enough strips to make a wall.
- To strengthen the walls, you can staple the bottles together.
The roof is made according to the same principle. The ceiling can also be made flat, using the algorithm for making walls. By changing the direction of the "strings" on which the containers are strung, you can make windows.
Plastic Bottle Doll
A craft made from a plastic bottle can be turned into a fully functional doll that you can play with.
List of tools and materials:
- plain fabric in pastel color;
- synthetic padding;
- 2 buttons;
- knitting threads;
- printed fabric;
- thread and needle;
- marker;
- bottle;
- glue gun.
Manufacturing technique:
- Formation of the head. Cut a circle out of plain fabric. Sew along the edge with a small running stitch. Pull the workpiece together a little, stuff it with padding polyester. Tighten the thread completely and secure the seam. Sew on the button eyes, draw the nose and lips with a marker.
- Making the neck. Cut a wide strip from the same fabric. Sew the cut on one side, pulling the fabric together a little. Attach the element to the head seam and sew the pattern. You will get a kind of skirt at the bottom of the head.
- Creating a hairstyle. Cut the knitting thread into equal pieces. Thread each piece through a needle. Make a stitch on the doll's "head". Pull out the needle and tie the thread into 2 knots. This will give you 2 hairs at once. After repeating the manipulations, trim the hairdo with scissors.
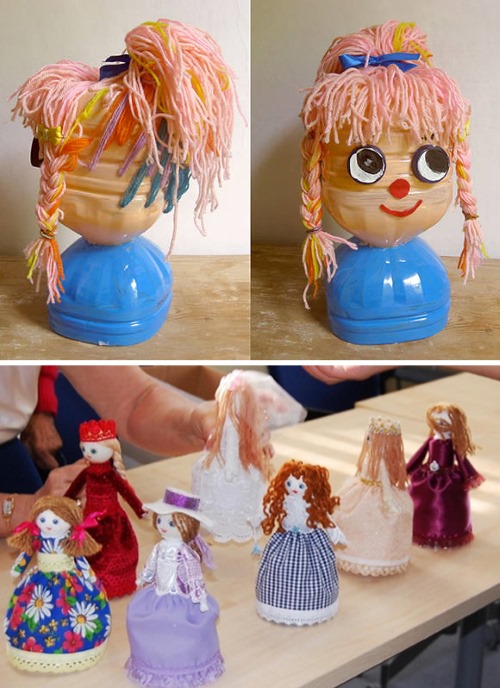
- Making hands. Cut 2 strips from pastel-colored fabric. Sew each strip together to form a tube. Fill the space with padding polyester, sew up the edges.
- Torso. Cut off the bottom of the bottle. Glue the area around the neck. Place the head on top and lay the skirt-neck flat along the adhesive part. Use the glue gun to attach the arms to the base of the container.
- Take measurements from the container and sew a sarafan or dress for the doll. Put the clothes on the doll. You can fix the element with glue.
You can make a more complex doll model using other auxiliary materials.
DIY Bird from Plastic Bottles
It is easy to make a parrot or an owl from a plastic container, since the silhouette and manufacturing principle are identical.
Preparation:
- 2 identical containers;
- several multi-colored bottles;
- scissors or a stationery knife;
- glue gun;
- 2 lids and a marker.
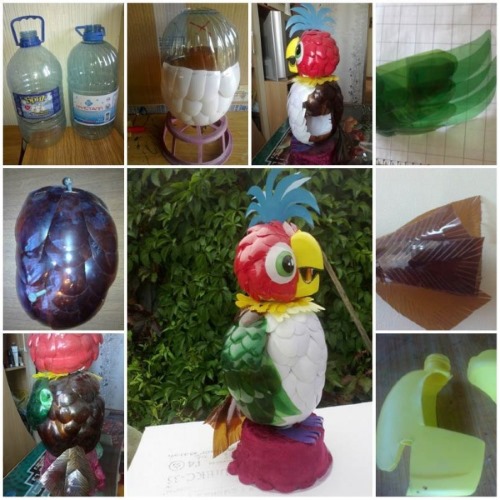
Manufacturing algorithm:
- Make a base from identical containers. Cut out the middle part from one container and connect the pieces together, cut off the bottom of the second container to the expansion. Use a glue gun to connect the bottoms together. You will get a kind of hourglass.
- Cut out the middle parts from the remaining containers. Use a marker to draw the number of ovals that will fit on the canvas.
- using a glue gun, attach the ovals to the base. You need to make sure that each subsequent element breaks 1/3 of the lower one. You get feathers that are applied in layers.
The ovals are laid out in a specific pattern. When making an owl, the eye circles are formed first, then the rest of the head is filled. The parrot's feathers are distributed evenly over its entire body - from top to bottom. The lids form the eyes.
Flowerbed from a plastic bottle
A two-tiered flower bed made from plastic bottles is neat, compact and at the same time roomy.

Manufacturing technique:
- Prepare a place for the flower bed, decide on the parameters and shape of the product.
- Dig a small ditch that will become the outline of the flower bed fence.
- Fill the containers with sand or soil and screw on the lids.
- Bury the filled container in the ditch. Immerse the containers in the ground a little more than halfway. Bury them with the neck down.
- Having formed the lower tier of the flowerbed, you need to fill the inside with soil. To prevent the bottles from spreading under the influence of the soil, you can tie them together with wire. Tamp the soil.
- Using measurements and calculations, determine the center of the flowerbed and make another similar fence, but smaller. Fill it with soil and compact it.
The flowerbed is ready for planting. The structure can be additionally strengthened with natural stone, brick, or tiles.
Birdhouse from a plastic bottle
To make a birdhouse, it is better to take a 5-liter plastic bottle. Additionally, you need to prepare scissors and a glue gun.
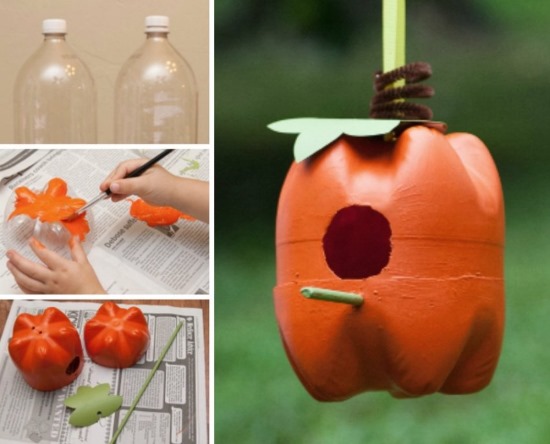
Manufacturing features:
- Cut off the bottom.
- Remove half of the bottle base.
- At the base of the neck (parallel to it) using bends form the silhouette of a house with a gable roof. You can bend the plastic using scissors.
- In accordance with the layout, bend the rest of the bottle.
- Place the model on the cut bottom and cut out the shape. Glue it to the house using a glue gun.
You will get a full-fledged house, the “entrance” to which is through a wide neck.
Bird feeder from a plastic bottle
A craft made from a plastic bottle can be used as a bird feeder.
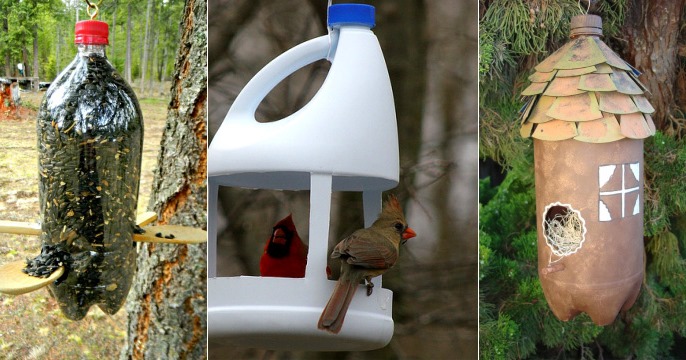
Simple manufacturing option:
- Select a barrel-shaped bottle with a volume of 1.5-2 liters.
- Cut out large arched windows in the base of the container. It is better to make 4 openings.
- Burn 4 holes at the same level in the neck area. Thread wire or thread through to create fasteners.
Grain is poured into the bottom, and birds can get into the feeder through the windows.
Palm tree made from plastic bottles
To create a plastic palm tree, you need to collect more than 100 brown and 100 green bottles and prepare a construction stapler.

Manufacturing technique:
- Cut off the bottom of each brown container. Form 5 round petals 5-7 cm long from the container fabric.
- Insert the bottle neck into the bottle with the petals facing up, securing each element with a construction stapler.
- Cut off the neck and bottom of the green containers. Bend the cylinder in half along the heights. Cut the element along the fold. Use scissors to make terry along the long sides of the rectangle, cutting the edges into thin strips.
- Place the green part on the other half and fix it with a stapler. You get leaves.
At the end, the crown and trunk of the palm tree are assembled. The parts need to be connected tightly – it is advisable to use wire. To make the trunk stand, you need to thread the workpiece with a metal pin.
Crafts from plastic bottles for preschoolers
A preschool child can make a toy or craft from plastic bottles, which is relevant for all kinds of competitions in kindergarten.
It is worth choosing simple options and work schemes so that the child can do everything right away, and help from adults is minimized.
Chamomile
Find a container of yogurt or milk. It is desirable that the lid be orange and the container itself white. Cut the bottle in half. Divide the base of the top of the bottle into 8-10 equal parts.
Cut into strips up to the neck. Round off the edges and curl them slightly with the blade of scissors. Bend each petal to the bottom. Screw on the lid.
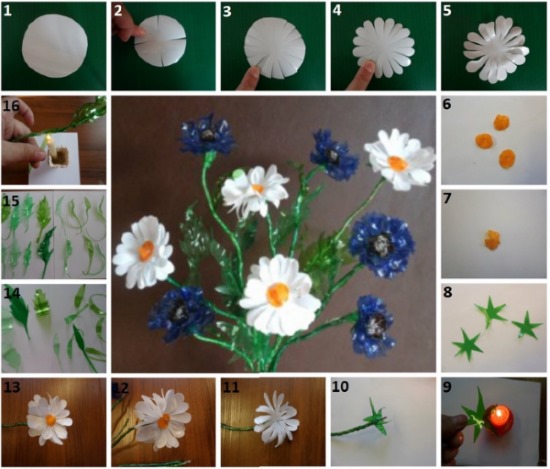
Make a hole in the center of the twist by burning the base with a hot nail. Thread the wire through to make a stem. Cut out leaves from green plastic and glue them to the metal base with glue.
Penguin
Take 2 identical shaped bottles. Cut one in half – leave the part with the bottom. Cut off the larger half of the second, leaving only the bottom part. Connect the blanks, fastening them with glue.
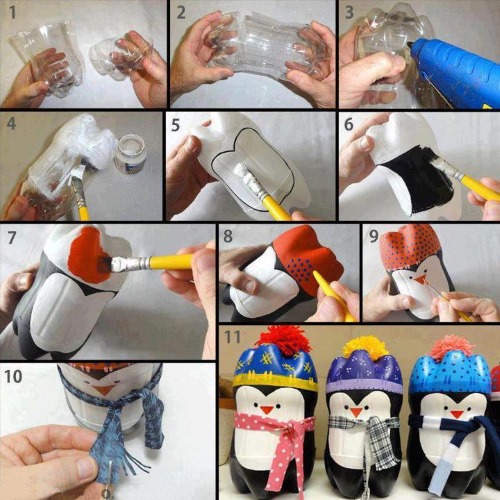
Paint the shape black, the bottom with any other paint. Draw the base for the front part with white paint. Form the muzzle. Glue a pompom made of threads to the colored bottom. Tie a ribbon at the transition point, which will act as a scarf.
Crocodile
You will need 2 green containers. Cut off only the bottom and the hard part of the neck from the first. Glue the edges of the smaller cut. Cut off the solid part of the bottom and top from the second container. Cut off half the bottle lengthwise at the narrowing point.
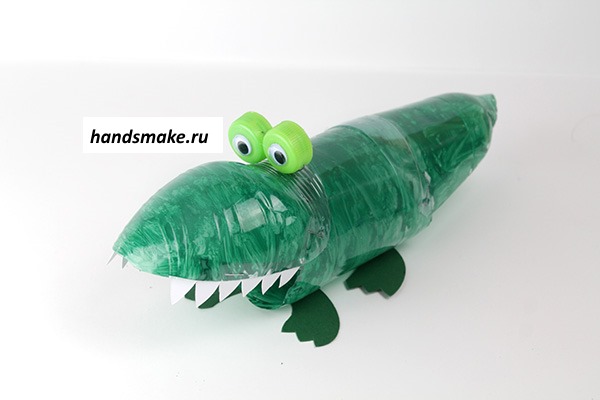
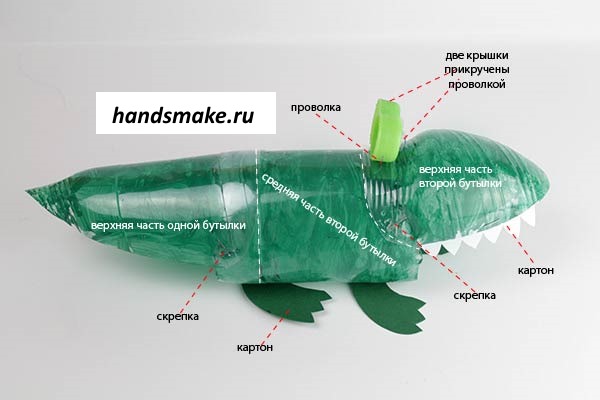
Cut out 20 triangles from white paper. Make eyes from colored paper and fix them to the base. Glue the elements along the cut. Connect the bottles together. Glue 4 lids to the bottom of the form – these are the paws.
Bees
Paint a small bottle yellow, form black stripes along the entire "body" of the bee. Glue decorative eyes to the lid. You can draw with a marker. Cut out a medium-sized oval (wings) from a transparent or brown bottle.
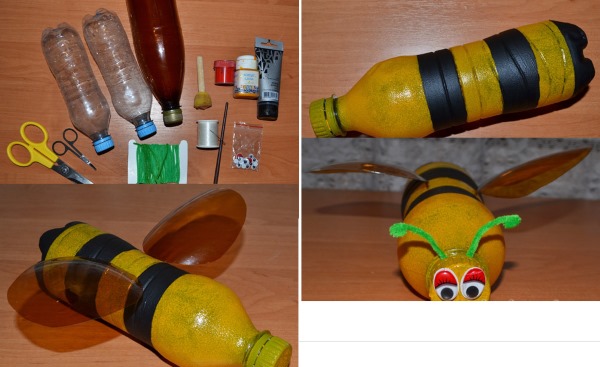
Attach the manufactured parts to the base of the container. Make the legs from narrow strips cut from the same container as the wings. Make a hole between the wings through which you can thread a thread - such a detail will allow you to hang the insect.
Butterflies
Cut out the soft part from the plastic container, forming a rectangular canvas. Select a butterfly stencil in accordance with the size of the base. Place the plastic base on the stencil, fix the components at 4 points with clothespins or office clips. Trace the contours with a marker, transferring the drawing to the plastic.
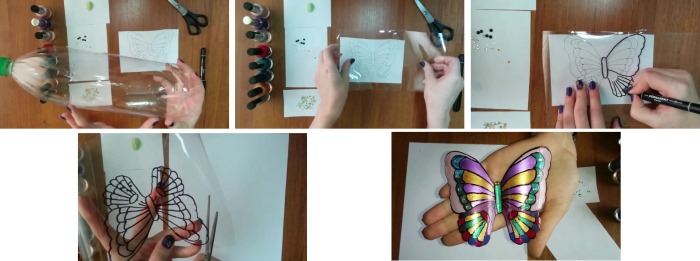
Place the sketch on the board and cut out the shape using a stationery knife along the contour. Additionally, you can cut out some parts of the wing pattern. You can paint the product along the marked lines with nail polish. To add shine, you can use sequins, beads and rhinestones.
Hedgehogs
Prepare 20-25 brown plastic containers. A transparent base will also work, which will then have to be painted. Cut all the parts in half. Make a fringe by cutting strips to a dense place in the neck area.
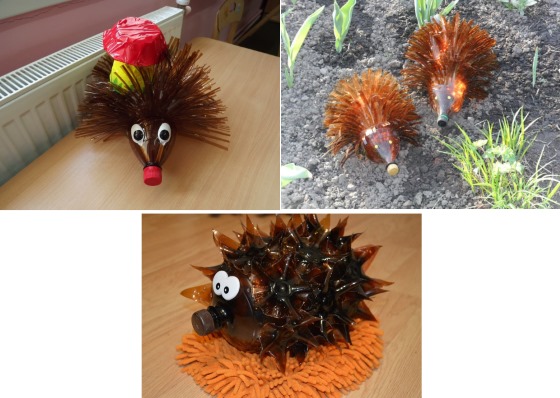
Assembly is done by inserting bottles into each other. On the first container, draw the eyes of the animal. The cork represents the nose of the animal. An apple made of bottles can be placed on the "needles".
Helicopter
Find a table tennis ball and a container with the same diameter as the sports equipment. You will also need cocktail straws, glue, scissors, and a safety pin.
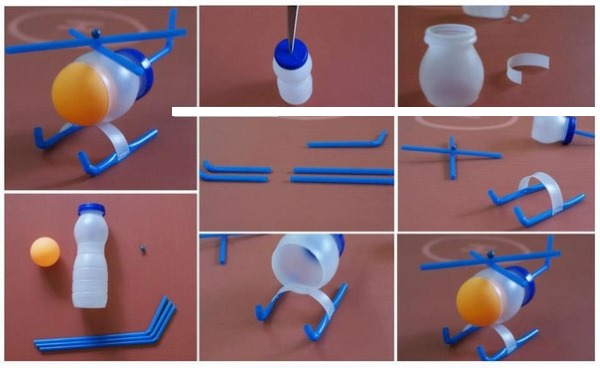
Procedure:
- Cut off the bottom of the container, leaving the neck screwed with a lid. It is enough to use a part with a length of 5-8 cm.
- Make a cross out of the straws and fasten it by piercing it with a safety pin. Attach it to the bottle cut.
- Cut a strip of container around the circumference and divide in half.
- Glue a piece of straw to the edges of the narrow strip. Use the part of the device that has a bend.
- Glue the part to the bottom of the helicopter body - on the other side relative to the blades.
- Insert a tennis ball into the hole in the container cut.
Glue the tail, made from cocktail straws, onto the lid. The model of this part of the helicopter can be made based on the example of a real aircraft.
Matryoshka
The matryoshka is made using two techniques – working with plastic containers and papier-mâché. Choose the most figured container. Glue pieces of white paper soaked in PVA glue onto the surface.
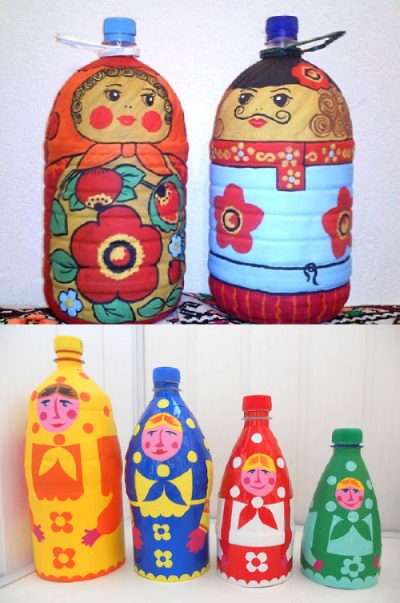
Cut off the hard neck. Seal the hole using the same principle as the bottle base. When the base dries, smooth the surface with a damp brush. Paint the blank according to the matryoshka sketch. You can use gouache or acrylic paints for this purpose.
Fly agarics
Prepare 2 containers – 2 l and 0.5 l. Cut off the bottom of the larger one, paint it with red paint. Make white dots. Paint the smaller container with white paint. Cut a rectangle out of paper, form a fringe on one side.
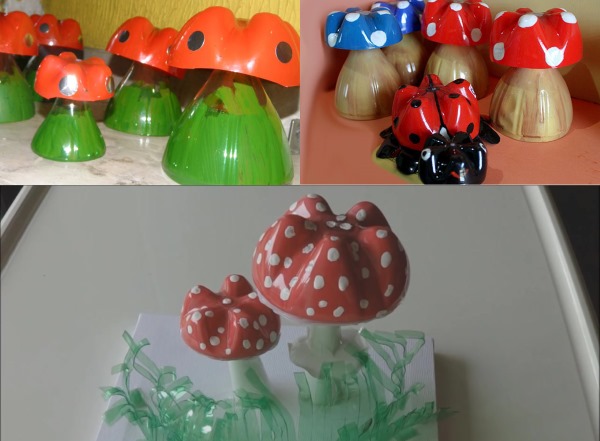
Glue to the middle of the white bottle. Fix the fly agaric "cap" on the white stem. You can make an additional fly agaric of a smaller size and glue it to the larger element.
Household items made from plastic bottles
From a plastic bottle you can make not only jewelry or children's toys, but also functional products that are relevant in everyday life.
Options for things:
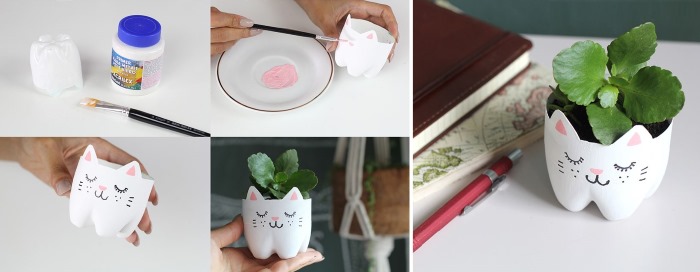
- Flowerpots for indoor and garden flowers. Cut the container in half, give the base an original shape and paint.
- Country wash basin. Cut off the bottom part. Fix the container upside down. When the lid loosens slightly, water begins to pour out.
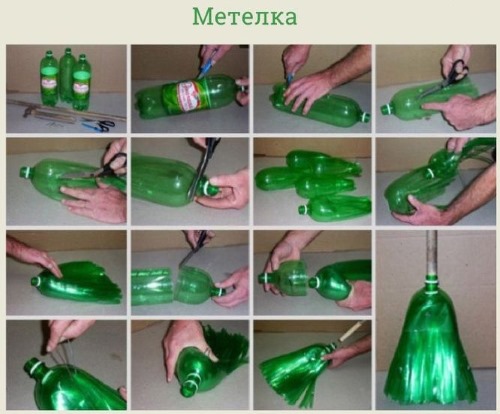
- You can make a broom for cleaning outside from 10 identical containers. Cut off the lower parts. Fold each element in half lengthwise and make a fringe. Thread the elements, connecting them with wire.
- Containers cut in half can become ideal caps for seedlings in the garden. If you remove the lids, the cover will be additionally ventilated.
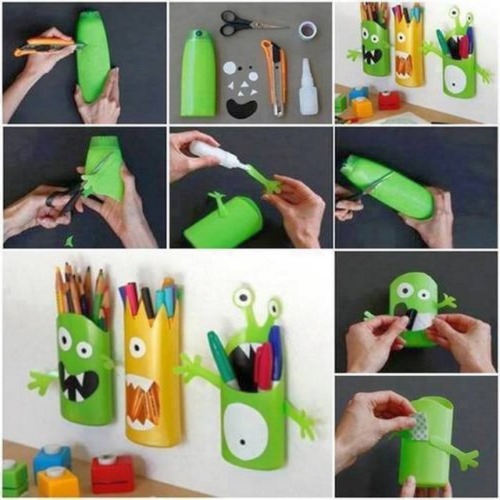
- If you cut off 1/3 of the top of the bottle, you will get a wonderful container for storing pencils, crayons and other small items.
- Plastic containers can become the basis for weaving various baskets that can be used in the household.
- If you put a zipper between the two parts of the cut container, you will get an original organizer for storing cotton wool and bandages.
- Cut off the bottoms of several containers, string them through the center of the element on a metal rod. Evenly distribute the bowls along the rod. You will get a stand for jewelry.
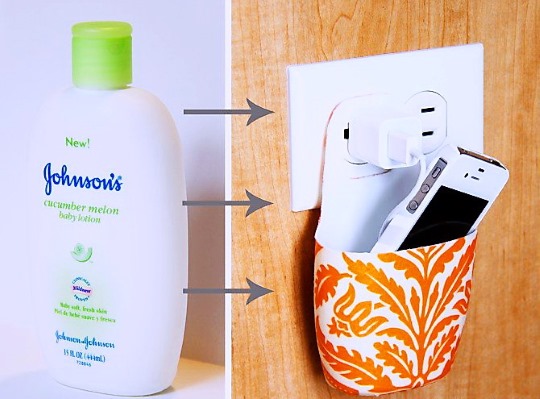
- Cut the bottle in half. Cut out a square in the base. This device will become a pocket for the phone, which fits on the base of the charger, and the phone fits in the bowl.
The craft can be decorated using paints, rhinestones, beads, glass stones, beads, ribbons. The elements can be attached to the plastic bottle using a construction stapler or glue gun.
Article formatting:Natalie Podolskaya
Video about plastic crafts
DIY craft from a plastic bottle - video instructions for making: